Showing posts with label Julep. Show all posts

Monday, December 3, 2018

Glittery Fall- Fall Tree Nail Design

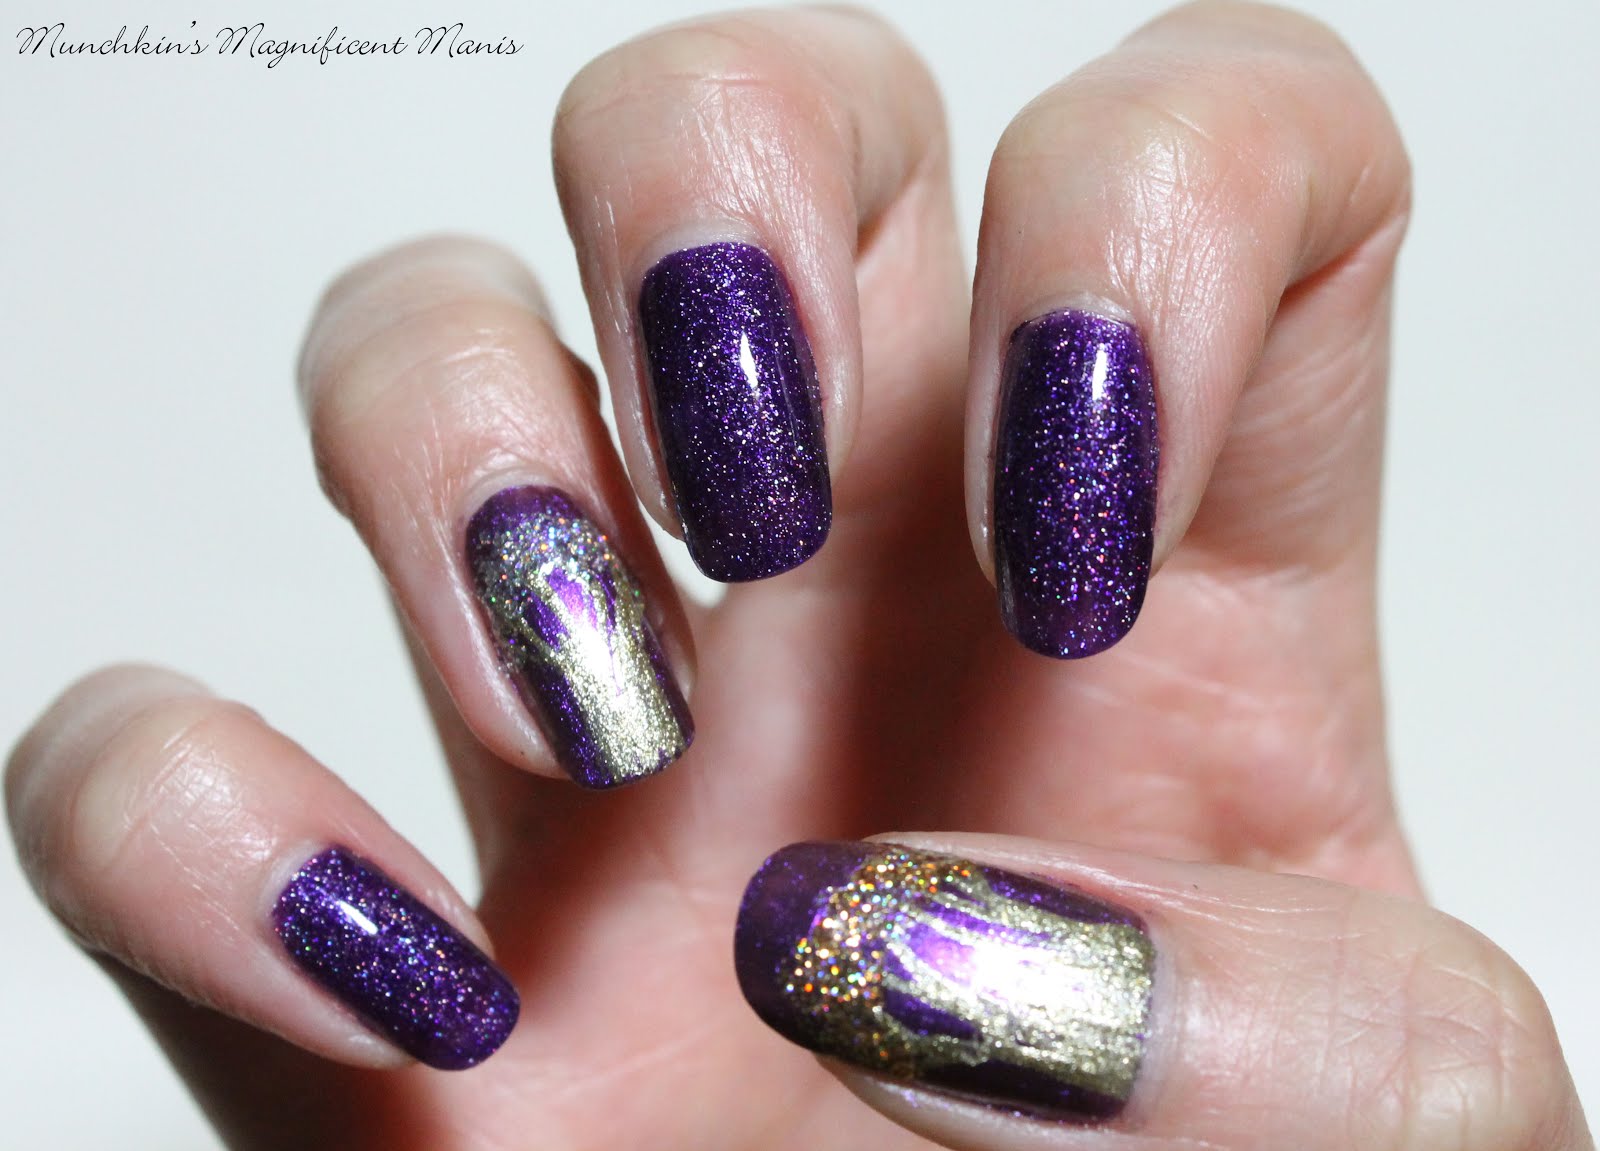
Hello everyone! Today we have one more fall nail design, this design I felt like it would be a nice way to transition into winter. I have stated in other blog that I don't care for fall nail designs or fall polish colors, so for this design the leaves will be glittery and not like normal fall designs. As all of my nail designs I get inspiration from Pinterest and make it my own, I saw a glitter fall nail design like this one and thought that was a cool way of doing a fall design without the boring colors, like browns and neutrals.  

Fall Tree Nail Design 
Fall Tree Nail Design

Here are the polishes and nail art tools used to make this glittery fall nail design:   


Base and top coat- CND Stickey Base Coat and Revlon Extra Life No Chip top coat.

Polishes- Julep- Hazel- Boho glam, Revlon- Gold Coin, Fun Lacquer- Million Dollar Dream, Color Club- Mini- Silver Glitter, Color Club- Mini- Green glitter, and Cover Girl- Boundless color- Disco dazzle. 

Nail art tools- thin detail brush and a thin stripper brush.

Small glass jar with acetone in it to clean off nail art brushes.

Fall Tree Nail Design   Fall Tree Nail Design    Fall Tree Nail Design

Start off with a thin layer of base coat to protect your nails and to help your design to last, then let that dry.

Then polish all of you nails with a shimmery purple polish, once again let that dry.

Fall Tree Nail Design 
Fall Tree Nail Design

Now on to the design, for this design you can put the trees on all of your nails or just a few of the nails, for the photos above I put the tree design on all of the nails. 

First we will start off with the tree trunk, take a thin stripper brush with gold polish on it and make two curved lines on each side of the nail to make the shape of the tree trunk, then in the middle of those lines start to make some random lines going different directions for the branches, also on the tree trunk make sure to fill that in with gold polish as well.   

Once you have finished that part take a few different glitter polishes (I used a gold, sliver and green) and kind of blob them on to the nail on the tree branches. I used a nail art brush to blob the leaves on, you can also just use the brush that is in the bottle.

Fall Tree Nail Design 
 Fall Tree Nail Design, on the thumb

Fall Tree Nail Design  
Fall Tree Nail Design

Then once you have your fall glittery trees the way you like apply a top coat to seal in your nail design and to help it to last. 

Fall Tree Nail Design 
Fall Tree Nail Design

Want an even simpler design? You can just put the tree designs on a few nails, on my other hand I only did the design on my thumb and ring finger and then the other nails I used a purple holographic glitter from Zoya called Finley. 

Hope all of you enjoyed this very simple fall to winter nail design and I hope all of you enjoyed the fall and have a nice winter and try to stay warm as well, unless you are luck and live a warm place.

See you next time for more nail fun!   

Friday, May 19, 2017

Unicorn Frap- Water Marble Nail Design

Hello everyone! This week on the M.M.M blog we will be creating a unicorn frap nail design, I am a little late on the whole unicorn frap craze that was around because of a certain coffee company. But I had been seeing some people creating a cool looking nail design inspired by this popular drink, so I figured why not give it a try anyways (I didn't get a chance to try the drink when it was out though.)

Unicorn Frap, Water Marble Nail Design 
 Unicorn Frap, Water Marble Nail Design

This nail design has been done a few different ways, but the best way that it seem to work out for me is by water marbling. 

Here are the nail polishes and nail art tool used to create this mythical nail design.


Base and Top coat - CND Stickey Base Coat and Revlon Extra Life No Chip top coat.

Nail polishes- Glam Polish Experiment 626- Stitch to the Rescue, OPI- La Paz-itively Hot, OPI- Hello Kitty- My Pal Joey, Julep- Hazel- Boho glam, Essie- Coconut Cove, and Color Club- Mini- Blue Purple glitter.  

Nail art tools- a stylus or tool for marbling and a makeup sponge.

Other (Not show in the photo above)- two plastic cups with room temp water in it ( I recommend two cups just in case your water starts to get to messy), toothpicks (if you don't have the stylus, even if you do I recommend toothpicks!), tape to tape around your fingers, or Liquid Latex, and some paper tower this design is Messy!

Let's start this mythical unicorn water marble nail design!  

Unicorn Frap, Water Marble Nail Design  
 Unicorn Frap, Water Marble Nail Design
 Unicorn Frap, Water Marble Nail Design

First off start off with a thin layer of base coat to protect your nails and too help your polish last a little longer. 

Then once your base coat has dried, polish your thumb, middle, and ring finger with a bright hot pink polish. We will only be doing the water marbling on those fingers, you can always do this design on all the nails, I just wanted to do the water marble on three finger nails. 

If you want to only do the water marble on the three nails, you can polish your index and pinky with a bright blue with white, bright pink and holo glitter in it, I found that the polish from the Glam Polish Experiment 626 collection Stitch to the Rescue, went perfect with this design. 

Once the bright pink polish has dried on your thumb, middle and ring finger nails we will start the water marbling. This process is messy so it is best to put tape around your finger, near the cuticles and the sides of the nail, or even better you can use liquid latex to put  around your finger for an easier cleanup. I still don't have any liquid latex, so I used tape.  

Then take your bright pink polish (the same one you used for your base color), a purple and a blue polish and open all of the bottles, so you have them ready to go, you do need to work kind of fast for this design.    

Take the bright pink and make sure the polish brush is loaded with polish, so you can drip the polish into the water. Do the same with the purple and blue, in the end you should have a bulls-eye design in your cup. 

Then with your stylus or toothpick start to drag the toothpick in the water to create a marble design. Then quickly dip your finger into the part of the water that you like design.

Then take another toothpick and remove the rest of the polish around your finger. Then take your finger out of the water. Then remove the tape or liquid latex around your fingers, as you go on each finger that you are going to marble.

Once your marble design has dried we will add some whip cream on top or on the tip of the nails. Take a small piece of makeup sponge and polish some white polish on it, then dab the sponge onto the tip of the nail, kind of like a french manicure but it does not need to be perfect.

Then once that has dried we will add the sprinkles or sugar (not sure what is on top of the drink?) Just take a blue and purple glitter polish and polish that over the white polish.   

Unicorn Frap, Water Marble Nail Design 
Unicorn Frap, Water Marble Nail Design

Once your unicorn frap water marble nail design has dried apply a top coat to seal in your nail design. 

Water marbling can be both easy and hard, the concept seem easy but some times your water marble still does not come out the way you want, it just takes practice, the right temperature for your water and the right nail polishes. Also here is a link to the first water marble that I did back in 2015 Lets try water marbling, where I show step by step photos. I definitely feel like this time around that the water marble turned out much better. Also their are a lot of YouTube videos out their on how to do water marbling as well.

Hope all of you enjoyed this unicorn frap, water marble nail design, even if you did or didn't care for the drink, I still think this design turned out pretty cool!

See you next time for more nail fun! 

Friday, April 15, 2016

So Emotional- Emotions Design

Hello everyone! Life can be an emotional roller coaster with a lot of ups and down in our lives. I know personally in my life I have had plenty of ups and downs in my life. As of recently, I decided I was unhappy with how things where going in a certain part of my life, that was when I decided to go back to school (after thinking long and hard if I wanted to do that again) to be come a nail tech. Anyway I thought it would be cool to do a emotions nail design with all of you, yes this may remind you a little bit of the movie Inside Out, just a little bit simpler. 

Emotions nail deisgn      Emotions nail design. Happy, Sad, Disgust, Fear, and Anger.

The nail polish and tools used for this design will be right next to the images as we go.

The skill level for this emotions design is:

Beginners

This design is great for beginners. It is very simple to create with a dotting tool and a thin nail art brush with simple lines to create the happy face designs.


Before we start I just wanted to let you know that the happy face was one of the very first designs that I use to do on my nails. I use to us a pencil that you are suppose to write on paper with, dip that in polish and draw a happy face on my nails. They really didn't turn out to well, plus I use to bite my nails really badly so they did not stay on my nails for very long. 

Let's not be to emotional when creating this design!

 
  Base cost used- CND Sticky 

1. Start off with a thin layer of base coat to protect your nails.

 
Polishes used- Sally Hansen- Triple Shine- Lemon Shark, 
OPI- Hello Kitty- My Pal Joey, OPI Hawaii- My Gecko Does Tricks, 
Julep- Hazel- Boho glam, and Finger paints- Cubism Crimson.

2. After your base coat has dried paint you thumb nail yellow, index finger nail blue, middle finger nail green, ring finger nail purple, and pinky finger nail red.

 
Sally Hansen- Hard as Nails- Black Heart and Large dotting tool.

3. Once your colorful base colors has dried, take your large dotting tool with black polish on it and dot two dots for the eyes on each nail.


 Black acrylic paint and a thin nail art brush

4. Next we will start to make the faces for each emotion; happy, sad, disgust, fear, and anger. Refer to the photo above for the faces, the only thing with disgust is make the mouth more curved (I had to redo that part disgust looked a little to happy.)

Emotions nail deisgn   Final emotional nail design 

5. For some final touches on the sad face add two tears, disgust a tongue and some slated eye brows, and the anger face some slanted eye brows as well.    

Then once your emotional design has dried apply a top coat to protect your nails, because the last thing you want it to be mad or sad that your nails just chipped. 

Just a side note as stated above life is a emotional roller coaster, and all of us want to be happy but sometime our other emotions like to get in the way. But all emotions are their to balance out everything (well that what they said in the movie Inside Out.) 

That was kind of the reason why Happiness is on the thumb nail because being happy should be important part of life and the other emotions are their to balance everything. Also anger is on the smallest finger because no one likes to be anger and we want to make anger a smaller part of out lives.

Hope all of you enjoyed this emotional nail design!

See you next time for more nail fun!              

Friday, October 2, 2015

Top 10 Nail Care Items

Hello Everyone! Today on the M.M.M blog, I kind of have an update for my nail care routine that I want to share with all of you. Last year I did two post called nail care and hand and cuticle care, I wanted to update all of you on that by doing a top 10 post. Some of the items that I have used in my last post have changed and their are some that have not, I just thought this would be a fun way to update all of you. 

Top 10 nail care items


Here are my top ten (with 2 extras) favorite nail care items, Let's start off with Moisturizers:

Yes to Carrots Super Rich Body ButterYes to Coconut Hand & Cuticle cream
Yes to Carrots Super Rich Body Butter $9.99 at Target  
Yes to Coconut Hand & Cuticle cream $5.99 at Target    

1. Yes to Carrots Body Butter. This is a body butter I have been using for years and have gone through many jars of this. This is a super thick body lotion that I like to us on my hands. It keeps your hands moisturized for a long time, it is a little bit greasy but absorbs in no time. It is a natural lotion with a natural smell.

Another lotion that I have been using lately is another product from the Yes to line (in case you didn't notice, I love the Yes to line), The Yes to Coconut hand & cuticle cream. I actually ran out of my favorite lotion the Yes to Carrots Body Butter, so I thought I would give this a try. So far I do like this lotion, it is also a little bit greasy by absorbs well. It does smell like coconut, but not the fake smelling coconut, this smell like a real or natural coconut.


Burt's Bees Lemon Butter Cuticle Cream
     Burt's Bees Lemon Butter Cuticle Cream $5.99 

2. Is another item to keep your cuticles moisturized, that is the Burt's Bees Lemon Butter Cuticle Cream. I rub this cuticle cream around my fingers and on the cuticles ever night, a long with my favorite lotion.  This is a nice cuticle cream that keeps your cuticles soft and moisturized and smells just like lemon.


Julep Mighty nail & cuticle serum
     Julep Mighty nail & cuticle serum $28.00 on Julep.com or $22.00 at Sephora.

3. This cuticle and nail serum is not a must, but I do still really like this. My fingers have the problem of on the sides being dry and then peeling. Since I got this in a Julep mystery box, this serum has helped the dry parts on the sides of my fingers, not 100 percent, but they are much better I just every so often will still get dry parts. The only thing about this product is the price, it costs a lot for the amount of product that you get.

Now on to other nail care items.

Beauty Secrets Nail Polish Remover in a jar Up & Up Acetone nail polish remover
      Beauty Secrets Nail Polish Remover in a jar 
from Sally Beauty $4.99 or $1.99 with Sally card.
Up & Up Acetone nail polish remover $0.97 at Target.

4. The Beauty secrets nail polish remover I actually got because I forgot to get my old favorite remover from Meijer. I then stopped by Sally's to get something else and then remembered that I need some remover. Let's just say I am glad I forgot that remover at Meijer, This remover works so much better, it actually will remove all of your polish when you dip your finger in the sponge.    

The Up & Up Acetone polish remover I use to clean my nail art brushes between designs and at the end. I also use this to clean up around my nails when I get polish on the sides of my fingers. This remover is also good for removing stubborn glitter. Do to this remover being acetone based it is very drying and I only use this for those purposes.   


nail clippers
 Way to many nail clippers!

5. Is nail clippers, I cut and file my nails once a month, I first use the big nail cutters and then the regular sized one to cut the sides of the nails. The third and fourth nail cutters in the photo I use if I get the dry peeling skin on the side of my fingers. You really do not need all of these nail clippers, just one or two would be fine. I really don't know why I use so many. 


 Sally Hansen crystal nail file
 Sally Hansen crystal nail file $8.99 at Ulta 


Kiss four way nail shaper
 Kiss four way nail shaper $2.00  

Trim buffing block
Trim buffing block, $1.87
four sides; 1.even out, 2.smooth nail, 3. buff nail, 4. shine nail

6. Once again I do use a lot of different files when filing my nails, which you don't really need, I just found that using all of these works for me. I first start off with a crystal file which is suppose to be less harsh on your nails. Then I use the Kiss nail shaper the light blue side, then the light or the darker pink (not both), I never use the dark blue side it is a little to harsh. Then filing I use the buffing block on my finger tips, this I think is actually suppose to be used your nail surface. I just use the even out, and smooth part, and some times the buff side. 

Now time for cuticle clean up.

Sally Hansen Instant cuticle remover
   Sally Hansen Instant cuticle remover $4.99

7. The Sally Hansen cuticle remover, I use once a month usually after I cut and file my nails.
This product is nice for helping to remove your cuticles and making your nails look nice.


360 beauty metal cuticle pusher
    360 beauty metal cuticle pusher from CVS $3.99

8. The metal cuticle pusher I use along with the cuticle remover. Their are many cuticle pushers from wooden ones or the orange sticks, plastic or rubber pushers, and metal ones. I do own all of them, but I found that the small metal one works the best for me.

The Base and top coats.

Nicole by OPI 3 in 1 base, top and strengthener
          Nicole by OPI 3 in 1 base, top and strengthener $7.00

9. For the longest time I never used a base coat, then I decided it would be a good idea to start. I had a lot of trouble finding one I liked, then I found this one. This is a three in one, I only use it as a base coat, I have not noticed any strengthening from this product. One thing I noticed with this base coat is with cream polishes they start to crack after a few days. So maybe after this base coat is done I will try the OPI natural nails base coat.

Revlon Extra life no chip top coat
Revlon Extra life no chip top coat $5.00

10. The Revlon Extra life no chip top coat has been by go to top coat for the longest time, after the Sally Hansen no chip acrylic top coat stop working as well, I tried this one and have liked it and have been using it since. 

Can't believe I almost forgot this one for
moisturizers!

Yes to Coconut Polishing Body scrub
 Yes to Coconut Polishing Body scrub $7.99 at target 

11. The Yes to Coconut body scrub is a great way to keep your hands nice and soft. I use this after removing my nail polish or whenever I feel that I need something a little extra.


Elf concealer brush
 Elf concealer brush $1.00

12. The Elf concealer brush I just recently bought and started to use to clean up the polish that gets on the sides of my fingers and on the cuticles. This brush is amazing for clean up, it makes it easy to really get into the sides of your fingers and to make it look like your are almost perfect a painting your nails. I use this brush with the Up &Up acetone remover. 

Hope all of your enjoyed this list and also found it helpful in your nail care routine!

See you next time for more nail fun!