Showing posts with label Revlon no chip top coat. Show all posts

Friday, May 13, 2022

Products We Love that Get Discontinued- Nail Care

Hello everyone! We all have certain products that we have been using for a long time maybe even for years, then we run out of these products and we go to the store or online to get more of this item and we can't find it. 😭 Then we later find out this product is discontinued and we can no longer get this item, now what do we do? Today I will be going over some nail care products that I have been using for a long time and sadly I can not find these products anymore and what products I use instead. 


This sadly has happen to all of use, and with the pandemic happen there has been a lot of supply chain issues and small business that might have gone out of business. 

I am going to talk about the first item that I am very sad that I can't get this nail care item anymore. 


That item is Nail Butter. I have been using Nail Butter since 2014 or 2015, I found out about this product from a few YouTubers that I am subscribed to, they had said that it had really helped out their nails and cuticle area. This product you could only buy online on NailButter.com, it was a small business ran by lady name Christine that lives in Georgia. 

Nail Butter I felt did wonders for my nails, before the skin around my nails would have small pieces of loose skin that would keep showing up (I know sounds kind of gross, but it was not as gross as it sounds.) then after using Nail Butter it went away. At first you use this twice a day morning and night, then after a month you use it only at night. This in combo with the CND Solar Oil has done wonders for my nails. 

I am beyond sad that I can't get anymore after my last jar is gone. 😭 Nail Butter does last a very long time, a small jar last me about a year or even just a little longer. 

In 2020 In November I did order my last jar of Nail Butter and I kind of had a clue then that might be my last jar because it took a month to get to me and usually it doesn't take that long Georgia is not far from me. 

Once my last jar of Nail Butter is gone, I will try the cuticle butter from Lush the Lemony Flutter. I have heard that this product is good, so we shall see. I just would rather by Nail Butter to support a small business, but sadly Nail Butter is no more.

Here is my review of Nail Butter from 2016: butter-up-with-nail-butter


Next we have a Top Coat that I have been using for many years, that I can not find anymore.


The Revlon Extra Life No Chip Top Coat, I don't even remember how long I have been using this top coat it has been that long. Before this top coat I loved a topcoat from Sally Hansen called No Chip Acrylic Top Coat, then all of a sudden it just didn't seem to work as well, so I found the Revlon top coat. 

Revlon is mainly a makeup brand and for the past few years I have been having a harder time even find their nail polishes, I could only find the top coat at Meijer. Then once again at the beginning of 2022 I could not find this top coat. I am not sure if this was because of supply chain issues or if Revlon plains to not make nail polish anymore.


Now I have been using the CND Super Shine High Gloss Top Coat, the one with a pink tint to it. This one has been good so far, I use this with any polish and the CND Stickey Base for my base coat.  

That was the product that where just recently discounted for this year, really I am especially sad about Nail Butter.

As for some other products that I have loved over the years, that where discounted sometime ago.  

The Yes To Carrot Body Butter, I loved using this body butter on my hands day and night it didn't seem to thick or greasy. I had gone though so many jars of this body butter, then sadly Yes To don't make this anymore. 

As for lotion that I use now, it changes all the time. Right now I have been using the Cerave Moisturizing cream in the morning/ day because it is not to greasy and moisturizes well. Then at night I use the Gold Bound Aloe lotion, this lotion is thick and kind of greasy that why I save it for night time use. In the winter, at night I use the Aveeno Baby Eczema Therapy Nighttime balm, this stuff is very thick and great for dry winter skin. 

Before this I was using a lotion from Hempz the pineapple and melon lotion, this lotion smells amazing, then my hands started to not like it and I got a rash on my hands, so that why I have been using the Cerave lotion. 


Next we have a scrub that I used on my hand for a long time.


The Yes To Coconut Body Scrub, this was another product that I loved and used for a long that they stopped making. Now the Yes To line just makes face products no more body care. 

For hand scrubs I have tried Shea Moisture body scrub, that was more of dry scrub formula that was ok. Then I tried the Tree Hut Mango sugar scrub that one I felt like was similar to the Yes To Coconut. 

At first I would us this scrub all over my hands and nails (I use a brush just on the nail area only) after removing polish, then a few day later before applying polish. Then when my skin started to get intreated for the lotion I was using, I just us the scrub on my palms and finger/ nails after removing nail polish, so just once a week. 


Recently I found this scrub the Beloved Coconut and Warm Vanilla Whipped body butter. I feel like this one is great for the hands if you want to use a scrub, due to the whipped formula it has a lotion feel to it and a very little bit of sugar grit to it, plus it smell good too. 

Well that is all of the products that I can think of that I loved that have been discontinued, some products where easy to find new possible favorites(I don't want to say replacement, because I feel like that just sounds bad), other it is a on going search, like lotions.

Hope all of you enjoyed this post of product that I loved that I can no longer find. I know we all have been there. 😓 Hopefully a lot of product that we love will stick around forever, we can only hope. 😔

Also here is a link to my nail care routine that I did back in 2017, for the most part it is still then same, just a few product changes. updated-nail-and-hand-care-routine

See you next time for more nail fun! 

Saturday, March 21, 2020

Koala Bear Care- Koala Nail Design

Hello everyone! Hope everyone is staying safe and try to stay healthy as well. I know that this year has started off not so well and the past few weeks have been scary, that's why I decided to hop on the blog and post a cute koala bear care nail design for all of you, just to kind of get you mind off of what is happening even just for a little bit.  

Koala Nail Design 
Koala Nail Design 

Here are the polishes and nail art tools used to create this cute koala nail design: 


Base and top coat- as always, CND Stickey Base Coat and Revlon Extra Life No Chip top coat.

Nail polish- Zoya- Lillian.

Arcylic paint- White, black, green, yellow, and brown. 
Used black and white to make two shades of grey, and used a darker green and yellow to make a lighter green.

Nail art brushes- Thin detail brush and stripping brush.

A small cup of water to clean off your nail art brushes.

Koala Nail Design 
Koala Nail Design

Apply base coat.

Let that dry.

Polish all of your nails with a light blue polish.

Let that dry as well.  

First we will start off with the eucalyptus leaves that going on all four nails. Starting with the index nail and going to the middle and ring finger nail. Make a long branch across those three nails, then make some more smaller branches from the larger one. 

Then with two different greens, a light and a darker green, make some very small leaves coming from those smaller branches and some on the larger branch as well.

 Koala Nail Design
 Eucalyptus leaves

For the pink finger nail we will make four branches from all four coroners of the nail. On each corner make a long branch and then two shorter ones. Then make some leaves on each branch. 

Koala Nail Design 
Koala Nail Design

Lastly on to the Koala on the thumb nail. First make sure you have a lest two shades of grey, a light and darker grey. Then make a large circle for your koala's head, then two ears (use the lighter grey.) Then make his body, then with a darker shade of grey make two arms and two legs. 

With that same darker grey take your stripper brush and make your koala's ears look fuzzy, by making small lines very close to each other to make his ears fuzzy looking. 

Now on to the koala's face, make two oval for his eyes and a side ways oval for his nose and then two curved lines for his smile. 

For some for details, we will add some branches and leaves. Make a long thick line between your koala's arms and legs, then a thin line that is coming from his ear. Then add two leaves in his paws and then two more near the bottom the branch near the cuticle. Also add some leaves near his ear as well. 

Koala Nail Design 
Koala Nail Design

Once you have your koala bear nail design the way you like apply a top coat to seal in your design and to help it to last.


 Practice Koala Nail Design


Hope all of you enjoined this koala design and take care of yourselves.

See you next time for more nail fun!

Thursday, February 20, 2020

Full Moon- Night Sky Nail Design

Hello everyone! Today on the blog I have a night sky/ full moon design for all of you, I created this on my nails a few weeks ago and just now have gotten around to typing up a post, this design is suppose to go along with the Starry Night Sky design that I all ready created back in January. 
 
 Full Moon- Night Sky Nail Design
 Full Moon- Night Sky Nail Design

Here are the polishes and nail art tools use to create this night sky nail design:

 
Base and top coat- CND Stickey Base Coat and  Revlon Extra Life No Chip top coat. 

Nail Polishes- Zoya- Twinkling- Jen and Kiss nail art striper- Silver.

Arcylic paint- White and black to make grey. 

Nail art brushes- thin detail brush.

Other- Q- tips for clouds. 

 Full Moon- Night Sky Nail Design  
 Full Moon- Night Sky Nail Design
 Full Moon- Night Sky Nail Design

 Apply your base coat, let that dry.

Polish all of your nails with a shimmery blue (I used Zoya Jen.)

Let that dry as well.

 Full Moon- Night Sky Nail Design
 Full Moon- Night Sky Nail Design
  Full Moon- Night Sky Nail Design

For the nail art first we will be creating clouds with a Q- tip/ cotton swab, this helps to make the clouds look fluffy. Take your Q- tip and dip it into just a little watered down white paint, then dab it on to the nail to make it look like clouds, do this on random parts of the nail (I tried to focus the clouds near the tip, sides and cuticles), and make sure to leave some blue showing for the night sky. 

For the stars take your sliver stripping polish, and just dab some dots on the nail for some smaller stars. Then add a few larger dots as well for some big stars, on the larger dots add two lines to add more detail. For the larger stars I just add a few on the nails, one on the middle finger nail and three on the thumb nail.

  Full Moon- Night Sky Nail Design
  Full Moon- Night Sky Nail Design
 Full Moon- Night Sky Nail Design

 Full Moon- Night Sky Nail Design
 Full Moon- Night Sky Nail Design
 Full Moon- Night Sky Nail Design

Lastly we will make the moon in the sky on the ring finger. First take your detail brush with white paint on it, make a circle kind of near the cuticle. Then take some grey paint and make a few lines on the moon a kind of blend them in with the white so they show up a little bit. 

 Full Moon- Night Sky Nail Design  
 Full Moon- Night Sky Nail Design
 Full Moon- Night Sky Nail Design

Once your night sky is finished apply a top coat to seal in your design and to help it last. 

Also if you liked this design don't forget to check out  Starry Night Sky design as well. 

Hope all of you enjoined this full moon/ night sky nail design!

See you next time for more nail fun!

Tuesday, November 26, 2019

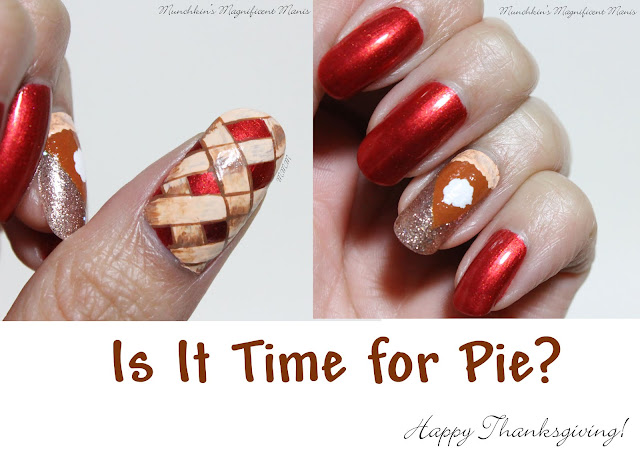
Pie Time- Thanksgiving Nail Design

Hello everyone! Happy almost Thanksgiving! What is your favorite food to eat during Thanksgiving? My favorite food is ham and mac and cheese, as for desert I love pumpkin pie that is loaded with lots and lots of whip cream! So today on the blog we will be celebrating Thanksgiving with a fun pie design, cherry and pumpkin pie. 

  Thanksgiving Pie Nail Design Thanksgiving Pie Nail Design 


Here are the polishes and tools used for this yummy pie design: 


Top an base coat- CND Stickey Base Coat and Revlon Extra Life No Chip top coat.

Polishes- OPI Lisbon- Now Museum Now You Don't and China Glaze mini- Sesame Street- 50 Shimmering Years.

Acrylic paint- Brown, peach, red, yellow (to make orange) and white.

Nail art brushes- thin detail brush and a thin stripper brush. 

A small cup of water to clean off your nail art brushes.

Thanksgiving Pie Nail Design  
Thanksgiving Pie Nail Design 

Apply base coat.

Polishes-  

Thumb, index, middle, and pinky finger nails. A reddish orange polish (I used OPI - Now Museum Now You Don't.) 
Ring finger nail, a rose gold glitter polish (I used China Glaze- 50 Shimmering Years.)

Thanksgiving Pie Nail Design  
 Thanksgiving Pie Nail Design 

Pumpkin Pie Design on the Ring Finger Nail- 

Mix a red,orange and brown paint together to make your pumpkin pie color. Then make a triangle shape near the cuticle, fill that in with the paint you just mixed. You will need to go over this a few times to be opaque. 

Then to make the crust take a peach colored paint on a thin detail brush and dab the paint near the cuticle making a crust looking shape.

Now to add the whip cream, which I would add way more then what I did in this design on my actual pie, but for the purpose of this design I just put a little whip cream, so you can tell that this is pumpkin pie. Anyways take a thin detail brush with white paint on it and dab the white in the center of the triangle in a circle shape. 

Thanksgiving Pie Nail Design  
 Thanksgiving Pie Nail Design 

Cherry Pie on the Thumb Nail- 

For the cherry pie design, we will be making a checkered patterned for the crust on the nail. Starting from the tip of the nail make a thick peach strips with your stripping brush, I made four going down the nail. Then staring on the side of the nail, make three more thick strips. 

For added detail you can outline your crust pieces with brown, some pieces can over lap and some can not. Then for even more detail take some brown paint and place that paint on different parts of the crust, then with water smudge that paint to make it kind of blend in.      

Thanksgiving Pie Nail Design  
Thanksgiving Pie Nail Design 
Once you have your pies looking yummy and ready to eat, apply a top coat to seal in your design and to help it last all though out your Thanksgiving day meal, unlike all the food you will be eating that will not last.

Hope all of you have a wonderful Thanksgiving and enjoy all the yummy food!

See you next time for more nail fun!  

Saturday, November 16, 2019

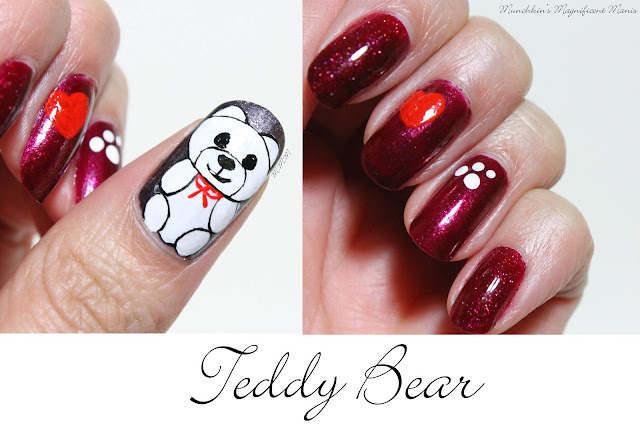
Teddy Bear Nail Design

Hello everyone! Today we will be creating a teddy bear nail design, just for fun, this design can be great for any time of year. I did choose some darker more holiday colors for the base colors, but really this design can be done at any time. 
 
Teddy Bear Nail DesignTeddy Bear Nail Design

 Here are the polishes and nail art tools used to create this cute teddy bear design:


Base and top coat - CND Stickey Base Coat and Revlon Extra Life No Chip top coat.

Nail polishes-  Zoya- Urban Grunge- Troy, Zoya- Blaze, and Zoya- Marjorie- Red book Trio.

Acrylic paint- black, white, and red.

Nail art brushes- thin detail brush, a thin stripper brush and a dotting tool.


Teddy Bear Nail Design
 Teddy Bear Nail Design
Teddy Bear Nail Design

Apply base coat

Polish colors-
Thumb nail- a dark grey toned sliver, Zoya Troy.
Index and pinky finger nail- a holographic burgundy color, Zoya Blaze.
Middle and ring finger nail- a shimmery burgundy color, Zoya Marjorie.

For this design I will just go over how to create the bear on the thumb nail. As for the middle finger nail I just put a heart on the upper right hand corner and on the ring finger nail and a paw print also on the upper right hand corner. 

 Teddy Bear Nail Design
  Teddy Bear Nail Design
 Teddy Bear Nail Design

For the teddy bear take a thin detail brush with white paint on it, make a oval shape near the tip of the nail for the bears head and two ears on the top of the head. Then make two ovals on the sides for his arms, another larger oval for his tummy and then two more smaller ovals for his feet. You will need to go over this a few time to be opaque.

Once you have your bears outline done we can make his features. Take a dotting tool with black paint on it, make two dots in the middle of his head for the eyes. Then with a thin detail brush make a small oval shape for the nose, take a thin stripper brush make a small line down the middle of the nose and then a large curved line for the smile. 

For his red bow, take your thin stripper brush with red paint on it make a line on his neck then two loops, then two line from those two loops. 

Now for the hard part outlining your bear, if this step is to hard you can skip this step, I just feel like it makes it look better. If you would like to outline your bear, take a thin stripper brush with black paint on it and starting with the head begin to outline the whole bear. Also don't forget to add the oval shape around his nose and mouth. 

Teddy Bear Nail Design     Teddy Bear Nail Design
Teddy Bear Nail Design

Once you have your teddy bear nail design the way you like apply a top coat to seal in your design and to help it last. 

Here is the practice version of the teddy bear design.

Hope all of you enjoyed this teddy bear nail design!

See you next time for more nail fun!   

Thursday, October 31, 2019

Holoween Gradient- Halloween Nail Design

Hello everyone! Happy Halloween! Today we will be creating a simple gradient design with just the polish and the brush that it comes with. I wanted to post this earlier, but a lot of things keep coming up. 

Halloween Gradient Nail Design 
Halloween Gradient Nail Design

Here are the polishes that you need for this design and no nail art tools/ brushes:


Base and top coat- CND Stickey Base Coat and Revlon Extra Life No Chip top coat. 

Polishes- Color Club- Black Magic- holo and Wet n wild- Glitter orange.

That's all you need!

Halloween Gradient Nail Design
Halloween Gradient Nail Design  
Halloween Gradient Nail Design

Apply base coat.

Polish all of your nails with a black holographic polish, let that dry.


Halloween Gradient Nail Design
 Halloween Gradient Nail Design
 Halloween Gradient Nail Design

Then with the polish brush that is in the bottle, polish with a small amount of orange glitter polish half way up the nail, then focus most of the polish on the tip of the nail. You will need to go over this a few time, I suggest only doing two coats, I did way to many coats and ended up slightly denting the polish even after I thought it was dry.     

You can also do a gradient with a makeup sponge as well. I will share some link to some of my other gradient that I have done in the past a well. 


Halloween Gradient Nail Design  
Halloween Gradient Nail Design 
 Halloween Gradient Nail Design

Then once you have your gradient the way you like apply a top coat to seal in your nails and to help them last all Halloween.

Also here is a link to last years design that I did, That I really liked and enjoyed making. I honestly had very little time this year to plan out a nail design, that why I just did a simple gradient, that I still wanted to share with all of you.


Hope all of you enjoined this, even though this post was very short!

Happy Halloween! 

See you next time for more nail fun!