Showing posts with label OPI. Show all posts

Saturday, July 18, 2026

Tropical Dream Vacation- Tropical Nail Design

Hello everyone! Hope everyone is having a good summer so far. Like every summer I love doing tropical design and I am missing Hawaii so much right now and I want to go back so bad! If you are like me and dreaming of a tropical vacation this nail design well be great for us to create together. Today's design remind me of the beautiful ocean and the sunset, along with a yummy smoothie that you can find on a tropical vacation. 

Tropical Nail Design

Here are the polishes and nail art tools used to create this tropical nail design:


Base and top coat- CND Stickey Base Coat and CND Super Shiney Top Coat.

Polishes- Pretty& Polished- Sea Spray, China glaze- Shades of Paradise- Mer-Made For Bluer Waters, Holo Taco-Vacation collection-Beach Please, Sally Hansen- Triple Shine- Lemon Shark, OPI Hawaii- Is Mai Tai Croooked, and OPI- La Paz-itively Hot. 

Acrylic paint- Black, white, blue, yellow.

Nail art brushes- Thin detail, linear, and striper brushes.

Other- Makeup sponge for gradients, a small cup of water to clean off your nail art brushes, and Liquid latex for easy clean up when you are doing gradients. Also not pictured a Q-tip or cotton swab. 

Tropical Nail Design

Apply a topcoat to clean dry nails, and let that dry.

Polish- 

This is the base colors that you need for your gradients, always start off with the lights color. 

Thumb- Light shimmery ocean colored polish (China Glaze- Mer- Made For Bluer Waters)

Index, middle, ring and pinky finger nails- a yellow cream polish (Sally Hansen- Lemon Shark)

Tropical Nail Design

Tropical Nail Design

Sunset Gradient On the Index, Middle, Ring and Pinky Fingers: 

We will first start off with the sunset gradient, that kind of reminds me of a fruit smoothie. Take a makeup sponge, take a pink cream polish (OPI- La Paz-itively Hot), over lapping that polish just a little, polish with a light orange (OPI- Is Mai Tai Croooked) then over lapping that polish a little, lastly polish a yellow cream polish (Sally Hansen- Lemon Shark.)

For easy clean up if you are not allergic to liquid latex, apply a liquid latex (I use the Holo Taco one) around all the fingers. 

Now take your makeup sponge with the pink side facing your cuticle and dab on your nail, you will have to repeat the steps that you just did above for each nail. You always need to reapply your polish on the sponge for each nail. 

Once you are finished with your gradient peel off your liquid latex if you applied one to your fingers. 

Tropical Nail Design

Beach Scene On The Ring Finger Nail:

On the ring finger nail we will create the beach scene. If you don't have a light blue paint, first take some white paint and a little blue and mix those to together. Take a thin striper brush with a darker blue paint on it, near the tip of the nail make a thin line for your ocean, also on the side of the nail make a slanted line for where the ocean and the sand will be. Leave some space on the side of the nail for some sand, by polishing a sand colored polish (Holo Taco- Beach Please.)

Back to the ocean water, take a detail brush with a blue on it and near the line we just made paint this area with the blue, then with the lighter blue near the tip of the nail paint that area. Try to blend the two colors together where they meet. 

For the ocean waves take a thin striper brush with white paint on it, where the light and the dark blue meet make a thin line, while that is till wet take a clean dry liner brush, push that wet paint upward to make a wave. Then where the water and the sand meet make a wavy line there as well. 

On the sand make a large palm tree, take a thin striper brush with black paint on it make a thin line from the sand, then two curved lines on each side, two more from that, and lastly one form the top for your palm tree. Then for your palm leaves make very small lines on each of the lines you just made (this is very tedious, but looks great in the end) 

Next for the final touches, we will make the sun, first to make an outline we will make a half oval with white paint, then once that dries go over that with yellow paint. To show the glow from the sun, take a little bit of the yellow and paint that around the sun. 

Lastly we will make two very small birds in the sky, by making to small v shapes near the cuticle. 

Tropical Nail Design

Ocean On The Thumb Nail: 

For the last part of the nail design we will create the ocean. First we need to create the gradient just like the sunset gradient we did above, we will repeat the same steps.For the colors start with a darker holo blue (Pretty& Polished- Sea Spray), then the same as your base color (China glaze- Mer-Made For Bluer Waters) and lastly a sand colored polish (Holo Taco- Beach Please). You will need to dab the nail a few times to be opaque. 

For your the final touches for your ocean nail take a thin striper brush with white paint on it, make a wavy line where the ocean and the water meet and while it is still wet with a clean linear brush push that paint upward. Then for a final touch take a Q-tip with white paint on it and dab that on the wave you just made to give that bubble look that the ocean sometimes has. 


Tropical Nail Design

Once your tropical nail design is all ready for your next vacation or you are just dreaming of one, apply a top coat to seal in your design and to help it to last.

Tropical Nail Design
Practice Design 

Hope all of you enjoyed this tropical dream vacation design! 

See you next time for more nail fun! 

Thursday, June 11, 2026

Mandalorian and Grogu Nail Design

Hello everyone! Sorry it has been a while since I have posted, there has been a lot going on. A couple of months ago I got into a bad car accident that totaled my car. I was driving to work and was very close to work and some guy turned right into my Herbie, I was hurt and my dream car was destroyed. 😭 I was out of work for a week and a few days, I am much better now, but that was the most terrifying thing that has ever happened. I just wish people would just pay attention and slow down, I am far from a perfect diver, but what happened could have been avoided if that guy was paying attention. 

Also last month we also moved into a new home, are last apartment we had been at for a long time and it was time to go, it was old and the place did not want to do updates. Anyways now things are better and we our now settling in our new place. This also means soon I will have a room that I can do my nails in and no longer have to do them in the kitchen like I have been for years now. Anyway today we will be creating a Mandalorian and Grogu nail design to celebrate the new movie that has been in theaters since May 22. I just got a chance to create and design and I thought it is still ok to share, the movie is still in theaters as of typing this post. 

Mandalorian and Grogu Nail Design

Here are the polishes and nail art tools used to create this Mando and Grogu design:


Base and Top coat- CND Stickey Base Coat and CND Super Shiney Top Coat.

Polishes- Glam Polish-Mando Collection-The Child, OPI Holiday 2017- Ornament to Be Together, and Starrily- Northen Lights- Geomagnetic Storm Sights- Magnetic. 

Acrylic paint- White, black, mix black and white to make two shades of grey, green (mix green and white to make a light green), brown, and peach. 

Nail art brushes- Thin striper, detail, and linear brush, and a small dotting tool.

Other- water to clean off your nail art brushes. 

Mandalorian and Grogu Nail Design

Apply a top coat to clean dry nails, let that dry.

Polishes-

Thumb- a light green (Glam Polish-Mando Collection-The Child, Had to use the Grogu polish)

Index, middle, and pinky nails- a mutichrome polish ( Starrily- Northen Lights- Geomagnetic Storm Sights- Magnetic) 

Ring finger nail- a silver polish (OPI- Ornament to Be Together)

Let that dry.

Mandalorian and Grogu Nail Design

Galaxy Nails, on the Index, Middle and Ring Finger Nails: 

Let's star with the easy part on the nails that you polished with a mutlichrome polish, this is like a galaxy in a bottle and a easy way to have galaxy nails.To make them look more like a galaxy we just need to add star. To make the bigger stars, take a thin striper brush with white paint on it and make two large stars, by making a cross shape and then with a dotting tool with white paint on it make a dot in the center. 

With the smaller end of the dotting tool make small dots all around the nails. Then you have a simple galaxy nail design. 

Mandalorian and Grogu Nail Design

Mandalorian and Grogu Nail Design

Mandalorian on the Ring Finger Nail: 

Now on to the harder nails, let's create Mando on the ring finger nail. First if you don't have a light and dark grey, you can mix more white and a very small amount of black for the grey color, then mix a little more black in to your light grey to make a little bit darker grey, keep these to separate. 

To make Mando's helmet outline, take a linear brush with a light grey paint near the cuticle make a half oval shape and then a long rectangle under that half oval, fill that in with the light grey, then make two line down the nail and once you get near the tip of then nails square off each side for the bottom of the of his helmet. 

Next we will make his eyes, take a detail brush with black paint on it and make a thick black line going across his helmet, then down the sides make tow slanted lines, fill in that area with black, then going down the center make a thick black line, where I guess his mouth would be? 

On the lower corner of his helmet make two half triangles shapes on both sides, with a striper brush with the darker grey paint on it.  

Next we will outline Mano's helmet, take a striper brush with dark grey paint on it then outline the outer part of his helmet, on the top part of the helmet make two lines going down the center, then outline the rectangle above his eyes. 

Mandalorian and Grogu Nail Design

Grogu on the Thumb Nail:

Last by far form lest is our favorite green dude, Grogu, Baby Yoda, The Child, on the thumb nail. For Grogu's body color if you don't have a light green mix mainly white and a little bit of green to make very light green. 

In the middle of the nail make an oval shape for Grogu's head fill that in, then make two ears on the side of his head.  

For the center part of his ears take a detail brush with a peach colored paint on it and make a triangle shape in the ears.

For his face first make his nose, by making a small curve with a striper brush with dark green paint on it (I made his nose first to know where to place everything else, like his eyes). Then make a small curve under the nose for his little smile. Then make a few lines on his forehead for his little wrinkles. 

Next make two small ovals for his eyes and fill that in with black paint. Then make two smaller white dots for his pupils.

For part of his rope, make a small rectangle with brown paint under his head and fill that in, and then take that peach color paint and make a small line in the middle of his robe. We are just going to make this part of his rope to kind of keep it simple and to have a floating Groug head. 

For the final touch you can also outline your Grogu with a dark green paint. 

Mandalorian and Grogu Nail Design

Once your nails are all ready to see the new Mando and Grogu movie, apply a top coat to seal in your nails and to make them last. 

Practice version of Mando and Grogu

Hope all of you enjoyed this Mando and Grogu nail design along with the movie, we did see the movie, my hubby and I on Friday May 22. I liked the movie I am a Grogu fan and I loved every scene that he was in he is so cute. I do recommend seeing Mando and Grogu in theaters and was a good movie for any long time Star Wars fans our just Grogu fans. 

See you next time for more nail fun! 

Friday, November 24, 2023

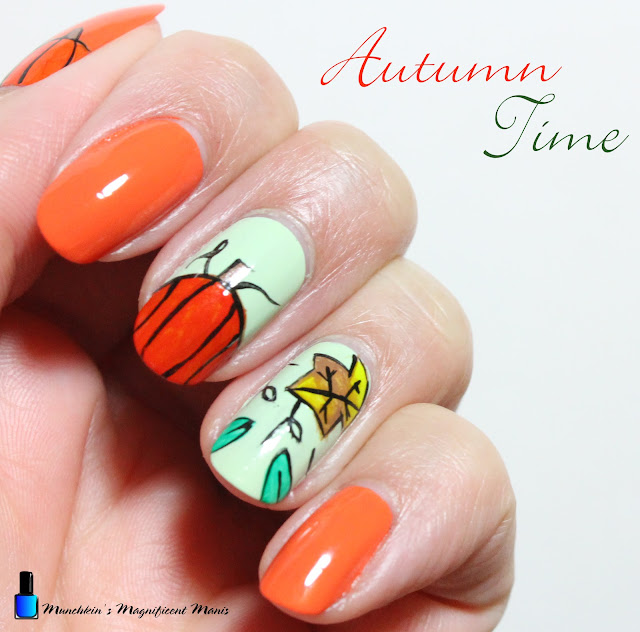
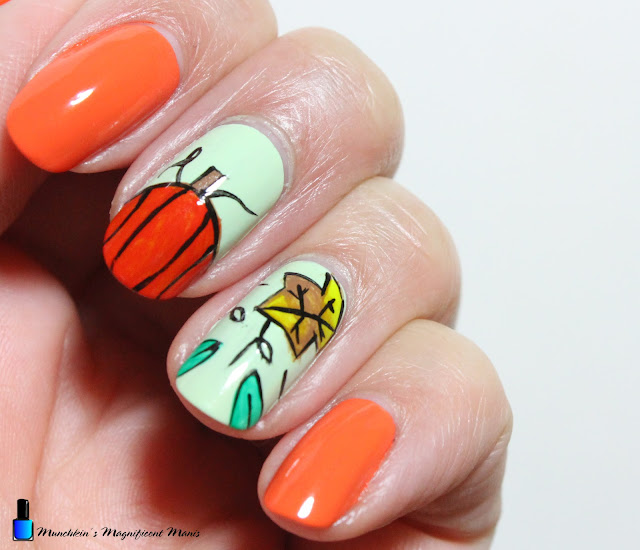
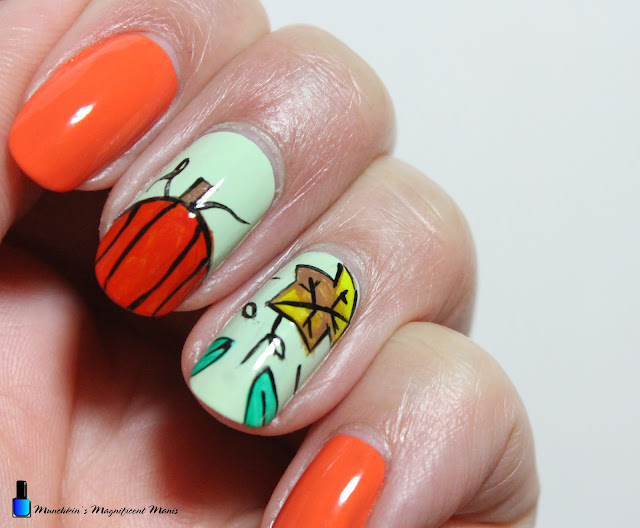
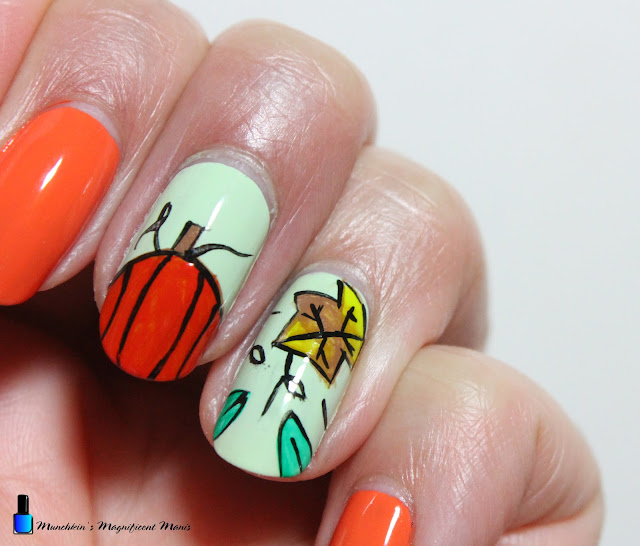
Autumn Time- Fall Nail Design

Hello everyone! Hope everyone had a good Thanksgiving and a long weekend (if you got the time off from work.) Today on the blog we will be creating a fall themed nail design, even though most people are probably like it is winter, but it is actually it is still fall, so I thought we could still go a head and create a fall design, even thought most people might be in the winter/ Christmas mood. 

Fall Nail Design

Here are the polishes and nail art tools used to create this fall nail design-


Top and Base coat- CND Stickey Base Coat and CND Super Shiney Top Coat.

Polishes- Sally Hansen- xterme wear- Sun kissed and OPI Hawaii- That's Hula- rious. 

Acrylic paint- Black, red, yellow, green, and brown.

Nail art brushes- Thin detail brush and stripper brush.

Other- Small cup of water to clean off nail art brushes. 

Fall Nail Design

Apply a top coat, let that dry.

Polish-

Thumb, index, and pinky- orange creme polish. 

Middle and ring finger nail- light green creme polish. 

Let that dry. 

Fall Nail Design

Pumpkin on the Middle Finger Nail: 

First we will start off with the pumpkin design on the middle finger nail. Take a thin stripper brush with black paint on it, starting near the tip of the nail make an oval shape. Then make a stem and fill that in with brown paint. 

Then with a detail brush, mix yellow and red to make orange (unless you have orange paint) and then fill in your pumpkin.

For some small details make four line on your pumpkin, then make a curved line with a loop coming out of the top your pumpkin and another curved line on the other side. 

Fall Nail Design

Leaves on the Ring Finger Nail:

Next we will make leaves on the ring finger nail. First we will make the lager leaf on the upper right hand corner of the nail near the cuticle. First take a thin stripper brush with black paint on it and make small triangle near the center of the nail, make two more triangles on both sides, then fill that in with yellow and brown, once you have the leaf color opaque enough make a few line in the leaf for the veins. 

After that make two green leaves on the tip of the nails and then outline them. 

Lastly make a few curved lines in the empty space of the nail for some vines. 

Fall Nail Design

Pumpkin's on the Thumb Nail:

Lastly on the thumb nail we will make two pumpkins, take a thin stripper brush with black paint on it and make a large oval and then a small oval right next to each other. 

Fill in your pumpkins with orange paint, then make a stem with brown paint, and outline the stem.

Then on your pumpkins make two line on them. 

Fall Nail Design

Fall Nail Design

Once your nail design is Fall/ Autumn ready apply a top coat to seal in your design and to help it to last.

Hope all of you are having a good fall and had a Happy Thanksgiving!

Hope all of you enjoyed this fall nail design!

See you next time for more nail fun! 
 

Wednesday, October 27, 2021

Happy Bloody Halloween- Nail Design

Hello everyone! Happy Halloween! Well early Halloween. Anyone have any plans for halloween this year? Not me, the most I do is of course create a fun nail design and eat candy, that pretty much it. Anyways this year we will be kind of recreating a design that I created back in 2018, with a few of the nails having a fake blood splatter on them, and of course changing it up by adding a pumpkin on the thumb nail and a spider web on the pinky nail. 

Halloween Nail Design


Here are the polishes and tool used to create this spooky/ gross nail design:


Base and top coat- CND Stickey Base Coat, Revlon Extra Life No Chip top coat, and - OPI- Matte Topcoat.

Polish- Holo Taco- Electrostatic- Electric Holo Collection, and Essie Coconut Cove.

Acrylic paint- red, black, yellow, white, and brown. (mixed red and yellow to make orange.) 

Nail art brushes- thin detail and stripper brush, and a medium flat brush.

Water to clean up your nail art brushes and the big mess you will make on your fingers. 

Halloween Nail Design

Apply a base to clean dry nails.

Let that dry.

Polish- 
Thumb and pinky- black holographic or creme polish 
Index, middle, and ring- an off white polish. 

Let that dry.

Halloween Nail Design

Halloween Nail Design

Fake Blood Splatter on the index, middle and ring finger nails:

Now time for the messy part!

*For this part use paint and not nail polish! Also wait to polish your other hand last, this step is very messy and your other hand will be all red at the end! Also make sure to have something down on your surface that you do your nails, I use a nail mat.*  

First we need to make our fake blood take a red paint and add the smallest amount of black to it, or until your red looks blood like. This time I added a little more black to make the red look darker, last time it was a little to bright red. 

Then water down your red paint/ fake blood, so it is very watery! this will make it easier to splatter. Take a flat brush and make sure your brush is soaked with the red paint/ fake blood, then with your other hand and one finger, flick your brush at your nail to make the blood splatter, your will need to do this step a few time to have the right amount of splatter.

Halloween Nail Design

Spider Web and Spider on the pinky nail: 

For the spider web make three long lines on the right hand corner of the cuticle. Then staring from the corner, make a curved line in each section.

For your little spider make a large circle and fill that in with white paint for the body. Then make three curved lines on each side of the circle for the legs. 

Halloween Nail Design

Pumpkin and Spider Web on the thumb nail:

* I always jump around from nail to nail when doing nail art that way you are not setting their waiting for each part to dry.*

On the thumb nail we will make the pumpkin first and then the spider web. First make a white oval, with a small square at the top, in the middle of the nail. Let that dry, then fill in the white oval with orange, you will need to do this a few time to be opaque. To add some light to the top of the pumpkin, add a little bit of yellow paint to the top. 

Let that dry. Then add a few curved liens to your pumpkin. Also fill in your stem/ small square at the top of your pumpkin with brown paint.

For the pumpkins face make two triangles, then fill that in with black paint, then make a curved line for his smile and and some squares for teeth, fill that in as well.

Halloween Nail Design

Halloween Nail Design

Once your nail are Halloween ready apply a top coat to seal in your design and to help it to last through all of your trick or treats. Also on the nails that we did the blood splatter apply a matte top coat, after the gloss top coat has dried. 

Hope all of you enjoyed this Halloween nail design. I enjoyed creating a design similar to this a few years ago and just wanted to do a similar design again, with of course some differences. Even though this design is very messy!

Check out my last design that I created. things-are-going-to-get-messy-halloween

Hope all of you have a bloody good Halloween!

See you next time for more nail fun! 👻 🎃

Tuesday, November 26, 2019

Pie Time- Thanksgiving Nail Design

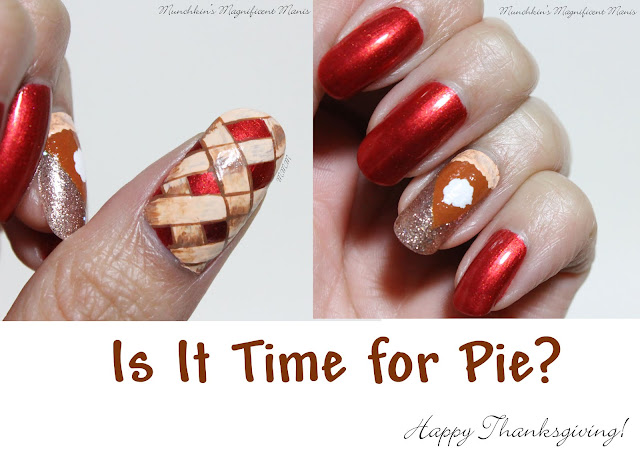
Hello everyone! Happy almost Thanksgiving! What is your favorite food to eat during Thanksgiving? My favorite food is ham and mac and cheese, as for desert I love pumpkin pie that is loaded with lots and lots of whip cream! So today on the blog we will be celebrating Thanksgiving with a fun pie design, cherry and pumpkin pie. 

  Thanksgiving Pie Nail Design Thanksgiving Pie Nail Design 


Here are the polishes and tools used for this yummy pie design: 


Top an base coat- CND Stickey Base Coat and Revlon Extra Life No Chip top coat.

Polishes- OPI Lisbon- Now Museum Now You Don't and China Glaze mini- Sesame Street- 50 Shimmering Years.

Acrylic paint- Brown, peach, red, yellow (to make orange) and white.

Nail art brushes- thin detail brush and a thin stripper brush. 

A small cup of water to clean off your nail art brushes.

Thanksgiving Pie Nail Design  
Thanksgiving Pie Nail Design 

Apply base coat.

Polishes-  

Thumb, index, middle, and pinky finger nails. A reddish orange polish (I used OPI - Now Museum Now You Don't.) 
Ring finger nail, a rose gold glitter polish (I used China Glaze- 50 Shimmering Years.)

Thanksgiving Pie Nail Design  
 Thanksgiving Pie Nail Design 

Pumpkin Pie Design on the Ring Finger Nail- 

Mix a red,orange and brown paint together to make your pumpkin pie color. Then make a triangle shape near the cuticle, fill that in with the paint you just mixed. You will need to go over this a few times to be opaque. 

Then to make the crust take a peach colored paint on a thin detail brush and dab the paint near the cuticle making a crust looking shape.

Now to add the whip cream, which I would add way more then what I did in this design on my actual pie, but for the purpose of this design I just put a little whip cream, so you can tell that this is pumpkin pie. Anyways take a thin detail brush with white paint on it and dab the white in the center of the triangle in a circle shape. 

Thanksgiving Pie Nail Design  
 Thanksgiving Pie Nail Design 

Cherry Pie on the Thumb Nail- 

For the cherry pie design, we will be making a checkered patterned for the crust on the nail. Starting from the tip of the nail make a thick peach strips with your stripping brush, I made four going down the nail. Then staring on the side of the nail, make three more thick strips. 

For added detail you can outline your crust pieces with brown, some pieces can over lap and some can not. Then for even more detail take some brown paint and place that paint on different parts of the crust, then with water smudge that paint to make it kind of blend in.      

Thanksgiving Pie Nail Design  
Thanksgiving Pie Nail Design 
Once you have your pies looking yummy and ready to eat, apply a top coat to seal in your design and to help it last all though out your Thanksgiving day meal, unlike all the food you will be eating that will not last.

Hope all of you have a wonderful Thanksgiving and enjoy all the yummy food!

See you next time for more nail fun!  

Monday, November 26, 2018

Pumpkin Everything- Pumpkin Nail Design

Hello everyone! For today I don't know if I am a little bit late for this design, but I thought it would still be fun to create a pumpkin nail design, it is still technically fall even though it feels like winter outside. 

Pumpkin Nail Design 
Pumpkin Nail Design

Here are the nail polishes and nail tools that you will need to create this pumpkin design:


Base and top coat- CND Stickey Base Coat and Revlon Extra Life No Chip top coat. (The same top an base that I always use.)

Polishes- OPI Lisbon- Now Museum Now You Don't and Zoya- Urban Grunge- Troy. 

Acrylic paint- black, red, and yellow (red and yellow to make orange) 

Nail art brushes- thin linear brush and a thin stripper brush.

Small glass jar with acetone in it to clean off your nail art brushes.  


It's pumpkin everything season, or is it, or maybe I missed out? 

Pumpkin Nail Design 
 Pumpkin Nail Design

As always start off on a nice clean nails with no polish on them and apply a thin layer of base coat to protect your nails. 

Let that dry.

Once your base coat has dried, polish your thumb, middle and ring finger nails a gunmetal grey (I used Zoya- Troy), then polish your index and pinky nail a red orange color (I used 
OPI- Now Museum Now You Don't.) 

For this design I decided to go with more darker colors for the background/ base colors, well the gunmetal polish color, and a fall red orange, that was weirdly in the OPI summer collection even though I feel like that color was a fall color. 

Let that dry. 

Pumpkin Nail Design
Pumpkin Nail Design

Now on to the nail art, we will be making pumpkins on the thumb, index and ring finger nails (all of the nails that we polish with the gunmetal colored polish.) 

For the pumpkins on the middle and index nail we will just be making one pumpkin. Take your linear brush dipped into orange paint and make a large oval shape for the pumpkins (I made one near the tip of the nail and the other more in the middle of the nail), then fill in the oval shape with orange, I ended up having to go over the pumpkin shape three times to be opaque. 

Once that is dry take your stripping brush with black paint on it and careful outline the oval shape of the pumpkin and then make four large curved lines for the ring finger nail pumpkin. For the middle finger nail pumpkin make three small curved lines at the top and then four small curved lines at the bottom.

Now on the the vines and steam, take your thin linear brush with green paint on it and make a steam on the top of the pumpkin. Then with that same stripper brush with green paint on it, make some curved going from the top of the pumpkin and some on the pumpkin.  

Pumpkin Nail Design    Pumpkin Nail Design

For the thumb nail we will be make two pumpkins, you can just repeat the same steps as the other nails just over lap the two pumpkins, the pumpkin in the back will be kind of hiding behind the other pumpkin.   

Pumpkin Nail Design 
 Pumpkin Nail Design

Once your pumpkin nails are just right apply a top coat to seal in your design and help it to last.  

What is your favorite pumpkin item or do you not get why fall is always pumpkin everything? My favorite pumpkin item is pumpkin pie, loaded with whip cream.  

Hope you enjoined this pumpkin nail design! 

See you next time for more nail fun!

Friday, September 21, 2018

Rumbly In My Tumbly- Pooh Bear Nail Design

Hello everyone! Today we will be creating a cute Pooh Bear nail design. Originally I was going to create this to celebrate the release of the new live action Pooh Bear movie Christopher Robin, but the movie has been out for a while, it was released in theaters at the beginning of August, so I'm not sue if that is really relevant or not, but I feel like you can still have Pooh Bear on your nails at any time, so why not still create a Pooh Bear nail design. I did see the Christopher Robin movie in theaters and I thought it was good, I feel like it was more for adults though, basically people/ big kid that grew up watching Pooh Bear because it had a classic Pooh Bear feel to it, that some younger kid might not get.  

Pooh Bear Nail Design 
Pooh Bear Nail Design     

Here are the polishes and tools used to create this Pooh Bear nail design: 


Base and top coat- CND Stickey Base Coat and Revlon Extra Life No Chip top coat.

Polishes- Zoya Mini- Lillian, Sally Hansen- Triple Shine- Lemon Shark, Color Club- Daisy Does it, Nicole by OPI- That's Just Plain Nuts!, and OPI Red. 

Acrylic paint- yellow, red, white, and black. 

Nail art tools- thin detail and liner brush and very very thin/ tiny brush, and a large dotting tool.

A cup of water to clean off your nail art brushes.

Let's begin this hundred acre wood adventure with Pooh!  

Pooh Bear Nail Design
 Pooh Bear Nail Design
 Pooh Bear Nail Design

Apply a base coat as always and the let that dry.

Once your base coat is dry polish your thumb a light blue, your index and middle with a yellow polish, your ring finger nail brown, and your pinky finger nail with a red. Also on your middle finger nail apply a glittery yellow polish over the creme yellow polish as well.

Let that dry as well.

Then on the index finger once the yellow has dried, polish the top part (near the cuticle) of your nail red and leave the bottom part near the tip of your nail yellow, this will be for Pooh's shirt. 

Then on to Pooh Bear on the thumb nail. For Pooh himself I mixed paint to make his color, take a lot of yellow paint and small bit of red to make the yellow orange for Pooh Bear. Once you have the yellow orange the way you like (it did take me adding a little more yellow to try and get the color right.) make a large circle shape for his head and then two circles at the top for his ears, then fill that in, you may have to go over your Pooh Bear shape a few time to be opaque, I had to go over it three times.

Then on to his face. For his eyebrows take very small/ tiny brush with black paint on it and make two curved lines near the top of his head. Under his eyebrows make two black circles with a detail brush. Then with that same small/ tiny brush make a curved line right under his eyes, right under that is where his nose goes. Then with a detail brush make a small oval for his nose. Lastly Pooh need a smile, take your small/ tiny brush and make a large curved line for his smile, then two small lines at each end to complete his smile.    

Pooh Bear Nail Design  
  Pooh Bear Nail Design

On the middle and pinky finger nail, these two nails will have no nail art on them they will just have the polish color on them. As stated above I just applied a yellow glittery polish over the creme yellow polish, and then the red I left as is.

Pooh Bear Nail Design 
 Pooh Bear Nail Design

Now on to the dripping honey on the ring finger nail. I did this with acrylic paint, it did end up look a little bit thick, but is actually seems okay because it is suppose to be honey and honey is thick. Take a large dotting tool with yellow paint on it and make three or more dots at all different levels on your nail. Then with a liner brush make a glob of honey near the cuticle and make dripping lines that connect to the dots.

Pooh Bear Nail Design     Pooh Bear Nail Design

After you have finished your dripping honey nail, on to the hard part writing the word Pooh on the index nail, this will be for his shirt. I do have trouble my self writing word on the nail, you just have to slowly write out the word having your hand placed on the table. I did end up not giving my self enough space on the nail and I ended up have to smashing the letters together, so I suggest first make the P and then at the other end make the H and then the O's in the middle, so kind off backwards from how you would normally write.

Pooh Bear Nail Design    Pooh Bear Nail Design

Once you have your Pooh bear design the way you like apply a top coat to seal in your design and to help it last. 

Growing up and even now which Pooh Bear character was your favorite? Mine was Pooh Bear him self, My mom also likes Pooh as well, as for my hubby he has always liked Tigger. 

Hope all of you enjoyed this Pooh Bear nail design!

See you next time for more nail fun!