Friday, September 30, 2016

Endless Summer! Polish Review

Hello everyone! Today we have some polishes that are perfect for this time of the year, well not really. Once again back in August I placed an order with Live Love Polish. I ordered three summer colors that I wanted to show all of you. I know it is now considered fall, but why should their be rules on what colors you can wear for a season, why not wear a bright yellow in the middle of fall or winter. Anyways I did still want to share all of these pretty polishes from my favorite season, summer time before it go to much into fall.  

Picture Polish Salt Water and Summer, and Glitter Daze Let's have a Waikiki. 
Endless Summer! Polishes from Live Love Polish; Picture Polish Salt Water and Summer, and Glitter Daze Let's have a Waikiki.

Picture Polish Salt Water by Nailstorming  
 
 Picture Polish Salt Water by Nailstorming 

First we will start off with Picture Polishes Salt Water, this is a light blue/ pastel turquoise scattered holographic as described on the Live Love Polish website. This polish was opaque for me in three thin coats, I have read that most people where able to get this opaque in two. This color was a little bit streaky for me, but that was not to big of a deal. I did really like this color, it is very pretty and look great in the sun.

This polish reminds me of the ocean water and that was the one of the reason why I decided to purchase this polish. If you have been following this blog for a while you know I love anything that reminds me of the ocean or Hawaii.

Picture polish does a lot of collaborations with bloggers and YouTube's. This polish was a collaboration with Gianna from Nailstorming  she is a Instagram nail artist that also did have a YouTube channel but I guess she decided not to do her channel anymore, which make me sad I really enjoyed her video's. She does still have her Instagram account though. 

I do remember that Nailstorming really liked light blues and turquoise color's just like this one. She had also described this color as the sun shinning on the ocean. 

picture polish-salt water  is available on Live Love Polishes website for $15.00.

This polish has been very popular and might still be, so if you want this polish you may need to be on the look out for it if it is sold out, currently it is still available.

Picture Polish Summer 
Picture Polish Summer

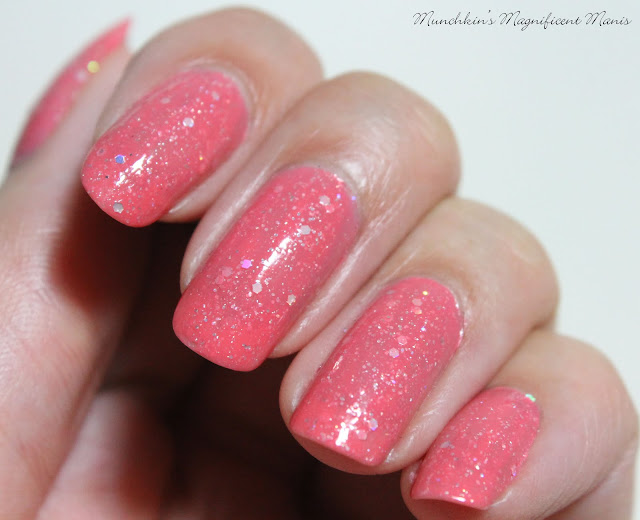
Next we have another polish from Picture Polish Summer, this is a coral polish with holographic hexes, micro glitter, and scattered holographic. This polish on my nails kind of looks like a rose pink and this color would be good for spring or summer. This polish was opaque for me in two coats, the formula was good and went on smooth. I also really liked this polish as well, it was beautiful and also look great in the sun.

 picture polish-summer is available on Live Love Polish website for $15.00

 Picture Polish Salt Water by Nailstorming
 Love the rubber caps on the Picture Polish polishes

Picture polish is an indie brand that is made in Australia, and as stated above they do a lot of collaborations polishes and polishes on their own. This is the first time I have tried Picture Polish and I really like the polishes, the formula is pretty good, and the polishes are very pretty.    

I also really like the caps for the brushes on the Picture Polish polishes, they are rubber which can make it much easier to open. If you polish your nails a lot, which I am sure you do if you are reading this blog, then you know the struggles of trying to open bottles of nail polish. This and some of Zoya's polishes are the only brands that I can think that have rubber caps. Any other brand if I have trouble opening them I just put a rubber band around the cap, to have a grip to help open the bottles.   

Glitter Daze Let's have a Waikiki 
 Glitter Daze Let's have a Waikiki
 Glitter Daze Let's have a Waikiki

Last but certainly not least is Glitter Daze Let's have a Waikiki this is a pink polish with pink and purple glitter flakies, with holographic and silver micro glitter, as described by Live Love Polish. This polish was opaque in two coats, this polish is loaded with glitter which can make it hard to remove, but for me it was not to hard. This was another polish that I really like, it looked amazing in the sun and is just a beautiful polish.

If you can tell form the name Let's have a Waikiki, I kind of purchased this because of the name and the polish, also it looks so shinny and pretty as well! Waikiki is a city on Oahu, Hawaii and this was the city that we stayed on when my hubby and I got married, along with the first time as a family vacation. This was not a Hawaii collection from Glitter Daze, just a   tropical collection.      
     
glitter daze-lets have a waikiki is available on Live Love Polish website for $12.00.

Glitter Daze polish box  
 Glitter Daze boxes that the polishes come in.

I also wanted to show all of you the cute box that the Glitter Daze polishes come in. I just like this small added touch, and that on the side of the box it says made with love and when you open the box it says have a nice daze!

Glitter Daze is another indie brand that is made in the USA.

This is the third time that I have ordered from Live Love Polish and once again I am impressed with all of the polishes that I ordered, they always have very unique polishes that I really enjoy. As for the polishes I ordered they where all pretty and had good formula and of course gotta love all the holo! 

Here is the website if you would like to order some polishes:

Hope all of you enjoyed this summer polish review. Even though it is actually fall, their is nothing wrong with wearing bright summer colors year round, if you love summer as much as I do. 

See you next time for more nail fun!

Friday, September 23, 2016

Roar- Leopard Print and Gradient Design

Hello everyone! Today we will be creating a kind of simple design, leopard print and a gradient. Their really was no reason that I wanted to make this design, other then just for fun (really that's every design) and I was just kind of thinking of a design that future clients of mine might ask for, I know that not everyone would like my cartoon style of nail art, so I decided to create something simple that maybe everyone of any age would like. 

Leopard Print and Gradient design 
    Roar! Leopard Print and Gradient design 

Here are the polishes and tools used in this leopard and gradient design:


Base and top coat - CND Stickey Base Coat and Revlon Extra Life No Chip top coat.

Nail polishes- Finger paints- Tiffany imposter, Sally Hansen- xtreme wear-Celeb city, OPI- Hello Kitty- My Pal Joey, and Sally Hansen- Hard as Nails- Black Heart.

Optional polishes- these polishes I used on my right had with no gradient. Picture Polish- Salt Water- Nailstorming, and Pretty& Polished- Sea Spray.

Nail art tools- Large dotting tool and a fan brush.

Other- A glass jar with nail polish remover in it to clean of your brushes, a sandwich bag for the gradient to help to blend your polishes, for easier clean up you can put tape around your fingers, or a liquid latex if you have any.    

* This time I didn't use any acrylic paint, just nail polish! (Wow!)

Let's stat this leopard print design, Roar!

 
I decided to put this back into the post,even though I am still not doing the step by step with pictures, but just explaining each step. 

Start off with a thin layer of base coat to protect your nails and to help your polish to last. I used my fave base coat CND Stickey Base.

Leopard Print and Gradient design 
Leopard and gradient design

After your base coat has dried apply a light sky blue to your index, middle, and pinky nail. For this you really only need 1 coat because of the gradient we will be making, but I ended up putting two coats. Then on the thumb and ring finger nail apply a silver polish.

On the nails that we will be doing a gradient, it is best that you put a top coat on first. I learn the hard way on this because if you don't apply a top coat first and let that dry, and you go to do the gradient it will not blend well at all and just smudge. 

Leopard Print Design:
As we let the nails that we just top coated dry, we will create the leopard print on the thumb and pinky nail. Take a large dotting tool with some blue polish on it and make random dots all over the nail, (they don't need to be perfect) also make sure to leave some silver showing. 

Once your blue spots have dried, take the smaller end of your dotting tool with black polish on it and around the blue dots make kind of a C shape around the blue dots. Some of the blue dots you can make two C shapes or one it is up to you. Then in the blank areas, add a few more small black spots. Also make sure to still have some of the silver showing.

The nice part about this design is their is no set way of do this design, their are just a lot of random dots made to look like leopard print, and no leopard has the same print, so each nail can look different.

Leopard Print and Gradient design          Leopard and gradient design close up

Light and Dark Blue Gradient:

* If you want to make the clean up around your finger a little easier, you can use tape and tape around your finger or if you have a liquid latex you can use that as well. I used tape because I don't have any liquid latex. 
 
Now your light blue polish that you top coated has dried. We will be doing a gradient a little bit different this time. Usually we create a gradient with a makeup sponge, but today we will be using a fan brush. 

For me using the fan brush help to blend the colors together much better. When I practice this they blended together perfectly, but then when I went to do this on my nails not so much, I probably should have blended the polishes a little more, by brushing over the nails a few more time with the fan brush, but it still tuned out.  

First you will need to take a sandwich bag and paint a generous amount of the darker blue on one side, and then on the other side paint a generous amount of the same light blue that you polishes all over your nails (it is okay if the colors start to over lap a little.) 

Then take your fan brush and glide over the two colors, you can wipe the brush on the sandwich bag to start to per-blend the colors and to make sure you don't have to much polish on the brush.           

Then with the darker blue near the tip, start to brush the fan brush back and fourth to create a gradient effect.   

Leopard Print and soild color
Leopard print on other hand

Want to create an even simpler design? On my right hand I just create the leopard print on the thumb and ring finer nail and the index, middle, and pink finer nail I painted a solid color. 

On the index and pinky nail I used Pretty & Polished- Sea Spray and on the middle finger nail I used on of my new polishes (that I will be reviewing, along with some other polishes very soon) Picture Polish's Salt Water.      

Once your leopard and gradient or just leopard and a solid color, or even all leopard print design has dried apply a top coat to seal in your design, as always I used Revlon Extra Life No Chip top coat. 

With any design you can use whatever color you would like, you could use a tan and a brown for a more realistic look, pink, green, orange, whatever color you would like.

Feeling a little more wild? Last year I create a Tiger print design as well, that you can create or even add to this design. Here is the link if you would like to check out this design as well.
Blue Tiger- Tiger print design    

Hope all of you enjoyed this leopard print design!

See you next time for more nail fun!  

Friday, September 16, 2016

Nailed It! Nail Polish Design

Hello everyone! Sorry that it has been a few weeks since I did a post. If you have been following the M.M.M blog then you know that I went back to school to become a nail tech, and that I recently finished and that I have been studying for the practical and theory part of the nail tech certification/ licenses. As of August 30 and 31, I took the practical and theory test and I am now a licensed nail tech! To celebrate, I wanted to create a design with all of you based on nails.

Nail polish design     
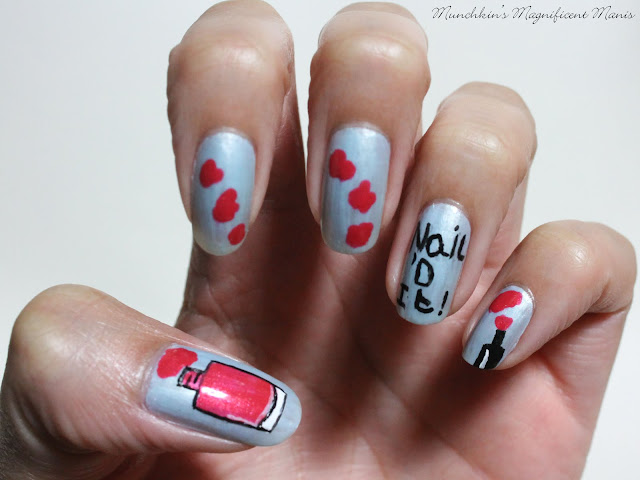
Nail 'D It! Nail polish design.
   
Here are the polishes and tools used for this design:


Base and Top coat- CND Stickey Base Coat and Revlon Extra Life No Chip top coat.

Nail Polishes- NYC- Cashmere Creme and OPI Hawaii- Go with the lava flow.

Acrylic paint- white and black paint.

Nail art tools- medium dotting tool and a thin detail brush.

Other- small jar with water in it to clean off your nail art brushes.


Let's Nail this design!

As always start off with a thin layer of base coat to protect your nails.

Once your base coat has dried, apply a light blue polish to all of your nails and let that dry, I used NYC Cashmere Creme.  

Nail polish design 
 Thumb nail design, nail polish bottle

We will first start off with the thumb nail design, a bottle of polish. Take a thin detailed brush with black paint on it and start to make the shape of a nail polish bottle, by starting at the bottom with a curved line, then making two lines on the sides and then one at the top. Then make a small square at the top of the bottle.

For the clear white part at the bottom of the polish, just paint a white line at the bottom of the bottle, then outline that part with black.

Once your outline has dried take any colored polish you would like and fill in the bottle. When I was practicing this design I used a dark blue, but the color seem to be to dark and when I outline the bottle it seem to get lost, so I ended up using OPI Go with the Lava Flow it ended up looking better.  

After you have filled in the bottle, at the top just paint a blob coming out of the polish bottle, like the polish has spilled. 

Once you have let your polish dry, you may need to re-outline your bottle.
Nail polish design
 Index, middle, and ring finger Nail Polish design

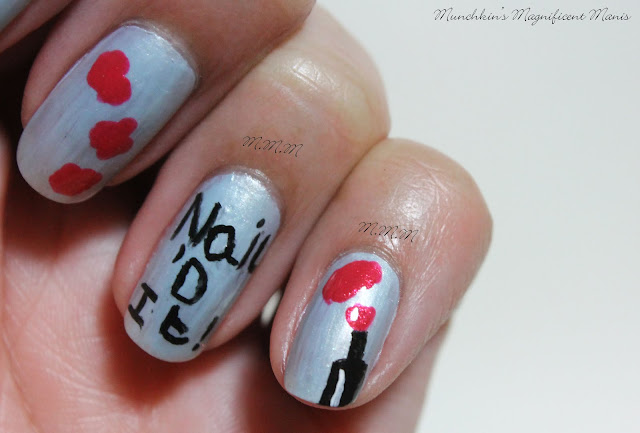
Next we will be doing the simple part of the design that is on the index and middle finger nail, the polish splatter. You can just take the brush in the bottle and just make random blobs or take some polish on a dotting tool and make the blobs that way.  

After you have your polish blobs, we will go on to the ring finger nail where we will paint Nail 'D It! This part is kind of tricky, I did have a little trouble keeping my hand from shaking so that the letters would look smooth. For this one you have to try and keep you hand flat on the table and paint your words.

Nail polish design    Ring finger polish brush design

The last part of this design is the polish brush with polish spilled. Take your thin detail brush with black paint on it and make a small rectangle near the tip of the nail, then a smaller rectangle on top of that. Then with polish make the small bristles of the brush and then once again make a blob of polish above the brush.

Nail polish design     Final Nail Polish Nail Design

Once all of your nails have dried, apply a top coat to protect your design.

Hope all of you enjoyed this Nail 'D It nail polish design!

Some of you may wonder now that I am a professional/ licensed nail tech, what does this mean for the M.M.M blog. I do plan on still continuing this blog for a long time, even when I start work in a salon. I enjoy creating fun and bright nail design with all of you and don't want to stop do that

See you next time for more nail fun!