Showing posts with label Nail art brushes. Show all posts

Saturday, March 21, 2020

Koala Bear Care- Koala Nail Design

Hello everyone! Hope everyone is staying safe and try to stay healthy as well. I know that this year has started off not so well and the past few weeks have been scary, that's why I decided to hop on the blog and post a cute koala bear care nail design for all of you, just to kind of get you mind off of what is happening even just for a little bit.  

Koala Nail Design 
Koala Nail Design 

Here are the polishes and nail art tools used to create this cute koala nail design: 


Base and top coat- as always, CND Stickey Base Coat and Revlon Extra Life No Chip top coat.

Nail polish- Zoya- Lillian.

Arcylic paint- White, black, green, yellow, and brown. 
Used black and white to make two shades of grey, and used a darker green and yellow to make a lighter green.

Nail art brushes- Thin detail brush and stripping brush.

A small cup of water to clean off your nail art brushes.

Koala Nail Design 
Koala Nail Design

Apply base coat.

Let that dry.

Polish all of your nails with a light blue polish.

Let that dry as well.  

First we will start off with the eucalyptus leaves that going on all four nails. Starting with the index nail and going to the middle and ring finger nail. Make a long branch across those three nails, then make some more smaller branches from the larger one. 

Then with two different greens, a light and a darker green, make some very small leaves coming from those smaller branches and some on the larger branch as well.

 Koala Nail Design
 Eucalyptus leaves

For the pink finger nail we will make four branches from all four coroners of the nail. On each corner make a long branch and then two shorter ones. Then make some leaves on each branch. 

Koala Nail Design 
Koala Nail Design

Lastly on to the Koala on the thumb nail. First make sure you have a lest two shades of grey, a light and darker grey. Then make a large circle for your koala's head, then two ears (use the lighter grey.) Then make his body, then with a darker shade of grey make two arms and two legs. 

With that same darker grey take your stripper brush and make your koala's ears look fuzzy, by making small lines very close to each other to make his ears fuzzy looking. 

Now on to the koala's face, make two oval for his eyes and a side ways oval for his nose and then two curved lines for his smile. 

For some for details, we will add some branches and leaves. Make a long thick line between your koala's arms and legs, then a thin line that is coming from his ear. Then add two leaves in his paws and then two more near the bottom the branch near the cuticle. Also add some leaves near his ear as well. 

Koala Nail Design 
Koala Nail Design

Once you have your koala bear nail design the way you like apply a top coat to seal in your design and to help it to last.


 Practice Koala Nail Design


Hope all of you enjoined this koala design and take care of yourselves.

See you next time for more nail fun!

Thursday, February 20, 2020

Full Moon- Night Sky Nail Design

Hello everyone! Today on the blog I have a night sky/ full moon design for all of you, I created this on my nails a few weeks ago and just now have gotten around to typing up a post, this design is suppose to go along with the Starry Night Sky design that I all ready created back in January. 
 
 Full Moon- Night Sky Nail Design
 Full Moon- Night Sky Nail Design

Here are the polishes and nail art tools use to create this night sky nail design:

 
Base and top coat- CND Stickey Base Coat and  Revlon Extra Life No Chip top coat. 

Nail Polishes- Zoya- Twinkling- Jen and Kiss nail art striper- Silver.

Arcylic paint- White and black to make grey. 

Nail art brushes- thin detail brush.

Other- Q- tips for clouds. 

 Full Moon- Night Sky Nail Design  
 Full Moon- Night Sky Nail Design
 Full Moon- Night Sky Nail Design

 Apply your base coat, let that dry.

Polish all of your nails with a shimmery blue (I used Zoya Jen.)

Let that dry as well.

 Full Moon- Night Sky Nail Design
 Full Moon- Night Sky Nail Design
  Full Moon- Night Sky Nail Design

For the nail art first we will be creating clouds with a Q- tip/ cotton swab, this helps to make the clouds look fluffy. Take your Q- tip and dip it into just a little watered down white paint, then dab it on to the nail to make it look like clouds, do this on random parts of the nail (I tried to focus the clouds near the tip, sides and cuticles), and make sure to leave some blue showing for the night sky. 

For the stars take your sliver stripping polish, and just dab some dots on the nail for some smaller stars. Then add a few larger dots as well for some big stars, on the larger dots add two lines to add more detail. For the larger stars I just add a few on the nails, one on the middle finger nail and three on the thumb nail.

  Full Moon- Night Sky Nail Design
  Full Moon- Night Sky Nail Design
 Full Moon- Night Sky Nail Design

 Full Moon- Night Sky Nail Design
 Full Moon- Night Sky Nail Design
 Full Moon- Night Sky Nail Design

Lastly we will make the moon in the sky on the ring finger. First take your detail brush with white paint on it, make a circle kind of near the cuticle. Then take some grey paint and make a few lines on the moon a kind of blend them in with the white so they show up a little bit. 

 Full Moon- Night Sky Nail Design  
 Full Moon- Night Sky Nail Design
 Full Moon- Night Sky Nail Design

Once your night sky is finished apply a top coat to seal in your design and to help it last. 

Also if you liked this design don't forget to check out  Starry Night Sky design as well. 

Hope all of you enjoined this full moon/ night sky nail design!

See you next time for more nail fun!

Thursday, January 16, 2020

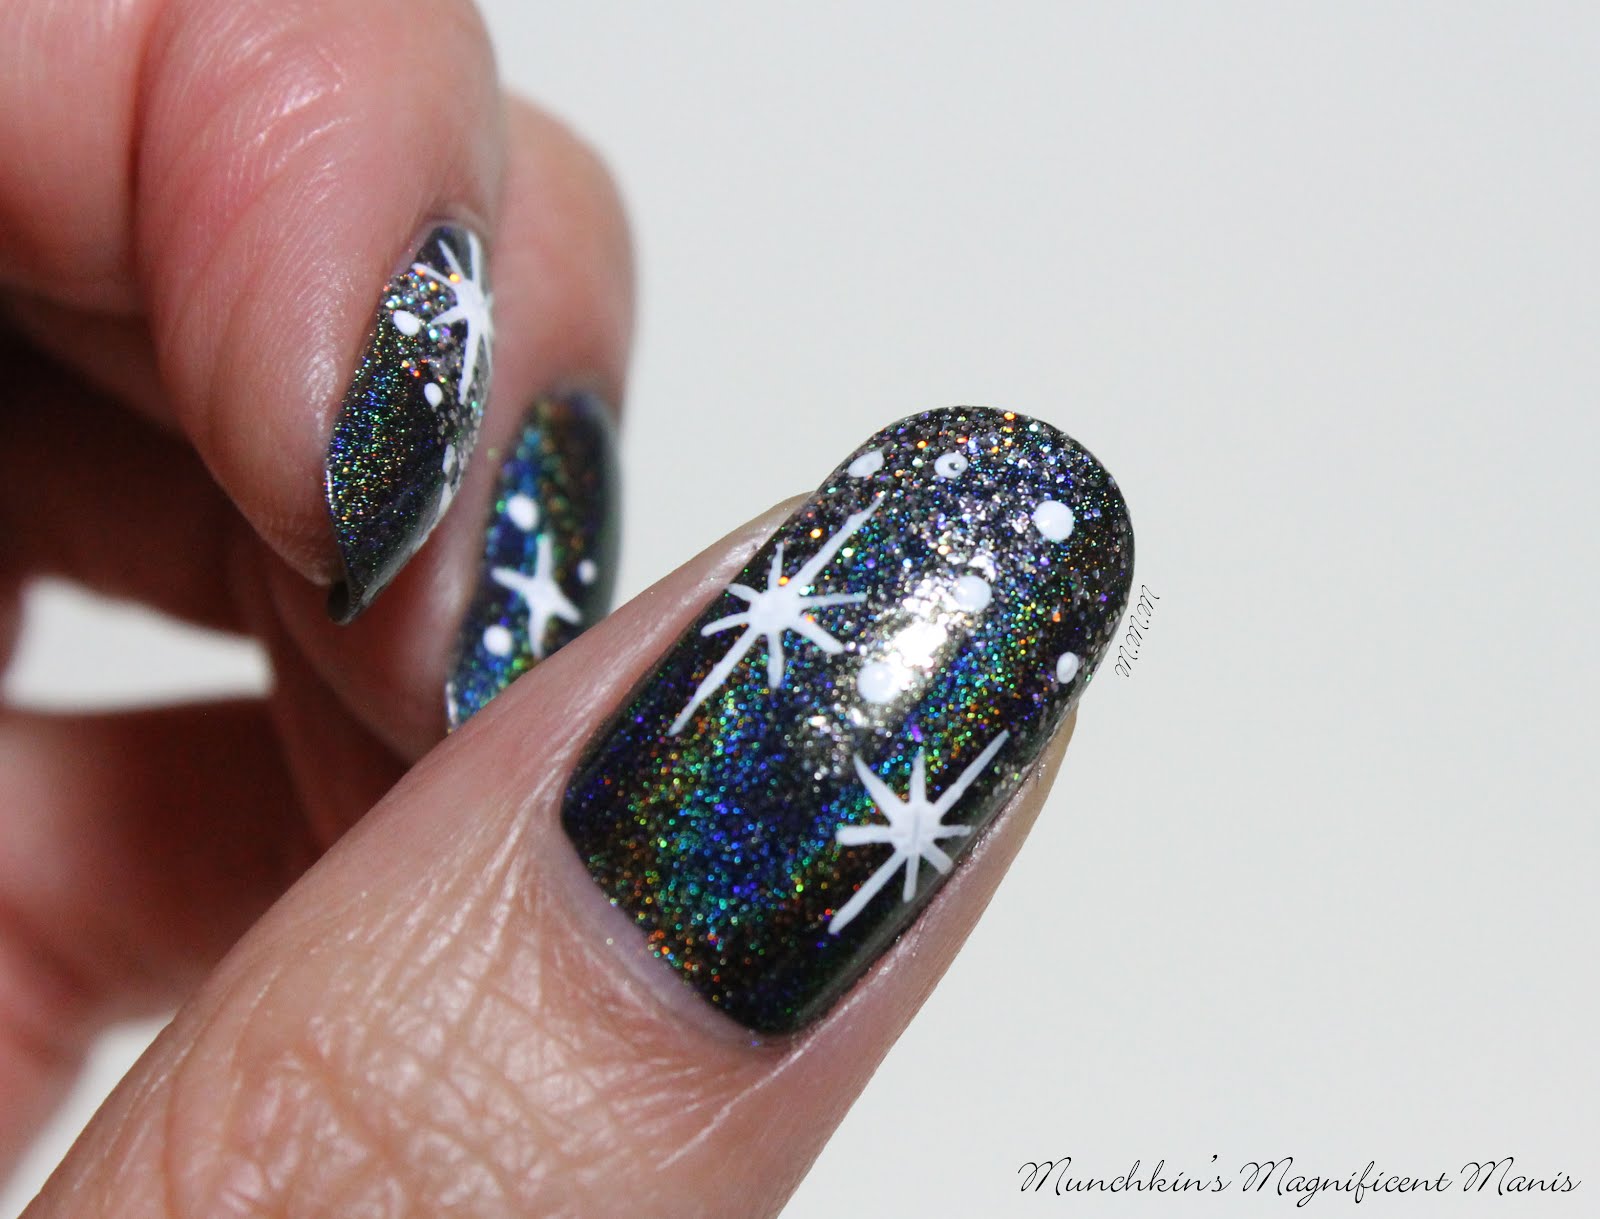
Starry Night Sky- Star Nail Design

Hello everyone! Hope everyone is having a good new year so far! Today we will be creating a starry night sky inspired nail design, just because. Sometimes I don't really have a reason to do a design, I just decide sometimes that when I look for inspiration that would be cool to do, and today it the day that that happened.

Star Nail Design
Star Nail Design 

Here are the polishes and tool used to crate this starry night nail design:  


Top and base coat- CND Stickey Base Coat and Revlon Extra Life No Chip top coat.

Polishes- Color Club- Black Magic- holo, Color Club- Mini- Silver Glitter, Cover Girl- Boundless color- Disco dazzle (very old polish). 

Other option for base color- Zoya Dream.

Arcylic paint- white.

Nail art tools- thin stripper brush, small and medium dotting tools.

Cup of water to clean off you nail art brushes. 

Star Nail Design  
Star Nail Design
 Star Nail Design 

Apply base coat, let dry.

Polish all of your nail with a black holographic polish, or a creme black polish if for some reason you don't have a holo polish. 

Thumb nail- add a silver glitter near the tip of the nail.
Index nail- make a thick line of glitter going across the nail.
Middle finger nail- no glitter. 
Ring and pink nail- add a larger glitter polish near the tips of the nails.

Another option that I will show later on is to use a blue scattered holo polish as your base color.   

Let that dry. 

Star Nail Design
Star Nail Design  
Star Nail Design 

For this star nail design it is very similar to making snowflakes, just less lines depending on what kind of snowflakes you make.


For making the stars on all the nails-
Just take a dotting tool with white paint on it and place a dot on the nail. Then with a thin stripper brush with white paint on it as well make four or two long lines from the circle. (depending on how you want to make your stars)


On the index nail we will make a large star and a actual star shape, then make different size dots with a dotting tool.

On the middle finger nail, make three stars that only have two lines, and then place random dots around your big stars. Also focus this near the tip of the nail. 

Star Nail Design  
 Star Nail Design
 Star Nail Design 

On the ring finger nail make three large stars going down the nail, kind of near the tip of the nail, once again add random small dots with a dotting tool. Also on these stars make the line in the center longer then the other lines. 

On the pinky finger nail make one large star and a few dots near the large star.

Star Nail Design
Star Nail Design  
Star Nail Design 

Lastly on the thumb nail, make your star just like the one on the ring finger with a longer line down the middle, and only two stars, and then add a few dots near the tip of the nail.

Star Nail Design
Star Nail Design
 Star Nail Design 

Once you have your starry night sky looking just right, apply a top coat to seal in your design and to help it to last.

Star Nail Design
Star Nail Design
  Star Nail Design
 Star Nail Design
 Star Nail Design, Blue Polish

Above is another option, using blue polish as your base color and just doing the design on two nails. Lately on my right hand,(If I do nail art on that hand) I have just been doing a design on two nails. 

 Practice version of My Star Nail Design 

I originally was going to polish all of my nails with Zoya's Dream (as you can see from the practice version), but then when I showed my hubby, he said maybe I should use a black polish for the sky because this look to similar to a design that I have done before. So that is why I went with Color Club's Black Magic.   

Hope all of you enjoyed this starry night sky nail design! 

See you next time for more nail fun! 

Tuesday, November 26, 2019

Pie Time- Thanksgiving Nail Design

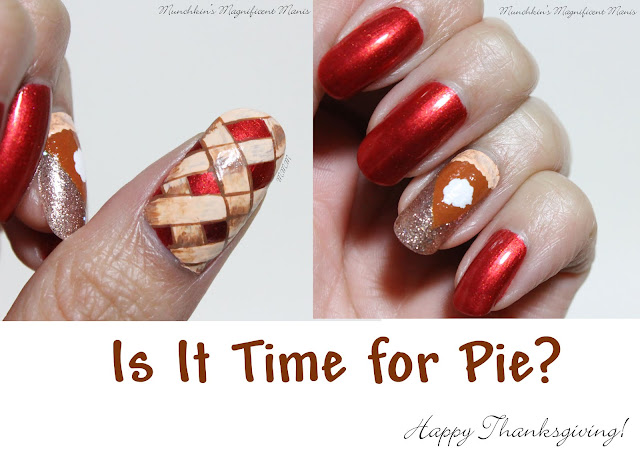
Hello everyone! Happy almost Thanksgiving! What is your favorite food to eat during Thanksgiving? My favorite food is ham and mac and cheese, as for desert I love pumpkin pie that is loaded with lots and lots of whip cream! So today on the blog we will be celebrating Thanksgiving with a fun pie design, cherry and pumpkin pie. 

  Thanksgiving Pie Nail Design Thanksgiving Pie Nail Design 


Here are the polishes and tools used for this yummy pie design: 


Top an base coat- CND Stickey Base Coat and Revlon Extra Life No Chip top coat.

Polishes- OPI Lisbon- Now Museum Now You Don't and China Glaze mini- Sesame Street- 50 Shimmering Years.

Acrylic paint- Brown, peach, red, yellow (to make orange) and white.

Nail art brushes- thin detail brush and a thin stripper brush. 

A small cup of water to clean off your nail art brushes.

Thanksgiving Pie Nail Design  
Thanksgiving Pie Nail Design 

Apply base coat.

Polishes-  

Thumb, index, middle, and pinky finger nails. A reddish orange polish (I used OPI - Now Museum Now You Don't.) 
Ring finger nail, a rose gold glitter polish (I used China Glaze- 50 Shimmering Years.)

Thanksgiving Pie Nail Design  
 Thanksgiving Pie Nail Design 

Pumpkin Pie Design on the Ring Finger Nail- 

Mix a red,orange and brown paint together to make your pumpkin pie color. Then make a triangle shape near the cuticle, fill that in with the paint you just mixed. You will need to go over this a few times to be opaque. 

Then to make the crust take a peach colored paint on a thin detail brush and dab the paint near the cuticle making a crust looking shape.

Now to add the whip cream, which I would add way more then what I did in this design on my actual pie, but for the purpose of this design I just put a little whip cream, so you can tell that this is pumpkin pie. Anyways take a thin detail brush with white paint on it and dab the white in the center of the triangle in a circle shape. 

Thanksgiving Pie Nail Design  
 Thanksgiving Pie Nail Design 

Cherry Pie on the Thumb Nail- 

For the cherry pie design, we will be making a checkered patterned for the crust on the nail. Starting from the tip of the nail make a thick peach strips with your stripping brush, I made four going down the nail. Then staring on the side of the nail, make three more thick strips. 

For added detail you can outline your crust pieces with brown, some pieces can over lap and some can not. Then for even more detail take some brown paint and place that paint on different parts of the crust, then with water smudge that paint to make it kind of blend in.      

Thanksgiving Pie Nail Design  
Thanksgiving Pie Nail Design 
Once you have your pies looking yummy and ready to eat, apply a top coat to seal in your design and to help it last all though out your Thanksgiving day meal, unlike all the food you will be eating that will not last.

Hope all of you have a wonderful Thanksgiving and enjoy all the yummy food!

See you next time for more nail fun!  

Saturday, November 16, 2019

Teddy Bear Nail Design

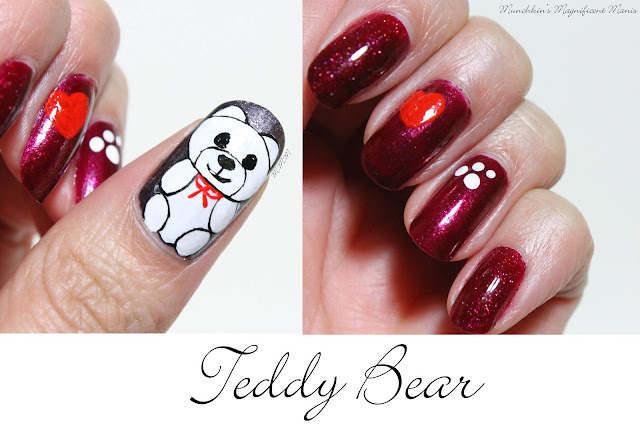
Hello everyone! Today we will be creating a teddy bear nail design, just for fun, this design can be great for any time of year. I did choose some darker more holiday colors for the base colors, but really this design can be done at any time. 
 
Teddy Bear Nail DesignTeddy Bear Nail Design

 Here are the polishes and nail art tools used to create this cute teddy bear design:


Base and top coat - CND Stickey Base Coat and Revlon Extra Life No Chip top coat.

Nail polishes-  Zoya- Urban Grunge- Troy, Zoya- Blaze, and Zoya- Marjorie- Red book Trio.

Acrylic paint- black, white, and red.

Nail art brushes- thin detail brush, a thin stripper brush and a dotting tool.


Teddy Bear Nail Design
 Teddy Bear Nail Design
Teddy Bear Nail Design

Apply base coat

Polish colors-
Thumb nail- a dark grey toned sliver, Zoya Troy.
Index and pinky finger nail- a holographic burgundy color, Zoya Blaze.
Middle and ring finger nail- a shimmery burgundy color, Zoya Marjorie.

For this design I will just go over how to create the bear on the thumb nail. As for the middle finger nail I just put a heart on the upper right hand corner and on the ring finger nail and a paw print also on the upper right hand corner. 

 Teddy Bear Nail Design
  Teddy Bear Nail Design
 Teddy Bear Nail Design

For the teddy bear take a thin detail brush with white paint on it, make a oval shape near the tip of the nail for the bears head and two ears on the top of the head. Then make two ovals on the sides for his arms, another larger oval for his tummy and then two more smaller ovals for his feet. You will need to go over this a few time to be opaque.

Once you have your bears outline done we can make his features. Take a dotting tool with black paint on it, make two dots in the middle of his head for the eyes. Then with a thin detail brush make a small oval shape for the nose, take a thin stripper brush make a small line down the middle of the nose and then a large curved line for the smile. 

For his red bow, take your thin stripper brush with red paint on it make a line on his neck then two loops, then two line from those two loops. 

Now for the hard part outlining your bear, if this step is to hard you can skip this step, I just feel like it makes it look better. If you would like to outline your bear, take a thin stripper brush with black paint on it and starting with the head begin to outline the whole bear. Also don't forget to add the oval shape around his nose and mouth. 

Teddy Bear Nail Design     Teddy Bear Nail Design
Teddy Bear Nail Design

Once you have your teddy bear nail design the way you like apply a top coat to seal in your design and to help it last. 

Here is the practice version of the teddy bear design.

Hope all of you enjoyed this teddy bear nail design!

See you next time for more nail fun!