Showing posts with label Thanksgiving Nail Design. Show all posts

Wednesday, November 24, 2021

What about Thanksgiving?- Thanksgiving Nail Design

Hello everyone! Happy Thanksgiving! Today on the blog we will be creating a design for a holiday that does not get much love, Thanksgiving. I feel like a few years ago or more (time is going so fast!) that first their is Halloween (kind of) then right to Christmas, but what about poor Thanksgiving? So this year to show Thanksgiving some love, I wanted to create a Thanksgiving nail design. I have done one before, but it has been some years, so I thought it was time for an update.

Thanksgiving Nail Design

Here are the polishes and nail art tools used to create this Thanksgiving nail design:

Base coat and Topcoat- CND Stickey Base Coat and Revlon Extra Life No Chip top coat.

Polish- OPI Hawaii- Do you take Lei away, OPI Lisbon- Now Museum Now You Don't, and Wet n wild- Glitter orange.

Acrylic- black, red, green, yellow, white, brown, and peach.

Nail art tools- thin stripper, and detail brush, and a large dotting tool. 

A cup of water to clean off your nail art brushes.

Thanksgiving Nail Design

Apply a base coat.

Let that dry.

Polish- 
Thumb and ring finger nail- a peach/ tan polish (OPI Do you take Lei away)
Index nail- orange glitter (Wet n wild- Glitter orange)
Middle and pinky nail- a brick red/ red-orange (OPI Now Museum Now You Don't)

Let that dry.
Thanksgiving Nail Design

Thanksgiving Nail Design

For this design we will just be doing nail art on the thumb and ring finger nail. The other nails leave them as is with the red and orange.

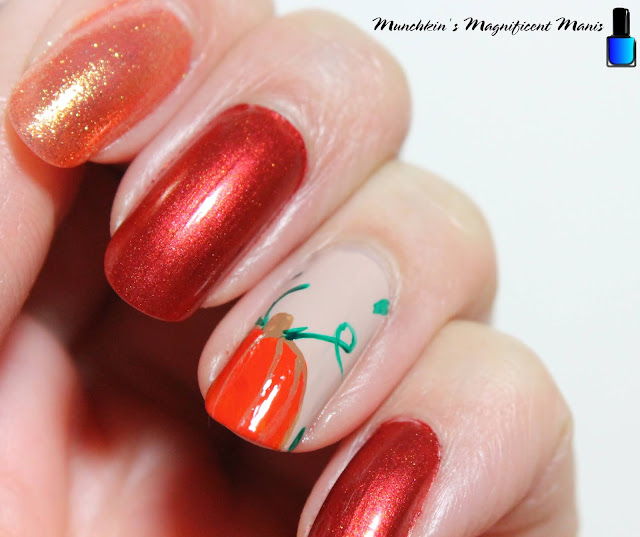
Pumpkin on the ring finger nail: 

Starting with the pumpkin, make an oval shape, with your detail brush dipped in orange paint, near the tip of the nail on the left side, then fill that in a few times with the orange paint. 

On the top of your pumpkin make a small square with brown paint for the steam.

Then with that same brown make some curved lines on your pumpkin.

Lastly take your thin stripper brush with green paint on it, and make some swirl lines for the vines, and a few green leaves on the pumpkin and on the sides of the nail.

Thanksgiving Nail Design

Turkey on the thumb nail:

To finish this design we will make a turkey on the thumb. First take your detail brush with brown paint on it, make a medium size circle in the middle of the nail, then make an oval shape for the body and two longer ovals for the arms. You will need to go over this a few time to be opaque. 

For the turkey's feather's starting at the top of his head make a half oval (the colors I used was red, orange, and yellow.) Do this all the way around the head stopping at the shoulders. 

An optional step is to outline your turkey with a peach paint. 

For his face, we will make his eyes, with a large dotting tool with white paint on it, dot two eyes in the center of the face. Then when that is dry make to small black dots in the large white dots.

Lastly we need to make his beak, take your detail brush with orange on it and make an upside down triangle and then fill that in with the orange. Also add a red curves line on the side of the beak. 
 
Thanksgiving Nail Design

Once your nails are Thanksgiving day ready, apply a top coat to seal in your design and to help it last though all of the yummy food. 

What is your favorite Thanksgiving food? My fav's are pumpkin pie, ham and Mac and cheese made by My Mom In Law. 

Hope all of you have a wonderful Thanksgiving!

See you next time for more nail fun! 

Tuesday, November 26, 2019

Pie Time- Thanksgiving Nail Design

Hello everyone! Happy almost Thanksgiving! What is your favorite food to eat during Thanksgiving? My favorite food is ham and mac and cheese, as for desert I love pumpkin pie that is loaded with lots and lots of whip cream! So today on the blog we will be celebrating Thanksgiving with a fun pie design, cherry and pumpkin pie. 

  Thanksgiving Pie Nail Design Thanksgiving Pie Nail Design 


Here are the polishes and tools used for this yummy pie design: 


Top an base coat- CND Stickey Base Coat and Revlon Extra Life No Chip top coat.

Polishes- OPI Lisbon- Now Museum Now You Don't and China Glaze mini- Sesame Street- 50 Shimmering Years.

Acrylic paint- Brown, peach, red, yellow (to make orange) and white.

Nail art brushes- thin detail brush and a thin stripper brush. 

A small cup of water to clean off your nail art brushes.

Thanksgiving Pie Nail Design  
Thanksgiving Pie Nail Design 

Apply base coat.

Polishes-  

Thumb, index, middle, and pinky finger nails. A reddish orange polish (I used OPI - Now Museum Now You Don't.) 
Ring finger nail, a rose gold glitter polish (I used China Glaze- 50 Shimmering Years.)

Thanksgiving Pie Nail Design  
 Thanksgiving Pie Nail Design 

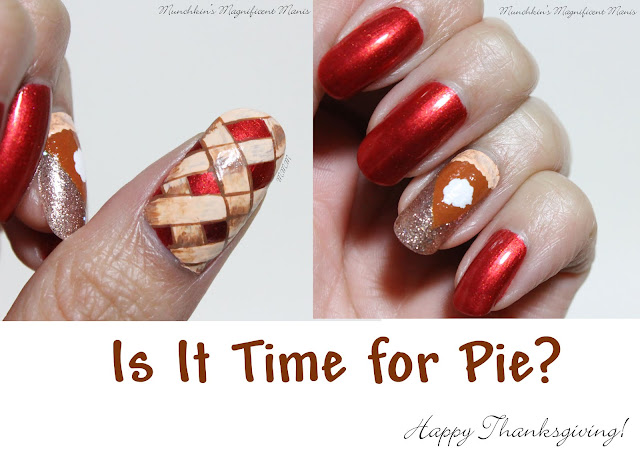
Pumpkin Pie Design on the Ring Finger Nail- 

Mix a red,orange and brown paint together to make your pumpkin pie color. Then make a triangle shape near the cuticle, fill that in with the paint you just mixed. You will need to go over this a few times to be opaque. 

Then to make the crust take a peach colored paint on a thin detail brush and dab the paint near the cuticle making a crust looking shape.

Now to add the whip cream, which I would add way more then what I did in this design on my actual pie, but for the purpose of this design I just put a little whip cream, so you can tell that this is pumpkin pie. Anyways take a thin detail brush with white paint on it and dab the white in the center of the triangle in a circle shape. 

Thanksgiving Pie Nail Design  
 Thanksgiving Pie Nail Design 

Cherry Pie on the Thumb Nail- 

For the cherry pie design, we will be making a checkered patterned for the crust on the nail. Starting from the tip of the nail make a thick peach strips with your stripping brush, I made four going down the nail. Then staring on the side of the nail, make three more thick strips. 

For added detail you can outline your crust pieces with brown, some pieces can over lap and some can not. Then for even more detail take some brown paint and place that paint on different parts of the crust, then with water smudge that paint to make it kind of blend in.      

Thanksgiving Pie Nail Design  
Thanksgiving Pie Nail Design 
Once you have your pies looking yummy and ready to eat, apply a top coat to seal in your design and to help it last all though out your Thanksgiving day meal, unlike all the food you will be eating that will not last.

Hope all of you have a wonderful Thanksgiving and enjoy all the yummy food!

See you next time for more nail fun!