Friday, June 24, 2016

Tropical Fun in the Sun- One Stroke Flower

Hello everyone! For today we will be getting back into doing nail art, it had been a few weeks since I had done a post and last week I did a review for all of you. Do to my schedule, I do have some time to get back to doing the M.M.M blog, but for the step-by- step tutorials of nail designs, I will be changing up the post to save some time. I hope all of you still enjoy these nail art post.

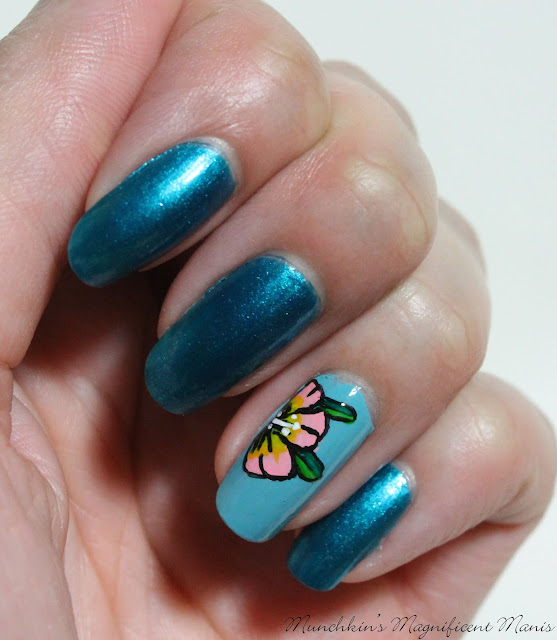
For today we will be creating a one stroke/ double loaded brush tropical flower, as an accent nail on our left hand, and then another more simple flower on the right accent finger nail.
   
One Stroke Tropical Flower Design
 Hibiscus one stroke flower on the ring finger nail, left hand.

Tropical flower deisgn  
Tropical flower on the ring finger, right hand.

The polishes and tools that we will be using to creating this great for summer/ tropical vacation flower design:


Base coat & Top coat- CND Stickey Base Coat and Revlon Extra Life No Chip top coat.

Nail polishes- Zoya- Oceane and Cover Girl- Glosstinis Blue Hawaiian.

Acrylic paint- Red, white, yellow, green, and black.

Nail art brushes- a small to medium flat brush, thin linear brush, and a detail brush.   

For now I will not be doing step by step tutorials of the nail art that we will be creating, but I will still explain how each design is made, along with all the polishes, paints and tools used for each design. 

One Stroke Tropical Flower Design  
 More of a close up of the Hibiscus flower.

First we will start off with the one stroke or the double loaded brush flower. You may wonder why it is called this, well in order to create this flower you need to take to colors on a flat brush, one side a light pink and the other yellow

Then on a flat surface, just swipe the brush to kind of pre-blend the colors together

After that starting near the side of the nail, take your brush a kind of rotate the brush on the side to make a petal, do this two or three more times to make more petals. The petals should go in a circular shape. You also may need to go over the petals two more time to make them opaque enough.

Once you have the petals looking okay, you take a thin nail art brush with black paint and outline the flower, this step really helps the flower to look more like a flower. 

Then you can add your leaves on the sides with two different shades of green, and then just adding in your small details for the flower, like the black lines in the center and the sides, and the white part of the flower.

For creating this flower I found that outlining it was the key to helping it look more like a hibiscus flower.   

 One Stroke Tropical Flower Design
Another example of the Hibiscus flower, this was the practice flower that I did. 

Tropical flower deisgn  
     Close up of the tropical flower on the right hand. 

Next we have another tropical flower that I did on my right hand using my non dominate hand (my left hand). This is another more simple option for creating a tropical flower. 

This flower you take a small nail art brush with a light pink paint, and just swipe the brush up ward to make a more pointed petal. You can do this four times to make four petals, also because this is on the side of the nail, you create the petals in a circular shape.

Then with a slightly darker pink outline the petals to make the flower pop or look more like a flower.

For the smaller details just paint a yellow circle in the center and with that same pink you used to outline the flower, draw some lines going out from that circle, then add some yellow lines as well.

After that just add some green leaves with two shades of green and then you have your flower.

If you would like you can add some more flowers or petals on the sides, if you feel like this nail needed something extra

Tropical flower deisgn         
    An example of the tropical flower, that  practice
  
 Tropical flower deisgn
 Another example of the two tropical flower that I practice

Hope all of you like the way I explained this nail art design even if it was not step by step.

As always hope all of you liked this tropical nail art design of the hibiscus flower and a simple tropical flower.

See you next time for more nail fun! 

Friday, June 17, 2016

Holo Fun! Live Love Polish Hologrphic Review

Hello everyone! Sorry I have been missing in action lately! A few weeks ago in school I just went on the floor/ can work on clients, so my schedule has been busy with going to school five days a week and then working the other two, I had zero free time/ very little. But I decided to take a very big risk, and put in my two weeks at the job I had been at for along time, due to being unhappy (I don't really get into it here). So now I have time to work on my blog again, which I have missed doing! 

Anyways to transition back into to the M.M.M blog, I will be doing a review of some polishes that I bought way back in April from the company Live Love Polish, this is my second time buying anything from this company and I was very happy both time!

Live Love Polish Review    

As you can tell/ if you have been following the M.M.M blog we love us some Holo polish! After all it like a rainbow in each bottle!

Pretty & Polished Sea Spray 

Let's start off with this pretty blue holographic polish from Pretty & Polished.

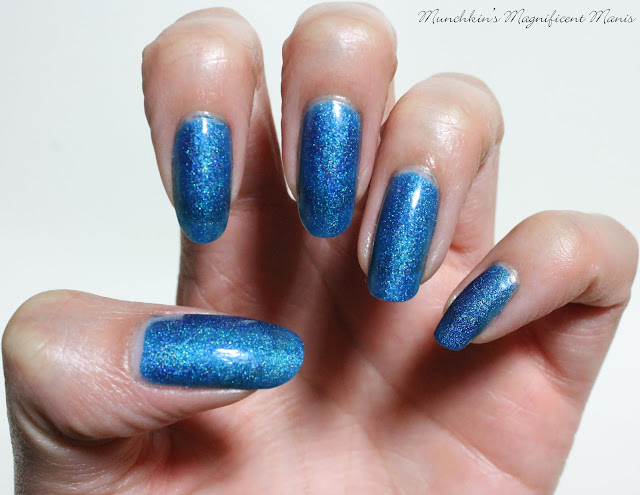
Sea Spray is a scattered holographic royal or sapphire blue. This polish was opaque in two coats and went on very smooth. If you want to you could apply a third coat to make sure that it is not sheer, as you can tell in the photo above it looks a little sheer still, but this may be do to the daytime light bulb that I use to take my photos. This polish is very pretty and the application was really good, which is always a good thing and makes it a polish that I really liked.

Pretty & Polished Sea Spary  $9.50 on Live Love Polishes website 

Color Club Eternal Beauty 
 Color Club Eternal Beauty
 Color Club Eternal Beauty 

Next we have Color Club Eternal Beauty, this is a purple linear holographic polish. I have purchase quite a few Color Club polishes and all of the formulas have been excellent, and this one is no different. This polish went on very smooth in almost one coat, but I always like to put on two coats to make sure it is at full opacity. This was another very beautiful polish that I really liked. 

Unfortunately at this time this polish is sold out on Live Love Polish, but if you are interested keep a look out for it, it will probably go back in stock soon.  

 
Cirque Madder 
Cirque Madder     
 Cirque Madder
The next polish we have is from the brand Cirque. This brand is new for me, before I purchase this polish I had never tried this brand. Cirque is an indie brand polish that hand mixes all of their polishes, and they are based out of New York City. The polish Madder is a beautiful red scattered holographic polish, that is part of the 2015 Cirque Holiday collection. This polish went on very smooth and was opaque in two coats. Once again this was very pretty red holo polish and for my first try of this brand, I would say this polish was great. 

Cirque Madder  $13.00 On Live Love Polish.com


  Fun Lacquer Million Dollar Dream
 Fun Lacquer Million Dollar Dream
Fun Lacquer Million Dollar Dream 

Last but far from lest is the beautiful, amazing, and super shinny Fun Lacquer Million Dollar Dream. This polish was very hard to capture the true beauty of in the photo, but at the end I have a link to Fun Lacquer website, so you can see the true awesomeness that  Million Dollar Dream is! 

Anyways this a gold holographic glitter boom, that on Fun Lacquer website is said to have higher quality glitter that makes it much more brighter/ shinier then other glitter polishes. This polish was a little bit patchy as you can see from the photo above, and it is best to apply one coat with the brush, then take a makeup sponge and dab on the second coat on to have the full glitter pay off. I knew this but forgot to do that for when wore this polish, but I will remember that for next time. 

Just to warn all of you that like this polish, this is a very dense glitter polish,which means it is a pain to get off. So when it is time to take this polish off, it is best to take some cotton balls soaked in pure acetone and then wrapped in foil around your fingers, then let it soak for maybe ten minutes, then pull the foil off. Or you can always take some acetone and scrub the polish off, it will just take a while to come off. 

Fun Lacquer is another new brand to me that I decided to give a try. Fun Lacquer is a artisan indie brand that is made in Singapore. Once again I am very pleased with this brand, at first the only thing that was holding me back from purchasing this polish was the price, Fun Lacquers polishes are $16.00 to $18.00 per bottle! Which is high for one bottle of nail polish, but as always I wait until I can get a discount code, which I got 10% off

Million Dollar Dream is not available on Live Love Polishes website anymore, but here is a link to Fun Lacquers website.


Also here is a link to Live Love Polishes Fun Lacquer polishes on their site http://www.livelovepolish.com/collections/fun-lacquer

All of these polishes I really enjoyed, they are all very beautiful and I would highly recommend any of these polishes. I personally think you can't go wrong with holographic polish, and any holo polish that I have purchased has had really great formals, that go on very smooth and are just amazing. 

For all four of these polishes with free shipping and a 10% discount code I spent $43.65. Which I know it kind of high, but as I always say if they are unique enough, I will pay extra for the polish.

If you missed my first Live Love Polish review make sure to check that out as well.
Live Love Polish Review Time 

Here is a link to Live Love Polishes website:
 http://www.livelovepolish.com/


Hope all of you enjoyed this Holo filled review

See you next time for more nail fun!

I will be back next week with more nail art!!