Showing posts with label Fun Lacquer Million Dollar Dream. Show all posts

Wednesday, May 19, 2021

Purple Flower Nail Design- Purple Bloom

Hello everyone! Happy Spring time! Now that the weather is getting nice it is time for some spring flower nail design. Today we will be creating a purple flower nail design, that is great for spring or even summer time and with all the design I create you can always make the flowers another color it's all up to you. 

Purple Flower Nail Design

Here are the polishes and nail art tools used to create this purple flower nail design:


Base and top coat- CND Stickey Base Coat and Revlon Extra Life No Chip top coat.

Polishes- Zoya Sunshine- Delia, Nails Inc-Dream Dust- Sparkle like a Unicorn duo, Holo Taco- Gold Flakie- Anniversary, and Fun Lacquer- Million Dollar Dream. 

Acrylic paint- Purple, blue and white. 

Nail art brushes- Thin stripper and detail brush, and a medium dotting tool.

Other- a cup of water to clean off your nail art brushes. 

Purple Flower Nail Design

Apply base coats and let that dry. 

Polish-

Thumb, middle, and pinky- Light purple (Zoya Sunshine- Delia)

index and ring- Shimmer pinky/ purple (Nails Inc-Dream Dust)

Let that dry. 

Purple Flower Nail Design

First we need to mix out paint for our flowers, you will need three shades; medium (which we already have),dark and light. Take your medium colored purple as your base color, then mix white for a lighter purple and then take blue for a darker purple.  

For this design I decided to put flowers on all or the nails, you can always just do this design on a few nails or which ever you choose.

Purple Flower Nail Design

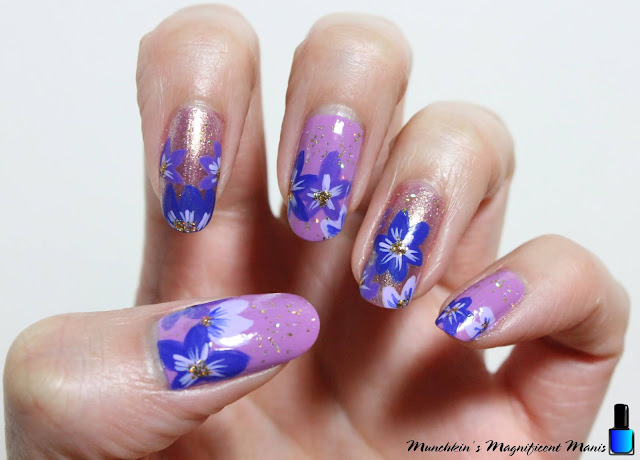
For your flowers (example: the middle finger nail) for the first flower in the middle of the nail, take a thin detail brush and make a thick petal shape at the top and then two on each sides, and then lastly two more under that one. That is the basic outline for the flowers that I made and some are just half a flower or just a few petals. 

Purple Flower Nail Design

Then for more detail take a thin stripper brush with the opposite color of the flower and make thin lines in the center of your flower. 

The for your last detail, the gold in the center of the flower. Take a dotting tool with gold glitter polish (Fun Lacquer- Million Dollar Dream) and make a few small dots in the center of your flower.

Lastly for a final touch I decided to add a little bit of gold flakie polish to the background using a little bit of Holo Taco- Gold Flakie. 
Purple Flower Nail Design

Once you have your purple flower nail design just right and ready for spring, apply a top coat to help your design to last and make them nice and shinny. 

Hope all of you enjoyed this purple flower nail design!


Also here is my practice version that I created as well, thought it was worth sharing! 


Also if you have been following/ reading this blog for a while now you may have notice that the M.M.M logo has changed. I recently decided that I wanted to redesign the logo, I just felt like it was time to create a new one. If you don't know I do have a degree in design along with being a licensed nail technician.   

See you next time for more nail fun!

Friday, January 1, 2021

Good Riddance 2020- Happy New Year 2021 Nail Design

Hello everyone! Happy New Year 2021! As well all know this past year has been a horrible year for everyone in more ways then one, and we all are hoping for a better year, the bar is low but will are still hoping. Honestly I feel like this past year has brought out the worst in people (not all but a lot) with the hording of the toilet paper, hand soap, sanitizer, clean products, mask, and gloves, this was completely not necessary and wrong in so many ways! Anyways sorry for that rant, on the blog today's nails we will be doing something very similar last year, I really wanted to do something a lot like last year with the Holo Taco polishes, so I did. 😁   

New Years Glitter GradientNew Years Glitter Gradient 

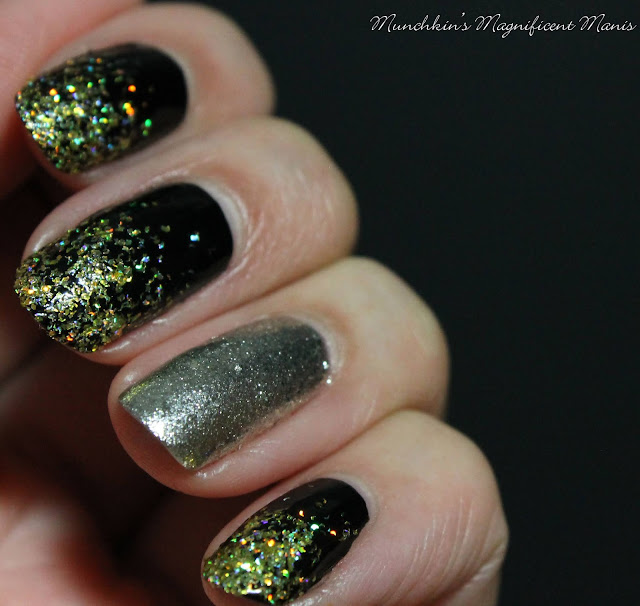
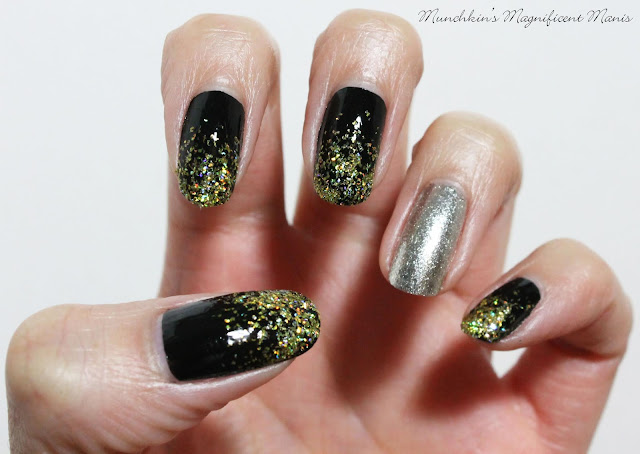
So as you can see if you have been following this blog for a while, I decided to do basically the same thing I did last year, black nails with gold glitter gradient, and gold as an accent nail. This year I slightly changed it with my left hand having a silver nail. I just love dong this kind of design for new years, it just seems timeless and great for ever year.   

Here are the polishes that I used for this years design:  

 
Base polish- Black cream polish, Sally Hansen- Hard as Nails- Black Heart.
 
Glitter gradient-  Holo Taco- Gold Flakie- Anniversary
 
Accent nail/ ring finger nail- Silver for the right hand, Holo Taco- Gift Receipt- Metallic Foil Collection, and gold for the right hand , Zoya Ziv, over top Fun Lacquer- Million Dollar Dream.   
New Years Glitter Gradient
New Years Glitter Gradient- Gold 

New Years Glitter Gradient
New Years Glitter Gradient- Silver 
 
Hope all of you enjoined this new year design and have a safe a happy new year! Also here's hoping that we have better year all around.

 
See you next time for more nail fun! 

Monday, December 30, 2019

Bye 2019, Hello 2020- New Years Glitter Gradient Nail Design

Hello everyone! Happy almost New Year 2020! I can't believe that I am saying that! Time has just been going so fast, it just seem like it was just the beginning of 2019 not to long ago. I do say that 2019 was not to bad, in the middle of the year I got a new full time job that I have been at now for three months and I do still like, and along with get that new job it helped me to be able to get a new car that I unfortunately needed (yes I got the same car a VW Beetle, just a newer version, I had a 2005 Beetle for 14 years and I loved that car.) Anyways today we will be creating a basic glitter gradient nail design that is great for new years.   

New Years Glitter Gradient Nail Design 
Happy New Year's Nail Design 

All you need for this simple glitter gradient nail design:

  
Base and top coat- CND Stickey Base Coat and Revlon Extra Life No Chip top coat.

Polishes- Sally Hansen- Hard as Nails- Black Heart, Fun Lacquer- Million Dollar Dream and Revlon- Gold Coin (your base color under the glitter.)

Other- a makeup sponge for your glitter gradient. 

New Years Glitter Gradient Nail Design 
 Happy New Year's Nail Design 

Apply Base coat, let that dry.

Polish nails-

Thumb, index, middle, and pinky nail- a black creme polish.

Ring finger nail- a gold polish (Revlon- Gold Coin) and a gold holographic glitter polish, the same one that you will use for the gradient on all the other nails (Fun Lacquer- Million Dollar Dream.)

Let dry.

New Years Glitter Gradient Nail Design
 New Years Glitter Gradient Nail Design
 Happy New Year's Nail Design 

For the gradient on the tip of the nails, first just polish a light coat of your gold holo glitter polish, starting from the tip of the nails and just slightly going up the nail. 

Then take your makeup sponge and polish that same glitter on the sponge, this soaks up most of the clear base making more of the glitter stick to the nail. 

Then dab the sponge mainly at the tip of the nail, making sure that their is not that much glitter going up the nail, that is starts to almost fade.  

Also I did go over a few spots with the brush that may have needed just a little more glitter.

New Years Glitter Gradient Nail Design
 Happy New Year's Nail Design 

That's all you need to create this beautiful glitter gradient nail design, that with the gold holo glitter and black are perfect for New Years, or any time of the year all you have to do is just change up the colors that you use.

Once your nails are new years ready, apply a top coat to seal in your design and to help it last through all of your parties and midnight or just saying at home to watch the ball drop, (that is what my hubby and I will be doing and eating pizza.)

Hope all of you enjoyed this black and gold holo glitter gradient nail design.

Have a safe and Happy New Year 2020!  

See you next year for more nail fun!  

Thursday, March 14, 2019

Lucky Day- St. Patrick's Day Nail Desig

Hello everyone! Happy St Patrick's Day! First off I want to say sorry for not posting for a while (since Valentine's Day) I have just been feeling tried from work and I have been a little busy. Anyways today we will be creating a rainbow and pot of gold nail design that will start from the thumb nail and go to the ring finger nail. 

St. Patrick's Day Nail Design

Here are the polishes and nail art tools used to create this lucky nail design:


Base and top coat-  CND Stickey Base Coat and  Revlon Extra Life No Chip top coat.

Nail polishes- OPI Hawaii- My Gecko Does Tricks, China glaze mini- Grinch- Grinchworthy, and Fun Lacquer- Million Dollar Dream.  

Acrylic paint- black, red, blue, yellow, and green.

Nail art tools- medium dotting tool, and a thin detail brush. 

A small cup of water to clean off your nail art brushes. 

St. Patrick's Day Nail Design 
 St. Patrick's Day Nail Design

Start by removing any old polish that you might have on your nails. On clean dry nails, apply a thin layer of base coat.  

Let that dry.

Once your base coat has dried polish your thumb, index, middle, and ring finger nail with a shimmery green polish (I used OPI My Gecko Does Tricks), then for your pinky finger nail polish that with a glittery green polish (I used China Glaze- Grinchworthy).

Let that dry as well.


St. Patrick's Day Nail Design
  St. Patrick's Day Nail Design St. Patrick's Day Nail Design

Once your polish has dried we will first be creating the rainbow that will go across most of the nails on the index, middle, and ring finger nail, the rainbow we also will be on the thumb nail as well. For the pinky nail I decided to leave it as is with just  green glitter polish, but you can always make the rainbow go on to the pinky nail as well. 

Rainbow Design:

Starting off with the index nail, take your thin detail brush with blue paint on it and make a curved line near the cuticle staring on the side of the nail.

On the middle finger nail, take that same blue and make a arch near the cuticle.

Then on the ring finger nail, once again with that same blue, make another curved line that will end at the other side of the nail.

Repeat this step for each color; red, green, and yellow. When you are done it should look like a rainbow that is stretched from all three of your nails, along with the thumb later on. 

St. Patrick's Day Nail Design 
 St. Patrick's Day Nail Design

Rainbow and the Pot of Gold: 

Lastly is the lucky part of this nail design, the pot of gold at the end of the rainbow.

First we will make the pot of gold at the end of the rainbow. Take a thin detail brush with black paint on it, near the middle of the nail and off to the side make a thick line that is curved on each corner, this is for the top of the pot. Then make a circle that is attached to the line you just made for the top of the pot. 

Also we need to complete the rainbow that will be coming out of the pot/ the end of the rainbow. For this step once again repeat the steps to make the rainbow, make sure the rainbow is near the cuticle and off the side of the nail. 

For the final touches take a gold glitter polish (I used Fun Lacquer- Million Dollar Dream) I then used a dotting tool to place the glitter, or you can just place the glitter with the polish brush on to the pot of gold. 

I also added a curved line and a small dot on the side of the pot as well, just for that small bit of detail.

St. Patrick's Day Nail Design 
 St. Patrick's Day Nail Design
 St. Patrick's Day Nail Design

Once your St. Patrick's Day design is all done and ready to bring you luck, apply a top coat to seal in your design and help it to last.

Hope all of you enjoyed this St. Patty's Day nails design, and have a safe and Happy St. Patrick's Day if you celebrate this holiday.   

See you next time for more nail fun!

Monday, December 3, 2018

Glittery Fall- Fall Tree Nail Design

Hello everyone! Today we have one more fall nail design, this design I felt like it would be a nice way to transition into winter. I have stated in other blog that I don't care for fall nail designs or fall polish colors, so for this design the leaves will be glittery and not like normal fall designs. As all of my nail designs I get inspiration from Pinterest and make it my own, I saw a glitter fall nail design like this one and thought that was a cool way of doing a fall design without the boring colors, like browns and neutrals.  

Fall Tree Nail Design 
Fall Tree Nail Design

Here are the polishes and nail art tools used to make this glittery fall nail design:   


Base and top coat- CND Stickey Base Coat and Revlon Extra Life No Chip top coat.

Polishes- Julep- Hazel- Boho glam, Revlon- Gold Coin, Fun Lacquer- Million Dollar Dream, Color Club- Mini- Silver Glitter, Color Club- Mini- Green glitter, and Cover Girl- Boundless color- Disco dazzle. 

Nail art tools- thin detail brush and a thin stripper brush.

Small glass jar with acetone in it to clean off nail art brushes.

Fall Tree Nail Design   Fall Tree Nail Design    Fall Tree Nail Design

Start off with a thin layer of base coat to protect your nails and to help your design to last, then let that dry.

Then polish all of you nails with a shimmery purple polish, once again let that dry.

Fall Tree Nail Design 
Fall Tree Nail Design

Now on to the design, for this design you can put the trees on all of your nails or just a few of the nails, for the photos above I put the tree design on all of the nails. 

First we will start off with the tree trunk, take a thin stripper brush with gold polish on it and make two curved lines on each side of the nail to make the shape of the tree trunk, then in the middle of those lines start to make some random lines going different directions for the branches, also on the tree trunk make sure to fill that in with gold polish as well.   

Once you have finished that part take a few different glitter polishes (I used a gold, sliver and green) and kind of blob them on to the nail on the tree branches. I used a nail art brush to blob the leaves on, you can also just use the brush that is in the bottle.

Fall Tree Nail Design 
 Fall Tree Nail Design, on the thumb

Fall Tree Nail Design  
Fall Tree Nail Design

Then once you have your fall glittery trees the way you like apply a top coat to seal in your nail design and to help it to last. 

Fall Tree Nail Design 
Fall Tree Nail Design

Want an even simpler design? You can just put the tree designs on a few nails, on my other hand I only did the design on my thumb and ring finger and then the other nails I used a purple holographic glitter from Zoya called Finley. 

Hope all of you enjoyed this very simple fall to winter nail design and I hope all of you enjoyed the fall and have a nice winter and try to stay warm as well, unless you are luck and live a warm place.

See you next time for more nail fun!   

Friday, June 1, 2018

Million Dollar Holo- Fun Lacquer Polishes

Hello everyone! Today we will once again be going over the two Fun Lacquer polishes, Million Dollar Dream and How Deep is Your Holo, that I bought a while ago that where very glittery and I was just having a hard time trying to get them to look good and not so thick on the nails. Well today I gave them another try and this time I felt like it turned out much better. 

 Fun Lacquer Polishes- How Deep is Your Holo? and Million Dollar Dream
Fun Lacquer Polishes- How Deep is Your Holo? and Million Dollar Dream   


Fun Lacquer- How Deep is Your Holo? 
When I first ordered these polishes from Live Love Polish I applied these like it says on the website along with what YouTuber Simply Nailogical. They said to first polish on a thin layer, then take a makeup sponged and sponge on the secound layer and then polish on another thin layer, then finally apply a top coat. (as show on the left in the photo above.) 

I did this and as you can see from the photo above it looks and felt thick. This may have also been a user error on my part. I cut a small piece of sponge and dabbed it that way, when maybe it would have go on better if I had used the full sponge.  

Fun Lacquer- How Deep is Your Holo? 
 Fun Lacquer- How Deep is Your Holo?

So this time around I first applied two coats of a base colored polish, Zoya's Estelle that matched the Fun Lacquer polish, then I just polished two coats of How Deep is Your Holo and I feel like it turned out much better, it looked and felt smoother.

Fun Lacquer- Million Dollar Dream 
I also gave Fun Lacquer Million Dollar Dream another try again as well, this one was my third time try this polish out. This polish also looks so amazing, but was a pain in the butt try to take a photo of.

Fun Lacquer- Million Dollar Dream 
Fun Lacquer- Million Dollar Dream

Just like How Deep is your Holo I applied it the same way. I applied one coat of a gold base polish Revlon's Gold Coin and then polished on two coats of Million Dollar Dream. Once again I felt like the looked much better, it was not thick, it looked and felt smooth.   

Fun Lacquer- How Deep is Your Holo?
 Fun Lacquer- How Deep is Your Holo?

Fun Lacquer- Million Dollar Dream 
Fun Lacquer- Million Dollar Dream

I know their was not much to this post, but I really wanted to give these polishes another try and show all of you.

Hope all of you enjoyed this secound or third try of these very shinny, beautiful holographic glitter polsihes!   

See you next time for more nail fun!