Showing posts with label Cover Girl. Show all posts

Monday, December 3, 2018

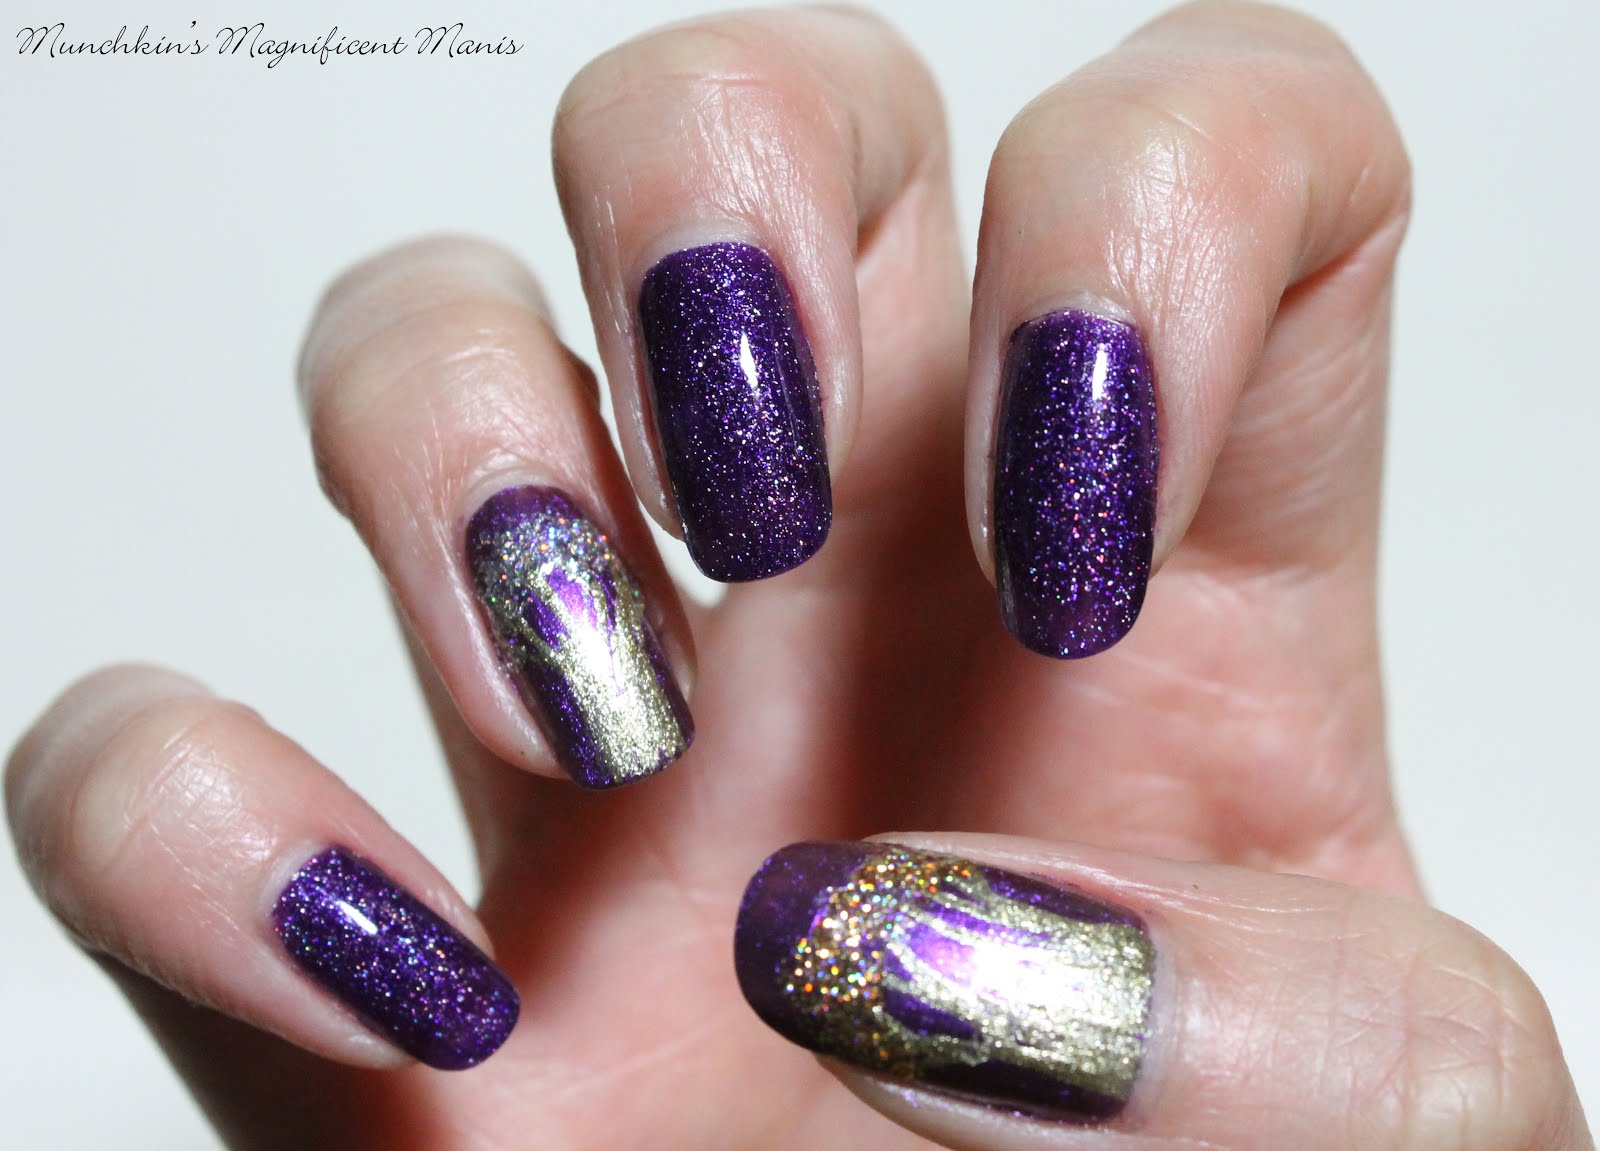
Glittery Fall- Fall Tree Nail Design

Hello everyone! Today we have one more fall nail design, this design I felt like it would be a nice way to transition into winter. I have stated in other blog that I don't care for fall nail designs or fall polish colors, so for this design the leaves will be glittery and not like normal fall designs. As all of my nail designs I get inspiration from Pinterest and make it my own, I saw a glitter fall nail design like this one and thought that was a cool way of doing a fall design without the boring colors, like browns and neutrals.  

Fall Tree Nail Design 
Fall Tree Nail Design

Here are the polishes and nail art tools used to make this glittery fall nail design:   


Base and top coat- CND Stickey Base Coat and Revlon Extra Life No Chip top coat.

Polishes- Julep- Hazel- Boho glam, Revlon- Gold Coin, Fun Lacquer- Million Dollar Dream, Color Club- Mini- Silver Glitter, Color Club- Mini- Green glitter, and Cover Girl- Boundless color- Disco dazzle. 

Nail art tools- thin detail brush and a thin stripper brush.

Small glass jar with acetone in it to clean off nail art brushes.

Fall Tree Nail Design   Fall Tree Nail Design    Fall Tree Nail Design

Start off with a thin layer of base coat to protect your nails and to help your design to last, then let that dry.

Then polish all of you nails with a shimmery purple polish, once again let that dry.

Fall Tree Nail Design 
Fall Tree Nail Design

Now on to the design, for this design you can put the trees on all of your nails or just a few of the nails, for the photos above I put the tree design on all of the nails. 

First we will start off with the tree trunk, take a thin stripper brush with gold polish on it and make two curved lines on each side of the nail to make the shape of the tree trunk, then in the middle of those lines start to make some random lines going different directions for the branches, also on the tree trunk make sure to fill that in with gold polish as well.   

Once you have finished that part take a few different glitter polishes (I used a gold, sliver and green) and kind of blob them on to the nail on the tree branches. I used a nail art brush to blob the leaves on, you can also just use the brush that is in the bottle.

Fall Tree Nail Design 
 Fall Tree Nail Design, on the thumb

Fall Tree Nail Design  
Fall Tree Nail Design

Then once you have your fall glittery trees the way you like apply a top coat to seal in your nail design and to help it to last. 

Fall Tree Nail Design 
Fall Tree Nail Design

Want an even simpler design? You can just put the tree designs on a few nails, on my other hand I only did the design on my thumb and ring finger and then the other nails I used a purple holographic glitter from Zoya called Finley. 

Hope all of you enjoyed this very simple fall to winter nail design and I hope all of you enjoyed the fall and have a nice winter and try to stay warm as well, unless you are luck and live a warm place.

See you next time for more nail fun!   

Friday, December 8, 2017

Galaxy Far Away- Galaxy Nail Design

Hello everyone! Today I kind of wanted to recreate a design that I have done before, but change it up a little,that design is the galaxy design. I have been wanting to recreate this design on it's own for a while now, and I final got a chance to do it. I did a similar design like this one, it was a Star Wars design that had a galaxy design in it. For this design it will just be the galaxy no Star Wars, but if you would like to incorporate that in this design for the new movie you can do as well. 

Galaxy Nail Design
Galaxy Nail Design

Also here is the link to my Star Wars Galaxy design May force be with you- Star Wars Nail Design     

Here is the polishes and nail art tools used for this galaxy design, for this recreation I did use some different and some of the same polishes:


Base and Top coat- CND Stickey Base Coat and Revlon Extra Life No Chip top coat.

Nail Polishes- Sally Hansen- Hard as Nails- Black Heart, Zoya- Urban Grunge- Alicia (used on left hand), OPI Holiday 2017- Ornament to Be Together (used on right hand), Zoya- Dream, Zoya- Urban Grunge- Finley, and Cover Girl- Boundless color- Disco dazzle.    

Acrylic paint- white

Nail art tools- Small dotting tool, very small detail brush, makeup sponge  

Other- small cup or jar with water in it to clean of brushes  

Let's start this out of this world nail design! 

Galaxy Nail Design 
Galaxy Nail Design
Galaxy Nail Design, left hand 

Start off with a thin layer of base coat.

As soon as that is dry on all of your finger except your ring finger nail, polish your nails black, then the ring finger nail, polish that with a holo blue polish. On my right hand I polished the ring finger nail with a purple holo polish.   

Once again let that dry, On our thumb, index, middle, and pinky finger nails we will be creating a galaxy. For this you will need a makeup sponge, I cut my sponge into small pieces for this step.

Take a silver holo polish for my left hand I used Zoya- Alicia and my right hand I used OPI- Ornament to Be Together. (This is optional because in the end you really can't tell the different.) Take one of these silver holo polishes, polish it on the sponge then in any random spots sponge on the polish. For example on the middle finger I sponge the silver in the middle and a little on the tip of my nail on the corner. 

Next take another small piece of sponge polish that with the blue holo polish and sponge that on to one of the sides of the silver. For the purple do the same thing but on the other side of the silver.

For each nail it is best to sponge on the polish in a different spot, that way each nail looks different. 
 Galaxy Nail Design
 
 Galaxy Nail Design, right hand 

Once that has dried, take a glitter polish that has small and big glitter pieces and polish that on all of your galaxy nails. This will represent some stars.

For the final touch we will paint some stars on to the nails. Take your very small brush with white paint on it and make a few random X's on the nails, not to many, at most I did three to four little X's for stars. Then take a very small dotting tool and make some random dots as well, making sure not to make to many.

 Galaxy Nail Design
 Galaxy Nail Design
 Galaxy Nail Design,right hand 

Galaxy Nail Design    Galaxy Nail Design
Galaxy Nail Design, left hand  

Once you have your galaxy design the way you liked, apply a top coat to all of your nails to help protect your nails and make your galaxy nice and shinny.

Hope all of you enjoyed this galaxy nail design!

See you next time for more nail fun!    

Friday, April 28, 2017

Spring Is In The Air- Spring Flower Nail Design

Hello everyone! Hope everyone is enjoying this nice weather! If you live in an area that is just now getting warm, then it feel nice to finally have some nice weather. For today we will be celebrating spring with a spring flower nail design. 

Spring flower nail design 
Spring flower nail design

Here are the polishes and tools used for this spring flower nail design:

 
Base and top coat- CND Stickey Base Coat and Revlon Extra Life No Chip top coat.

Nail polishes- Sally Hansen- Color Therapy- Mauve Mantra, Revlon- Scented parfume- Not so Blueberry, Sinful Color- Purple Diamond, Zoya Mini- Leslie, and Cover Girl- Boundless color- Disco dazzle (this is an older polish, but you should be able to find one just like it.) 

Nail art brushes- two thin liner brush, a thin detail brush. 

Other- a small jar with acetone in it to clean up nail art brushes, a cup of water to also clean up brushes, and a toothpick to pick up the glitter pieces.

Let's start this spring flower nail design!

Spring flower nail design 
Light purple flower on the thumb nail

Start off with a thin layer of base coat to protect your nails. 

Once that has dried polish all of your nails a light pink.

First we will start off with the thumb nail (the design that is on the middle finger nail is similar to this design just a different color.) for each of the flower I first did an outline with white acrylic paint then went back over that with polish. 

For the flower on the thumb (along with the middle finger nail), take a thin detail brush with white paint on it and make one pedal on top then, two on the sides, and two near the bottom, this flower will be near the tip of the nail.

For the second flower this one will go right above the first one,then just repeat the same steps as the first flower.

Once your white paint has dried you can go over that with polish, with a linear brush fill in the flower with a light glitter purple polish. 

One that has tried you can outline the flower pedals with a darker purple polish, this helps to make the pedals stand out, then on each pedal draw one line from the center. 

For an add touch you can take a large glitter polish and place a piece of the glitter, with a toothpick in the center of the flower. I also took that same glitter and polished it near the flowers.

Spring flower nail design     Spring flower nail design

For the nail on the middle finger this flower is similar to the one on the thumb nail, the only different is the color. I used two different shades of purple a glitter purple and a lighter purple, then outline the pedals with white paint. 

Spring flower nail design 
 Spring flower nail design

For the other flowers on the index, ring and pinky finger nail, they are also very similar. They are for the most part just a different color.

Also for the most part the flowers are very similar in shape as well, they are rounded at the top of the petal, except for the flower on the pinky finger nail, that one is more pointed.

Once again all of the flower I started off making the outline with white acrylic paint, the only flowers that is just paint are the flowers on the ring finger nail.  

For the white flowers on the ring finger nail, make sure to add a lot of water to the acrylic paint to make the white watery, it needs to be kind of sheer, then you can build up the white. For the outline make sure this paint is opaque, so it stands out more.

For the index finger nail you can use a darker purple polish to fill in the flower, and just leaving a little bit of white showing around the edges of the flowers.

On the pinky finger nail you can use a light purple to fill in the flower and a darker purple for some lines in the center.

For the green steams and leaves that are coming from flowers/ attach the flowers together. Take a thin liner brush with dark green paint on it and make different random lines, that content all the flower together on that one nail, you can also add some leaves as well.    

For all of the flower you can add a piece of glitter to the center, for a added touch.

Spring flower nail design 
 Spring flower nail design

Hopefully I explained this design clearly. For the most part this design can be simple, you just need to try and have a steady hand. Pretty much all the flowers are the same just different colors.  

Spring flower nail design 
 Spring flower nail design 

As always once your flower nail design has dried apply a top coat to protect your nails and to help them last though spring, or maybe just through the week.

Hope all of you enjoyed this spring flower nail design and the nice weather too!

See you next time for more nail fun!  

Friday, June 24, 2016

Tropical Fun in the Sun- One Stroke Flower

Hello everyone! For today we will be getting back into doing nail art, it had been a few weeks since I had done a post and last week I did a review for all of you. Do to my schedule, I do have some time to get back to doing the M.M.M blog, but for the step-by- step tutorials of nail designs, I will be changing up the post to save some time. I hope all of you still enjoy these nail art post.

For today we will be creating a one stroke/ double loaded brush tropical flower, as an accent nail on our left hand, and then another more simple flower on the right accent finger nail.
   
One Stroke Tropical Flower Design
 Hibiscus one stroke flower on the ring finger nail, left hand.

Tropical flower deisgn  
Tropical flower on the ring finger, right hand.

The polishes and tools that we will be using to creating this great for summer/ tropical vacation flower design:


Base coat & Top coat- CND Stickey Base Coat and Revlon Extra Life No Chip top coat.

Nail polishes- Zoya- Oceane and Cover Girl- Glosstinis Blue Hawaiian.

Acrylic paint- Red, white, yellow, green, and black.

Nail art brushes- a small to medium flat brush, thin linear brush, and a detail brush.   

For now I will not be doing step by step tutorials of the nail art that we will be creating, but I will still explain how each design is made, along with all the polishes, paints and tools used for each design. 

One Stroke Tropical Flower Design  
 More of a close up of the Hibiscus flower.

First we will start off with the one stroke or the double loaded brush flower. You may wonder why it is called this, well in order to create this flower you need to take to colors on a flat brush, one side a light pink and the other yellow

Then on a flat surface, just swipe the brush to kind of pre-blend the colors together

After that starting near the side of the nail, take your brush a kind of rotate the brush on the side to make a petal, do this two or three more times to make more petals. The petals should go in a circular shape. You also may need to go over the petals two more time to make them opaque enough.

Once you have the petals looking okay, you take a thin nail art brush with black paint and outline the flower, this step really helps the flower to look more like a flower. 

Then you can add your leaves on the sides with two different shades of green, and then just adding in your small details for the flower, like the black lines in the center and the sides, and the white part of the flower.

For creating this flower I found that outlining it was the key to helping it look more like a hibiscus flower.   

 One Stroke Tropical Flower Design
Another example of the Hibiscus flower, this was the practice flower that I did. 

Tropical flower deisgn  
     Close up of the tropical flower on the right hand. 

Next we have another tropical flower that I did on my right hand using my non dominate hand (my left hand). This is another more simple option for creating a tropical flower. 

This flower you take a small nail art brush with a light pink paint, and just swipe the brush up ward to make a more pointed petal. You can do this four times to make four petals, also because this is on the side of the nail, you create the petals in a circular shape.

Then with a slightly darker pink outline the petals to make the flower pop or look more like a flower.

For the smaller details just paint a yellow circle in the center and with that same pink you used to outline the flower, draw some lines going out from that circle, then add some yellow lines as well.

After that just add some green leaves with two shades of green and then you have your flower.

If you would like you can add some more flowers or petals on the sides, if you feel like this nail needed something extra

Tropical flower deisgn         
    An example of the tropical flower, that  practice
  
 Tropical flower deisgn
 Another example of the two tropical flower that I practice

Hope all of you like the way I explained this nail art design even if it was not step by step.

As always hope all of you liked this tropical nail art design of the hibiscus flower and a simple tropical flower.

See you next time for more nail fun!