Showing posts with label Sally Hansen Color Therapy. Show all posts

Saturday, April 9, 2022

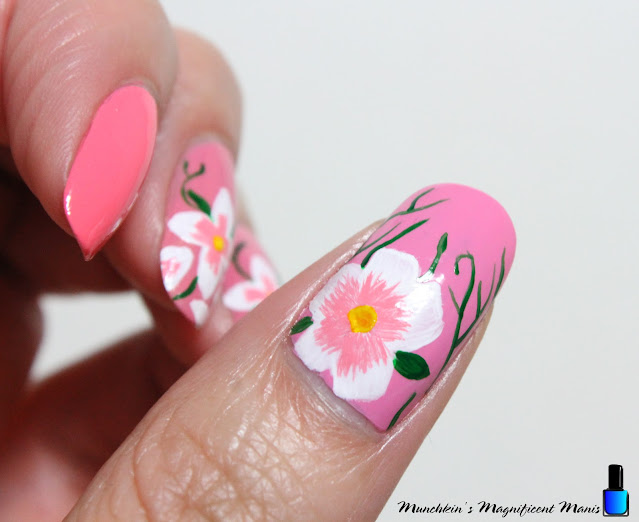
Floral Bloom- White and Pink Flower Nail Design

Hello everyone! Happy spring time! Here in the USA it is now spring time, even though it may not feel like it just yet, at lest where I live. Today we are going to create a spring themed nail design, with white and pink flowers.

White and Pink Flower Nail Design 

Here are the polishes and nail art tools used to create this pink spring nail design:

Base and top coat- CND Stickey Base Coat, and CND Super Shiney Top Coat.

Nail polish- Sally Hansen- Color Therapy- Mauve Mantra, Zoya Sunshine- Minnie, and Zoya Sunshine- Missy.

Acrylic paint- Red, green, yellow, and white. Mix red and white to make pink. 

Nail art tools- Thin detail and stripper brush, and a small flat brush.

Other- Cup of water to clean off your nail art brushes. 

White and Pink Flower Nail Design

Apply base coat.

Let that dry.

Polish- Different shades of pink polish. I pretty much always like to have a mix of different polishes on my nails, you of course can just have one shade of pink polish. 

Thumb- Light pink (Zoya Sunshine- Minnie).

Index and pink finger nail- a slightly brighter light pink (Zoya Sunshine- Missy).

Middle, and ring finger - Light pink with a little bit of pink shimmer ( Sally Hansen- Color Therapy- Mauve Mantra).

Let that dry. 

White and Pink Flower Nail Design

Multiple Flowers on the Middle and Ring Finger Nails-

First we will start off with the smaller flowers on the middle and index nails. For both nails we will make one larger flower near the tip of the nails and a few flower petals around that. The middle finger nail does have a few more petals than the ring finger nail.

For the large flower, take a detail brush with white paint on it starting near the tip of the nail make a petal shape, then two on the sides, and one at the top, you will need to go over this a few times to be opaque. Repeat this step on the other nail.

On the middle finger nail I decided to add a four more petals on the sides, the ring finger nail I just added two petals.

Once the white has dried take a thin stripper brush with pink paint on it (I just mixed red and white to make my pink paint) on the white petals make very close lines on each petal. 

Lastly on the flowers make a small yellow dot on the center. 

As always with any design you can add more larger flowers or more petals, depending on your nail length and size. 

White and Pink Flower Nail Design

For a final touch we will add leaves and vines. Take your thin stripper brush with green paint on it   and make leaves on the sides of the flowers and a few around the nail. Then make some random lines around the flower for the vines. 
White and Pink Flower Nail Design

Large Flower on the Thumb Nail: 

On the thumb nail we will make one large flower. Take a small flat brush with white paint on it, starting from the middle of the nail swipe up to make a petal, then do this again on both sides and then twice under those to petals. You will need to go over this a few times to be opaque. 

Once that is dry, similar to the smaller flower we will make the pink part of the flower. With your thin detail brush make a lot of small lines close together on each petal. 

Lastly for the flower make the yellow circle in the center of the flower. 

For the final touch again, we will make two leaves on the side of the flower and a small one on top, and then more lines for the vines. 

White and Pink Flower Nail Design

Once your nails are spring time ready apply a top coat to seal in your design and to help it to last   though spring or at lest until you want to change your nails. 

Hope all of you have enjoyed this white and pink flower nail design.

See you next time for more nail fun! 

Friday, April 28, 2017

Spring Is In The Air- Spring Flower Nail Design

Hello everyone! Hope everyone is enjoying this nice weather! If you live in an area that is just now getting warm, then it feel nice to finally have some nice weather. For today we will be celebrating spring with a spring flower nail design. 

Spring flower nail design 
Spring flower nail design

Here are the polishes and tools used for this spring flower nail design:

 
Base and top coat- CND Stickey Base Coat and Revlon Extra Life No Chip top coat.

Nail polishes- Sally Hansen- Color Therapy- Mauve Mantra, Revlon- Scented parfume- Not so Blueberry, Sinful Color- Purple Diamond, Zoya Mini- Leslie, and Cover Girl- Boundless color- Disco dazzle (this is an older polish, but you should be able to find one just like it.) 

Nail art brushes- two thin liner brush, a thin detail brush. 

Other- a small jar with acetone in it to clean up nail art brushes, a cup of water to also clean up brushes, and a toothpick to pick up the glitter pieces.

Let's start this spring flower nail design!

Spring flower nail design 
Light purple flower on the thumb nail

Start off with a thin layer of base coat to protect your nails. 

Once that has dried polish all of your nails a light pink.

First we will start off with the thumb nail (the design that is on the middle finger nail is similar to this design just a different color.) for each of the flower I first did an outline with white acrylic paint then went back over that with polish. 

For the flower on the thumb (along with the middle finger nail), take a thin detail brush with white paint on it and make one pedal on top then, two on the sides, and two near the bottom, this flower will be near the tip of the nail.

For the second flower this one will go right above the first one,then just repeat the same steps as the first flower.

Once your white paint has dried you can go over that with polish, with a linear brush fill in the flower with a light glitter purple polish. 

One that has tried you can outline the flower pedals with a darker purple polish, this helps to make the pedals stand out, then on each pedal draw one line from the center. 

For an add touch you can take a large glitter polish and place a piece of the glitter, with a toothpick in the center of the flower. I also took that same glitter and polished it near the flowers.

Spring flower nail design     Spring flower nail design

For the nail on the middle finger this flower is similar to the one on the thumb nail, the only different is the color. I used two different shades of purple a glitter purple and a lighter purple, then outline the pedals with white paint. 

Spring flower nail design 
 Spring flower nail design

For the other flowers on the index, ring and pinky finger nail, they are also very similar. They are for the most part just a different color.

Also for the most part the flowers are very similar in shape as well, they are rounded at the top of the petal, except for the flower on the pinky finger nail, that one is more pointed.

Once again all of the flower I started off making the outline with white acrylic paint, the only flowers that is just paint are the flowers on the ring finger nail.  

For the white flowers on the ring finger nail, make sure to add a lot of water to the acrylic paint to make the white watery, it needs to be kind of sheer, then you can build up the white. For the outline make sure this paint is opaque, so it stands out more.

For the index finger nail you can use a darker purple polish to fill in the flower, and just leaving a little bit of white showing around the edges of the flowers.

On the pinky finger nail you can use a light purple to fill in the flower and a darker purple for some lines in the center.

For the green steams and leaves that are coming from flowers/ attach the flowers together. Take a thin liner brush with dark green paint on it and make different random lines, that content all the flower together on that one nail, you can also add some leaves as well.    

For all of the flower you can add a piece of glitter to the center, for a added touch.

Spring flower nail design 
 Spring flower nail design

Hopefully I explained this design clearly. For the most part this design can be simple, you just need to try and have a steady hand. Pretty much all the flowers are the same just different colors.  

Spring flower nail design 
 Spring flower nail design 

As always once your flower nail design has dried apply a top coat to protect your nails and to help them last though spring, or maybe just through the week.

Hope all of you enjoyed this spring flower nail design and the nice weather too!

See you next time for more nail fun!  

Friday, November 18, 2016

Magnificent Find- New Sally Hansen Color Therapy Polishes

Hello everyone! It has been quite some time since we last had a Magnificent find, I just recently stumbled across some brand new nail polishes that I am super excited to share with all of you. The new polish line is from Sally Hansen called Color Therapy! A lot of nail polish companies have been coming out with polishes that are suppose to help dry and damaged nails, and this is another polish to add to that.
As a nail tech, I see people come into the salon all the time with dry and damaged nails, most likely due to them going to a salon where they don't care what they do to your nails, like using a drill to take off your acrylic nails or even gel polish, over filing the nail, the list goes on and on. If you are a person that gets your nails done, I think that it is always a good idea to know what is being done to your nails and what protects are being put on them as well, It is also a good idea to have a nail tech that know what they are doing and that will not damage your nails. After all if you go to a salon to get your nails done, don't you want them to not only look nice, but also not be damaged and be healthy as well?         
 
Sally Hansen Color Therapy- Mauve Mantra and Rosy Glow. 
Anyways sorry for that long intro. I really wanted to include that in this post, about the importance of knowing what is being done to your nails. Let's get into the post about these Color Therapy polishes.
     
So you may wonder what in the world is so special about these polishes? These are a regular polish that has Argan Oil in the formula, that is suppose to add nourishment and moisture to your nails and help them to look healthy. 

Also you may have thought, if you have oil or any lotions on your nails it makes it hard for the polish to stick? Well not this polish the oils in the polish are put into the formula and then released on to your nail plate once the polish has dried.

The Color Therapy line is a little bit different from your average Sally Hansen polish or polishes in general, with the oil in the polish of course. But this polish does not need a base coat! You may think what no base coat! The reason why you may not need a base coat with these polishes is due to the oil's in the polish, it is meant to make your nails healthy and that makes it so their is no need for a base coat, because a base coat are meant to protect your nails

Sally Hansen Color Therapy- top coat, Mauve Mantra and Rosy Glow.  
 Sally Hansen Color Therapy- top coat, Mauve Mantra and Rosy Glow.

As stated above this polish does not require a base, but their is a special top coat that you can use with this polish, along with a cuticle oil (that I did not purchase, I use CND Solar Oils.

  
 Instructions and brush for the Sally Hansen Color Therapy polishes. 

When it comes to applying this polish you apply it like any other polish, just with no base coat. You polish the color on with however many coats that you will need, then apply the Color Therapy top coat, let it dry and then if you purchased the oil you can apply that to your cuticles as well. I always apply CND Solar oil to my cuticle, once my nails are dry no matter what polish I use. On the Sally Hansen website this polish is said to last up to 10 days with no chipping or fading. 

Also these polishes have a nice wide brush as well (as you can see in the photo above.) 

You may wonder do I really need this special top coat? Probably not, but I thought for this test I would purchase the top coat that is suppose to go with this polish just to see if their was a difference

For a test on my left hand I wore the light pink, Mauve Mantra like you are suppose to, no base coat and with the Color Therapy top coat. Then on my right I used my usual base coat CND Stickey, the hot pink color Rosy Glow, and Revlon Extra Life No Chip top coat. We will see at the end of this post if they wore any different?  

Ok let's get into the two polishes that I purchased from this collection! I only purchase two polishes because I was unsure if I would like them, and I wanted to test them out first before I bought to many.  

Sally Hansen Color Therapy- Mauve Mantra
   
 Sally Hansen Color Therapy- Mauve Mantra

First we will start off with Mauve Mantra, this is a light pink that has some gold shimmer in it. This is normally not a color that I gravitate to, I normally like very bright colors, but this color I really ended up liking, maybe it is the gold shimmer in the polish. This polish was a bit streaky for me when I applied the first and even the second coat, on the third coat it had much better coverage, this may be due the argan oil in the polish. This was the polish that I used the Color Therapy top coat with.         

Sally Hansen Color Therapy- Rosy Glow. 
 Sally Hansen Color Therapy- Rosy Glow.
  Sally Hansen Color Therapy- Rosy Glow

Next we have Rosy Glow, this is a shimmery hot pink polish. This was a polish that I took forever to decide if I wanted it, due to the fact that I was unsure if I had a polish like this in my collection already. (that's when you know you have way to many polishes!) by the way I didn't have this color already. This polish also applied very streaky on the first and second coat, then the third coat it looked much better. This was the polish that I did apply a base coat (CND Stickey) and my usual top coat Revlon Extra Life No Chip top coat. This color I had read in a review can stains the nails, so that's why I wore this one with a base coat. 

Also these polishes have a weird smell to them when applied to the nail, one blog I read said they smell like Granny Smith Apples, I'm not to sure about that? This is probably the argan oil, which I was expecting it to smell a little bit different. I mean don't sit their and smell the bottle of polish, that would not be a good idea, but once you apply the polish it does have a weird smell to it.     

Final thoughts:

I did really like these polishes, I mean they where not super unique but I like the idea behind the formula and helping to keep your nails healthy. As for the formula it self, I didn't like that it was streaky and took three coats to be smooth, but this could just be due to the oil in the polish.   

As for any health/ beautifying the nail, this is hard for me personally to tell because my nails normal are in very good shape, and I am unsure if the argan oil really did anything as well, for the same reason. With any kind of moisturizing with lotions and cuticle oil it will help out your nails, so maybe after time with someone that has damaged or dry nails this may help. 

As for wear, as stated above this is suppose to wear well with no chipping or fading for 10 days. I normal take my polish off Saturday night, then polish my nails Sunday and wear it for that whole week. So far I would say that it is wearing very well, no chips or fading, I have had this polish on for five days so far. Normally polish wears very well on me, and I always do touch ups on the color and top coat. But this polish I have only touched up the top coat. 

So yes I would recommend purchasing these polishes. So far their are 38 polishes in this collection that are very spa orientated (with the names) and even the bottle look very nice and spa like.

These polishes are suppose to be in stores in December, but I found these at Target last week (November), which is supper exciting

I purchased these polishes for $6.99 each even the top coat was $6.99. So for three polishes and top coat I spent around $20 plus tax.
           
Here is a link to Target's website if you would like to purchase some of these polishes.


Also here is a link to Sally Hansen's website for more information.

Hope all of you enjoyed this kind of long blog post!

See you next time for more wild and bright nail fun!