Friday, September 25, 2015

I Heart Oahu! Tropical Design


Hello everyone! As you all know lately I have really been doing a lot of tropical themed nail designs, seeing how I just went to Hawaii in July. Yes, yet again I have another tropical nail design to share with all of you. If you have been following M.M.M blog, then you know that I just recently got married in Hawaii on the island of Oahu, and the island will always hold a special place in my heart because my husband and I got married there. So I thought I would create an Oahu nail design to share with all of you!

Oahu, Hawaii nail design
Diamond Head in Honolulu, Hawaii on the island of Oahu. 


Here are the polishes and tools used for this Oahu nail design:


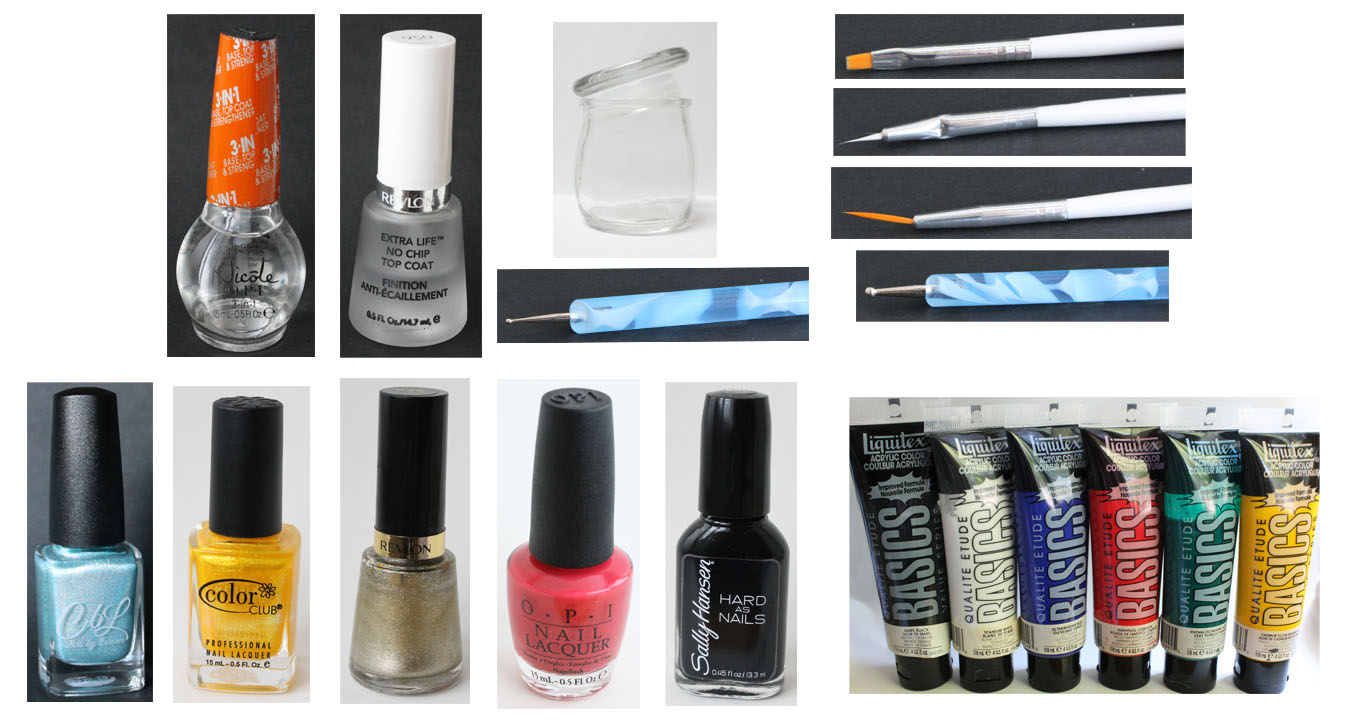
Base and Top coat- Nicole OPI-  3in1- base, top, & strengthener and Revlon Extra Life No Chip top coat.

Nail polishes- Colors by llarowe- Arturo, Color Club- Daisy Does it, Revlon- Gold Coin, OPI Hawaii- Go with the lava flow, and Sally Hansen- Hard as Nails- Black Heart.

Acrylic paint- black, white, blue, red, green, and yellow.

Nail tools- a glass jar with nail polish remover in it for cleaning your nail art brushes, a small and large dotting tool, small flat nail art brush, thin slanted brush, and a longer thin brush.


The skill level for this Oahu nail design is:

 Intermediate to Advanced 

This design can be difficult, due to the small details that are included in creating diamond head and the letter for Oahu and Aloha. The other parts of the design are a little bit easier, depending on your skill level.


Let's start this Oahu design!   

1. Start off with a base coat.

2. After your base coat is dried, apply a holographic polish that has more of a subtle holo. This polish might be part of a review that I will be doing about some new polishes that I just bought, I once again got too excited to wait.

3. We will first start off with a well known land mark on Oahu in the city of Honolulu, that is Diamond head, which is a crater that you can see as soon as you get close to Oahu. Also you can climb up Diamond head and see an amazing view of Honolulu.
On the thumb nail, we will start off with the water. First mix blue and black to make a dark blue, then mix blue and white to make a light blue. Paint a strip at the bottom of your nail for the water, starting from darkest blue to lightest. 

4. Now for Diamond head it's self, take your red, yellow, and blue acrylic paint and mix them together to make a brown. Also add just a little more blue to the color you just made to make a darker brown, this will be for some small details that we will put on Diamond head. As for the shape I really don't know how to explain it, other then to look at the photo above or the photo of the real Diamond head. For the small details we will add small lines to Diamond head. Take your darker brown and make small lines on Diamond head (you can refer to the final photo.)  

5. Next on the ring finger nail we will write Aloha. Aloha has a few means it means hello, goodbye, and love or compassion. As for letters, this can be a little bit tricky but I found that using acrylic paint made is much easier. For this take your thin nail art brush dipped into black paint and carefully write Aloha.

6. Right under Aloha we will make a heart.Take your large dotting tool dipped into a red or pinkish red (I used Go with the Lava flow because this was the color I wore on my nails on my wedding, and it is extra special to me.) and slowly drag the doting tool down. Do this on the other side as well to make a heart.

7. Next we will make a sea shell on the middle finger nail. Take your large dotting tool dipped into a gold polish and drag the dotting tool down, do this a as  many times as you would like to make a shell shape.

8. On the index finger nail we will make a cute pineapple. If you have ever been to Hawaii then you now that the pineapple there is so good, very fresh and juicy. For the pineapple shape take your small flat nail art brush dipped into yellow acrylic paint, fill in the bottom half of your nail and then make it curved at the top. You may need to go over this two or three times to be opaque enough.

9. As we let the pineapple shape dry we will make the leaves at the top. Take your thin nail art brush dipped into green paint and make four leaves at the top of the pineapple.

10. For a little bit more detail in the pineapple we will make intersecting lines. Take a yellow nail polish that is a little bit darker then the paint you used, then take your thin nail art brush dipped in the yellow polish and make three lines going up the pineapple, then two lines going down to make intersecting lines.  

11. To make your pineapple cute, we will make a happy face on the pineapple. Take your large dotting tool dipped into black nail polish (acrylic paint did not work well for this) and dot two eyes. 

12. An optional step for the sea shell is to add more detail is to outline the shell. Take your thin nail art brush dipped into black acrylic paint and carefully outline the shell, I thought this helped to make the shell stand out more.

13. For the last design on the pinky nail we will make a sunshine. Hawaii is know for there sunny warm weather, it does rain on and off there but really for only 10 to 20 minutes at a time, at lest when we were there. To make your sunshine take a shimmery yellow polish and the brush that comes with the polish, and make a curved line and fill in the bottom part of the nail all the way to the tip of the nail. You may need to apply two or three coats to make the yellow opaque enough.

Oahu, Hawaii nail design
 Final Oahu nail design

14. For the final touches, on the pineapple we will add a smile. Take your thin nail art brush dipped into black nail polish and make a curved line for the smile.

For the sun, take the small end of your dotting tool dipped into yellow polish and drag the dotting tool down to the sun shape to make the sun raises. 

Lastly for the thumb nail with Diamond Head, we will write Oahu and just add a green line for the grass. Take your thin nail brush dipped into black paint and slowly write Oahu over Diamond head. Then for the grass just take your thin nail art brush dipped into green paint, and just make a green line under Diamond Head.

After your Oahu design has dried apply a top coat to seal in your design.

Have another favorite Island in Hawaii that is your favorite or special to you? You can always change the thumb nail to fit the island that you love; with a landmark, the Island shape or anything that is special to that island.

Hope all of you enjoyed this Oahu nail design and I am glad that I could share my love for nails and the beautiful island of Oahu with all of you!  

See you next time for more fun and bright nail tutorials!           

Friday, September 18, 2015

Funky Fingers- Polish Review


Hello everyone! Today I have a review of three polishes called Funky Fingers. This brand can be found in the store known as Five Below. I think Five Below stores can only be found in the mid west/east coast, so unfortunately for all of you that live else where you might not have a Five Below to get these polishes, but maybe you can find this brand online.

For a while now I have been a little bit curious about Five Below, then one day I final went in the store. Five Below is a store where everything is five dollars or lower (hence the name.) They have an area where you can purchase beauty products and I saw in that area a lot of nail polish that looked very cool, so I decided to pick up a few.  

Here are the three polishes that I decided to purchase:


Funky Fingers #Boo2U, DIA DE Muertos, and As If
#Boo2U, DIA DE Muertos, and As If

As you can see the bottles, and even the polish it's self, I think looks cool and unique.

Funky Fingers #Boo2U, DIA DE Muertos
For the first polish I applied #Boo2U over a light blue polish. Then DIA DE Muertos I applied two coats on my ring finger as an accent nail.

#Boo2U is a light blue glitter topper that goes well over a light blue. I don't think this could be opaque on it's own.

DIA DE Muertos is a crelly poilsh which is a sheer less opaque polish, that can be layered to cover the nail line, but still sheer enough for glitter to show through. This polish is a sheer light blue with hot pink bar and hex glitters, and small blue hex and square glitters. 

Also by the way #Boo2U and DIA DE Muertos does something cool!

They glow in the dark!
I tried to capture the awesomeness of the glow in the dark polish, 
but it was a little bit difficult. 


Funky Fingers, As If
Next I applied As If over a light purple and pink, along with a holographic polish as an accent nail. The holographic polish is another polish I just recently purchased and was just to excited to wait to use this for the review I will be doing soon. 

As If is a glitter topper with a lot of glitter pieces in it. This polish has star glitters, black hex's, small black circle pieces, hot pink and purple hex glitter both big and small. 

Funky Fingers #Boo2U, DIA DE Muertos, and As If
The two polishes #Boo2U and DIA DE Muertos that glow in the dark, they do not contentiously glow. You first have to be in a bright room or put your nails up to a bight light, then go into a dark room then your nails will glow for a while.

Also DIA DE Muertos reminds me of many indie brand polishes that I have seen online, with the polish be a crelly. A lot of indie brand have crelly polishes and as far as I know their are none in main stream nail polishes. 

As for As If the color combination I choose made my nail look very teenage like, which was not a big deal. The star glitter pieces where the only thing that gave me problems, the points on the starts do not stick well to the nails and snag on things.  
  
My final thoughts on these polishes I really like them. They are unique to me with the polish it's self and the bottle shapes. All three of these polishes wore well like any other polish I have. 

Funky Fingers #Boo2U, DIA DE Muertos, and As If
Funky Finger nail polish are available at Five Below store for $3.00 each or two for $5.00.
For three polish I spent $8.48, which is a great price for three unique polishes.

Hope all of you enjoyed this review of Funky Finger polish!

See you next time for more fun nail tutorials!    

Friday, September 11, 2015

Tropical Passion Flowers

Hello everyone! Sorry for the lack of post for the past few weeks, I was not feeling well last week. Anyways I don't know about everyone else but this summer went way to fast! But as long as the weather is still hot, why not still do a summer/ tropical nail design. For this week we will be creating a Hawaiian flower themed nail design with hibiscus and plumerias. 

Tropcail flower nail design
Tropical Passion Flower (Hibiscus and Plumerias nail design) 
 Yes I am still in a tropical mood, I don't think that will ever stop!


Here are the polishes and tools used for this tropical flower nail design:
Base and top coat- Nicole OPI-  3in1- base, top, & strengthener and Revlon Extra Life No Chip top coat. 

Nail polishes- OPI Hawaii- Go with the lava flow, Cover Girl- glosstinis Blue Hawaiian, and Finger paints- Cubism Crimson.

Acrylic paint- White, yellow, and green.

Nail tools- small thin nail brush, and a very thin detail brush. a glass jar with nail polish remover in it for cleaning nail art brushes. 

*Other supplies- a basic paint brush for mixing paints, a cup of water to clean brush off, and a piece of paper or foil to mix your paint. 


The skill level for this tropical nail design is:  

Beginners

This design is, for the most part, quite simple. Their is basic flower shapes and for blending the acrylic paint you just need to make a shade lighter for the green. 

Let's start this pretty tropical flower nail design! 

This design will be a mix of using nail polish and acrylic paint. 

1. Start off with a base coat.

2. Once your base coat has dried paint all of your nails except your pinky finger, with a light blue. Then paint your pinky nail a pink/ red shimmery color (I used OPI Go with the lava flow.) 


3. Once again wait for your polish to dry, then we will start to make the plumeria. We will make a plumeria on the index and ring finger nail. After the last tropical nail design that I created, I fell in love with using acrylic paint for creating the small designs on the nails, so I once again deiced do use acrylic paint. Take your white acrylic paint and squirt a small amount on to a piece of paper or foil, then dip your thin nail art brush into the paint and make a rounded petal shape at the top and then two on the sides. 

4. Then to finish your plumeria shape make two more petals under the two on the side. Do step 3 and 4 on the ring finger nail as well.


5. For the detail of the plumeria take your small thin nail art brush dipped into yellow acrylic paint and start to make small lines working from the center of the petal and then outward, like the photo above. Do this on each petal.

4. Now for the hibiscus, we will be making a hibiscus on the thumb and middle finger nail. This flower shape is similar to the plumeria. Take your thin nail art brush dipped in a pink/red shimmer color nail polish and make a rounded petal shape at the top and then two on the sides.

5. Just like the plumeria make to more petals under the two on the sides. 

6. For the leafs we will be switching back to using acrylic paint. Take your green and then some yellow and make a lighter green, then dip your thin nail art brush into the green and make a longer line in the middle, then small lines from the sides to make your leaf. Repeat this step for the leaf on the other side. 


7. For more detail in the leafs, take the original darker greed and create the vines in the leafs. 

8. Now for the center yellow part of the hibiscus. Take your yellow acrylic paint and draw a curved line from the center of the flower, and then dot a few small dots at the top of the curved line.     


Tropcail flower nail design
9. For the last detail of the hibiscus take your thin nail art brush dipped in a red polish and make small thin lines from the center of the flower going outward.  

For the pinky finger nail I decided to just leave that nail with just a solid color (Go with the lava flow) I did this so I would have equal number of flowers on each hand. 

Once your tropical nail design has dried, apply a top coat to seal in your design.

For this design you can use all nail polish or use both acrylic paint and nail polish, I now find it much easier to use acrylic paint for the designs/small details. 

Hope all of you enjoyed this tropical design and if you live some where that gets cold in fall and winter, enjoy the warm weather that we are having!

See you next time for more fun and bright nail designs!