Showing posts with label Colors by llarowe. Show all posts

Friday, February 8, 2019

The Polar Bear Vortex- Polar Bear Nail Design

Hello everyone! This past week, at least where I live has been supper cold, in the teens and in the negatives, and even now it is still very cold. So I thought it would be cool to make a cute polar bear nail design to help us all get through this cold weather/ polar vortex.

Polar Bear Nail Design  
Polar Bear Nail Design 

Here are the polish and tools used to create this cute polar bear design:


Base and top coat - CND Stickey Base Coat and Revlon Extra Life No Chip top coat.

Polishes- Colors by llarowe- Arturo and Color Club- Halo's- Crystal Baller.

Acrylic paint- black, white, and red.

Nail art brushes/ tools- medium or large dotting tool, thin detail brush, thin stripper brush, and a very small detail brush. 

A small cup of water to clean off your brushes.

What is the best way that you keep warm in the winter? with a fuzzy blanket, a nice cup of tea, coffee, or hot chocolate? 

Polar Bear Nail Design

Start off with clean nails, with no polish on them, and apply a thin layer of base coat to all of your nails.

Let that dry.

Polish all of your nails with a light blue polish/ a light holographic blue polish. 

Let that dry.

Then on to the nail art, we will first start off with the easy part the snowflakes on the index, middle and pinky finger nail. For the larger snowflakes we will just make a simple star shape, an X with a few lines going through it, on each nail you can do a different amount. After that take a larger dotting tool with a little bit darker holographic polish on it and make random dots around the nail, this is for the smaller snowflakes.

 Polar Bear Nail Design
 Polar Bear Nail Design
Polar Bear Nail Design

Next we will make a the polar bear that is kind of peeking out from the tip of the nail on the ring finger nail. Take a thin detail brush with white paint on it and make a large circle near the tip of the nail, and then two smaller circles at the top of the head for his ears. You will have to go over this a few times to be opaque. Then take a large dotting tool with black paint on it and make two dots for his eyes and then with your detail brush make a small oval shape for his nose right under his eyes.     

Also on this nail I did add some dots above the bear for some snowflakes. 

Polar Bear Nail Design
 Polar Bear Nail Design
Polar Bear Nail Design 

Last by not least is the polar bear him self on the thumb nail. Take a small detail brush with white paint on it and make a circle near the tip of the nail for his head, then make another circle that is attached to his head for his body, fill in both of those. Then make two small arms and two circles for his feet, for the small detail on his paws, just make two lines on each paw and for his feet make a small circle and three little dots above that. 

For his face take your dotting tool with black paint on it, and make two circles for his eyes an then make an oval for his nose, and right under that draw a small line and two curved lines for his smile. For his ears make two half circles with black paint on the white part of his ears. 

To finish your little polar bear, we will add a scarf. Take that same detail brush with red paint on it and make a thick line around his neck and then two lines coming down from that line.
         
Polar Bear Nail Design
 Polar Bear Nail Design 
Polar Bear Nail Design

Once you have your polar bear nail design the way you like apply a top coat to seal in your design to help it last through this cold weather. 


 Polar Bear Nail Design

Here is the practice version of this design as well. 


Hope all of you enjoined this polar bear nail design and try to stay warm if it is cool where you live at.   

See you next time for more nail fun!

Friday, May 11, 2018

Safe In My Shell- Turtle Nail Design

Hello everyone! Sorry that once again I have gone missing for a few weeks, life has just been kind of stressful and allergy season has really been bad for me. Anyways for this week we will be creating a cute turtle nail design, this design is inspired by my favorite online T-shirt company TeeTurtles. They have the cutest mascot, a turtle and I thought it would be cool to create a turtle nail design inspired by their mascot. 

Turtle Nail Design 
Turtle Nail Design (Cute TeeTurtle Plushies)   

Here are the polishes and nail art tools used for the cute turtle nail design:  


Base and Top Coat- CND Stickey Base Coat and Revlon Extra Life No Chip top coat.

Polishes- Colors by llarowe- Arturo, KBShimmer- Peridot- August Birthstone, OPI Hawaii- My Gecko Does Tricks, and Sinful Color- HD Nails.

Acrylic paint- black, green, and yellow.

Nail art brushes- thin detail brush and a stripper brush.

Other- small cup of water to clean off your nail art brushes.

Let start this cute turtle nail design!

Turtle Nail Design  
Turtle shell nail design

As always start off with a thin layer of base to protect your nails and to help your polish to last. As always I used CND Stickey Base Coat, I love this base coat and don't want/ need to try any more base coats.

Let your base coat dry.

Once that has dried, we will polish our base colors, on your thumb,index, ring and pinky finger nail, polish that a light blue (I used Colors by llarowe- Arturo) and for your middle finger nail, polish that with a glittery green polish (I used KBShimmer- Peridot- August Birthstone.) Also for some reason the two KBShimmer birthstone polishes that I purchased a few years ago changed colors, which has never happen to any of my polishes.

Once your polishes has dried on to the fun part, the nail art. On the index and ring finger nail we will be create the turtle's shell. I used two different colored green polishes but you don't have to. On the index nail take a dark green polish (I used Sinful Color- HD Nails) and make a circle shape with the brush that is in the polish. Then if you would like, do the same thing with that same polish or a light green (I used OPI Hawaii- My Gecko Does Tricks) on the ring finger nail.

 Turtle Nail Design
 Turtle shell nail design, left hand 

 Turtle Nail Design
 Turtle shell nail design, right hand

Let the green circles dry and then with black paint outline the circle, then in the middle you can create a diamond shape or a rectangle in the middle of the circle, then make four lines going from each corner of the diamond or rectangle out toward the circle. 

Turtle Nail Design   Turtle on thumb nail 

Last but not least is the cute turtle on the thumb nail. Make a medium size circle in the middle of the nail for his head and fill that in twice to be fully opaque, then make an oval shape for his body fill in his tummy with yellow, them make two arms and two legs, then on his tummy make a checker board pattern. Then lastly make to black dots for his eyes and a curved line for his smile. 

Turtle Nail Design 
      Turtle Nail Design

Once you have your cute turtle nail design the way you like apply a top coat to seal in your design and help it to last. 

Turtle Nail Design 
Turtle Nail Design, right hand design

Also here is the design that I created on my right hand, basically the same design just the turtle shells have rectangle in the middle. 

Hope all of you enjoyed this cute turtle nail design! 

See you next time for more nail fun! 

Friday, April 14, 2017

Hoppy Easter- Easter Nail Design

Hello Everyone! Happy Easter, well almost Easter! Today we will be creating a cute bunny, a chick and some grass with Easter eggs in it. As always the theme will be cute, that's just my style when it comes to nail art and art in general. 

  Easter Nail Design Happy Easter Nail Design

Here are the polish and tools that we will be using for this Easter nail design:

Base and Top Coat - CND Stickey Base Coat and Revlon Extra Life No Chip top coat.

Nail polishes- Colors by llarowe- Arturo, Essie- Coconut Cove, Zoya; Daisy, Eden, Leslie, Lillian, and Rayne. 

Acrylic paint- red,white, black, green, yellow.

Nail art tools- thin liner brush, detail brush, long thin liner brush, and a small detail brush. 
(you really don't need that many brushes, I just ended up using four brushes) and a medium size dotting tool.

Other- cup of water to clean off your brushes and a small glass jar with acetone to clean off the polish on your brushes as well.

Let's hop to it and start this Easter nail design!

Easter Nail Design     Chick in egg nail design

Start off with a thin layer of base coat.

Once your base coat has dried polish all of your nail with a light holographic polish, I used
Colors by llarowe- Arturo. Then polish your thumb with a shimmery or cream yellow polish, I used Zoya Daisy. 

Once your polish has dried we will start to paint the chick in the egg on the thumb nail. Take a thin liner brush with white paint and make a zig- zag line kind of in the middle of the nail, then fill in the top near the tip of the nail with white.

Then repeat that same step near the cuticle area, just make sure their is enough room for your little chick to peak out. 

Now for the eyes and beck, with a dotting tool dot two black dots for his eyes. Then for his beak make a side ways triangle.   

If you would like you can also go over the white shell part with an off white or white polish, that was what I did.

Once the shell is dry for an added touch I just dotted colorful dots on the shell.

Easter Nail Design  
 Grass an Easter eggs on index nail

Now onto the index nail where we will paint grass and Easter eggs. First we will make three different shades of green, the main green that you already have, a light green and a dark green. First take your main green paint and then make a dark green by add a small amount of black, and then a light green by adding a small amount of yellow.

With the main green paint make random blades of grass and then, switch the colors from dark green to light green. 

Once that has dried with white paint on a detail brush make two eggs on the grass. Once that has dried go over the eggs with whatever polish color you would like (a spring color) and then you can add dots or lines onto the eggs. 

Easter Nail Design    Grass and Easter eggs on pinky nail

For the pinky nail repeat the last steps again. 

Easter Nail Design
 Bunny and bunny butt nail design 

Now on to the cute bunny and the bunny butt, which I think turned out super cute! 

First we will start off with the bunny's face on the ring finger. With white paint on a thin liner  brush, make a circle and then fill that in.

Then on top of the head make two ears, you may need to go over the bunny a few times with the white paint to make it fully opaque.

Once that has dried, with a dotting tool and black paint dot to large eyes.

With a thin detail brush with pink paint on it make a upside down triangle for the nose.

Then with a thin liner brush with black paint on it make three lines on each side of his face for whiskers.

Just for an added touch you can add some colorful dots up top of the bunny, for the background.


Next we will make the bunny butt, take a thin detail brush with white paint on it and make a big circle and then fill that in with white paint. 

Then make two oval shapes on the sides of the body for the feet. At the top of the large circle make a small circle for his fluffy. 

For the paws make a large circle and the three small dots under that with pink paint.

For the fluffiness of the tall take a light gray, a dark gray, and a white paint and dab each color into the tall until the tall look fluffy. 

Once you have your bunny butt the way you like you can also outline the bunny with a light gray paint, or if this is a little to tricky you can always skip that part, I just think this step helps to make the bunny stand out more. 

Easter Nail Design  
 Easter Nail Design

Once you have your cute bunny and chick the way you like, apply a top coat to protect you nails and help them to last longer.

 Easter nail design
 Simple Easter Nail Design, on right hand

As usually here is a simple design that I did on my right hand. I just did the grass with eggs and some colorful dots. 

Practice Easter nail design  
 Practice version of Easter Nail Design
Also here is the practice version of the Easter design that I did as well. As always I do still need to practice my nail designs before doing the final design on my nails, practice makes perfect!  

Hope all of you enjoyed this cute Easter nail design and have a Happy Easter as well!

See you next time for more nail fun!  

Friday, May 13, 2016

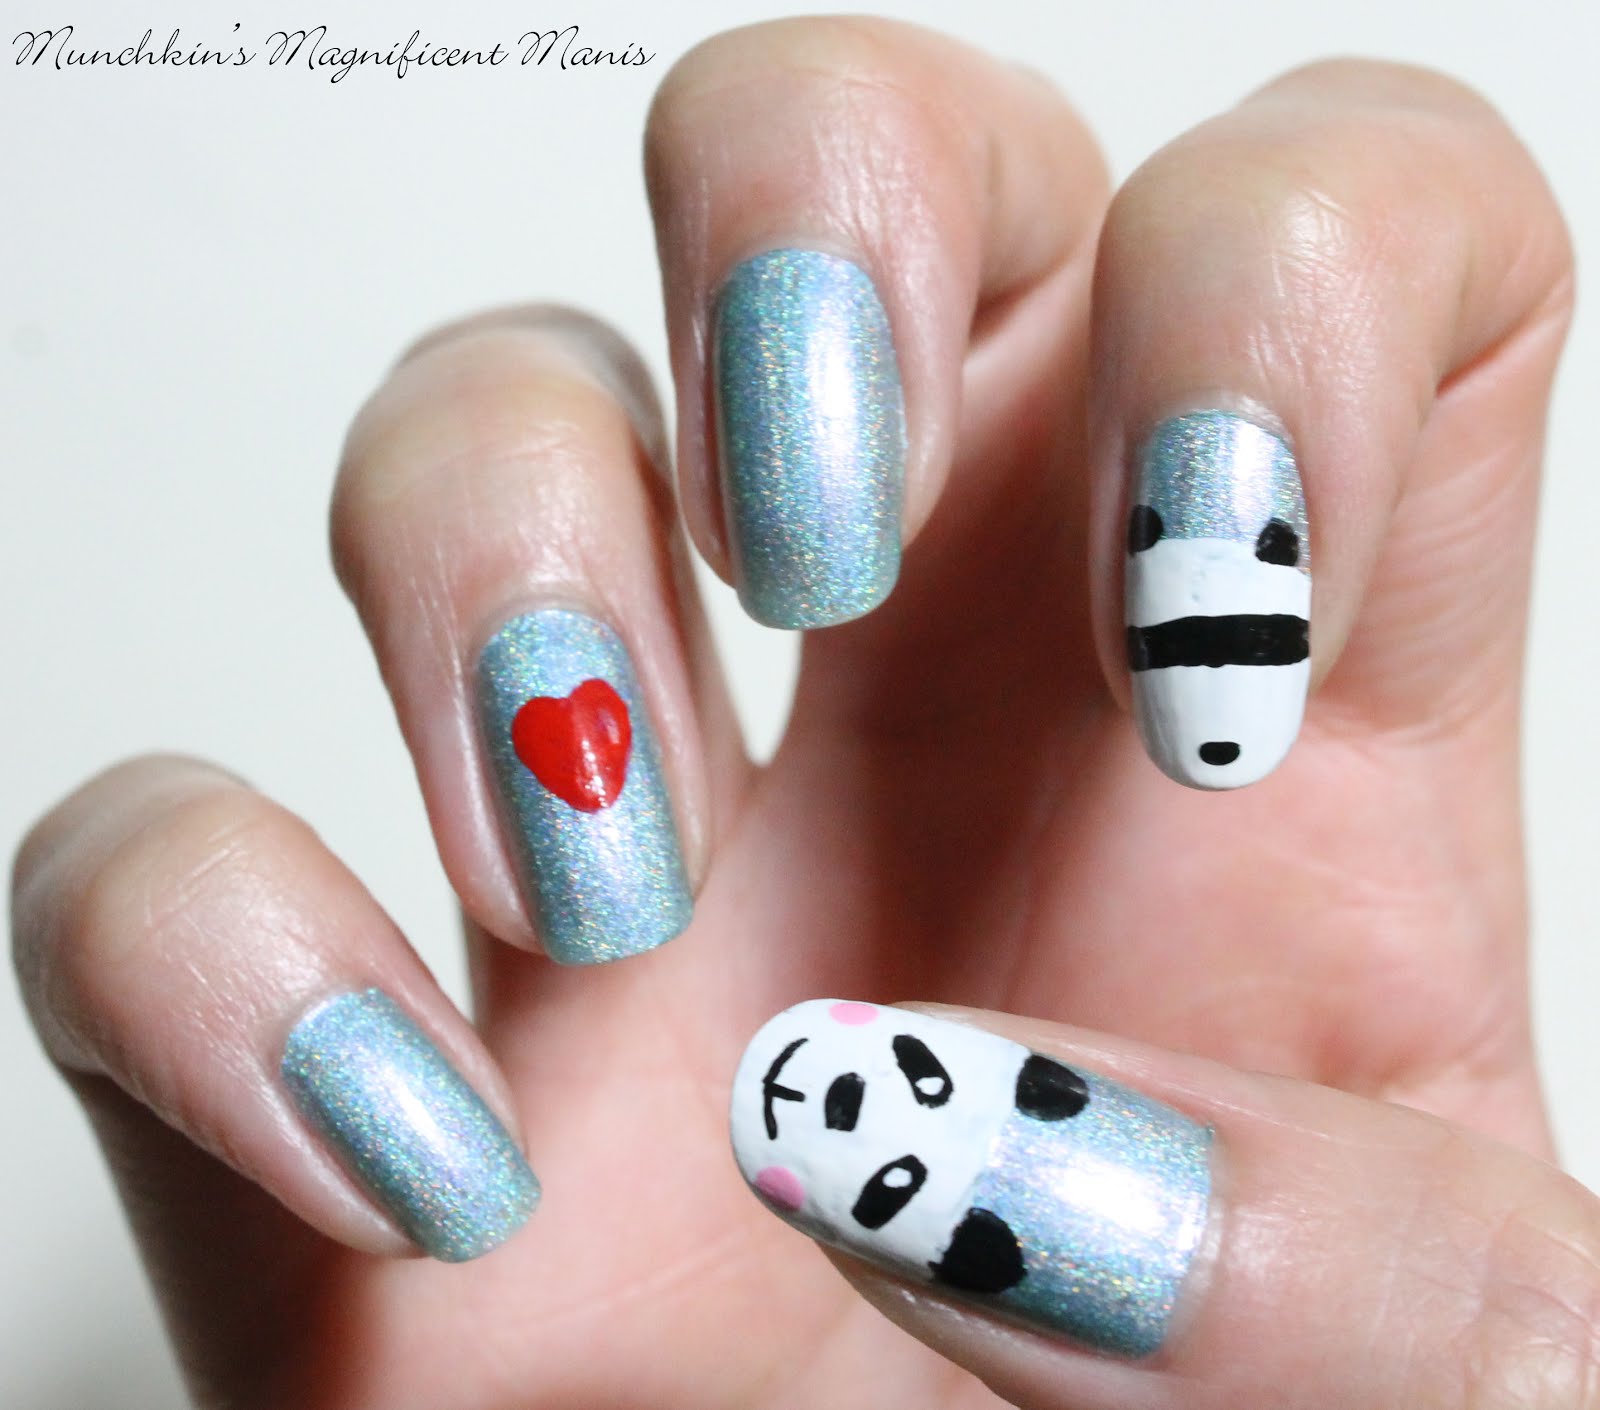
Panda Butt, What What! Panda Bear Design

Hello everyone! Today we have a fun and funny nail design that we will be creating, called panda butt! This design is inspired by Elleandish, or Janelle's panda butt design that she did a while ago, this is just inspired by, as always I try and make the design my own. Anyways I thought this would be a cute and a fun way of putting panda bears on your nails.

Panda Butt Nail design

The nail polish and tools used for this design will be right next to the images as we go.

The skill level for this panda bear nail design is:

  
Beginners to Intermediate 

The panda bear face and the panda bear bottom on the thumb and index finger nail are for the most part simple to create, with just the brush that comes in the polish bottle and simple stokes with a nail art brush. The panda bear on the ring finger can be a little more tricky, due to the small details.

Let's start this cute panda butt nail design:

CND Stickey Base

1. Start off with a thin layer of base coat to protect your nails.

 
 Polished used- Colors by llarowe- Arturo

2. Paint all of your nails with a light blue, I choose a subtle light blue holographic polish.

 
China glaze- white on white

3. We will start off with the Panda Bear face on the thumb nail. Take a white polish and the brush that is in the bottle, just swipe it in the middle of the nail, then fill in the bottom half near the tip of the nail.

 
 Black acrylic paint and a thin liner brush

4. After we have the panda's face we will make his cute little ears. Take your thin liner brush with black paint on it and make to half circles at the top of the head. 


Black acrylic paint and a thin detail brush 

5. Next we will start to make the panda's facial features. Take your thin detail brush with black paint on it, first make a small oval in the middle of the face for the noise, then swipe two lines on each side for the eyes then make them more oval shape, then draw a line under the nose and two curved lines attached to that for his smile.

 
 White acrylic paint and thin detail brush

6. After your panda face has dried, which doesn't take much time at all with the paint. We need to add the white part of his eyes. You can do this with a dotting tool or like me a brush. Take your clean thin detail brush with white paint and make two small dots at the top of the ovals. 

 
China glaze- white on white, black acrylic paint, and thin liner brush

7. Now on to the panda butt on the index nail. The panda body I forgot to take a photo of before hand, This can be done around the same time that you do the panda head, you just take the brush that came in the polish and swipe the brush across the top, then fill the bottom half in, pretty much the same thing as the panda head. After that has dried we will make the ears, with a clean thin detail brush with black paint on it make two half circles on top of the panda's head.

 
black acrylic paint, and thin liner brush

8. Next we will make his cute little tail. You can also make this with a dotting tool or a brush. We will be doing this with a brush, take your clean liner brush with black paint on it and make a small oval near your nail tip.

 
   black acrylic paint, and thin liner brush

9. To finish off your cute panda butt, we will make the black strip or the black part on the panda's back. Once again take your thin liner brush with black paint on it and make two lines in the middle of your nail, then fill that in with black or you can just make one thick black line.  

White acrylic paint and thin liner brush

10. Next we will be make the small panda bear on the ring finger nail, if this is a little bit to hard I have another option at the end that you can try. For the panda bear, take your clean liner brush with white paint on it and make a slightly larger circle, then a smaller one on the bottom of that one. 

 
 Black acrylic paint and a thin detail brush

11. After the white paint has dried we will make his cute paws. Take your clean detail brush with black paint on it and make two ovals at the bottom of his body, then two more ovals for his arms.


12. Now on to his little ears and nose. Once again take your thin detail brush with black paint on it , make two half circles at the top of his head, and then a oval in the middle of his head for his nose. 

Panda Butt Nail design
 Final Panda Bear Nail Design 

13. To finish off your small panda swipe two lines on his head for his eyes. For the little panda I did not put any pupils, I thought it looked cute as it is, along with no mouth. Also for an added touch of cuteness you can add some bamboo for your panda to eat. Just take some green paint on a detail brush and make a small line in the middle of his paws, and two smaller lines from that line.

 
OPI mini- Hawaii- Suzi shops & island hops and a large dotting tool
An optional touch of detail to your panda face, on the thumb nail is to add some pink checks to it. If you choose to do this take a large dotting tool with light pink polish on it, and make two dots on the sides of your panda's face.

Panda Butt Nail design 
 Final Panda Bear Nail Design on the right hand

If you are having trouble making the small panda on the ring finger here is another option, you can make a small heart, with a small liner brush dipped into red paint, make a point then start to make to curved lines to form a heart shape, this can also be done with a dotting tool as well.
As always you want to keep all of your hard work on your nails for a while, so you will need to apply a top coat to protect your nails. I used Revlon Extra Life No Chip top coat.

If you would like to check out Janelle's version (which I got inspiration from) of this design here is a link to her YouTube channel: 
 Janelle- Easy Panda Butt Nails
 
Hope all of you enjoyed this super cute panda butt nail design!
See you next time for more nail fun! 

Friday, October 9, 2015

Holo-rific- Harlow & Co review

Hello everyone! If you have been checking out the M.M.M blog for a while now then you know that we all love bight, vibrant nail polish colors! I just recently went on a website called Harlow and Co. and purchased some really cool holographic polishes that I have been very excited to show all of you. 

Harlow and Co. is a Canada based company that sales international and indie brand nail polishes. I have been interested in indie brand nail polish for a while, due to the brands having more unique polishes. The only thing is indie brand polishes can be expensive. If you don't know what indie brand nail polishes are they are hand mixed nail polishes usually sold by the creator and can be found online. Then their are mainstream brands such as OPI, Zoya, and drugstore brands like Revlon that are made by larger companies and can be found in stores and online. 

Here are the four indie brand nail polishes I purchased, I got all holographic polishes.

Just in case you didn't know, their are two types of holographic polish: linear and scattered. Linear has a strong rainbow effect that creates a strong holographic, the way I can tell if it's linear is when you move your nail in the light you will see a rainbow circle in your nails. As for scattered, this holographic has larger particles and is less dense, and the rainbow is less intense.     

KBShimmer, Cupcake Polish, and Colors by Llarowe
From Top left to right KBShimmer- Blue- d Lines and KBShimmer- Up and Cunning.
Bottom left to right- Cupcake Polish- Some Berry to Love and Colors by Llarowe- Arturo.

We will start with a review of the KBShimmer polishes.

KBShimmer- Blue- d Lines

KBShimmer is more of a well know indie brand nail polish company (that I know of), they are based out of Indiana.
Here is a link to KBShimmer's website if you would like more info. https://www.kbshimmer.com/

The first KBShimmer polish I purchased is called Blue- d Lines this is a aquamarine linear holographic polish, with intense holographic that really shows in the bright sunlight. 

I applied two thin coats for the photo above. This formula was great, it was opaque in two coats and went on very smooth. 

On Harlow & Co. website for USD for me this cost $7.23 US, but I think it might have gone up because now the price is listed as $8.36 US.

Here is a link for KBShimmer- Blue- d Lines

KBShimmer- Up and Cunning
 KBShimmer- Up and Cunning

Next we have Up and Cunning this is a deep teal linear holographic polish.

This polish was a little bit more sheer on the first coat, but was easily build-able on the second. This formula once again was really good, went on smooth in two coats.

Unfortunately on Harlow & Co. website this polish is sold out. I payed $7.23US for this polish. If you like this polish you can always be on the look out for it, they do restock.

Here is the link for KBShimmer Up & Cunning 
         
Now for the other two polishes.

Cupcake Polish- Some Berry to Love
 Cupcake Polish- Some Berry to Love

Cupcake polish is a company that is based out of Dallas,Texas. They hand mix all of their polishes in small batches.
Here is a link to Cupcake polishes website if you would like more info.

The Cupcake polish I purchased is Some Berry to Love, this is a bright pink, linear holographic polish that I actually thought was scattered when I saw it in the bottle. Once this is applied to the nail it does have a more noticeable linear holographic.

This polish also went on very smooth, almost a one coat wonder, but it is always best to apply two thin coats. 

On Harlow & Co website this cost $12.16 US

Here is the link for the Cupcake Polish- Some Berry to Love 


Colors by Llarowe- Arturo with out top coat.
  Colors by Llarowe- Arturo with out top coat.

Colors by Llarowe- Arturo with top coat.
Colors by Llarowe- Arturo with top coat. 
Don't know if you can really tell the differences in the photo, 
actually the one with top coat look more shinny then the one with out.  

Colors by Llarowe is another hand mixed nail polish. This polish is mixed in large batches and the polishes can be slightly different between each batch.

Here is a link to Colors by Llarowe website if you would like more info.

Arturo is a light blue, sublet scatter holographic polish, with out top coat this polish kind of has a matte finish to it. It is really hard to describe this polish looks matte with out a top coat, but is still shimmer due to the holographic elements. 

This polish also had a good formal, went on smooth in two coats.   

This polish I actually purchased for the name, Arturo. My brothers name is Arturo and I thought it was kind of cool that their is a polish out that named Arturo. 

On Harlow & Co. website this cost $12.16 US.

Here is the link for the Colors by Llarowe- Arturo

All of these polishes I loved, they had great formula and wore very well, except for one polish the cupcake polish, it started to chip a little on the second day. Also what I love about these polishes is the fact that they are holographic, which mades them awesome. 

As for Harlow & Co. themselves, I was very happy with their service my package arrived in a reasonable time of one week, and arrived in great condition in a envelope with each polish bubble wrapped. Also an added bonus their was a orange lollipop that came with the package, I ate the lollipop right a way, so I didn't get a chance to take a photo of that.    

As a final note if you order from Harlow & Co. as stated above they are a Canadian company, so all of their currency on the website is in the Canadian dollar. On the top right hand corner of their site they do have where you can change the currency to fit where you live from  CAD, USD, GBP, EUR, RUB, and AUD. Once you place a order it will say the Canadian currency, but don't worry it is still sit to your currency. That part did confuse me at first because the amount was higher then it first said. 

For the final cost of all four of these polishes with shipping, it did cost a lot more than I usually pay for polish. But do to the fact that I feel that they are unique enough, I am willing to spend a little more on these polishes, and do to the fact that these are indie brand polishes as well makes them cost more.

In the end with shipping (standard shipping) of $5.77 US, I ended up spending $43.36 US on four polishes, which is a lot, but worth it in the end!  

Hope all of you enjoyed this holographic polish/ Harlow & Co. review!  

See you next time for more nail polish fun!