 Happy Easter Nail Design
Here are the polish and tools that we will be using for this Easter nail design:
Base and Top Coat - CND Stickey Base Coat and Revlon Extra Life No Chip top coat.
Nail polishes- Colors by llarowe- Arturo, Essie- Coconut Cove, Zoya; Daisy, Eden, Leslie, Lillian, and Rayne.
Acrylic paint- red,white, black, green, yellow.
Nail art tools- thin liner brush, detail brush, long thin liner brush, and a small detail brush.
(you really don't need that many brushes, I just ended up using four brushes) and a medium size dotting tool.
Other- cup of water to clean off your brushes and a small glass jar with acetone to clean off the polish on your brushes as well.
Let's hop to it and start this Easter nail design!
Start off with a thin layer of base coat.
Once your base coat has dried polish all of your nail with a light holographic polish, I used
Colors by llarowe- Arturo. Then polish your thumb with a shimmery or cream yellow polish, I used Zoya Daisy.
Colors by llarowe- Arturo. Then polish your thumb with a shimmery or cream yellow polish, I used Zoya Daisy.
Once your polish has dried we will start to paint the chick in the egg on the thumb nail. Take a thin liner brush with white paint and make a zig- zag line kind of in the middle of the nail, then fill in the top near the tip of the nail with white.
Then repeat that same step near the cuticle area, just make sure their is enough room for your little chick to peak out.
Now for the eyes and beck, with a dotting tool dot two black dots for his eyes. Then for his beak make a side ways triangle.
If you would like you can also go over the white shell part with an off white or white polish, that was what I did.
Once the shell is dry for an added touch I just dotted colorful dots on the shell.
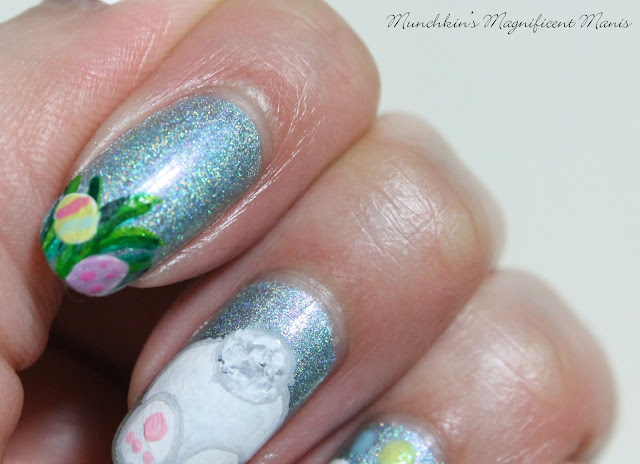
Grass an Easter eggs on index nail
Now onto the index nail where we will paint grass and Easter eggs. First we will make three different shades of green, the main green that you already have, a light green and a dark green. First take your main green paint and then make a dark green by add a small amount of black, and then a light green by adding a small amount of yellow.
With the main green paint make random blades of grass and then, switch the colors from dark green to light green.
Once that has dried with white paint on a detail brush make two eggs on the grass. Once that has dried go over the eggs with whatever polish color you would like (a spring color) and then you can add dots or lines onto the eggs.
For the pinky nail repeat the last steps again.
Bunny and bunny butt nail design
Now on to the cute bunny and the bunny butt, which I think turned out super cute!
First we will start off with the bunny's face on the ring finger. With white paint on a thin liner brush, make a circle and then fill that in.
Then on top of the head make two ears, you may need to go over the bunny a few times with the white paint to make it fully opaque.
Once that has dried, with a dotting tool and black paint dot to large eyes.
With a thin detail brush with pink paint on it make a upside down triangle for the nose.
Then with a thin liner brush with black paint on it make three lines on each side of his face for whiskers.
Just for an added touch you can add some colorful dots up top of the bunny, for the background.
Next we will make the bunny butt, take a thin detail brush with white paint on it and make a big circle and then fill that in with white paint.
Then make two oval shapes on the sides of the body for the feet. At the top of the large circle make a small circle for his fluffy.
For the paws make a large circle and the three small dots under that with pink paint.
For the fluffiness of the tall take a light gray, a dark gray, and a white paint and dab each color into the tall until the tall look fluffy.
Once you have your bunny butt the way you like you can also outline the bunny with a light gray paint, or if this is a little to tricky you can always skip that part, I just think this step helps to make the bunny stand out more.
Easter Nail Design
Once you have your cute bunny and chick the way you like, apply a top coat to protect you nails and help them to last longer.

Also here is the practice version of the Easter design that I did as well. As always I do still need to practice my nail designs before doing the final design on my nails, practice makes perfect!
Hope all of you enjoyed this cute Easter nail design and have a Happy Easter as well!

Simple Easter Nail Design, on right hand
As usually here is a simple design that I did on my right hand. I just did the grass with eggs and some colorful dots.
Practice version of Easter Nail Design
Hope all of you enjoyed this cute Easter nail design and have a Happy Easter as well!
See you next time for more nail fun!


No comments:
Post a Comment