Wednesday, May 19, 2021

Purple Flower Nail Design- Purple Bloom

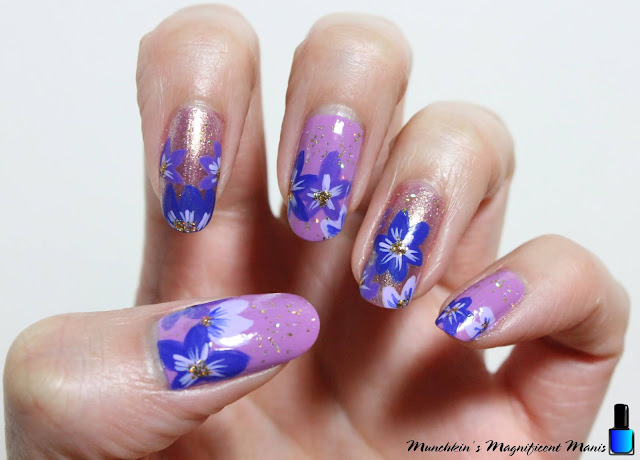
Hello everyone! Happy Spring time! Now that the weather is getting nice it is time for some spring flower nail design. Today we will be creating a purple flower nail design, that is great for spring or even summer time and with all the design I create you can always make the flowers another color it's all up to you. 

Purple Flower Nail Design

Here are the polishes and nail art tools used to create this purple flower nail design:


Base and top coat- CND Stickey Base Coat and Revlon Extra Life No Chip top coat.

Polishes- Zoya Sunshine- Delia, Nails Inc-Dream Dust- Sparkle like a Unicorn duo, Holo Taco- Gold Flakie- Anniversary, and Fun Lacquer- Million Dollar Dream. 

Acrylic paint- Purple, blue and white. 

Nail art brushes- Thin stripper and detail brush, and a medium dotting tool.

Other- a cup of water to clean off your nail art brushes. 

Purple Flower Nail Design

Apply base coats and let that dry. 

Polish-

Thumb, middle, and pinky- Light purple (Zoya Sunshine- Delia)

index and ring- Shimmer pinky/ purple (Nails Inc-Dream Dust)

Let that dry. 

Purple Flower Nail Design

First we need to mix out paint for our flowers, you will need three shades; medium (which we already have),dark and light. Take your medium colored purple as your base color, then mix white for a lighter purple and then take blue for a darker purple.  

For this design I decided to put flowers on all or the nails, you can always just do this design on a few nails or which ever you choose.

Purple Flower Nail Design

For your flowers (example: the middle finger nail) for the first flower in the middle of the nail, take a thin detail brush and make a thick petal shape at the top and then two on each sides, and then lastly two more under that one. That is the basic outline for the flowers that I made and some are just half a flower or just a few petals. 

Purple Flower Nail Design

Then for more detail take a thin stripper brush with the opposite color of the flower and make thin lines in the center of your flower. 

The for your last detail, the gold in the center of the flower. Take a dotting tool with gold glitter polish (Fun Lacquer- Million Dollar Dream) and make a few small dots in the center of your flower.

Lastly for a final touch I decided to add a little bit of gold flakie polish to the background using a little bit of Holo Taco- Gold Flakie. 

Purple Flower Nail Design

Once you have your purple flower nail design just right and ready for spring, apply a top coat to help your design to last and make them nice and shinny. 

Hope all of you enjoyed this purple flower nail design!


Also here is my practice version that I created as well, thought it was worth sharing! 


Also if you have been following/ reading this blog for a while now you may have notice that the M.M.M logo has changed. I recently decided that I wanted to redesign the logo, I just felt like it was time to create a new one. If you don't know I do have a degree in design along with being a licensed nail technician.   

See you next time for more nail fun!

Tuesday, May 11, 2021

Holo Water Marble Nail Design

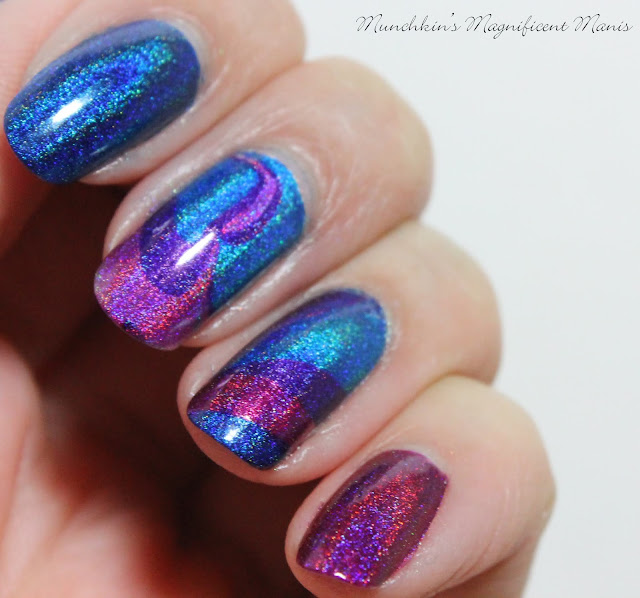
Hello everyone! Today we will be doing water marble again, back in 2015 I tried water marbling for the first time and it turned out okay for my first try. So today we will try water marbling again. My original idea I got from when I was cleaning up my nails with these same polishes one time and it look really cool on the paper towel, but when I tried to do something similar it didn't work out to well. The whole idea was to blend three polish together, so then I thought water marbling the three polishes together, shown in the photo below, would work out better and that worked out perfectly. 

Holo Water Marble Nail Design


Here are the polishes and tools used to create this water marble design:


Base and top coat- CND Stickey Base Coat and Revlon Extra Life No Chip top coat.

Polish- Color Club Halo's- Harp on, Holo Taco- Blue Freezie- Rainbow Collection, Holo Taco- Magenta Jelly- Rainbow Collection, and Holo Taco- Purple Slushie- Rainbow Collection. 

Not show- A plastic cup of water at room temp to water marble with, toothpicks, tape or liquid latex to put around your finger for easy clean up. 

Holo Water Marble Nail Design

Holo Water Marble Nail Design

Apply base coat, let that dry.

We will just be doing the water marble on the thumb, middle and ring finger nails. But as always you can do this on all the nails. 

For your base colors on the nails that we will be water marbling ( the thumb, middle and ring finger nail) polish with a silver holographic polish. It is best to use a light based color polish for your marbling. 

index nail a blue holographic polish and pinky nail a magenta holographic polish.

Let that dry.  

Holo Water Marble Nail Design

Holo Water Marble Nail Design

Holo Water Marble Nail Design

Tape off all of your finger that are going to be water marbled; your thumb, middle, and ring finger. 

Open all three of your polishes and have them ready to marble. 

Take a cup of water and with a fully loaded brush and dip your polish over the water (without touching the water) and create a bullseye with one of the polishes at a time, repeat this with all three colors. 

Then take a toothpick and and drag the polish to make a pattern, if you mess up on your pattern just clean off your polish in the cup with that toothpick and try again. 

Then once you have a pattern you like quickly dip your finger in the cup and back out again and your marble should come out on your nails.

Holo Water Marble Nail Design

Holo Water Marble Nail Design

Each nail will look different, which is the cool part about water marbling. 

Then once you have finished all the nails that you want to water marble take the tape or liquid latex off to reveal your design and if you still have polish on your fingers can clean that up with acetone and a clean up brush. 

Holo Water Marble Nail Design

Holo Water Marble Nail Design

Once you have your design just right apply a top coat to seal in your design and to help it to last.

I think this water marble did turn out very well and it is great that the Holo Taco Rainbow Holo's do water marble! 

Hope all of you enjoyed this holo water marble!

Also if you want more detailed tutorial check out my first water marble post 

Along with the Unicorn Frap design I did as well that also was a water marble.

See you next time for more nail fun!

Wednesday, May 5, 2021

Playstation 5 Nail Design

Hello everyone! Today on the blog we will be creating some nerdy nails, Playstation 5 nails. It has been a while since we creating some nerdy nails, so I thought it would be fitting to create a nerdy design again. Back in 2015 I created a Playstation 4 nail design, and not too long ago late 2020 Sony related their newest system, the Playstation 5. This design is very similar to the Playstation 4 design, the only different is the base color is white (just like the system) and on the thumb we have a character from a game called Astro Playroom.   

Playstation 5 Nail Design

Here are the polish and nail art tool tools use to create this fun nerdy nail design:


Base and top coat- CND Stickey Base Coat and Revlon Extra Life No Chip top coat.

Polish- Sally Hansen- Hard as Nails- Hard to get.

Acrylic Paint- Black, blue and white. 

Nail art tools- Large dotting tool, thin stripper brush and thin detail brush.

Other- Cup of water to clean off your nail art brushes.

Playstation 5 Nail Design

Apply a base coat. Let that dry.

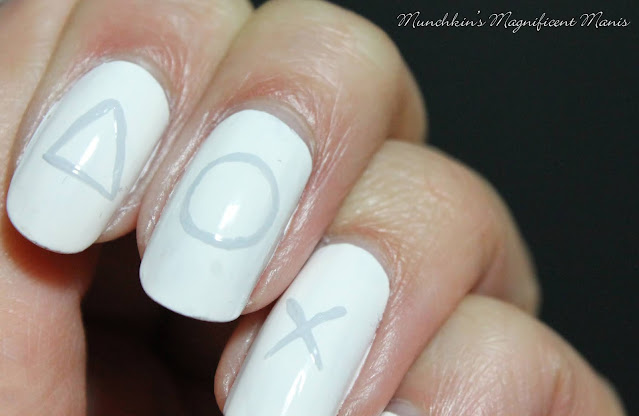
Polish all of your nails white, the same color as the PS5. I know you are probably thinking if you have followed this blog for a while, all white nails! Knowing I hate to polish my nails all white, but unfortunately the PS5 is all white, so I had to polish them all white for this design. 😑

Let that dry.

Playstation 5 Nail Design

Starting with the buttons on the controller. All of the buttons I painted by hand with no stencil. All though I kind of wish I would have used some nail stripping/ nail art tape to try and get the lines to look more cleaner. But this does give it a hand done look, which I am okay with. 

Playstation 5 Nail Design

With a thin stripper brush with grey paint on it (I mixed white and a very small amount of black, to make a very light grey.) On the index nail make a triangle, middle finger nail a circle, the ring finger an X, and lastly a square on the pinky finger nail.

Playstation 5 Nail Design

Playstation 5 Nail Design- Astro

Lastly the hard part Astro from Astro's Playroom. First make black square with rounded edges,  then fill that in. Then make a square with rounded edges with white, this is for his helmet. For his antenna make two curved lines that come together and a blue dot at the end. 

For his body make a half oval and another oval in that with a light blue and a curve at the top, then fill that in. For his arms make square shape on both sides of his body, on the left arm make three small squares, and the last square make that one blue. 

For his cape make a thick squiggly line with blue paint, on the right side. 

Then back to his face with a large dotting tool with blue paint on it, make two large dots in the center of his face for his eyes. 

For the final touch with your thin stripper brush outline the four sides with blue, and the rest of your character with a light grey, the head and body where it is needed. 

Playstation 5 Nail Design

Once you have your nerdy nails the way you like apply a topcoat to seal in your design and to help it to last. 

Hope all of you enjoyed this Playstation 5 nail design!

See you next time for more nail fun!

Also if you like this design, check out my Playstation 4 design that I did a few years ago.

Which one is your favorite the PS4 or PS5 design? I kind of like both, other then the PS5 design I had to paint my nails the color I hate, white. I also do really like the Astro robot that I made on my thumb for the PS5 design. I didn't want to create the PlayStation logo again for this design so I came up with the idea to make Astro.