Showing posts with label Nails inc.. Show all posts

Wednesday, May 19, 2021

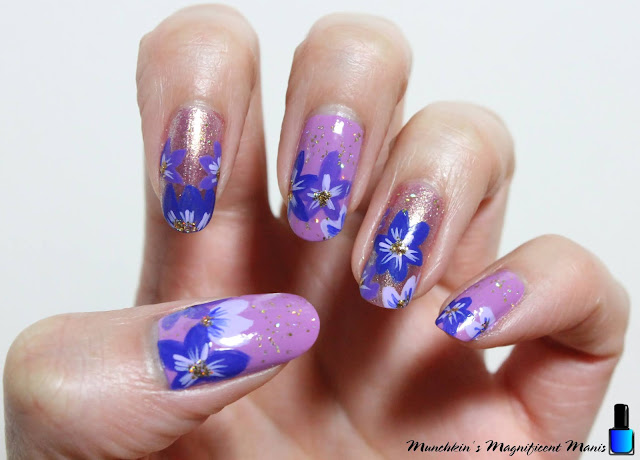
Purple Flower Nail Design- Purple Bloom

Hello everyone! Happy Spring time! Now that the weather is getting nice it is time for some spring flower nail design. Today we will be creating a purple flower nail design, that is great for spring or even summer time and with all the design I create you can always make the flowers another color it's all up to you. 

Purple Flower Nail Design

Here are the polishes and nail art tools used to create this purple flower nail design:


Base and top coat- CND Stickey Base Coat and Revlon Extra Life No Chip top coat.

Polishes- Zoya Sunshine- Delia, Nails Inc-Dream Dust- Sparkle like a Unicorn duo, Holo Taco- Gold Flakie- Anniversary, and Fun Lacquer- Million Dollar Dream. 

Acrylic paint- Purple, blue and white. 

Nail art brushes- Thin stripper and detail brush, and a medium dotting tool.

Other- a cup of water to clean off your nail art brushes. 

Purple Flower Nail Design

Apply base coats and let that dry. 

Polish-

Thumb, middle, and pinky- Light purple (Zoya Sunshine- Delia)

index and ring- Shimmer pinky/ purple (Nails Inc-Dream Dust)

Let that dry. 

Purple Flower Nail Design

First we need to mix out paint for our flowers, you will need three shades; medium (which we already have),dark and light. Take your medium colored purple as your base color, then mix white for a lighter purple and then take blue for a darker purple.  

For this design I decided to put flowers on all or the nails, you can always just do this design on a few nails or which ever you choose.

Purple Flower Nail Design

For your flowers (example: the middle finger nail) for the first flower in the middle of the nail, take a thin detail brush and make a thick petal shape at the top and then two on each sides, and then lastly two more under that one. That is the basic outline for the flowers that I made and some are just half a flower or just a few petals. 

Purple Flower Nail Design

Then for more detail take a thin stripper brush with the opposite color of the flower and make thin lines in the center of your flower. 

The for your last detail, the gold in the center of the flower. Take a dotting tool with gold glitter polish (Fun Lacquer- Million Dollar Dream) and make a few small dots in the center of your flower.

Lastly for a final touch I decided to add a little bit of gold flakie polish to the background using a little bit of Holo Taco- Gold Flakie. 
Purple Flower Nail Design

Once you have your purple flower nail design just right and ready for spring, apply a top coat to help your design to last and make them nice and shinny. 

Hope all of you enjoyed this purple flower nail design!


Also here is my practice version that I created as well, thought it was worth sharing! 


Also if you have been following/ reading this blog for a while now you may have notice that the M.M.M logo has changed. I recently decided that I wanted to redesign the logo, I just felt like it was time to create a new one. If you don't know I do have a degree in design along with being a licensed nail technician.   

See you next time for more nail fun!

Friday, September 28, 2018

Hubby Buys Me Polish- Nails Inc Polish Review

Hello everyone! Today I have something a little different as you can tell from the title, that back in July my hubby bought me some nail polish, along with some other gifts for our wedding anniversary. So I thought I would do a review on the four polishes that he got me and to see if he did a good job of picking out the polishes that I would like and if they are good quality. 
 
Nails Inc. Duo's
 Nails Inc. Duo's 


Let take a look at the polishes that my hubby bought. He got me two duo's from Nails Inc. that he purchased at Sephora. We will first start off with the holographic duo, which he already did good knowing that I love holo!  

Holler- Graphic Nails Inc Duo
Holler- Graphic Nails Inc Duo 
Holler- Graphic Nails Inc Duo

 Rocket Fuel, Nails Inc. Holler- Graphic Duo
 Rocket Fuel, Nails Inc. Holler- Graphic Duo 
    Rocket Fuel, Nails Inc. Holler- Graphic Duo

First we will start off with the silver holographic polish called Rocket Fuel. This is a silver  linear and scatter holographic polish, that applied in three coats, it was a little bit on the sheer side that is why it took three coats to be opaque. Other then that the formula seem pretty good. 

 Rocket Fuel, Nails Inc. Holler- Graphic Duo
  Rocket Fuel, Nails Inc. Holler- Graphic Duo
   Rocket Fuel, Nails Inc. Holler- Graphic Duo


Ghetto Galactic, Nails inc. Holler- Graphic duo  
Ghetto Galactic, Nails inc. Holler- Graphic duo 

The secound polish we have in this duo is called Ghetto Galactic. This is a pink linear and scattered holographic polish as well, it basically is the same as Rocket Fuel but just pink. This applied just like the silver polish in three coats and a little sheer. Both of these polishes I think could also be used as toppers as well. 

Ghetto Galactic, Nails inc. Holler- Graphic duo  
   Ghetto Galactic, Nails inc. Holler- Graphic duo
       
This polish is still available on Sephora's website and most likely in stores as well for $15.00

This duo is also available on Nails Inc. website as well for the same price. 


Sparkle Like a Unicorn Nails Inc. Duo
 Sparkle Like a Unicorn Nails Inc. Duo

Rainbow Wishes, Nails Inc. Sparkle Like a Unicorn Duo
Rainbow Wishes, Nails Inc. Sparkle Like a Unicorn DuoRainbow Wishes, Nails Inc. Sparkle Like a Unicorn Duo

The secound duo we have is called Sparkle Like a Unicorn, the first polish we have is called Rainbow Wishes this is a light purple with a iridescent shift to it. This polish covered in two coats, which was pretty good for a light colored polish. This polish did have pretty good formula.

Dream Dust, Nails Inc. Sparkle Like a Unicorn Duo 
Dream Dust, Nails Inc. Sparkle Like a Unicorn Duo

Lastly we have Dream dust this is a shimmery pink polish with a gold shift to it, on the nails and depending on the lighting this polish can look different. In the photo above it was taken with a day time light bulb and the polish looks pink, in the bathroom which has a very yellow toned light this polish looks copper/ rose gold, and then in the kitchen this polish looks more purple toned. 

Also for some reason on the back of the polish book they described this polish incorrectly, they called it holographic, when it is clearly not, one is is iridescent and the other is a shimmer. So I am unsure if Nails Inc just does not know the different?
  
This polish duo unfortunately is no long available, but I don't know it might end up coming back, I know both of these duo's have been is stores for a long time.  This duo also went for $15.00.


The last thing I wanted to go over about these polishes is the bottle and the formula. As you can see the tops on these polishes have a weird rectangle shape, that can be removed and they have a small round top, this does make the polishes a little hard to open and to polish with, I don't think you can really polish with the silver cap on, I really would not want to, it would make polishing way to hard. The brushes are wide which I don't mind, it made polishing easy on my nails. 

As for formula on the back of the box it says formulated with long wear system. Most polishes I feel wear very well on me and I felt like these polishes really did not last any long then any other polish I have.   

In conclusion how well did my hubby do picking out polishes for me? I think he did very well all four polishes are very pretty, of course my favorite was the Holler- Graphic duo. Out of the Unicorn duo I liked Dream Dust the best, Rainbow Wishes was a little to light for my taste but still pretty. After all my hubby did listen to all the polish stuff that I tell him after all.  

Hope all of you enjoyed this review of the Nails Inc polishes that my hubby got me.

See you next time for more nail fun!     

Wednesday, December 31, 2014

Happy New year 2015

Hello everyone! Happy New Year 2015, well almost new year. This is the time when we try to reflect on what we did this year and how we can make next year even better. A lot of people make new years resolutions, some keep them and others do not. As for me, I have never really been one to make any new years resolutions, I just always hope for a better year.   

For New Year's most nail designs have a dark/ black base color and add some glitter and a pop of color. For this tutorial I deiced to stick with that theme, with a black base and subtle bits of glitter, along with subtle bits of holographic polish. 

New years nail design
 Hope everyone has a safe and Happy New Year! 
Final 2014 design.


The polishes and nail tools used for this New years design:
 Top coat and base coat - Revlon Extra Life No Chip top coat, Nicole OPI-  3in1- base, top, & strengthener.

Nail polishes- Sally Hansen- Hard as Nails- black heart, Color Club-  Mini- Silver Glitter, Color Club Holo's- Harp on, Color Club- Holo's- Cloud Nine, Color Club- Holo's- Blue Heaven, Milani- Holographic Cyperspace, Nails Inc- Sapphire, and Nails Inc- Pink Diamond.

Nail art tools- Small glass jar with nail polish remover in it, to clean off nail art brushes, and a nail art stripper, I cleaned off and used the one that is in the nail art polishes. 

The Skill level for this New Year's nail design is:
  
Beginner/ Basic 

This New Year's design is very simple and great for people that might just be starting off with nail design, or just looking for something simple to create on their nails. This design is simple do to the fact that two of the fingers just being a glitter gradient, and the other consisting of very thin lines.
Now let's begin this party perfect nail design!

1. Start off with a thin layer of base coat.

2. Paint all of your nails a dark color, black or a dark blue.
3. First we will start off by doing a glitter gradient on the index and ring finger. Take your silver glitter polish and the brush that is in the polish, and paint a little bit of glitter, more at the top and a little at the bottom of the nail.
4. Then after you have just a little bit of glitter painted on the nail, paint a little more at the tips of the nail. This can also be done by sponging on glitter with a makeup sponge, but I just wanted to put a subtle amount of glitter, and when you sponge on the glitter it can end up going on a little bit thick.
 
5. For the other nails, the thumb, middle and pinky, we will be making a holographic line design. On each nail you paint thin lines starting from a comer of the nail, each nail I started from different corners to have a little bit of a different look for each nail. To make this design take a thin nail art stripper dipped in a blue holographic polish, or any color, start at a corner of the nail and slowly drag your nail art stripper down.
Here is the thumb nail design, where I stared from the side using a silver holographic polish.
6. For a final touch and a little bit more pop of color. Take a glitter polish that is the same color as the holographic polish and in the corner where all the lines met, dab a little bit of glitter polish. 
New years nail design Left hand New Year's nail design

As you can see in the final photo, on the thumb I used a silver holographic polish for the line design, then in the corner where all the lines met, I put a little bit of silver glitter polish. The middle finger I used a blue holographic (which is a little hard to tell that it is blue in the photo) and then put a little bit it of blue glitter on the corner. Lastly for the pinky nail I used a purple holographic polish,with purple glitter in the corner.

New years nail design
 Right hand nail design, where I switched the colors around and for 
the thumb used a different blue holographic polish. 

As always once your nail design have dried finish it off with a top coat, to make sure it last though your New Year's celebration.

Hope all of you have a wonderful and safe New Year's and I look forward to sharing and creating more nail tutorials with all of you, in the up and coming New Year!