Showing posts with label Spring Nail Design. Show all posts

Saturday, March 21, 2026

Ready for Spring- Flower Nail Design

Hello everyone! Sorry it has been a while since I posted anything, it was a busy month of February. Anyways who is tired of all this cold weather and is ready for spring? Well unless you live somewhere warm, I have heard that it has been hot in some places all ready, all I know is the weather has been crazy everywhere! So I thought for all of use that are tired of the cold weather we could use some nice pretty flower nail art that we can put on our nails. 

Flower Nail Design

Here are the nail art tools and polishes used to crate this pretty spring flower nail design:


Base and top coat- CND Stickey Base Coat and CND Super Shiney Top Coat.

Polishes- OPI- Hello Kitty- Look at My Bow, Sally Hansen- Color Therapy- Mauve Mantra, China Glaze- Shades of Paradise-Boujee Board, Orly- Kell's Galaxy Trio- Kelli's Moondust, Orly-Melting Point- Alloy Matey, and Holo Taco- Chrome Collection- Trophy Life.

Nail art tools- Thin striper and linear brushes and a small dotting tool.

Other- Nail polish remover/ acetone and water to clean off your nail art brushes. 

Flower Nail Design

Apply a top coat to clean dry nails. Let that dry.

Polish-

Thumb, index, middle and pinky finger nails- a light pink cream polish.

Ring finger nail- a rosy pink cream polish.

Let that dry.

Flower Nail Design

This is a simple design (at least that is what I think ☺️)

For each nail you can put as may flowers as you would like, some of them I put two or three it kind of depend on your nail length or if you want a lot of flower or not. 

First we will start off with making the petals, you can use the three colors that I used a purple (Orly- Alloy Matey) and lighter purple (Orly- Kelli's Moondust) and a light pink toned purple (China Glaze- Boujee Board.) Take one of the colors on a linear brush, then for example if you want to make your first flower (like on the index nail) make a oval shape near the tip of the nail, fill that in, make two more oval shapes on the side of the first one you made and then fill those petals in. 

Flower Nail Design

Flower Nail Design

Flower Nail Design


For the second flower repeat the same steps, make a oval shape near the cuticle, then make two more to the side of that petal, lastly make two more petals/ ovals under the last petals that you made. Also make sure to fill in each petal, you may need to do this a few times to be opaque. 

For each nail repeat this last step, you can make the flowers bigger or smaller, a whole flower or just a half. 

Lastly for the final touch the gold leaves or steams. Take a thin striper brush with a gold foil polish (Holo Taco-Trophy Life) and from part of your flower make some lines that can look like steams for leaves. You can also make a few line on other random parts of the nails as well.

Flower Nail Design

Once your flowers are spring ready, apply a top coat to add some shine and to help your nails to last.


Flower Nail Design
As always now, here is the practice version.

Hope all of you enjoy this flower spring nail design and hope that we start to see some nice weather, that will stick around.

See you next time for more nail fun! 

Saturday, April 5, 2025

Cherry Blossom Fest- Cherry Blossom Nail Design

Hello everyone! Today on the blog we will be creating a cherry blossom flower nail design. When I was trying to think of a spring design to create I thought of/ got inspiration from Pinterest. I looked up cherry blossom nail designs not really knowing that cherry blossom season is from March to April I think even May. So this design ended up working out for this time of year.

Cherry Blossom Nail Design

Here are the polishes and nail art tools used for this cherry blossom design: 


Base and top cast- CND Stickey Base Coat and CND Stickey Base Coat. 

Polishes- Nails Inc- Sparkle Like A Unicorn Duo- Dream Dust and Holo Taco- Toppers- Scattered.

Acrylic paint- Red, white and brown.

Nail art brushes- thin stripper brush and linear brush.

Other- water to clean off your nail art brush. 

Cherry Blossom Nail Design

Cherry Blossom Nail Design

Apply a top coat to clean dry nails, let that dry. 

Polish-
All of the nails polish with a shimmery pink polish (Nails Inc- Dream Dust) and then apply a scattered holo for an added shine (Holo Taco- scattered topper.)

Let that dry.

Cherry Blossom Nail Design

Cherry Blossom Nail Design

For this design we will be creating it on the thumb, middle, and ring finger nails, the index and pinky nails will have no design on it unless you would like to do a design on all the nails.

To start this design we will first make the branches. Take your thin stripper brush with brown paint on it, and make some branches on the nails, like the photos above. 

Cherry Blossom Nail Design

For the flowers first we will make a pink paint (unless you already have one) take a white paint and more red paint and mix though together. 

To start our flowers take a linear brush with white paint on it and make one petal, then right away put pink paint right over the white to try and blend the two. Then make two petals on the side then two more under that, also repeat the blending steps for each petal. Also for this design we will make a few flower buds as well which is just a small dot. 

Do this for all of the flowers that you want to make on the nails. Most of the nails I made three full flowers and a few flower buds. 

For the last small details for your cherry blossom, make a small brown dot in the center of each flower, then with your thin stripper brush with white paint on it make very tiny dots over the brown dot, with some of the brown still showing. 

Cherry Blossom Nail Design

Once you are happy with your cherry blossom design, apply a top coat to seal in your design and to help it last through Spring. 


Here is the practice design.

Hope all of you enjoyed this cherry blossom nail design!

See you next time for more nail fun! 

Saturday, March 29, 2025

Spring Bloom- Flower, Spring Nail Design

Hello everyone! Happy Spring time! Today on the blog we will be creating a spring flower design, to get into a warm weather kind of mood. 

Flower, Spring Nail Design

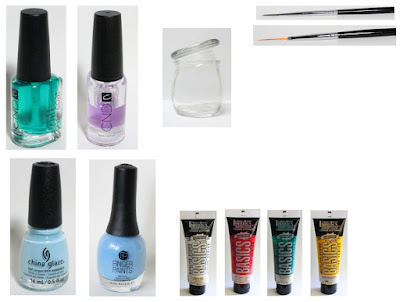
Here are the nail polishes and nail art tools used to create this spring design:


Base and top coat- CND Stickey Base Coat and CND Super Shiney Top Coat.

Polishes- China Glaze- Chalk Me Up! and Finger Paints- Heavenly Hues.

Acrylic paint- White, red, green, yellow, mix white and red to make pink, and mix yellow and green to make a light green.

Nail art brushes- Thin stripper brush and linear brush.

Other- Water to clean off your nail art brushes. 

Flower, Spring Nail Design

Flower, Spring Nail Design

Apply a top coat to clean dry nails and let that dry.

Polish- 
Thumb and pinky nails- Light blue cream polish (China Glaze- Chalk Me Up!)

Index, middle, and ring finger nails- Periwinkle blue cream polish ( Finger Paints- Heavenly Hues)

Let that dry.

Flower, Spring Nail Design

Thumb Nail Flower Design:

First we will start with the thumb nail and make a pink flower, take a linear brush with pink paint on it near the side of the nail on the top make one petal shape, two on the sides and then one on the bottom, you may need to go over your flower petals a couple of times to be opaque. 

For the yellow flower in the lower corner near the cuticle, do the same as the pink flower just make three petals. 

Once you have your petals take the tip of your brush with yellow paint and make a small dot in the middle of your flowers.

Then for some small details on your petals, take a thin stripper brush with red paint on it and from the center of the petals make a small group of lines going up the petals. For some more details, if you would like take some white paint on a stripper brush and outline your flowers.

Leaf details, take a thin stripper brush with green on it and make a squiggly line from your yellow flower and then make a small leaf at the end.

On the pink flower make a large leaf from the top of the flower.

Lastly make a long green line on the side of the nail near the pink flower, with a few shorter lines from that. Then we will make very small white flowers, take your linear brush with white paint on it and make two small flowers with a small yellow dot in the middle.

Flower, Spring Nail Design

Flower on the Middle Finger Nail: 

On the middle finger nail we will be making a flower that looks like a plumeria. Take your linear brush with white paint on it, make a one large petal in the center of the nail, then two on the side and then tow more on the bottom. Let that dry and then take a thin stripper brush with yellow paint on it and make a group of thick lines in the center of the flower and going up the petals.

For the green vines coming from your flower, take a thin stripper brush with green paint on it and make some random lines from your flower.

Also only one petal of a pink flower is showing, make one petal showing from the top corner part of the nail.

Flower, Spring Nail Design

Flower, Spring Nail Design

Flowers on the Ring Finger Nail: 

For this design follow the step that you did to create the pink flower on the thumb nail, minus the outlining in white. This flower goes in the upper left hand corner. For the plumeria flower in the lower right hand corner follow the same steps as we just did for the plumeria on the middle finger nail.

For the leaf details, take your stripper brush with green paint on it make a leaf shape on the tip of the nail, make a stem at the bottom and top of the plumeria, then make a stem from the pink flower with two leaves on the stem.

Flower, Spring Nail Design

Once you are happy with your spring flower nails design, apply a top coat to seal in your design and to help it last all spring or just a little bit through spring time.


Flower, Spring Nail Design
Here is the practice nail design 

Hope all of you enjoyed this spring nail design!

See you next time for more nail fun! 

Saturday, March 16, 2024

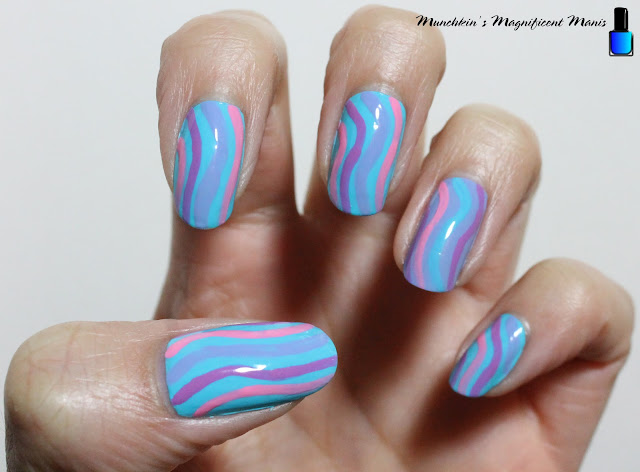
Spring Time Swirls- Swirl Nail Design

Hello everyone! Today on the blog we will be creating a simple swirl design. When I was looking for inspiration I thought it would be fun for spring a summer time to create a swirl bright color design. This design is supposedly is trending this year.

Swirl Nail Design

Here are the polishes and nail art tools used to create this nail design: 


Base and top coat- CND Stickey Base Coat and CND Super Shiney Top Coat.

Polishes- Sally Hansen- Insta Dri- Peeps Blue, Finger Paints- Heavenly Hues, Zoya Sunshine- Delia, and Sally Hansen- Insta Dri Jelly Belly- Bubble Gum.

Nail art brushes- Thin detail brush.

Other- Acetone and water to clean off your nail art brush.

Swirl Nail Design

Apply a base coat to clean nails.

Polish- This is your base colors.

Thumb, index, middle, pinky finger nails- Light blue (Sally Hansen- Insta Dri- Peeps Blue.)

Ring finger- Periwinkle blue (Finger Paints- Heavenly Hues)

Let that dry.

Swirl Nail Design

For this design I just switched the colors on each nail, from purple, pink, and periwinkle, with the light blue base. Then with the periwinkle base you would use purple and pink again and just add the light blue for the swirls. 

Swirl Nail Design

Swirl Nail Design

Swirl Nail Design

For this design it is very abstract with random lines. For this design I jump around from each nail for each color. First take a thin detail brush with a periwinkle polish on it and staring on the middle of the nail make a swirl line (this is for the nails with a light blue base). 

For the ring finger nail with a periwinkle base use the light blue polish to make your first swirl. 

Then for the other swirls switch between pink and purple, just make sure the other swirls are  right next to each other, leaving space in between each swirl so that you can still see the base color.   

Swirl Nail Design

Once you are happy with how your swirl nail design look, apply a top coat to seal in your design and to help it to last. 

Swirl Nail Design

Swirl Nail Design

If you want to go even more simple you can just put the swirl design on the ring finger and the thumb nails, and leave the other nails with no design.

Also as with any design you can use any colors that you want, you can use more spring colors, very bright colors for summer or later in the year you can use fall or winter colors. 


Here is the practice version.

Hope all of you enjoy this swirl nail design!

See you next time for more nail fun!


Saturday, April 9, 2022

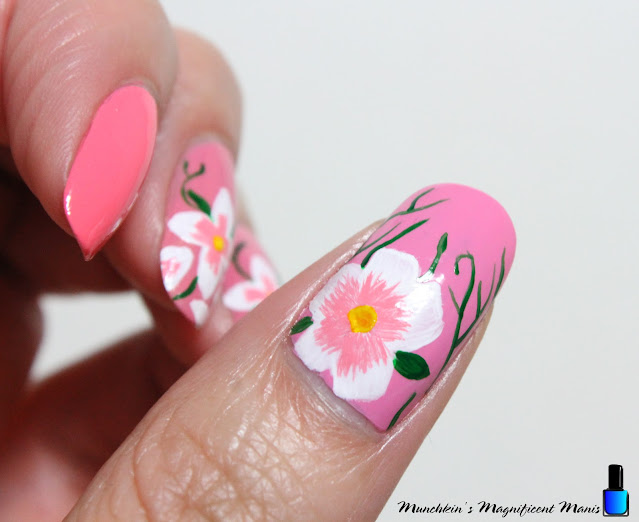
Floral Bloom- White and Pink Flower Nail Design

Hello everyone! Happy spring time! Here in the USA it is now spring time, even though it may not feel like it just yet, at lest where I live. Today we are going to create a spring themed nail design, with white and pink flowers.

White and Pink Flower Nail Design 

Here are the polishes and nail art tools used to create this pink spring nail design:

Base and top coat- CND Stickey Base Coat, and CND Super Shiney Top Coat.

Nail polish- Sally Hansen- Color Therapy- Mauve Mantra, Zoya Sunshine- Minnie, and Zoya Sunshine- Missy.
Acrylic paint- Red, green, yellow, and white. Mix red and white to make pink. 

Nail art tools- Thin detail and stripper brush, and a small flat brush.

Other- Cup of water to clean off your nail art brushes. 

White and Pink Flower Nail Design

Apply base coat.

Let that dry.

Polish- Different shades of pink polish. I pretty much always like to have a mix of different polishes on my nails, you of course can just have one shade of pink polish. 

Thumb- Light pink (Zoya Sunshine- Minnie).

Index and pink finger nail- a slightly brighter light pink (Zoya Sunshine- Missy).

Middle, and ring finger - Light pink with a little bit of pink shimmer ( Sally Hansen- Color Therapy- Mauve Mantra).

Let that dry. 

White and Pink Flower Nail Design

Multiple Flowers on the Middle and Ring Finger Nails-

First we will start off with the smaller flowers on the middle and index nails. For both nails we will make one larger flower near the tip of the nails and a few flower petals around that. The middle finger nail does have a few more petals than the ring finger nail.

For the large flower, take a detail brush with white paint on it starting near the tip of the nail make a petal shape, then two on the sides, and one at the top, you will need to go over this a few times to be opaque. Repeat this step on the other nail.

On the middle finger nail I decided to add a four more petals on the sides, the ring finger nail I just added two petals.

Once the white has dried take a thin stripper brush with pink paint on it (I just mixed red and white to make my pink paint) on the white petals make very close lines on each petal. 

Lastly on the flowers make a small yellow dot on the center. 

As always with any design you can add more larger flowers or more petals, depending on your nail length and size. 

White and Pink Flower Nail Design

For a final touch we will add leaves and vines. Take your thin stripper brush with green paint on it   and make leaves on the sides of the flowers and a few around the nail. Then make some random lines around the flower for the vines. 

White and Pink Flower Nail Design

Large Flower on the Thumb Nail: 

On the thumb nail we will make one large flower. Take a small flat brush with white paint on it, starting from the middle of the nail swipe up to make a petal, then do this again on both sides and then twice under those to petals. You will need to go over this a few times to be opaque. 

Once that is dry, similar to the smaller flower we will make the pink part of the flower. With your thin detail brush make a lot of small lines close together on each petal. 

Lastly for the flower make the yellow circle in the center of the flower. 

For the final touch again, we will make two leaves on the side of the flower and a small one on top, and then more lines for the vines. 

White and Pink Flower Nail Design

Once your nails are spring time ready apply a top coat to seal in your design and to help it to last   though spring or at lest until you want to change your nails. 

Hope all of you have enjoyed this white and pink flower nail design.

See you next time for more nail fun! 

Wednesday, May 19, 2021

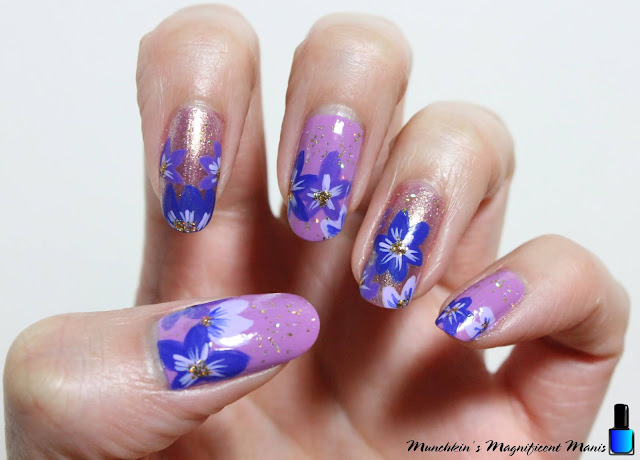
Purple Flower Nail Design- Purple Bloom

Hello everyone! Happy Spring time! Now that the weather is getting nice it is time for some spring flower nail design. Today we will be creating a purple flower nail design, that is great for spring or even summer time and with all the design I create you can always make the flowers another color it's all up to you. 

Purple Flower Nail Design

Here are the polishes and nail art tools used to create this purple flower nail design:


Base and top coat- CND Stickey Base Coat and Revlon Extra Life No Chip top coat.

Polishes- Zoya Sunshine- Delia, Nails Inc-Dream Dust- Sparkle like a Unicorn duo, Holo Taco- Gold Flakie- Anniversary, and Fun Lacquer- Million Dollar Dream. 

Acrylic paint- Purple, blue and white. 

Nail art brushes- Thin stripper and detail brush, and a medium dotting tool.

Other- a cup of water to clean off your nail art brushes. 

Purple Flower Nail Design

Apply base coats and let that dry. 

Polish-

Thumb, middle, and pinky- Light purple (Zoya Sunshine- Delia)

index and ring- Shimmer pinky/ purple (Nails Inc-Dream Dust)

Let that dry. 

Purple Flower Nail Design

First we need to mix out paint for our flowers, you will need three shades; medium (which we already have),dark and light. Take your medium colored purple as your base color, then mix white for a lighter purple and then take blue for a darker purple.  

For this design I decided to put flowers on all or the nails, you can always just do this design on a few nails or which ever you choose.

Purple Flower Nail Design

For your flowers (example: the middle finger nail) for the first flower in the middle of the nail, take a thin detail brush and make a thick petal shape at the top and then two on each sides, and then lastly two more under that one. That is the basic outline for the flowers that I made and some are just half a flower or just a few petals. 

Purple Flower Nail Design

Then for more detail take a thin stripper brush with the opposite color of the flower and make thin lines in the center of your flower. 

The for your last detail, the gold in the center of the flower. Take a dotting tool with gold glitter polish (Fun Lacquer- Million Dollar Dream) and make a few small dots in the center of your flower.

Lastly for a final touch I decided to add a little bit of gold flakie polish to the background using a little bit of Holo Taco- Gold Flakie. 

Purple Flower Nail Design

Once you have your purple flower nail design just right and ready for spring, apply a top coat to help your design to last and make them nice and shinny. 

Hope all of you enjoyed this purple flower nail design!


Also here is my practice version that I created as well, thought it was worth sharing! 


Also if you have been following/ reading this blog for a while now you may have notice that the M.M.M logo has changed. I recently decided that I wanted to redesign the logo, I just felt like it was time to create a new one. If you don't know I do have a degree in design along with being a licensed nail technician.   

See you next time for more nail fun!