Showing posts with label flower nail design. Show all posts

Saturday, March 21, 2026

Ready for Spring- Flower Nail Design

Hello everyone! Sorry it has been a while since I posted anything, it was a busy month of February. Anyways who is tired of all this cold weather and is ready for spring? Well unless you live somewhere warm, I have heard that it has been hot in some places all ready, all I know is the weather has been crazy everywhere! So I thought for all of use that are tired of the cold weather we could use some nice pretty flower nail art that we can put on our nails. 

Flower Nail Design

Here are the nail art tools and polishes used to crate this pretty spring flower nail design:


Base and top coat- CND Stickey Base Coat and CND Super Shiney Top Coat.

Polishes- OPI- Hello Kitty- Look at My Bow, Sally Hansen- Color Therapy- Mauve Mantra, China Glaze- Shades of Paradise-Boujee Board, Orly- Kell's Galaxy Trio- Kelli's Moondust, Orly-Melting Point- Alloy Matey, and Holo Taco- Chrome Collection- Trophy Life.

Nail art tools- Thin striper and linear brushes and a small dotting tool.

Other- Nail polish remover/ acetone and water to clean off your nail art brushes. 

Flower Nail Design

Apply a top coat to clean dry nails. Let that dry.

Polish-

Thumb, index, middle and pinky finger nails- a light pink cream polish.

Ring finger nail- a rosy pink cream polish.

Let that dry.

Flower Nail Design

This is a simple design (at least that is what I think ☺️)

For each nail you can put as may flowers as you would like, some of them I put two or three it kind of depend on your nail length or if you want a lot of flower or not. 

First we will start off with making the petals, you can use the three colors that I used a purple (Orly- Alloy Matey) and lighter purple (Orly- Kelli's Moondust) and a light pink toned purple (China Glaze- Boujee Board.) Take one of the colors on a linear brush, then for example if you want to make your first flower (like on the index nail) make a oval shape near the tip of the nail, fill that in, make two more oval shapes on the side of the first one you made and then fill those petals in. 

Flower Nail Design

Flower Nail Design

Flower Nail Design


For the second flower repeat the same steps, make a oval shape near the cuticle, then make two more to the side of that petal, lastly make two more petals/ ovals under the last petals that you made. Also make sure to fill in each petal, you may need to do this a few times to be opaque. 

For each nail repeat this last step, you can make the flowers bigger or smaller, a whole flower or just a half. 

Lastly for the final touch the gold leaves or steams. Take a thin striper brush with a gold foil polish (Holo Taco-Trophy Life) and from part of your flower make some lines that can look like steams for leaves. You can also make a few line on other random parts of the nails as well.

Flower Nail Design

Once your flowers are spring ready, apply a top coat to add some shine and to help your nails to last.


Flower Nail Design
As always now, here is the practice version.

Hope all of you enjoy this flower spring nail design and hope that we start to see some nice weather, that will stick around.

See you next time for more nail fun! 

Saturday, March 29, 2025

Spring Bloom- Flower, Spring Nail Design

Hello everyone! Happy Spring time! Today on the blog we will be creating a spring flower design, to get into a warm weather kind of mood. 

Flower, Spring Nail Design

Here are the nail polishes and nail art tools used to create this spring design:


Base and top coat- CND Stickey Base Coat and CND Super Shiney Top Coat.

Polishes- China Glaze- Chalk Me Up! and Finger Paints- Heavenly Hues.

Acrylic paint- White, red, green, yellow, mix white and red to make pink, and mix yellow and green to make a light green.

Nail art brushes- Thin stripper brush and linear brush.

Other- Water to clean off your nail art brushes. 

Flower, Spring Nail Design

Flower, Spring Nail Design

Apply a top coat to clean dry nails and let that dry.

Polish- 
Thumb and pinky nails- Light blue cream polish (China Glaze- Chalk Me Up!)

Index, middle, and ring finger nails- Periwinkle blue cream polish ( Finger Paints- Heavenly Hues)

Let that dry.

Flower, Spring Nail Design

Thumb Nail Flower Design:

First we will start with the thumb nail and make a pink flower, take a linear brush with pink paint on it near the side of the nail on the top make one petal shape, two on the sides and then one on the bottom, you may need to go over your flower petals a couple of times to be opaque. 

For the yellow flower in the lower corner near the cuticle, do the same as the pink flower just make three petals. 

Once you have your petals take the tip of your brush with yellow paint and make a small dot in the middle of your flowers.

Then for some small details on your petals, take a thin stripper brush with red paint on it and from the center of the petals make a small group of lines going up the petals. For some more details, if you would like take some white paint on a stripper brush and outline your flowers.

Leaf details, take a thin stripper brush with green on it and make a squiggly line from your yellow flower and then make a small leaf at the end.

On the pink flower make a large leaf from the top of the flower.

Lastly make a long green line on the side of the nail near the pink flower, with a few shorter lines from that. Then we will make very small white flowers, take your linear brush with white paint on it and make two small flowers with a small yellow dot in the middle.

Flower, Spring Nail Design

Flower on the Middle Finger Nail: 

On the middle finger nail we will be making a flower that looks like a plumeria. Take your linear brush with white paint on it, make a one large petal in the center of the nail, then two on the side and then tow more on the bottom. Let that dry and then take a thin stripper brush with yellow paint on it and make a group of thick lines in the center of the flower and going up the petals.

For the green vines coming from your flower, take a thin stripper brush with green paint on it and make some random lines from your flower.

Also only one petal of a pink flower is showing, make one petal showing from the top corner part of the nail.

Flower, Spring Nail Design

Flower, Spring Nail Design

Flowers on the Ring Finger Nail: 

For this design follow the step that you did to create the pink flower on the thumb nail, minus the outlining in white. This flower goes in the upper left hand corner. For the plumeria flower in the lower right hand corner follow the same steps as we just did for the plumeria on the middle finger nail.

For the leaf details, take your stripper brush with green paint on it make a leaf shape on the tip of the nail, make a stem at the bottom and top of the plumeria, then make a stem from the pink flower with two leaves on the stem.

Flower, Spring Nail Design

Once you are happy with your spring flower nails design, apply a top coat to seal in your design and to help it last all spring or just a little bit through spring time.


Flower, Spring Nail Design
Here is the practice nail design 

Hope all of you enjoyed this spring nail design!

See you next time for more nail fun! 

Saturday, June 8, 2024

Don't Worry Be Happy- Smiley Face & Flower Nail Design

Hello everyone! Hope everyone is having a nice spring/ soon to be start of summer. Today on the blog we will be creating a happy face and flower nail design, that is great for summer, well really any time you just want to feel happy. For this design we will be using the new Orly Melting Point Collection. 

Smiley Face & Flower Nail Design

Here are the polishes and nail art tools used to create this fun happy face and flower nail design:


Base and top coat- With these polishes Orly suggests that you don't need a base and top coat, I didn't use one with this design, I did still use CND Super Shiney Top Coat.

Polishes- Orly Melting Point Collection.

Acrylic Paint- Black and white.

Nail art tools- Medium dotting tool, this stripper and liner brush.

Other- Water to clean off your nail art brushes. 

Smiley Face & Flower Nail Design

Apply a base to clean nails if you would like. If you are using the Orly Melting Point collection you can apply a base coat or you don't have to apply a base coat, it is up to you (I did not apply a base coat.) 

Polishes- 

Thumb Nail- Orly- Glass Act

Index Finger Nail- Orly- The Floor is Lava

Middle and Ring Finger Nail- Orly- Having a Smeltdown

Pinky Finger Nail- Orly- Erupt To No Good

Let that dry.


Smiley Face & Flower Nail Design

Happy faces- 

First we will start off with the white base for the happy faces. I did a white base first that way the yellow polish would stand out over the background/ base polish. 

Starting with the thumb nail make a circle with white paint, near the tip of the nail and then make another near the cuticle that is very close the side of the nail.

Smiley Face & Flower Nail Design

Smiley Face & Flower Nail Design

On the middle finger nail make one large circle near the tip of the nail very close to the side of the nail. 

On the ring finger nail make two circles one near the cuticle and another one near the tip of the nail. 

Once you are done making all of your circles take your yellow polish and fill in each white circle, you may need to go over this a few time to be opaque enough. I did have to go in with a nail art brush to make sure the white was all covered. 

Let your now yellow circles dry and the we will make the eyes and smile, for that step take your liner brush with black paint on it and make two thick lines for the happy faces eyes, then take a striper brush with black paint on it make a curved line for the smile.

Flowers- 

Now on to the flowers on each nail. First we will start off with the center part of the flowers take your dotting tool with yellow polish on it on the thumb nail make a dot near the tip of the nail and one near the left hand side near the cuticle. 

On the middle finger nail make a yellow dot with your dotting tool near the cuticle on the left hand side and then make a dot near the tip of the nail on the left hand side. 

Lastly on the ring finger nail make one dot on the lower left hand near the tip of the nail.

Next we will make the flower petals around each of the yellow dots that we made. Take your liner brush with white paint on it make thick lines that look like petals around each of the yellow dots, due to the flowers all being close to the nails they will all be half flowers, so you will only need to make a few petals. 

Smiley Face & Flower Nail Design

Colorful Dots- 

To finish off this design we will make colorful dot all around the nail. We will be using all of the polishes from the Orly Melting Point Collection. Take one color at a time on your dotting tool and dot each color on the thumb, middle and ring finger nails. 

Smiley Face & Flower Nail Design

Once you are happy with your nails apply a top coat to seal in your nails and to help your nail art to last. 

Here is my practice design, I felt like it was worth showing because I did change a few of the nails a little bit.

Hope all of you enjoyed this happy face and flower nails design!

See you next time for more nail fun! 

Saturday, May 21, 2022

You Glow- Multichrome Flower Nail Design

Hello everyone! Today on the blog we will be creating flowers on our nails that looks like they are glowing from the multi-chrome polish we will be using, we are not using glow in the dark polish, we are just using multi-chrome that shifts in color and just looks like it is glowing because of the ark colored background. This design is great for spring and summer, even though I picked a dark blue and an ocean blue. 

Multichrome Flower Nail Design

Here are the polish and nail art tools used to create this glowing flower nail design. 


Base and top coat- CND Stickey Base Coat and CND Super Shiney Top Coat.

Polish- Zoya- Twinkling- Jen, OPI Fiji- Do you Sea what I Sea, Holo Taco-Wireless Mode- Lite Mode Collection, Holo Taco- Flash Drive- Lite Mode Collection, Holo Taco- Scattered, and Holo Taco- Flakie.

Nail art tools- Thin detail and stripper brush.

Multichrome Flower Nail Design

Multichrome Flower Nail Design

Apply a base coat. 

Let that dry.

Polish- 

Thumb and ring finger nail- dark blue polish (Zoya Jen)

Index, middle, and pinky finger nail- shimmery ocean blue polish (OPI Do You See What I Sea?)

Let that dry. 

Multichrome Flower Nail Design

Multichrome Flower Nail Design

This design is very simple, on three nails the thumb, index, and ring finger nail we will be making a flower, that is off to the side of the nail. 

Multichrome Flower Nail Design

On the thumb and ring finger nails we will be using Holo Taco- Wireless Mode for the flower. 

On the index nail we will be using Holo Taco- Flash Drive for the flower.

Multichrome Flower Nail Design

Multichrome Flower Nail Design

Starting with the index nail and using Holo Taco- Flash Drive for or flower. Take that polish on a thin striper brush, on the right hand corner, staring in the middle make a line, then one above that, and another line next to that, then two more lines under the middle line. Basically we will be making a star shape, five line for each petal. 

Once you have your five lines, take that same brush with the Holo Taco Flash Drive polish on it and make petal shapes using the lines as a guide. 

Multichrome Flower Nail Design

Multichrome Flower Nail Design

On the ring finger repeat this same step, just us the Holo Taco Wireless Mode polish. 

Multichrome Flower Nail Design

Multichrome Flower Nail Design

Once again repeat the same step on the thumb with Holo Taco Wireless Mode polish. 

For a last step of the flowers we will add the center part of the flower. Take a small detail brush with some Holo Taco Flakie on it and on all the nails that you made a flower put a dot of that polish in the middle of the flower. 

Multichrome Flower Nail Design

For a final touch add a shattered holo polish on all of the nails. I did not apply the holo on over the flowers, just on the background. 

Multichrome Flower Nail Design

Multichrome Flower Nail Design

Once you have finished your flowers apply a top coat to seal in your design and to help it to last. For this design I did only do the flowers on three fingers, if I would have gone back I would have done the flowers on all of the nails.

Hope all of you enjoyed this flower nail design.

See you next time for more nail fun! 

Saturday, May 16, 2020

Spring Time- Blue Flowers Nail Design

Hello everyone! Sorry that is has been a few weeks since I did a post, I was finally able to return to my job after being temporary lay-off,  so I have been trying to get back use to getting up early for work and just being back to work, with things being kind of different (like the rest of the world that has kind been able to return to some kind of normal.) Anyways today I thought it would be nice to create a simple blue flower design for spring time, seeing how it is finally staring to feel like spring, at lest where I live.   

Spring Time Blue Flowers Nail Design
Spring Time Blue Flower Nail Design


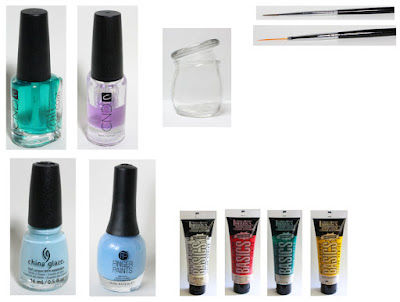
Here are the polishes and nail art tools used to create this spring flower nail design:


Base and top coat- CND Stickey Base Coat and Revlon Extra Life No Chip top coat.

Polish- OPI- Hello Kitty- My Pal Joey (just one polish for this design, the rest is paint.)

Acrylic paint- white, blue (mixed together to make a lighter blue), green and a light yellow.

Nail art tools- a small dotting tool, a very small detail brush, and a small detail brush.

Other- a  small cup of water to clean off your nail art brushes.

Spring Time Blue Flowers Nail Design

Polish all of the nails with a blue polish.

Let that dry.

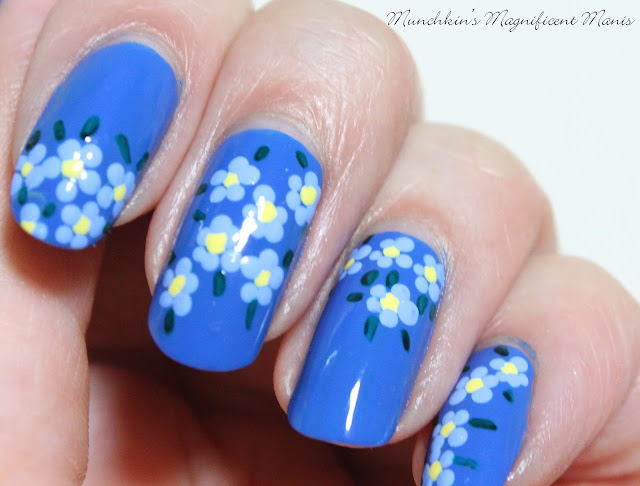
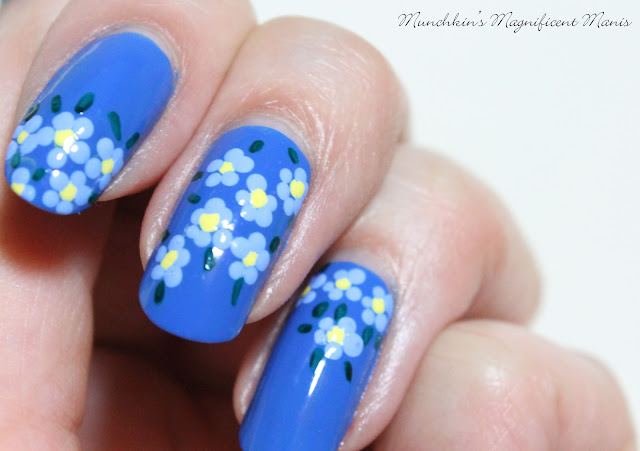
On the index, middle, ring, and pinky finger nails, these are the nails that we will be creating a simple dot flowers. On the thumb nail we will being creating a little of a different type of flowers.

Spring Time Blue Flowers Nail Design

For each nail I placed the flowers on a different part of the nail, just to make the design look a little bit different.

For the dot flowers take a small dotting tool with some light yellow paint on it for the center of the flower and place that dot on the spots that you want to create flowers.

Then with that same dotting tool with some light blue paint on it (I mixed a white and a dark blue to make the light blue) make one dot on the top of the yellow dot, one on each side and then two dots on the bottom.

Then you have your simple flower shape, then repeat this step on the nail as many times as you like.

Also for an added touch take a very small brush with green paint and make some small lines around your flowers for some leaves.

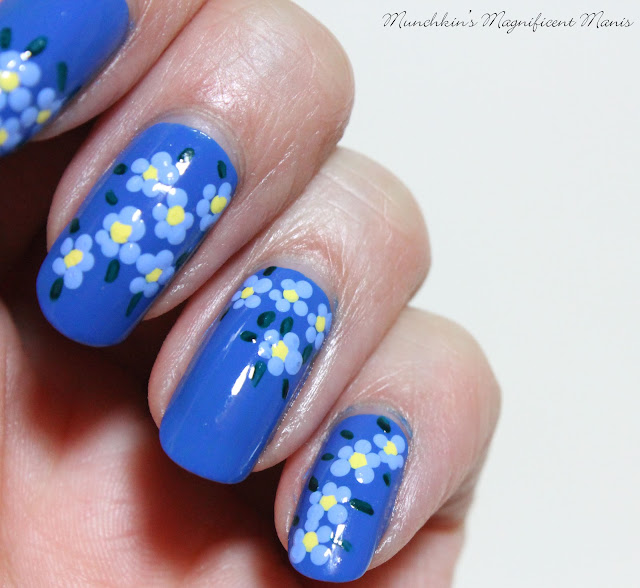
For all of your nails you can always just create the simple flowers or if you would like you can also create the next flowers that we are about to create on your thumb nail. (the photo below)

Spring Time Blue Flowers Nail Design

Next we will be creating some flowers that are a little bit different on the thumb nail, this design is still simple as well.

Staring off with the larger flower in the center of the nail, take a thin detail brush with white paint on it make two thick lines right next to each other, then two lines beside that and then two more thick lines under that. Lastly taking a light yellow paint make a small yellow dot in the center of your flower. If you would like you can also start off by making the small yellow dot and then making your petals. I just ended up making the petals first.

For your other flowers repeat that same step, just make them smaller and some light blue. 

Then just like the dot flowers we just made, take your very small brush with green paint on it and make some green lines for leaves.

Spring Time Blue Flowers Nail Design

Once you your flowers are spring time ready apply a top coat to seal in your design and to help it to last.

Hope all of you enjoyed this simple flower nail design and that all of you are stay safe and enjoying the spring weather as much as you can!

See you next time for more nail fun!