Friday, September 28, 2018

Hubby Buys Me Polish- Nails Inc Polish Review

Hello everyone! Today I have something a little different as you can tell from the title, that back in July my hubby bought me some nail polish, along with some other gifts for our wedding anniversary. So I thought I would do a review on the four polishes that he got me and to see if he did a good job of picking out the polishes that I would like and if they are good quality. 
 
Nails Inc. Duo's
 Nails Inc. Duo's 


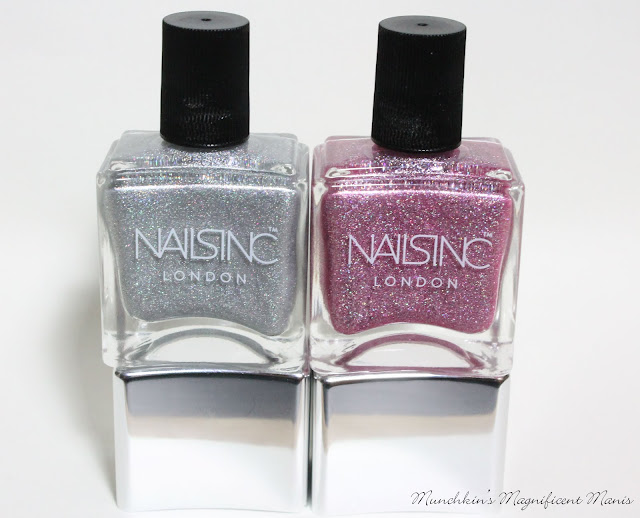
Let take a look at the polishes that my hubby bought. He got me two duo's from Nails Inc. that he purchased at Sephora. We will first start off with the holographic duo, which he already did good knowing that I love holo!  

Holler- Graphic Nails Inc Duo
Holler- Graphic Nails Inc Duo 
Holler- Graphic Nails Inc Duo

 Rocket Fuel, Nails Inc. Holler- Graphic Duo
 Rocket Fuel, Nails Inc. Holler- Graphic Duo 
    Rocket Fuel, Nails Inc. Holler- Graphic Duo

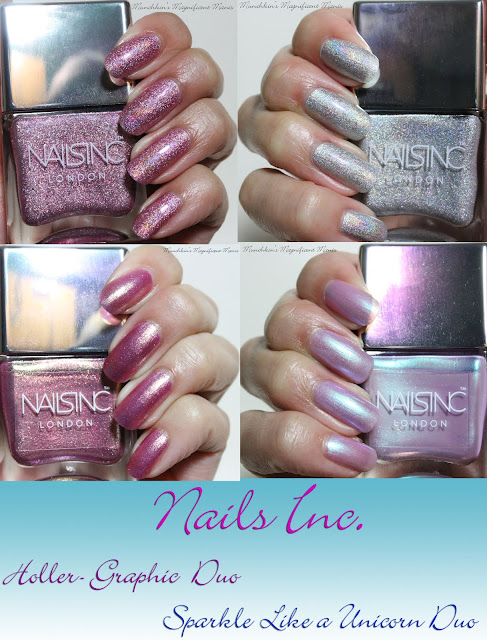
First we will start off with the silver holographic polish called Rocket Fuel. This is a silver  linear and scatter holographic polish, that applied in three coats, it was a little bit on the sheer side that is why it took three coats to be opaque. Other then that the formula seem pretty good. 

 Rocket Fuel, Nails Inc. Holler- Graphic Duo
  Rocket Fuel, Nails Inc. Holler- Graphic Duo
   Rocket Fuel, Nails Inc. Holler- Graphic Duo


Ghetto Galactic, Nails inc. Holler- Graphic duo  
Ghetto Galactic, Nails inc. Holler- Graphic duo 

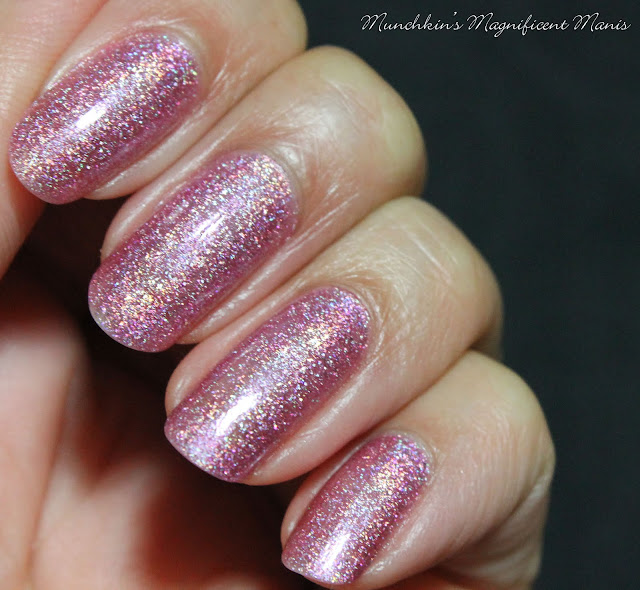
The secound polish we have in this duo is called Ghetto Galactic. This is a pink linear and scattered holographic polish as well, it basically is the same as Rocket Fuel but just pink. This applied just like the silver polish in three coats and a little sheer. Both of these polishes I think could also be used as toppers as well. 

Ghetto Galactic, Nails inc. Holler- Graphic duo  
   Ghetto Galactic, Nails inc. Holler- Graphic duo
       
This polish is still available on Sephora's website and most likely in stores as well for $15.00

This duo is also available on Nails Inc. website as well for the same price. 


Sparkle Like a Unicorn Nails Inc. Duo
 Sparkle Like a Unicorn Nails Inc. Duo

Rainbow Wishes, Nails Inc. Sparkle Like a Unicorn Duo
Rainbow Wishes, Nails Inc. Sparkle Like a Unicorn DuoRainbow Wishes, Nails Inc. Sparkle Like a Unicorn Duo

The secound duo we have is called Sparkle Like a Unicorn, the first polish we have is called Rainbow Wishes this is a light purple with a iridescent shift to it. This polish covered in two coats, which was pretty good for a light colored polish. This polish did have pretty good formula.

Dream Dust, Nails Inc. Sparkle Like a Unicorn Duo 
Dream Dust, Nails Inc. Sparkle Like a Unicorn Duo

Lastly we have Dream dust this is a shimmery pink polish with a gold shift to it, on the nails and depending on the lighting this polish can look different. In the photo above it was taken with a day time light bulb and the polish looks pink, in the bathroom which has a very yellow toned light this polish looks copper/ rose gold, and then in the kitchen this polish looks more purple toned. 

Also for some reason on the back of the polish book they described this polish incorrectly, they called it holographic, when it is clearly not, one is is iridescent and the other is a shimmer. So I am unsure if Nails Inc just does not know the different?
  
This polish duo unfortunately is no long available, but I don't know it might end up coming back, I know both of these duo's have been is stores for a long time.  This duo also went for $15.00.


The last thing I wanted to go over about these polishes is the bottle and the formula. As you can see the tops on these polishes have a weird rectangle shape, that can be removed and they have a small round top, this does make the polishes a little hard to open and to polish with, I don't think you can really polish with the silver cap on, I really would not want to, it would make polishing way to hard. The brushes are wide which I don't mind, it made polishing easy on my nails. 

As for formula on the back of the box it says formulated with long wear system. Most polishes I feel wear very well on me and I felt like these polishes really did not last any long then any other polish I have.   

In conclusion how well did my hubby do picking out polishes for me? I think he did very well all four polishes are very pretty, of course my favorite was the Holler- Graphic duo. Out of the Unicorn duo I liked Dream Dust the best, Rainbow Wishes was a little to light for my taste but still pretty. After all my hubby did listen to all the polish stuff that I tell him after all.  

Hope all of you enjoyed this review of the Nails Inc polishes that my hubby got me.

See you next time for more nail fun!     

Friday, September 21, 2018

Rumbly In My Tumbly- Pooh Bear Nail Design

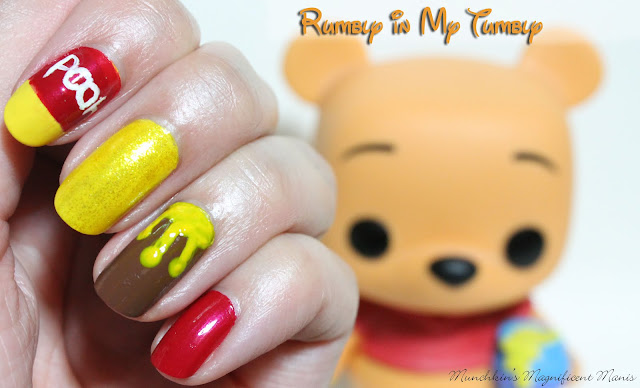
Hello everyone! Today we will be creating a cute Pooh Bear nail design. Originally I was going to create this to celebrate the release of the new live action Pooh Bear movie Christopher Robin, but the movie has been out for a while, it was released in theaters at the beginning of August, so I'm not sue if that is really relevant or not, but I feel like you can still have Pooh Bear on your nails at any time, so why not still create a Pooh Bear nail design. I did see the Christopher Robin movie in theaters and I thought it was good, I feel like it was more for adults though, basically people/ big kid that grew up watching Pooh Bear because it had a classic Pooh Bear feel to it, that some younger kid might not get.  

Pooh Bear Nail Design 
Pooh Bear Nail Design     

Here are the polishes and tools used to create this Pooh Bear nail design: 


Base and top coat- CND Stickey Base Coat and Revlon Extra Life No Chip top coat.

Polishes- Zoya Mini- Lillian, Sally Hansen- Triple Shine- Lemon Shark, Color Club- Daisy Does it, Nicole by OPI- That's Just Plain Nuts!, and OPI Red. 

Acrylic paint- yellow, red, white, and black. 

Nail art tools- thin detail and liner brush and very very thin/ tiny brush, and a large dotting tool.

A cup of water to clean off your nail art brushes.

Let's begin this hundred acre wood adventure with Pooh!  

Pooh Bear Nail Design
 Pooh Bear Nail Design
 Pooh Bear Nail Design

Apply a base coat as always and the let that dry.

Once your base coat is dry polish your thumb a light blue, your index and middle with a yellow polish, your ring finger nail brown, and your pinky finger nail with a red. Also on your middle finger nail apply a glittery yellow polish over the creme yellow polish as well.

Let that dry as well.

Then on the index finger once the yellow has dried, polish the top part (near the cuticle) of your nail red and leave the bottom part near the tip of your nail yellow, this will be for Pooh's shirt. 

Then on to Pooh Bear on the thumb nail. For Pooh himself I mixed paint to make his color, take a lot of yellow paint and small bit of red to make the yellow orange for Pooh Bear. Once you have the yellow orange the way you like (it did take me adding a little more yellow to try and get the color right.) make a large circle shape for his head and then two circles at the top for his ears, then fill that in, you may have to go over your Pooh Bear shape a few time to be opaque, I had to go over it three times.

Then on to his face. For his eyebrows take very small/ tiny brush with black paint on it and make two curved lines near the top of his head. Under his eyebrows make two black circles with a detail brush. Then with that same small/ tiny brush make a curved line right under his eyes, right under that is where his nose goes. Then with a detail brush make a small oval for his nose. Lastly Pooh need a smile, take your small/ tiny brush and make a large curved line for his smile, then two small lines at each end to complete his smile.    

Pooh Bear Nail Design  
  Pooh Bear Nail Design

On the middle and pinky finger nail, these two nails will have no nail art on them they will just have the polish color on them. As stated above I just applied a yellow glittery polish over the creme yellow polish, and then the red I left as is.

Pooh Bear Nail Design 
 Pooh Bear Nail Design

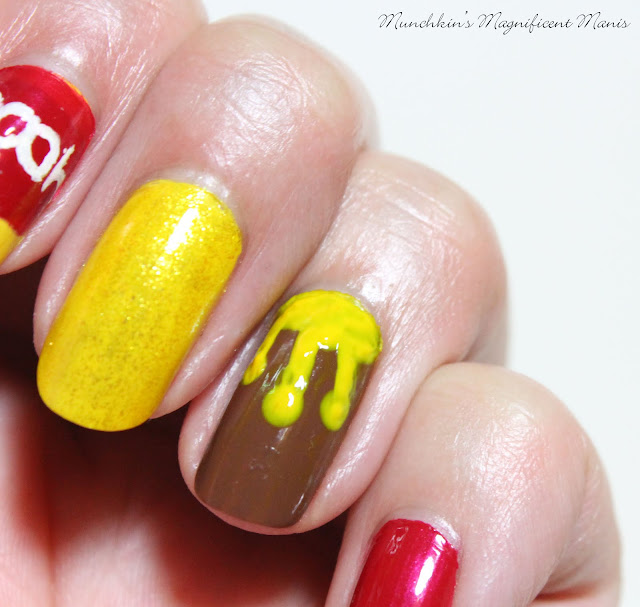
Now on to the dripping honey on the ring finger nail. I did this with acrylic paint, it did end up look a little bit thick, but is actually seems okay because it is suppose to be honey and honey is thick. Take a large dotting tool with yellow paint on it and make three or more dots at all different levels on your nail. Then with a liner brush make a glob of honey near the cuticle and make dripping lines that connect to the dots.

Pooh Bear Nail Design     Pooh Bear Nail Design

After you have finished your dripping honey nail, on to the hard part writing the word Pooh on the index nail, this will be for his shirt. I do have trouble my self writing word on the nail, you just have to slowly write out the word having your hand placed on the table. I did end up not giving my self enough space on the nail and I ended up have to smashing the letters together, so I suggest first make the P and then at the other end make the H and then the O's in the middle, so kind off backwards from how you would normally write.

Pooh Bear Nail Design    Pooh Bear Nail Design

Once you have your Pooh bear design the way you like apply a top coat to seal in your design and to help it last. 

Growing up and even now which Pooh Bear character was your favorite? Mine was Pooh Bear him self, My mom also likes Pooh as well, as for my hubby he has always liked Tigger. 

Hope all of you enjoyed this Pooh Bear nail design!

See you next time for more nail fun!   

Friday, September 14, 2018

Paradise Cove- Tropical Nail Design

Hello everyone! As promised I have one more tropical nail design to share with all of you, as summer comes to an end. I did this design a week ago but didn't get around to doing a post, and I thought I would share the back to school design that I did first ( I posted that on Tuesday.)  


 Tropical Island Nail Design


Here are the polishes and tools used for this tropical nail design:


Base and Top coat- CND Stickey Base Coat and Revlon Extra Life No Chip top coat.

Polishes- Finger paints- Tiffany imposter, Picture Polish- Salt Water- Nailstorming, and China glaze- white on white. 

Acrylic paints- black, white, blue, red, green, yellow. (basically all the colors.) 

Nail art brushes- thin stripper brush, detail and liner brushes, a flat brush and a fan brush. 

A cup of water to clean off your nail art brushes.


Tropical Island Nail Design
Start off with a thin layer of base coat and then let that dry.

Once your base coat has dried polish your thumb, index and pinky finger nail with a light blue polish ( the polish I used has a subtle holographic glitter in it). For your middle and ring finger nail which is the nails that we will be doing the design, polish those two nails with a slightly darker creme blue polish. 

Let that dry.

*Also once again a lot of the same techniques that we did for the other two nail designs we will be doing again for this design, but of course this is a completely different design.*   

 
Then for the topical design on the middle and ring finger nail. First leave just a little bit of that lighter blue creme polish showing, then on a larger flat brush near the cuticle with paint starting with a slightly lighter and going to a darker blue, we will be making a gradient for the sky. With the fan brush (while the paint is still kind of wet) start to blend those together, you will need to go over this a few time for the sky to be opaque.

Once you have the sky, add just a little bit of light green at the bottom of the sky and also kind of make that blend into the sky as well. 

Under that green make a large rectangle like shape for the water with white paint. 

Then on the tip of the nail and under the white water we just made, we will make a small patch of land. With your liner brush and brown paint, make kind of lumpy line and a curve at the top for a slop, and then fill that in with the brown paint.

Tropical Island Nail Design 
Tropical Island Nail Design

Next on to the palm trees, that will be peaking out from the sides of our nails. On our middle finger nail on the left side, with a thin stripper brush make three curved lines with a light green paint and then for the small palm leaves starting from a light to dark green (I used three shades of green) make a lot of small line from the larger three curved lines we just made. 

Repeat this step on the ring finger nail just make the palm leaves on the other side of the nail.  

Also for an add touch I added another piece of land that is suppose to be off in the distance. In the middle of the nail, with a detail brush with brown paint on it make another land formation with a curve and the a flat part.      

Tropical Island Nail Design 
Tropical Island Nail Design

Once you have your tropical nail design the way you like apply a top coat to seal in your design and to help it last though your tropical vacation.  

Hope all of you enjoined this tropical nail design and enjoy the last bits of summer like weather.

See you next time for more nail fun!
Tuesday, September 11, 2018

Back to School- Nail Design

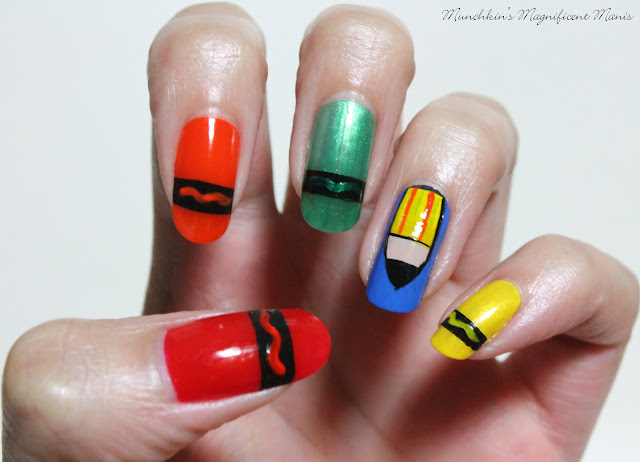
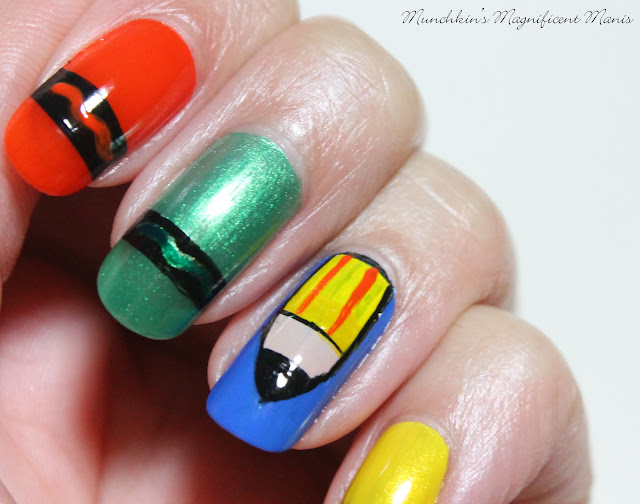
Hello everyone! It's that time of year again when kids and college students go back to school, yes I am a week or so late for this design that we will be doing today, but I thought it would still be okay to do. For the few years that I have been doing this blog I have never created a back to school themed nail design, so I thought I would this year. For this design we will be creating crayons on most of or nails and a pencil on our ring finger nail.   

Back to school nail design   
Back to school nail design

As always here are the polishes and nail art tools used for this back to school nail design:


Base and top coat- CND Stickey Base Coat and Revlon Extra Life No Chip top coat.

Polishes- Zoya- Renee- Redbook trio, Sally Hansen- Triple Shine- Play Koi, Sinful Colors- HD Nails, OPI- Hello Kitty- My Pal Joey, Sally Hansen- Triple Shine- Lemon Shark, Sinful Colors-Let's Meet (optional), and OPI Hawaii- Do you take Lei away 

Acrylic paint- white, yellow, black, and red. 

Nail art brushes-  detail and liner brushes, and a stripper brush.


Let get ready for back to school with this fun and colorful nail design!

Back to school nail design
Back to school nail design  

Start off with a thin layer of base coat to protect your nails. Then let that dry.

Once your base coat has dried polish your thumb red, index nail orange, middle finger nail green, ring finger nail blue, and pinky finger nail yellow (for the yellow I did use two yellows, a creme yellow then a shimmery yellow this optional, I just felt like do that.)  

Let your colored polish dry as well.

Back to school nail design   
Back to school nail design
Back to school nail design 

For all of our nails except our ring finger nail we will be making crayons on them. First we will start off with the crayon design. On all of our nails except our ring finger nail we will be making the thick black strip that is on crayons. Take a stripping brush with black paint on it and make a line kind of in the middle of the nail, then with some space in between that line make another line. Then with a liner or detail brush fill that in with black paint.

Back to school nail design   
Red crayon design on thumb nail

Let that dry and then with what ever color your nails is make a squiggly line on the black strip, you will need to go over that one more time as well.  

Now you have some crayons on your nails.

 Back to school nail design
 Back to school nail design
 Back to school nail design 

Next on to the pencil on our ring finger nail. For this part I did first make an outline of the pencil with white paint, you don't have to do this I just did this to be on the safe side. 

Where the triangle part of the pencil is or where the lead is, fill that part in with black paint. Then the center part, with a peach colored polish and then the bottom part of the pencil with a yellow paint. For some smaller detail you can outline the pencil if you want to with black paint, and then make two or more long orange lines on the yellow part of the pencil.  

Back to school nail design      Back to school nail design
Back to school nail design  

Once you have your design the way you like apply a top coat to seal in your nails design, and to help your nails design to last all the way through your first and maybe even your first week of school.  

What was your favorite subject in school? My favorite subject was always art class, I have always enjoyed coloring, painting and drawing, so that was always my favorite class. My least favorite was math, I was never to good with numbers.

Hope all of you enjoyed this back to school nail design and for all of you that are going back to school hope you have a great school year!
See you next time for more nail fun!