Showing posts with label China Glaze. Show all posts

Saturday, March 30, 2024

Easter Time- Easter Nail Design

Hello everyone! Happy Easter! Today on the blog we will be creating a cute Easter nail design with a bunny and a chick in an egg. 

Easter Nail Design

Easter Nail Design

Here are the polishes and nail art tools used to create the Easter design- 


Base and top coat- CND Stickey Base Coat and CND Super Shiney Top Coat. 

Polishes- China Glaze- Chalk Me Up!, Zoya Mini- Daisy, Zoya Mini- Rayne, Zoya Mini- Leslie, Zoya Mini- Eden, Holo Taco- Polar Princess, and Sally Hansen- Hard as Nails- Hard to get. 

Acrylic paint- White, black, yellow, green, red, and pink. (mixed yellow and red for orange if you don't have an orange paint.) 

Nail art brushes- Thin detail, linear and stripper brushes. 

Easter Nail Design

Apply a base coat and let that dry.

Polishes- 
Thumb- a light blue cream polish ( China Glaze- Chalk Me Up!)
Index- a light yellow shimmer (Zoya- Daisy)
Middle- a light blue shimmer (Zoya- Rayne)
Ring- a light purple shimmer (Zoya- Leslie)
Pinky- a pink cream polish (Zoya- Eden) 

Then take an iridescent polish, Holo Taco Polar Princess and polish it over the pink to give the pink a shimmer. 

Let that dry. 


Easter Nail Design
Easter Nail Design

For this design we will just be creating nail art on the ring finger and the thumb nail. The Index, middle and pink nail will just stay the blank colors with no nail art. 

Easter Nail Design

Chick in the Egg on the Ring Finger Nail- 

For your little chick I first made an outline of him with white and then went over him with yellow that way the yellow would pop more/ you can see it better.

First take a linear brush with white paint on it and make a large oval in the middle of the nail, add two lines above his head for hair, make a small half body for your chick too, we will let that dry. 

Once your base white has dried take a yellow paint and paint over the white a few time until it is opaque. 

For the egg shell make some triangle shapes along your nail above your chick, then fill in the bottom half of the nail with white polish. 

Lastly for his face make two small black dots for his eyes and then for his beak take a orange paint and make a small upside down triangle.
Easter Nail Design

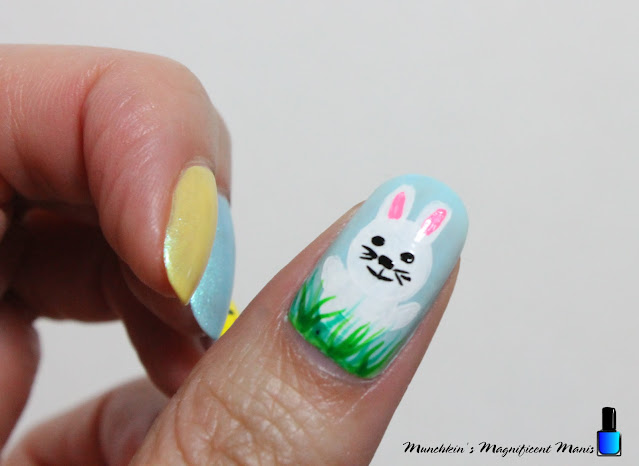
Easter Bunny on the Thumb Nail- 

On the thumb nail we will make a bunny in the grass. Take a detail brush with white paint on it and make a circle in the middle of the nail and fill that in for his head, then for his ears make two small oval shapes. For his body make a large oval, then for his arms make two thin oval shapes on each side of his body. 

Let that dry. 

For his face take that same detail brush with black paint on it and make two small dots for his eyes and one user that for his nose. 

Then take a stripper brush with black paint on it, make a few lines on the side of his face for whiskers. Then make a small line down his nose and a curved line for his smile. 

Lastly for his ears make a thick oval shape in his ears with pink paint. 

Now will need to make the grass for our bunny to sit in. Make sure you have two greens, a light and a dark green. First take your light green on a stripper brush and make some grass like lines under/ on your bunny, then do the same with a darker green. 

Easter Nail Design

Once your nails are Easter ready apply a top coat to seal in your nails and to help them to last.

Here is the practice version of the Easter design. I actually like how the chick turned out in the practice version because he looks chubby, I could not get him to look like this on my nails, my nails are not as wide as the nails that I practice on.  

Hope all of you enjoyed this Easter nail design and if you celebrate Easter hope you have a good Easter!

See you next time for more nail fun! 

Tuesday, February 11, 2020

Luv you- Valentine's Day Nail Design

Hello everyone! Happy almost Valentine's Day! For Valentine's Day this year we will be creating of course a heart design, along with some swirls too, and of course we have to have some glitter.

Happy Valentine's Day Nail Design 
Happy Valentine's Day Nail Design

Here are the polishes and nail art tools used to create this nail design:


Base and top coat- CND Stickey Base Coat and Revlon Extra Life No Chip top coat. 

Nail polishes- China Glaze mini- Sesame Street- Giggling All The Way, and Glitter Daze- Let's have a Waikiki.

Acrylic paints- White, red, and black.

Nail art brushes- Thin detail brush and thin stripper brush.

A cup of water to clean off your nail art brushes.

Happy Valentine's Day Nail Design  
Happy Valentine's Day Nail Design 
Happy Valentine's Day Nail Design

Apply base coat, then let that dry.

Polish- 
Thumb, index, middle, pinky- Shimmer pink polish.
Ring finger- Pink glitter polish. 

Let that dry.

Happy Valentine's Day Nail Design
 Happy Valentine's Day Nail Design

Starting with the thumb nail, first make a large heart near the left side of your nail.

Then make some random swirls coming from the heart, I did three from the top and one from the bottom. Then from those swirls create more. (I know that is a weird way to describe how to do that part, but I was not to sure how to describe that part.) 

Then from those swirls make a few hearts, I made four in different spots.

Happy Valentine's Day Nail Design
 Happy Valentine's Day Nail Design
 Happy Valentine's Day Nail Design

For the index and middle finger nail designs, these two are the same just on opposite sides.

On the index nail make a heart on the right side of the nail, then make a swirl on both sides, on the top of the heart make three curved lines at the top, then make a few dots a well. You can also outline the heart as well.

For the middle finger nail repeat the same steps just on the left side.

Happy Valentine's Day Nail Design
 Happy Valentine's Day Nail Design
 Happy Valentine's Day Nail Design

 Happy Valentine's Day Nail Design
 Happy Valentine's Day Nail Design
 Happy Valentine's Day Nail Design

Lastly the heart design on the pinky finger nail. Once again make a large heart in the middle of the nail and then make some swirls at the top and bottom. You can also outline the heart if you would like or not. 

Happy Valentine's Day Nail Design

Once you have your heart nail design the way you like, apply a top coat to seal in your design and to help it last through your Valentine's day date or just for fun.

Hope all of you have a nice Valentine's Day and hope all of you enjoy this design!

See you next time for more nail fun!

Monday, August 26, 2019

A Day At The Beach- Summer Beach Nail Design

Hello everyone! Sorry that I have not posted anything in a few weeks, I have just have had a lot of things coming up. Anyways this design I did a few weeks ago on my nails and now I am just now getting around to showing all of you. We will be creating a beach summer themed nail design, even though summer is sadly and way to quickly coming to an end. My favorite part of summer has always been just spending a relaxing day in the water at the beach, so what better way to celebrate the closing of summer then with a beach themed design. I mean after all even if summer might be ending their is still most likely still going to be some summer like weather for a little while longer, unless you live somewhere where it is warm year round.

 Summer Beach Nail Design 
Summer Beach Nail Design

Here are the polishes and tools used to create this beach nail design:  

 
Base and Top coat- CND Stickey Base Coat and Revlon Extra Life No Chip top coat.

Nail polishes- Finger paints- Tiffany imposter, China glaze- Shades of Paradise- Mer-Made For Bluer Waters, and Revlon- Gold Coin.

Nail art brushes- thin detail and liner brush, and thin stripper brush.

Other- Makeup sponge, and a small jar/ cup of water to clean off your nail art brushes.

Summer Beach Nail Design 
 Summer Beach Nail Design

On clean nails apply a thin layer of base coat, then let that dry.

Then polish your thumb and pinky nail with a shimmery ocean blue (I used China Glaze- Mer-Made For Bluer Waters), your index and middle finger with a gold polish (I used Revlon- Gold Coin) and then polish your ring finger nail with a light blue (I used Finger paints- Tiffany imposter.) 

Let that dry as well.

 Summer Beach Nail Design
Summer Beach Nail Design 
 Summer Beach Nail Design

Flip Flop on the index and middle nail, gold polish background:
  
We will start off with the flip flops on the index and middle finger nail. Take your thin liner brush with white or what ever colored paint you would like, and near the cuticle make a circle and then an oval that is attach to that to make the flip flop shape, then fill that in. 

For this you can make stripes of just leave it a sold color, for the design I did I decided to add stripes. For the stripes take a thin stripper brush with a light colored blue or once again what ever color you would like, then leave some white at the top for a white stripe, and then make a line under that for a blue stripe and then another under that, then fill that in with the light blue to make a thicker stripe. Repeat this step done the flip flop, I did this three times. 

Once you have your stripes we will add some of the bottom of the flip flop showing on the side. First take your stripping brush with black paint on it and outline the whole flip flop, then on one side make that part much thicker, to kind of show the bottom of the flip flop showing from the side.

Lastly we will add the strap that hold your foot into your flip flops. Once again take your thin stripper brush with black paint on it and make a V shape in the middle of your flip flop, you will need to go over this a few time to make it a little bit thicker.

Summer Beach Nail Design 
 Summer Beach Nail Design

Beach ball in the water on the ring finger nail:

Once you have your flip flops done, on to the beach ball in the water. First we will make the small waves in the water. Take some white paint and make it runny by adding water to it. Then take a makeup sponge and lightly dab it into the paint, then lightly dab it on to the nail to give a small wave effect.  

On to the beach ball, take your detail brush with white paint on it and make a circle near the tip of your nail. Then make three triangle shapes on the white circle; in red, yellow and blue. Then make a small white circle in the middle of the ball.

Summer Beach Nail Design 
 Summer Beach Nail Design


Here is the Practice design that I did.


Once your nails are beach ready apply a top coat to seal in your design and to help it to last through your beach adventure.  

Hope all of you enjoined this summer beach nail design and enjoy the rest of the summer as well.

See you next time for more nail fun!

Friday, May 10, 2019

I Choose You Pikachu- Pikachu Nail Design

Hello everyone! Today we will be doing something just a little bit different, in celebration of the new movie, Detective Pikachu that came out today, May 10. I will be showing you a recreation of the Pikachu design that I did back in 2015, this will not be a step by step tutorial because this design is very similar to the one I created in 2015, but  I will still add a link to that design if any of you would like to create it. 

Pokémon Pikachu Nail Design 2015 and 2019 
 Pikachu Nail Design 2015 and 2019

As all of you may have guessed I am a big Pokemon/ Pikachu fan and I super excited to see the new Detective Pikachu Movie! I have been a fan ever since Pokemon came to the USA in the 90's and Pikachu has always been my favorite. So I thought I would give the Pikachu design another try jut in time for the movie. 

As you can see from the photo above I did make a little bit of a change, on the thumb nail I add a teal background, I put Pikachu near the cuticle, and I painted Pikcahu with acrylic paint instead of polish like I did on the first design.
  
Pokémon Pikachu Nail Design 2015 and 2019

Then on the ring finger nail I made the Poke Ball/ a circle that did not covering up the whole nail on the same teal background. As for the other nails I decided to keep them the same, with the Poke Ball on the entire nail.   


Pokémon Pikachu Nail Design 2015 
 Pokémon Pikachu Nail Design 2015

With anything I feel that with time you can improve, looking back at the design I did back in 2015, I feel like I did better this time around, I mean the design I did back in 2015 when I first started this blog was still good, but I can tell that I have improved. The main thing I noticed is the cuticle area looks better now. 

 Pokémon Pikachu Nail Design
Pokémon Pikachu Nail Design 2019

Even the redo design that I did, I would still not mind recreating/ changing up this design again just to see if I can do better. On the design I created now, I did make the center parts of the Poke Balls a little big. Also what you can't see in the photo is I actually had to redo Pikachu on thumb because I messed up, but after waiting a while and trying again he came out really good.  


Pokémon Pikachu Nail Design
Pokémon Pikachu Nail Design 
Pikachu Design on thumb nail 

For this design I really wanted to recreate this design for the movie and just to see how I could improve on the design that I did back in 2015. Also along with the design it's self I feel like I have also improve on the photo as well. I do use a pro camera, well starter camera the Canon EOS Rebel T3 (this is a older camera, but still good), at first back in 2015 I took my photos next to a window, which is not always reliable, now I used a day time photography like bulb. I take my photos both then and now, in front of a box that I have covered with white paper or now sometimes a black piece of fabric. My set up is not fancy at all it is very basic, but I try to make my photos look like they are not just taken with a cellphone camera.    
Pokémon Pikachu Nail Design
Pokémon Pikachu Nail Design 

Pokémon Pikachu Nail Design 
Pokémon Pikachu Nail Design  

If you would like to create this design as well, here is the link to my first design called
 Pika- Pika and you can have you nails ready to see Detective Pikachu too.

Hope all of you enjoined this post even if it was not a step by step tutorial, but just a then and now.

See you next time for more nail fun!    

Friday, October 26, 2018

Purple Gradient and Chevron Nail Design

Hello everyone! Today we will be creating a simple gradient chevron nail design with purple polishes. For this nail design you can use what ever colors you would like, I just decided to go with purples and a gold background. 

Purple Gradient and Chevron Nail Design  
Gradient and chevron Nail Design 

Here are the polishes and tools used for this gradient and chevron nail design:


Base and top coat- CND Stickey Base Coat and  Revlon Extra Life No Chip top coat.

Polishes- Revlon- Gold Coin, OPI Hawaii- Lost my Bikini in Molokini, Zoya Sunshine- Delia, and  China glaze- Shades of Paradise- Board. Optional- Revlon- Holographic Pearls- Transforming Effects.

Nail art supplies- A thin stripper brush if needed for detail work/ clean up the lines, and stripping tape. 

Other- (not shown) small glass dappen dish with acetone in it to clean off nail art brush, tweezers to take stripping tape off of the nails. 

Let start this nail design!

Purple Gradient and Chevron Nail Design
 Purple Gradient and Chevron Nail Design 

Start off with a thin layer of base coat, and let that dry.

For this design you can do the chevron/ gradient on all of your nails or just a few, I decided to do the design on three nails; the thumb, middle and ring finger nails, and keep the index and pinky fingers a solid color.

Once your base coat has dried, polish all of the nails that you are going to do the design on with a gold polish, this is your base color/ gold stripes. 

If you are following the way I have done this design then polish your thumb, middle and ring finger nail gold, then polish your index nail with a dark purple (I used OPI Hawaii- Lost my Bikini in Molokini), and then polish your pinky finger nail with a light purple (I used Zoya Sunshine- Delia.) 

Purple Gradient and Chevron Nail Design  
Purple Gradient and Chevron Nail Design 

Once your base colors are pretty much fully dry, we can start the chevron/ gradient design. With the gradient you are suppose to go from lightest to darkest color (or the other way around) but I didn't follow what I just said on the middle and ring finger nail, I did follow what I said on the thumb nail.

Purple Gradient and Chevron Nail Design
 Purple Gradient and Chevron Nail Design Purple Gradient and Chevron Nail Design

For this design take a piece of stripping tape and cut it in to two pieces, place it on the nail one at a time in a triangle shape. Depending on how long your nail is will determine how many triangle shapes you can do, on my thumb I did three triangles of stripping tape, and then on the middle and ring finger nail, I did two.

Once you have your stripping tape placed, open all of your bottles of polish that way you can get to them easily. Staring near the cuticle polish a light purple or dark, depending on if you are following my color pattern or not, then polish a medium purple or light purple, then right away peel of the tape that you put on that area with tweezers.

* Do not let the polish dry on these two steps, doing this helps to make the lines look cleaner.*

Then for the last color, polish near the tip of the nail dark purple or medium purple and then once again with tweezers take off the stripping tape.


Also if need you can clean up your gold lines with a stripping brush dipped into that same polish. I needed to do this for the medium colored polish, China glaze- Boujee Board because of it being a matte it was acting kind of weird and when I pulled up the tape the polish wanted to come with it a little bit, so I had to go over the gold lines again with a stripping brush to make them look straight.    

Purple Gradient and Chevron Nail Design  
         Purple Gradient and Chevron Nail Design 

As an optional touch I applied a holographic topcoat to this design, but you can always leave it as is. I actually wish when I first did this design that I would have not applied the holo top coat to the chevron/ gradient part, and just applied it to the nails that had not design on it, but as the week went on and I had this on my nails it didn't look to bad and I started to like it. 

Anyways once you have finished your design apply a clear top coat to seal in your design and to help it it last.

Hope all of you enjoyed this design!

See you next time for more nail fun!