Showing posts with label Easter Eggs. Show all posts

Friday, April 18, 2025

No Bunny Like You- Easter Nail Design

Hello everyone! Happy Easter, well almost Easter. Today on the blog we will be creating a cute Eater themed nail design, with two bunnies and a chick in an egg, along with some dots. 

Easter Nail Design

Here are the polishes and nail art tools used to create this eater nail design:


Top and base coat- CND Stickey Base Coat and CND Super Shiney Top Coat.

Nail polishes- The Orly Melting Point Collection (6 polishes) 

Acrylic paint- White, black, red, yellow, and bright pink. Mix yellow and red to make orange. 

Nail art tools- Dotting tool, thin striper and linear brushes.

Other- Water to clean off your nail art brushes.

Easter Nail Design

Apply a base coat to clean dry nails, let that dry.

Polishes- 

Thumb- Purple polish (Orly- Melting Point- Glass Act) 

Index- Light blue green polish (Orly- Melting Point- Having a Smeltdown) 

Middle- Bright pink polish (Orly- The Floor is Lava- Melting Point) 

Ring- Yellow polish (Orly-Melting Point-Cesium The Day)

Pinky- Orange polish (Orly- Melting Point- Erupt To No Good)

Let that dry.

Easter Nail Design

Bunny Design On The Thumb Nail: 

First we will start with the bunny on the thumb nail. Take a linear brush with white paint on it and make a circle in the middle of the nail for your bunnies head, then feel that in your will need to do this a few times to be opaque. Also make two ears on top of your bunnies head as well.

Let that dry. Take a dotting tool with black paint on it and make two circles for the eyes. Then take your linear brush with black paint on it and make a small oval nose, next take your striper brush with black paint on it and make a month, then two lines on the sides of the face for the wickers on both sides.

Lastly take your linear brush with pink paint on it and make an oval in both of the ears, to make the inner part of the ears.  

Easter Nail Design

 Bunny on the Middle Finger Nail: 

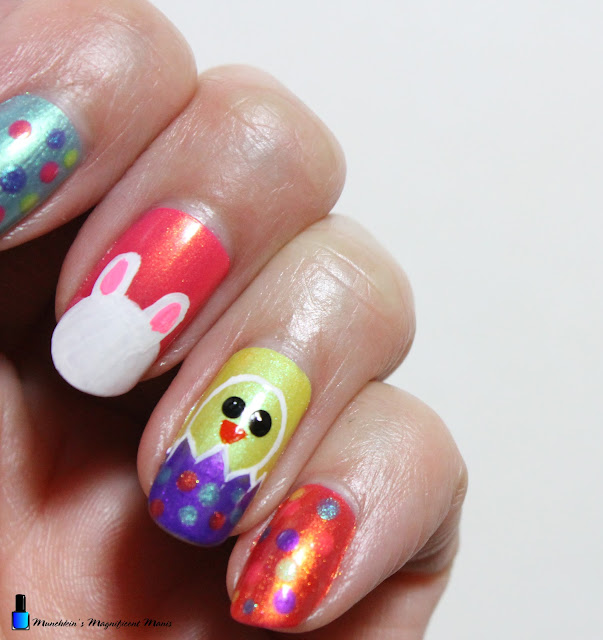
Next we will make the second bunny this is more less just a bunny shape or a bunny peeking. Take your linear brush with white paint on it and make a circle near the tip of the nail, fill that in you will need to go over this a few times to be opaque. Also once again make two ears on top of the head.

Let that dry and then make to ovals in the ears for the inner part of the ears. 
Easter Nail Design

Easter Chick in an Egg on the Ring Finger Nail: 

On the ring finger nail we will make a chick in an egg. First we will make the egg that our little chick will be in, take your striper brush with white paint on it and make a zig zag line half way up the nail and then two curved lines down the side of the nail. Then take a purple polish (Orly-Melting Point- Alloy Matey) and fill in the egg, you will most likely have to go over the outline of the egg again, due to the polish covering up the outline. 

For the chick, take your thin striper brush with white paint on it and make a circle for his head, I used a yellow background that way you don't have to feel in your chick. For the eye take your dotting tool with black paint on it and make two dots for the eyes. 

Lastly for the beak take your linear brush with orange paint on it and make an upside down triangle for the beak and fill that in.

For the final detail on the egg with your dotting tool take any random polish that you have put on the nails and dot that on the egg. 

Easter Nail Design

Dots on the Index and Pinky Nails:

Take your dotting tool with polish that you have used on the nails and dot them on random spots on the nails, make sure to wipe off the dotting tool in-between each polish. 

Easter Nail Design

Once your nails are Easter ready apply a top coat to seal in your nails and to help them last through all of your egg hunts.

Hope everyone that celebrates Easter has a good Easter!

Also here is the practice version.

Hope all of you enjoyed this Easter nail design!

See you next time for more nail fun! 

Saturday, March 30, 2024

Easter Time- Easter Nail Design

Hello everyone! Happy Easter! Today on the blog we will be creating a cute Easter nail design with a bunny and a chick in an egg. 

Easter Nail Design

Easter Nail Design

Here are the polishes and nail art tools used to create the Easter design- 


Base and top coat- CND Stickey Base Coat and CND Super Shiney Top Coat. 

Polishes- China Glaze- Chalk Me Up!, Zoya Mini- Daisy, Zoya Mini- Rayne, Zoya Mini- Leslie, Zoya Mini- Eden, Holo Taco- Polar Princess, and Sally Hansen- Hard as Nails- Hard to get. 

Acrylic paint- White, black, yellow, green, red, and pink. (mixed yellow and red for orange if you don't have an orange paint.) 

Nail art brushes- Thin detail, linear and stripper brushes. 

Easter Nail Design

Apply a base coat and let that dry.

Polishes- 
Thumb- a light blue cream polish ( China Glaze- Chalk Me Up!)
Index- a light yellow shimmer (Zoya- Daisy)
Middle- a light blue shimmer (Zoya- Rayne)
Ring- a light purple shimmer (Zoya- Leslie)
Pinky- a pink cream polish (Zoya- Eden) 

Then take an iridescent polish, Holo Taco Polar Princess and polish it over the pink to give the pink a shimmer. 

Let that dry. 


Easter Nail Design
Easter Nail Design

For this design we will just be creating nail art on the ring finger and the thumb nail. The Index, middle and pink nail will just stay the blank colors with no nail art. 

Easter Nail Design

Chick in the Egg on the Ring Finger Nail- 

For your little chick I first made an outline of him with white and then went over him with yellow that way the yellow would pop more/ you can see it better.

First take a linear brush with white paint on it and make a large oval in the middle of the nail, add two lines above his head for hair, make a small half body for your chick too, we will let that dry. 

Once your base white has dried take a yellow paint and paint over the white a few time until it is opaque. 

For the egg shell make some triangle shapes along your nail above your chick, then fill in the bottom half of the nail with white polish. 

Lastly for his face make two small black dots for his eyes and then for his beak take a orange paint and make a small upside down triangle.

Easter Nail Design

Easter Bunny on the Thumb Nail- 

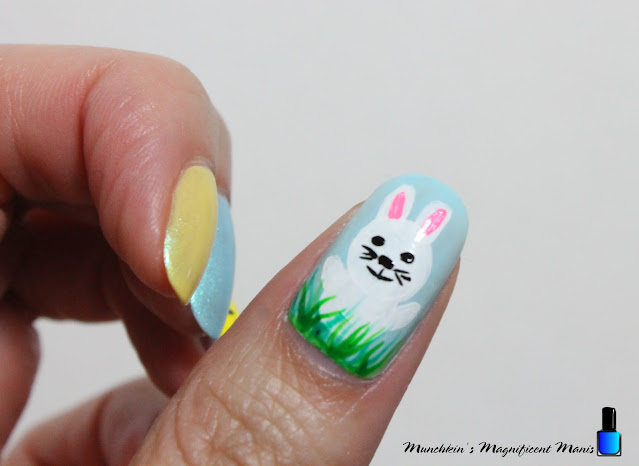
On the thumb nail we will make a bunny in the grass. Take a detail brush with white paint on it and make a circle in the middle of the nail and fill that in for his head, then for his ears make two small oval shapes. For his body make a large oval, then for his arms make two thin oval shapes on each side of his body. 

Let that dry. 

For his face take that same detail brush with black paint on it and make two small dots for his eyes and one user that for his nose. 

Then take a stripper brush with black paint on it, make a few lines on the side of his face for whiskers. Then make a small line down his nose and a curved line for his smile. 

Lastly for his ears make a thick oval shape in his ears with pink paint. 

Now will need to make the grass for our bunny to sit in. Make sure you have two greens, a light and a dark green. First take your light green on a stripper brush and make some grass like lines under/ on your bunny, then do the same with a darker green. 

Easter Nail Design

Once your nails are Easter ready apply a top coat to seal in your nails and to help them to last.

Here is the practice version of the Easter design. I actually like how the chick turned out in the practice version because he looks chubby, I could not get him to look like this on my nails, my nails are not as wide as the nails that I practice on.  

Hope all of you enjoyed this Easter nail design and if you celebrate Easter hope you have a good Easter!

See you next time for more nail fun! 

Saturday, April 11, 2020

Quarantine Easter- Easter Nail Design

Hello everyone! Happy Quarantine Easter! For all of you that celebrate Easter, times are weird, scary, and uncertain. For all of us that celebrate Easter, we will not be able to celebrate the way we have always had for previous years, by going to church and spending time with family, which will make it not feel like Easter, which I know it will feel that way for me. But I guess for now we will just have to think of the good times with family (and of course we can always call them) and of course the true meaning of Easter. 

Anyways today we will be creating a Easter eggs and chocolate bunny nail design to at lest fell a little like Easter, at lest on our nails. 

Easter Nail Design 
Easter Nail Design

Here are the polishes and tools used to create this Easter nail design:  


Base and top coats- CND Stickey Base Coat, Revlon Extra Life No Chip top coat, and NYC- Matte Me Crazy topcoat (I don't think this company is in business anymore, but you can use any matte topcoat.) 

Polishes- Nicole by OPI- That's Just Plain Nuts!, Julep- Lilou, Zoya Sunshine- Missy, and Zoya Sunshine- Delia. 

Acrylic paints- White, red (to make pink), blue, black, pale/ light yellow, purple, and brown.  

Nail art brushes- Thin detail brush and stripper brush.

Q-tip for the bunny tails. 

Small cup of water to clean off your nail art brushes.

Easter Nail Design
  Easter Nail Design Easter Nail Design 

Apply base coat, let that dry.

Polish-
Thumb and ring finger nail- brown  
Index- a light pale yellow
Middle- a light pink 
Pinky- purple

Paint colors- 
Light pink (mixed white and red)
Light blue (mixed white and blue)
Light yellow
Purple
White,black, and brown.

Let that dry as well.

Easter Nail Design 
 Easter Nail Design 

Easter Eggs- 

First we will start off with the Easter eggs on the index, middle and ring finger nail. For the index nail we will just make three stripe going down the nail. Take your thin stripper brush with some light blue paint on it and make a thin line going across the nail and then make another thin line next to it (we will make this line kind of thick), then fill in that area. Repeat this step with pink and then blue after that, you can always add more stripes or less depending how long or short your nails are. 

Next for the pink middle finger nail we will be making two lines on the top and bottom of the nail and some squiggly in the middle of the nail. Take your stripper brush with purple paint kind of near the cuticle, make a thin line and then another line next to that one, fill that in with purple. Repeat this step under the purple with blue and then near the tip of the nail repeat this step for the pink and yellow. In the middle of the nail make three squiggly lines with purple, yellow and blue. 

Easter Nail Design  
 Easter Nail Design
Easter Eggs- 

Lastly for the egg design on the pinky nail. Once again take a stripper brush with yellow paint on it and make a squiggly line near the cuticle and then a blue one  right under that nail. Repeat this step near the tip of the nails. Then we will add some pink dots, you can do this with a brush or dotting tool, just add some dots to some of the purple area, making sure some purple is still showing.


Chocolate Bunny on the ring finger nail-  

The chocolate bunny we will be making it on the ring finger and the thumb nail, each nail will be done different, the ring finger nail is probably the easiest of the two. For the ring finger nail take a brown paint that is lighter then your background color and first make the two ears, then make a circle for the head, and then another circle for his body, fill in each area as you go, you may need to go over it a few times. Once your bunny body is dry take a Q-tip and a small bit of white paint and dab the Q- tip where the tails should go to make the tail look fluffy.

 Easter Nail Design
Easter Nail Design 

Chocolate Bunny on the thumb nail- 

Lastly we will make the chocolate bunny on the thumb nail, this bunny is more of an outline compared to the bunny on the ring finger nail. Take a stripper brush with black paint on it, for the ears make a line, then a curved line at the top, and another straight line going down then a curved line in the middle of the head, then repeat the last step for the other ear. 

For the head, make a curved line on each side of the head. Lastly for the bunny body make two curved lines on each side under the head. For the finishing touch just like the other bunny take a Q-tip and a small bit of white paint and dab the Q- tip where the tails should go to make the tail look fluffy.

Easter Nail Design   Easter Nail Design

Once your nails are Easter ready, apply a glossy top coat to all of the nails and let that dry, to give your chocolate bunnies that chocolate look apply a matte top coat to your thumb and ring finger nail. I did apply a matte top coat to the thumb nail, but it still look a little bit shiny.  


 Here is my practice design where I made the bunny on the ring finger nail white chocolate, but I ended up liking both bunnies to look like milk chocolate.


Speckled Egg Nails
Speckled Egg Nails
Speckled Egg Nails on my right hand

Also here is another very simple way you can make your nails look Easter like. I did this on my other hand, the speckled egg look. I just polished my nails with some Easter colored polishes and added a topcoat that had black and white pieces in it. If you don't have this kind of polish you can always just make small dots on the nail with paint and a brush. 

 
 Here are the polishes I used; Revlon- Rebel graffiti, Julep- Brandis, Zoya Sunshine- Missy, Zoya Mini- Lillian,Zoya Sunshine- Delia, and Julep- Lilou.   


Hope all of you enjoyed this Easter design and hope all of you have a Happy Easter!

See you next time for more nail fun!