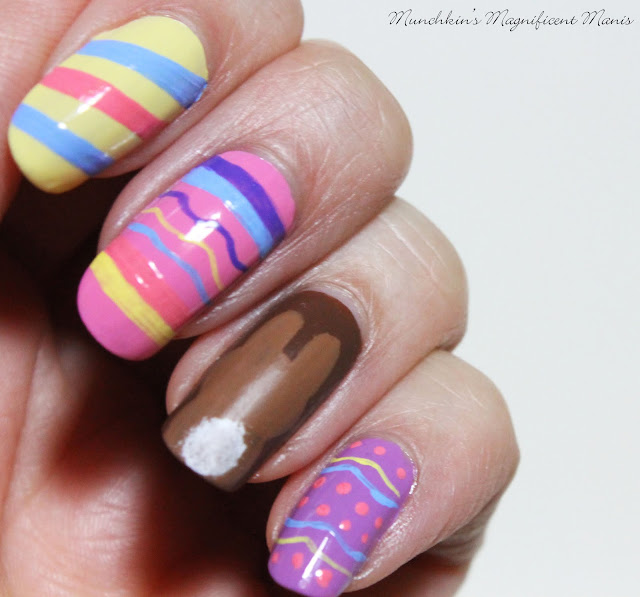
Anyways today we will be creating a Easter eggs and chocolate bunny nail design to at lest fell a little like Easter, at lest on our nails.
Easter Nail Design
Here are the polishes and tools used to create this Easter nail design:
Base and top coats- CND Stickey Base Coat, Revlon Extra Life No Chip top coat, and NYC- Matte Me Crazy topcoat (I don't think this company is in business anymore, but you can use any matte topcoat.)
Polishes- Nicole by OPI- That's Just Plain Nuts!, Julep- Lilou, Zoya Sunshine- Missy, and Zoya Sunshine- Delia.
Acrylic paints- White, red (to make pink), blue, black, pale/ light yellow, purple, and brown.
Nail art brushes- Thin detail brush and stripper brush.
Q-tip for the bunny tails.
Small cup of water to clean off your nail art brushes.
 Easter Nail Design
Apply base coat, let that dry.
Polish-
Thumb and ring finger nail- brown
Index- a light pale yellow
Middle- a light pink
Pinky- purple
Paint colors-
Light pink (mixed white and red)
Light blue (mixed white and blue)
Light yellow
Purple
White,black, and brown.
Let that dry as well.
Easter Nail Design
Easter Eggs-
First we will start off with the Easter eggs on the index, middle and ring finger nail. For the index nail we will just make three stripe going down the nail. Take your thin stripper brush with some light blue paint on it and make a thin line going across the nail and then make another thin line next to it (we will make this line kind of thick), then fill in that area. Repeat this step with pink and then blue after that, you can always add more stripes or less depending how long or short your nails are.
Next for the pink middle finger nail we will be making two lines on the top and bottom of the nail and some squiggly in the middle of the nail. Take your stripper brush with purple paint kind of near the cuticle, make a thin line and then another line next to that one, fill that in with purple. Repeat this step under the purple with blue and then near the tip of the nail repeat this step for the pink and yellow. In the middle of the nail make three squiggly lines with purple, yellow and blue.
Easter Nail Design
Easter Eggs-
Lastly for the egg design on the pinky nail. Once again take a stripper brush with yellow paint on it and make a squiggly line near the cuticle and then a blue one right under that nail. Repeat this step near the tip of the nails. Then we will add some pink dots, you can do this with a brush or dotting tool, just add some dots to some of the purple area, making sure some purple is still showing.
Chocolate Bunny on the ring finger nail-
The chocolate bunny we will be making it on the ring finger and the thumb nail, each nail will be done different, the ring finger nail is probably the easiest of the two. For the ring finger nail take a brown paint that is lighter then your background color and first make the two ears, then make a circle for the head, and then another circle for his body, fill in each area as you go, you may need to go over it a few times. Once your bunny body is dry take a Q-tip and a small bit of white paint and dab the Q- tip where the tails should go to make the tail look fluffy.
Easter Nail Design
Chocolate Bunny on the thumb nail-
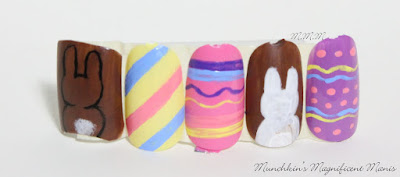
Lastly we will make the chocolate bunny on the thumb nail, this bunny is more of an outline compared to the bunny on the ring finger nail. Take a stripper brush with black paint on it, for the ears make a line, then a curved line at the top, and another straight line going down then a curved line in the middle of the head, then repeat the last step for the other ear.
For the head, make a curved line on each side of the head. Lastly for the bunny body make two curved lines on each side under the head. For the finishing touch just like the other bunny take a Q-tip and a small bit of white paint and dab the Q- tip where the tails should go to make the tail look fluffy.
Once your nails are Easter ready, apply a glossy top coat to all of the nails and let that dry, to give your chocolate bunnies that chocolate look apply a matte top coat to your thumb and ring finger nail. I did apply a matte top coat to the thumb nail, but it still look a little bit shiny.
Here is my practice design where I made the bunny on the ring finger nail white chocolate, but I ended up liking both bunnies to look like milk chocolate.


Speckled Egg Nails on my right hand
Also here is another very simple way you can make your nails look Easter like. I did this on my other hand, the speckled egg look. I just polished my nails with some Easter colored polishes and added a topcoat that had black and white pieces in it. If you don't have this kind of polish you can always just make small dots on the nail with paint and a brush.
Here are the polishes I used; Revlon- Rebel graffiti, Julep- Brandis, Zoya Sunshine- Missy, Zoya Mini- Lillian,Zoya Sunshine- Delia, and Julep- Lilou.
Hope all of you enjoyed this Easter design and hope all of you have a Happy Easter!
See you next time for more nail fun!


Great nails. Love both :-D
ReplyDelete