Showing posts with label Finger paints. Show all posts

Monday, August 26, 2019

A Day At The Beach- Summer Beach Nail Design

Hello everyone! Sorry that I have not posted anything in a few weeks, I have just have had a lot of things coming up. Anyways this design I did a few weeks ago on my nails and now I am just now getting around to showing all of you. We will be creating a beach summer themed nail design, even though summer is sadly and way to quickly coming to an end. My favorite part of summer has always been just spending a relaxing day in the water at the beach, so what better way to celebrate the closing of summer then with a beach themed design. I mean after all even if summer might be ending their is still most likely still going to be some summer like weather for a little while longer, unless you live somewhere where it is warm year round.

 Summer Beach Nail Design 
Summer Beach Nail Design

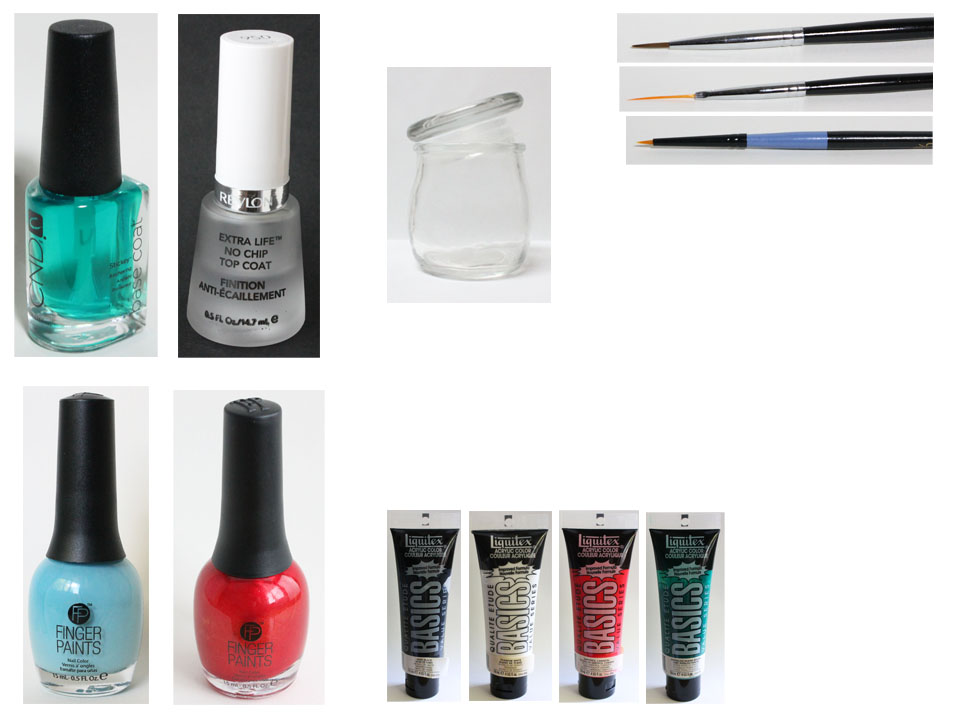
Here are the polishes and tools used to create this beach nail design:  

 
Base and Top coat- CND Stickey Base Coat and Revlon Extra Life No Chip top coat.

Nail polishes- Finger paints- Tiffany imposter, China glaze- Shades of Paradise- Mer-Made For Bluer Waters, and Revlon- Gold Coin.

Nail art brushes- thin detail and liner brush, and thin stripper brush.

Other- Makeup sponge, and a small jar/ cup of water to clean off your nail art brushes.

Summer Beach Nail Design 
 Summer Beach Nail Design

On clean nails apply a thin layer of base coat, then let that dry.

Then polish your thumb and pinky nail with a shimmery ocean blue (I used China Glaze- Mer-Made For Bluer Waters), your index and middle finger with a gold polish (I used Revlon- Gold Coin) and then polish your ring finger nail with a light blue (I used Finger paints- Tiffany imposter.) 

Let that dry as well.

 Summer Beach Nail Design
Summer Beach Nail Design 
 Summer Beach Nail Design

Flip Flop on the index and middle nail, gold polish background:
  
We will start off with the flip flops on the index and middle finger nail. Take your thin liner brush with white or what ever colored paint you would like, and near the cuticle make a circle and then an oval that is attach to that to make the flip flop shape, then fill that in. 

For this you can make stripes of just leave it a sold color, for the design I did I decided to add stripes. For the stripes take a thin stripper brush with a light colored blue or once again what ever color you would like, then leave some white at the top for a white stripe, and then make a line under that for a blue stripe and then another under that, then fill that in with the light blue to make a thicker stripe. Repeat this step done the flip flop, I did this three times. 

Once you have your stripes we will add some of the bottom of the flip flop showing on the side. First take your stripping brush with black paint on it and outline the whole flip flop, then on one side make that part much thicker, to kind of show the bottom of the flip flop showing from the side.

Lastly we will add the strap that hold your foot into your flip flops. Once again take your thin stripper brush with black paint on it and make a V shape in the middle of your flip flop, you will need to go over this a few time to make it a little bit thicker.

Summer Beach Nail Design 
 Summer Beach Nail Design

Beach ball in the water on the ring finger nail:

Once you have your flip flops done, on to the beach ball in the water. First we will make the small waves in the water. Take some white paint and make it runny by adding water to it. Then take a makeup sponge and lightly dab it into the paint, then lightly dab it on to the nail to give a small wave effect.  

On to the beach ball, take your detail brush with white paint on it and make a circle near the tip of your nail. Then make three triangle shapes on the white circle; in red, yellow and blue. Then make a small white circle in the middle of the ball.

Summer Beach Nail Design 
 Summer Beach Nail Design


Here is the Practice design that I did.


Once your nails are beach ready apply a top coat to seal in your design and to help it to last through your beach adventure.  

Hope all of you enjoined this summer beach nail design and enjoy the rest of the summer as well.

See you next time for more nail fun!

Monday, August 5, 2019

Tropical vacation- Tropical nail design

Hello everyone! Hope everyone is having a nice summer! I don't know about all of you but I feel like summer is going way to fast, I still can't believe it is already August! Anyway in summer I always like to create tropical nail designs, so once again I created a tropical sunset nail design for all of you. Plus I don't know about all of you but I am always dreaming about going on a nice tropical vacation, so with that in mind, that is what we will be doing today creating a mini vacation on our nails and to have a little piece of summer on our nails. 

Tropical Nail Design  
Tropical Nail Design

Here are the polishes and tools used to create this bright and fun nail design:


Base and top coat- CND Stickey Base Coat and Revlon Extra Life No Chip top coat.

Nail polishes- Finger paints- Legendary Lore and Sally Hansen- Triple Shine- Lemon Shark.

Acrylic paints- black, white, red, blue, yellow, and bright pink.

Nail art brushes- thin detail brush and a thin stripper brush. 

A cup of water to clean off your nail art brushes.

Tropical Nail Design    
Tropical Nail Design
  Tropical Nail Design 

As always start off with clean dry nails that are free of old polish, and apply a thin layer of base coat.

Let that dry.

Once your base coat has dried polish your thumb, index, and pinky nail with a shimmer pinkish, gold polish (I used Finger paints- Legendary Lore). Then the nails that we will be doing the nail art, the middle and ring finger polishes those yellow. 

Let that dry as well. 

Tropical Nail Design  
 Tropical Nail Design 

We will first start off with the design on the middle finger nail. 

The Sky and Ocean

For the sky you will need a bright pink, orange, red and yellow (yellow is for mixing). 

Starting near the cuticle on a detail brush paint a strip of bright pink, under that an orange, red, orange again, under that leave some of the yellow polish showing. You will need to go over this about three time, each time you go over the colors start to blend them together so it looks like a gradient. I did use some yellow paint over the yellow polish to help with the blending.   

*Just a Note: For this design I went back and forth between the two nails just to make sure each part was dry before starting another part. *

Once that has dried on to the water/ ocean. For the ocean I took some darker blue and white and mixed them together to make a lighter blue, then just dab the paint on with the detail brush. Then once that has dried just make some small white lines and blend them into the water, for waves.     

The Palm Tree and Land

For the big palm tree coming form the side of the nail.Take your thin stripper brush with black paint on it, from the right hand corner make a long line for the tree trunk.Then make six curved lines and one straight line form the top, for the outline/ shape of the palm tree, then you just add small lines to the branches for the palm leaves.

For the land on the tip of the nail make a thick black curved line and two hill shapes on each side.  

Tropical Nail Design
  Tropical Nail Design 

The Orange, Red, and Yellow Sky 

Now on to the design on the ring finger. For the sky on this nail we will first need to leave some of the yellow polish showing and then have orange under that, red and then orange again, then leave some of the yellow polish showing near the tip of the nail as well.  

Then repeat the same steps that we did for the the middle finger nail.
 
Three Palm Trees

For this nail we will make three palm trees, two tall trees on the sides of the nail and a short one in the middle. 

Once again repeat the same steps that we did for the palm tree on the middle finger nail. Just make then going straight up the nail.  

Tropical Nail Design
 Tropical Nail Design
Tropical Nail Design 

Once your tropical design is vacation ready, apply a top coat to seal in your design and to help your nails to last.   


Also here is the practice design that I did as well.
 

Hope all of you enjoyed this bright tropical nail design!  

See you next time for more nail fun!

Wednesday, May 1, 2019

Cherry Fest- Cherry Nail Design

Hello everyone! Happy first day of May! I can't believe it's already May, time is going by way to fast! Anyways today we will be create a fun and cute cherry design that I thought would be cute for spring and summer time. When it comes to cherries I don't actually like the fruit is self, but I do like cherry flavored candy and cherry scented things, my favorite fruit is strawberries and pineapples. What is your favorite fruit?
  
Cherry Nail Design  
Cherry Nail Design  

Here are the polishes and nail art tools to create this cute cherry nail design:  


Base and top coat- CND Stickey Base Coat and Revlon Extra Life No Chip top coat.

Nail polishes- Finger paints- Tiffany imposter, and Finger paints- Cubism Crimson.
(Just two polishes that is all you need, the rest is done with paint.) 

Acrylic paint- black, white, red, and green.

Nail art tools- thin liner brush, thin stripper brush, and a very small thin detail brush.

A cup of water to clean off your nail art brushes.

Cherry Nail Design  
 Cherry Nail Design 

Start off with clean nails, with no polish on them, then on your dry nails apply a thin layer of base coat to help your design to last and to protect them as well.

Let that dry. 

Then polish your thumb, middle and ring finger nail with a light blue, these are the nails that we will be doing the nail art on. Then on your index and pinky nail polish those two nails with a shimmer red polish, those two nails will just stay red.

Let that dry as well.

Cherry Nail Design
Cherry Nail Design 

Once your base polishes has dried, we will create the cherry nail art on our thumb, middle and ring finger nails, you also can always do this design on all the nails or even just one, it is up to you.   

For the cherries I did use two different colors of red, the red paint that I already had, and then I added a very small amount of black to the red a well, to make the red a little bit darker, although when I used the two colors on the nail it was a little hard to see the different in color. 

For the cherry shapes, take a liner brush with red paint on it and make random circles on the nail, making sure to leave a good amount of blue/ background around the nail. As stated above I did use two different reds, so make sure some of the cherries are a lighter/ brighter red and some are a darker red.

Cherry Nail Design  
Cherry Nail Design

Also for the cherries you can make some of them overlap like I did more so on the thumb, and some that are just one cherry. 

Then on to the steams of the cherries, take a thin stripper brush with green paint on it and from the red circles/ cherries we just made make a green line. On the cherries that are overlapping make the green lines connect, also on some of the steams make some smaller lines for leaves. 

For a small added touch I added a few very small leaves in the area around the cherries, most of the nail I just put three leaves. 

For are very last small detail we will add a very small white line on the cherries for the refection. Take your very small detail brush with white paint on it and on the corner of your cherries make a very small curved line. 

 Cherry Nail Design
 Cherry Nail Design 

Once you have your cherry design the way you like and ready for spring/ summer, apply a top coat to seal in your design and to help it last. 

Hope all of you enjoyed this cute and simple cherry nail design, that is really good for beginners.  

See you next time for more nail fun!  

Friday, December 14, 2018

Reindeer Games- Christmas Nail Design

Hello everyone! I don't know about all of you, but I can't believe it's all ready almost Christmas! I literally was just doing fall design (I was a little behind on fall designs, so maybe that's way.) For today we will be creating a Christmas nail design, with everyone's favorite reindeer, Rudolph, along with some Christmas trees. 

Christmas Nail Design, Rudolph and Christmas Trees  
Christmas Nail Design, Rudolph and Christmas Trees

Here are the polishes and nail art tools used for this Holiday/ Christmas nail design:


Base and top coat- CND Stickey Base Coat and Revlon Extra Life No Chip top coat.

Nail polishes- Finger paints- Tiffany imposter, Zoya- Estelle, Snowman rainbow glitter- frosty, Funky Fingers- As If, and China glaze mini- Grinch- Lukewarm Wishes

Acrylic paint- Green, white, red, black, brown, peach.

Nail art brushes-  Thin detail brush, stripper brush, liner brush, small flat brush and a very small detail brush. (not sure why I used so many brushes?) 

Small cup of water to clean off nail art brushes.


Let's start this reindeer game! 

Christmas Nail Design   
Christmas Nail Design

First start off with a thin layer of base coat over your clean nails, then let that dry.

Then polish your thumb, index, and ring finger with a light blue (I used Finger paints- Tiffany imposter) then once that light blue has dried to add a shimmer to the blue I applied China Glaze- Grinch- Lukewarm Wishes. Then on the middle and pinky finger nail polish those nails with dark shimmery blue (I used Zoya- Estelle).

Let that dry.

Christmas Nail Design   
Christmas Nail Design  
 Christmas Nail Design   

Once your polish has dried we will make our little trees on the index and ring finger nails. For the tree this is suppose to be done by the one stroke method, where you would dip your flat brush into green first and then white, then begin to paint your tree. Well that was not working out for me, so we will do this a little different.

On a small flat brush with green on it near the tip of the nail make a thick green line, by staring on one side and going to the other, by just pushing the brush up and down a little to make a line. Then take that same brush with white paint on it and right under the green do the same thing, just make this line thinner for the snow on the tree. 

Repeat this step three more times, each time you go up the tree make the green and white part shorter, until you get to the top then make a small triangle. 

   Christmas Nail Design
  Christmas Nail Design  

Next we need to add some ornaments to our tree, this is done simply with some glitter. I took a small amount on my nail mat and with a toothpick placed the glitters pieces on a few parts of the trees. For the star I have a polish that has stars in it, I just fished out one star out of the polish and just placed it on top of the tree.

Christmas Nail Design, Rudolph 
  Christmas Nail Design, Rudolph

Once you have your trees the way you like we will finish up this design with Rudolph the red nose reindeer. With thin liner brush with peach paint on it (yes I did get a peach and a brown paint, ever time I would try and make a brown color it would always turn out to dark, so I thought it would be easier to just buy a brown paint.) make a circle and fill that in, it can be kind a sheer at first.

Then for his mouth make a oval near the bottom of the circle, you may need go over this a few time to be opaque. For the rest of the circle fill that in a few time with brown paint, then  make two triangles at the top for his ears. Then for his antlers make two long lines with two small lines at the top.

Now on to his face, with your very small brush make to curved lines for his eyes, for his noes make a large red circle and then for his mouth make to upside down curved lines.

This is optional and I felt made Rudolph look better, you can outline him with black paint. This part is kind of hard, that why I suggested it as optional. 

Christmas Nail Design, Rudolph and Christmas Trees    Christmas Nail Design, Rudolph and Christmas Trees

Once Rudolph is already to help out Santa, you can apply a top coat to help your nails to last until Christmas, or at lest a week (that's about how long my polish last for me.)  

Hope all of you enjoyed this Christmas nail design, I do plan on doing another Christmas nail design using The Grinch China Glaze polishes for next week.  

See you next time for more nail fun!

Also hope all of you are have a wonderful start to the holiday season! 

Friday, September 14, 2018

Paradise Cove- Tropical Nail Design

Hello everyone! As promised I have one more tropical nail design to share with all of you, as summer comes to an end. I did this design a week ago but didn't get around to doing a post, and I thought I would share the back to school design that I did first ( I posted that on Tuesday.)  


 Tropical Island Nail Design


Here are the polishes and tools used for this tropical nail design:


Base and Top coat- CND Stickey Base Coat and Revlon Extra Life No Chip top coat.

Polishes- Finger paints- Tiffany imposter, Picture Polish- Salt Water- Nailstorming, and China glaze- white on white. 

Acrylic paints- black, white, blue, red, green, yellow. (basically all the colors.) 

Nail art brushes- thin stripper brush, detail and liner brushes, a flat brush and a fan brush. 

A cup of water to clean off your nail art brushes.


Tropical Island Nail Design
Start off with a thin layer of base coat and then let that dry.

Once your base coat has dried polish your thumb, index and pinky finger nail with a light blue polish ( the polish I used has a subtle holographic glitter in it). For your middle and ring finger nail which is the nails that we will be doing the design, polish those two nails with a slightly darker creme blue polish. 

Let that dry.

*Also once again a lot of the same techniques that we did for the other two nail designs we will be doing again for this design, but of course this is a completely different design.*   

 
Then for the topical design on the middle and ring finger nail. First leave just a little bit of that lighter blue creme polish showing, then on a larger flat brush near the cuticle with paint starting with a slightly lighter and going to a darker blue, we will be making a gradient for the sky. With the fan brush (while the paint is still kind of wet) start to blend those together, you will need to go over this a few time for the sky to be opaque.

Once you have the sky, add just a little bit of light green at the bottom of the sky and also kind of make that blend into the sky as well. 

Under that green make a large rectangle like shape for the water with white paint. 

Then on the tip of the nail and under the white water we just made, we will make a small patch of land. With your liner brush and brown paint, make kind of lumpy line and a curve at the top for a slop, and then fill that in with the brown paint.

Tropical Island Nail Design 
Tropical Island Nail Design

Next on to the palm trees, that will be peaking out from the sides of our nails. On our middle finger nail on the left side, with a thin stripper brush make three curved lines with a light green paint and then for the small palm leaves starting from a light to dark green (I used three shades of green) make a lot of small line from the larger three curved lines we just made. 

Repeat this step on the ring finger nail just make the palm leaves on the other side of the nail.  

Also for an add touch I added another piece of land that is suppose to be off in the distance. In the middle of the nail, with a detail brush with brown paint on it make another land formation with a curve and the a flat part.      

Tropical Island Nail Design 
Tropical Island Nail Design

Once you have your tropical nail design the way you like apply a top coat to seal in your design and to help it last though your tropical vacation.  

Hope all of you enjoined this tropical nail design and enjoy the last bits of summer like weather.

See you next time for more nail fun!

Friday, August 24, 2018

Pool Party- Swimming Pool Nail Design

Hello everyone! Hope everyone is enjoying the last bits of summer, But just because the calendar says that summer is coming to an end does not always mean that the weather will automatically get cold. For today's design I wanted to create a fun pool party nail design with all of you, to celebrate/ enjoy the last bits of summer by the pool or beach. 

pool nail design 
Pool Nail Design

Here are the polishes and nail art tools used for this pool nail design:

 
Base and top coat - CND Stickey Base Coat and Revlon Extra Life No Chip top coat.

Nail polishes-  Finger paints- Tiffany imposter, OPI- Hello Kitty- My Pal Joey, and  China glaze- white on white.

Acrylic paints-  White, red, blue, yellow, and green.

Nail art brushes- thin detail brush, and a medium dotting tool.

Other nail art supplies- Liquid latex for easier clean up around your nails, a plastic cup of room temp water for marble effect, rubbing alcohol in a spray bottle or hair spray, toothpicks to clean up the polish from the water, and paper towel. (Items not shown in photo above)

Other- cup of water for cleaning up nail art brushes.  

Let's start this pool party! Where is your favorite place to swim in a pool, at the lake or in the ocean? My most favorite place to swim is the ocean, but I don't live near an ocean so I have to settle for a lake.  

pool nail design
pool nail design

Start off with a thin layer of base coat, and then let that dry.

Once your base coat has dried polish your thumb, middle, and pinky finger nail with a light blue polish, and then polish your index and ring finger nail with a darker blue polish, or you can always polish more of your nails with the dark blue, it is up to you.

Now let your base colors of blue dry. Then grab a plastic cup of room temp water, this will be for the marbling effect for the pool water. You will also need hair spray or rubbing alcohol in a spray bottle for this as well.

For less of a mess apply a liquid latex around your fingers, if you are allergic to latex don't use this around your finger, you can always use tape instead.   

pool nail design 
 pool nail design

For this part of the design we will kind of be doing a water marble design. Take a white polish with a lot of polish on the brush and drip it into the water, and wait for is to spread. 

Then take your spray with rubbing alcohol or hair spray and not to close to the cup start to spray the polish to where it has a splatter look to it.

Then dip your finger into the part of the polish that you like, then take a toothpick and remove the extra polish from the cup, and then take your finger out of the cup, and remove the liquid latex, also if need to clean up any of the polish that might have gotten on your fingers.

Repeat this step for all of your nails, and then let this part dry.

pool nail design 
          pool nail design

Once your marble design has dried we will make this look more like a swimming pool, by adding in a beach ball and a pool float.  

On the middle finger nail we will make a beach ball. Take a thin detail brush with white paint on it and make a circle. Then add a blue, yellow, red and green triangle shapes to the ball. To finish the ball take a dotting tool with white paint on it and make a dot in the middle of the ball.

For the ring finger nail we will make a pool float. With that same detail brush with white paint on it make a donut shape. Then make red lines going all around the tube/ float.

pool nail design 
 pool nail design

Once your pool design is swim ready, apply a top coat to seal in your design and to help it last through all the rest of your summer pool parties.   

Also for the marbling, I feel like it kind of looks like clouds too, but I made it work for the swimming pool design. So you can also use this technique for make clouds too.

Hope all of you enjoyed this nail design!

See you next time for more nail fun!

Friday, July 20, 2018

Random Polish Time- Nail Polish Review

Hello everyone! Today we have a random post, as a nail polish lover I continuously by nail polish to where my collection as grown to 223 bottles of polish, a lot of times now I will be at the store and I will look at a bottle of polish or collection and I will like the polish but I will not be sure if I all ready have that same color or a color very close to it (the problems of having to much nail polish.) Anyways a few moths ago I found three polishes one at Sally Beauty and two at Walmart that I felt like where worth doing a small review on. 

Finger Paints and Color Club 
Finger Paints and Color Club

First we will take a look at the polish from Sally Beauty, Finger Paints.

Finger Paints Legendary Lore
 Finger Paints Legendary Lore
 Finger Paints Legendary Lore 

The first polish we have is called Legendary Lore from Finger Paints this polish is a pink iridescent polish with a gold shift/ shimmer. This polish applied well in two coats, it looks like it would be kind of a sheer polish, but it was not as sheer as it appears to be. 

This polish I really liked more so then I thought I would, I was drawn to this because of the iridescent gold shift in the pink. This polish I feel like say summer, almost like a sunset or sunrise type of color.  

Finger Paints Legendary Lore  
 Finger Paints Legendary Lore 

The brand Finger Paints can be found at Sally Beauty (I think this brand is a Sally Beauty Brand,you can only find it at Sally's) this polish is part of their Spring Summer collection, the Fantasy collection, their where four polishes in this collection, I am not sure if you can still find this collection at Sally's, at the time that I typed up this post it was still available on their website. 

Finger Paints- legendary lore at Sally Beauty for $4.99 (says Clarence on the website)

Color Club- It's a Sauna Out Here- Mood changing polish 
Color Club- It's a Sauna Out Here- Mood changing polish, both colors shown in a gradient.

Next we have Color Club- It's a Sauna Out Here the mood/ color changing polish. These types of polish change color with hot and cold temps, mainly if you get your hands are wet in hot or cold water, or you go into a room or outside and the temperature is very cold or hot.

Color Club- It's a Sauna Out Here- Mood changing polish  
Color Club- It's a Sauna Out Here- Mood changing polish 
Color Club- It's a Sauna Out Here- Mood changing polish, hot pink when warm

The color that this polish mainly stayed for me at least was hot pink, for when your nails/ hand are warm. This is also the color of the polish when you look at it in the bottle and first apply it to your nails. 

 Color Club- It's a Sauna Out Here- Mood changing polish
Color Club- It's a Sauna Out Here- Mood changing polish
 Color Club- It's a Sauna Out Here- Mood changing polish, red orange when cold.

When your nails/ hands are cold then your polish will turn a red orange. For my photos I did have to keep dipping my nails in hot and ice water to show each color. 

This polish has a velvet matte finish when first applied and then gets glossy when a topcoat is applied. It applied very well in one coat, but I applied two coats for good measure. 

As for the color changing part it is very cool, but most of the time this polish did stay hot pink, it was probably because it was warm when I wore this polish, but I still really liked this polish.     

Color Club- It's a Sauna Out Here- Mood changing polish
 Color Club- It's a Sauna Out Here- Mood changing polish

Also above I want to show the bottle, it shows the gradient of the polishes if your nails are both hot and cold. I also tried to show both the hot and cold on my nails in the above photo, but it is kind of hard to see, but hopefully I showed enough of the colors chaining in the photos in this post, with the gradient colors, hot and then cold. 

I found this polish (and the holo Color Club) at Walmart, Color Club polishes I feel are hard to find in store I have gotten lucky a few time, I found some at Meijer years ago and then just recently at Walmart. Most of the Color Club polishes I purchase are from Live Love Polish.com.

Color Club- It's a Sauna Out Here Walmart.com for $7.63, looking at my receipt I actually paid $3.50 for this in stores.

Color Club- it's a sauna out here  Color Club.com for $10.00.

 Color Club Black Magic- Holographic polish 
  Color Club Black Magic- Holographic polish
 Color Club Black Magic- Holographic polish

Like any polish review or when I purchase any polish it just seem incomplete or just wrong, if  I don't have a holo polish. So of course I had to get just one. I know you may be thinking this is the most random one, you have these two bright colors then a black polish. When I was at the store I was looking at a pink holo and this black holo, and the pink looked to close to a polish I already had, so I went with this. This polish is the darkest polish out of this review, but because of the holographic in it actually gives it some brightness with all the rainbows in it, if you look at it in that way.     

Anyways Color Club Black Magic is a black holographic polish, with a linear holo shift to it. This polish applied very well in two coats, all of the Color Club holo polishes and polishes in general that I have purchased have always had really great formula's and this is also had the same great formula as well.    


In conclusion I liked all of these polishes, they all applied well and look beautiful. Most of he polishes that I purchase I always like, If I don't then they are returnable, which has recently happen to me.

Hope all of you enjoyed this random polish review.   

See you next time for more polish fun!