Showing posts with label Holographic Polish. Show all posts

Tuesday, October 25, 2022

Treats Only, Candy Time- Halloween Nail Design

Hello everyone! Happy Halloween! It's that time again for lots and lots of candy and some scares too. Today on the blog we will be creating a Halloween design, with candy corn, spiders, a ghost and a pumpkin. 

Halloween Nail Design

Here are the polishes and nail art tools used for this Halloween nail design- 


Base and top coat- CND Stickey Base Coat and CND Super Shiney Top Coat. 

Polish- China Glaze- Chalk Me Up!, Holo Taco- Orange Drink- Rainbow Collection, Holo Taco- Lemon Sucker- Rainbow Collection, Holo Taco- Electrostatic- Electric Holo Collection, and Sally Hansen- Hard as Nails- Hard to get. 

Acrylic paint- Black, white, and brown.

Nail art tools- Thin detail and striper brushes, and a large dotting tool. Also a makeup sponge. 

Other- Water to clean off your nail art brushes.

Halloween Nail Design

Apply a base coat, then let that dry.

Polish-

Thumb- Light blue.

Index and ring finger nail- Holographic orange.

Middle and pinky finger nail- Holographic yellow.

Let that dry.

Halloween Nail Design

Halloween Nail Design

Candy Corn Gradient- 

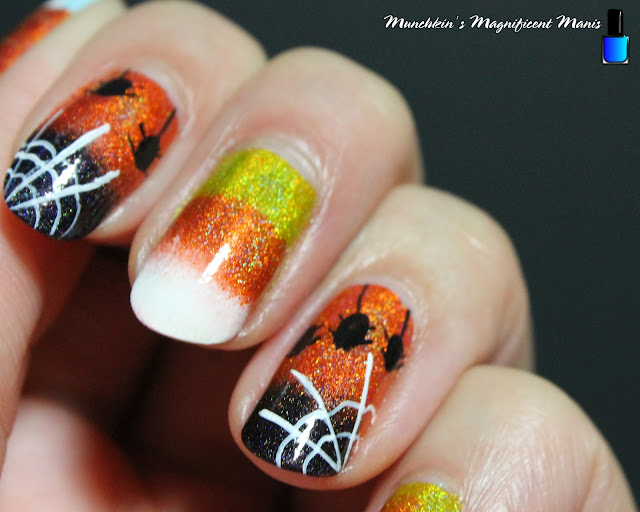
First we will start off with the candy corn gradient. Starting with your yellow base on the middle and pinky finger nail. Take that same base color, the yellow on a sponge, then polish orange, then lastly white for the gradient. Create a strip going down the sponge with all three colors.

Dab the sponge on the nail staring with the white on the tip. You will need to repeat this step a few time for it to be opaque.
Halloween Nail Design

Orange and Black Gradient, with Spiders- 

Just like the candy corn nails we will be doing a gradient with orange and black. Take a sponge with orange and black polish on it. Then dab the nails a few time for it to be opaque. 

For the spider web make three long lines from the left side on the index nails, and the right side on the ring finger nail. Then on each web make a curved line in each section of the web. 

Now on to the spiders, I decide to keep them very simple, by just make an oval shape for the body and then making four lines for the legs. Also add some lines from the cuticles to the spiders. 

Halloween Nail Design

Ghost on top of a Pumpkin- 

On the thumb nail we will make a ghost that is sitting on top of a pumpkin (even though my ghost kind of looks like a snowman.🙃) 

Staring off with your pumpkin, take the orange polish that you used on the other nails and staring near the cuticle, make kind of a heart shape, by swiping up to the middle and then doing the same thing on the other side. Then fill that in. 

Once your pumpkin is dry you can also outline the pumpkin with brown and make some curved lines inside the pumpkin as wells long with a stem. 

For the ghost, take some white paint on a detail brush and make a circle for the head than an oval shape for his body, lastly make two arms. 

For the ghost face take a large dotting tool with black paint on it and make two dots for the eyes. then, once that has dried make two smaller white dots over the black. For the smile make a small curved line under the eyes. Lastly you can add some pink checks as well.

Lastly a step I kind of wish I left out is, add some orange and black dot to the blue background.

Halloween Nail Design

Once your nails are ready for all the candy, apply a top coat to seal in your design and to help it last all Halloween.

Hope all of you enjoy this Halloween nail design and have a safe and Happy Halloween!

See you next time for more nail fun! 

Thursday, October 29, 2020

Jack Holo Lanterns- Halloween Nail Design

Hello everyone! Happy Halloween! This year Halloween for many people/ kids will be very different, but I feel like even before everything that has happened this year  Halloween just has not been the same. I remember when I was a kid and would go out trick or treating that I would get so much candy and now not really any kids go out anymore (even in past years.) So this year we will  keep things simple, we will be creating holographic pumpkin's or Jack O Lanterns on our nails, with a few of the polishes from the Holo Taco line and some other polsihes as well.

Halloween Nail Design


Here are the polish and nail art tools used to create this holo pumpkin nail design.


Base and Top coat- - CND Stickey Base Coat and Revlon Extra Life No Chip top coat.

Polishes- Color Club- Black Magic- holo, Holo Taco- Zyler the cat, and Holo Taco- Orange Drink- Rainbow Collection.

Acrylic paint- black and green.

Nail art brushes- Thin detail and stripper brush.

Small glass cup of acetone to clean off your nail art brushes and a cup of water as well.

Halloween Nail Design

 Apply base coat, let that dry.

Polishes- 

Thumb nail- Holographic orange. (I used Holo Taco- Orange Drink)

Index, middle, and pinky finger nail- holographic black. (I used Color Club- Black Magic)

Ring finger nail- Holographic glitter orange. ( I used Holo Taco- Zyler the cat) 

Let that dry.

Halloween Nail DesignHalloween Nail Design 
 
Halloween Nail Design
 Halloween Nail Design
 
Full Pumpkin on the index, middle and pinky nails:
 
On the index, middle and pinky finger nail we will create a circle/ full pumpkin on the tips of our nails. 
 
First take a thin detail brush with an orange holo polish and make a circle near the tip of the nail and fill that in, then let that dry. 
 
Once that is dry take a detail brush with black paint on it and make two triangles for the eyes and then with your stripper brush make a thin curve for the smile.
 
Lastly make a thick green line or a small square on top of your pumpkin for the steam.   
 
Halloween Nail Design
 Halloween Nail Design 
 
 
Pumpkin face on the thumb and ring finger nail:
  
For an even simpler option on the thumb and ring finger nail we will just make the Jack O Lanterns face.   
 
Take a thin detail brush with black paint on it and make two triangles kind of near the tip of your nails for the eyes, then make a small triangle under the two eyes for the nose. Then take a thin stripper brush with black paint on it and make a curved line for the smile, then make two flat line above the curve and leave an empty space in between that for the pumpkin's tooth, also don't forget to fill in each shape with black paint as well. 
 
Halloween Nail Design
Halloween Nail Design 
 
Once you have your Halloween nails the way you like apply a top coat to seal in your design and to help your nails to last through all the candy and scary movies that you will be watching this Halloween, or like me just help your nails to last though all the candy eating.
 
Hope all of you enjoyed this holographic pumpkin nail design!
 
Happy Halloween!
 
See you next time for more nail fun! 

Friday, July 20, 2018

Random Polish Time- Nail Polish Review

Hello everyone! Today we have a random post, as a nail polish lover I continuously by nail polish to where my collection as grown to 223 bottles of polish, a lot of times now I will be at the store and I will look at a bottle of polish or collection and I will like the polish but I will not be sure if I all ready have that same color or a color very close to it (the problems of having to much nail polish.) Anyways a few moths ago I found three polishes one at Sally Beauty and two at Walmart that I felt like where worth doing a small review on. 

Finger Paints and Color Club 
Finger Paints and Color Club

First we will take a look at the polish from Sally Beauty, Finger Paints.

Finger Paints Legendary Lore
 Finger Paints Legendary Lore
 Finger Paints Legendary Lore 

The first polish we have is called Legendary Lore from Finger Paints this polish is a pink iridescent polish with a gold shift/ shimmer. This polish applied well in two coats, it looks like it would be kind of a sheer polish, but it was not as sheer as it appears to be. 

This polish I really liked more so then I thought I would, I was drawn to this because of the iridescent gold shift in the pink. This polish I feel like say summer, almost like a sunset or sunrise type of color.  

Finger Paints Legendary Lore  
 Finger Paints Legendary Lore 

The brand Finger Paints can be found at Sally Beauty (I think this brand is a Sally Beauty Brand,you can only find it at Sally's) this polish is part of their Spring Summer collection, the Fantasy collection, their where four polishes in this collection, I am not sure if you can still find this collection at Sally's, at the time that I typed up this post it was still available on their website. 

Finger Paints- legendary lore at Sally Beauty for $4.99 (says Clarence on the website)

Color Club- It's a Sauna Out Here- Mood changing polish 
Color Club- It's a Sauna Out Here- Mood changing polish, both colors shown in a gradient.

Next we have Color Club- It's a Sauna Out Here the mood/ color changing polish. These types of polish change color with hot and cold temps, mainly if you get your hands are wet in hot or cold water, or you go into a room or outside and the temperature is very cold or hot.

Color Club- It's a Sauna Out Here- Mood changing polish  
Color Club- It's a Sauna Out Here- Mood changing polish 
Color Club- It's a Sauna Out Here- Mood changing polish, hot pink when warm

The color that this polish mainly stayed for me at least was hot pink, for when your nails/ hand are warm. This is also the color of the polish when you look at it in the bottle and first apply it to your nails. 

 Color Club- It's a Sauna Out Here- Mood changing polish
Color Club- It's a Sauna Out Here- Mood changing polish
 Color Club- It's a Sauna Out Here- Mood changing polish, red orange when cold.

When your nails/ hands are cold then your polish will turn a red orange. For my photos I did have to keep dipping my nails in hot and ice water to show each color. 

This polish has a velvet matte finish when first applied and then gets glossy when a topcoat is applied. It applied very well in one coat, but I applied two coats for good measure. 

As for the color changing part it is very cool, but most of the time this polish did stay hot pink, it was probably because it was warm when I wore this polish, but I still really liked this polish.     

Color Club- It's a Sauna Out Here- Mood changing polish
 Color Club- It's a Sauna Out Here- Mood changing polish

Also above I want to show the bottle, it shows the gradient of the polishes if your nails are both hot and cold. I also tried to show both the hot and cold on my nails in the above photo, but it is kind of hard to see, but hopefully I showed enough of the colors chaining in the photos in this post, with the gradient colors, hot and then cold. 

I found this polish (and the holo Color Club) at Walmart, Color Club polishes I feel are hard to find in store I have gotten lucky a few time, I found some at Meijer years ago and then just recently at Walmart. Most of the Color Club polishes I purchase are from Live Love Polish.com.

Color Club- It's a Sauna Out Here Walmart.com for $7.63, looking at my receipt I actually paid $3.50 for this in stores.

Color Club- it's a sauna out here  Color Club.com for $10.00.

 Color Club Black Magic- Holographic polish 
  Color Club Black Magic- Holographic polish
 Color Club Black Magic- Holographic polish

Like any polish review or when I purchase any polish it just seem incomplete or just wrong, if  I don't have a holo polish. So of course I had to get just one. I know you may be thinking this is the most random one, you have these two bright colors then a black polish. When I was at the store I was looking at a pink holo and this black holo, and the pink looked to close to a polish I already had, so I went with this. This polish is the darkest polish out of this review, but because of the holographic in it actually gives it some brightness with all the rainbows in it, if you look at it in that way.     

Anyways Color Club Black Magic is a black holographic polish, with a linear holo shift to it. This polish applied very well in two coats, all of the Color Club holo polishes and polishes in general that I have purchased have always had really great formula's and this is also had the same great formula as well.    


In conclusion I liked all of these polishes, they all applied well and look beautiful. Most of he polishes that I purchase I always like, If I don't then they are returnable, which has recently happen to me.

Hope all of you enjoyed this random polish review.   

See you next time for more polish fun!

Friday, July 28, 2017

Golden Pineapple- Pineapple Nail Design

Hello everyone! This week will be sticking to the tropical theme again, with another tropical nail design, this time we will be creating pineapple nails. When it comes to a tropical vacation other then the beautiful ocean, palm trees and nice weather, I think of yummy, juicy pineapple. I personally think pineapple from Hawaii is the best! 

Pineapple Nail DesignGolden Pineapple Nail Design

Here are the polishes and nail art tools used for this yummy pineapple design:


Base and Top coat- CND Stickey Base Coat and Revlon Extra Life No Chip top coat.

Nail polishes- Cupcake Polish- Some Berry to Love, Sinful Color-Let's Meet, Color Club- Daisy Does it, Sinful Color- HD Nails, OPI Hawaii- My Gecko Does Tricks, and OPI Hawaii- Do you take Lei away.

Acrylic paint- white

Nail art brushes- thin liner and detail brushes.

Other- small glass jar with acetone in it to clean off nail art brushes, and a cup of water to clean off nail art brushes as well.

Let's start this yummy golden pineapple nail design!

Pineapple Nail Design 

As always apply a thin layer of base coat to protect your nails. 

Once your base coat has dried polish all of your nails with a pink holographic polish, or if you want to be boring (or if you don't have a pink holo polish, which you need in your polish collection!), you can polish all of your nails with a bright pink creme color. 

Once your bright pink holo polish has dried, we will be creating the outline for each of the pineapples, with white acrylic paint, this will help the pineapples to show up on your nails.  On the thumb, middle, and pinky nail we will make a whole pineapple, then on the index, and ring finger nail we will make half of a pineapple.

For the whole pineapples,take a thin liner brush with white paint on it and make an oval shape half way up the nail, some of the nail tip should still be showing. Then for the half pineapples still make a oval shape that cover the tip of the nails. 

Next we will create the leaves that are on top of the pineapples. With a thin detail brush make three curved lines coming from the tops of the pineapple, on each side, then make one line coming from the top. You can have seven or more, or less leaves on top of your pineapples.

Pineapple Nail Design 

Now let's make these pineapples colorful and golden. Take a clean liner brush dipped into a shimmery yellow polish (Sinful Color-Let's Meet) and fill in the the oval part. Once that has dried take a glittery yellow (Color Club Daisy Does It) and go over the shimmery yellow.

I ended up having to use two different types of yellow polish because the glitter yellow looked to sheer, but you can always use more of a opaque yellow first then put a glitter yellow over that.  

On to the leaves, take a clean detail brush with a green polish on it and every other leaf fill in the white part of the leaves. Then take a lighter green and fill in the other leaves. 

Back to the pineapple itself, we will be making a crisscross pattern on the pineapple. With a thin detail brush dipped into a peach/ tan colored polish, make a few slanted lines going up the pineapple, then going the other direction make lines that crisscross with the lines you just made. When you are finished the pineapples should look like their are small diamond shapes on them.  

Pineapple Nail Design     
Once you have your pineapple design has dried apply a top coat to seal in and protect your nails from chipping. 

As with any nail design you can always change it up. For this design you can always just have a pineapple on the ring finger nail, or have the pineapples on the thumb, middle and index, it is always up to you the on the way you want to do your nail art.

Hope you enjoyed this yummy golden pineapple nail design!

See you next time for more nail fun!