Showing posts with label Christmas Nail Design. Show all posts

Monday, December 22, 2025

Cookies for Rudolph- Christmas Nail Design

Hello everyone! Merry Christmas and Happy Holidays! Today on the blog we will be creating a shinny and cute nail design for the holidays, a gingerbread man and Rudolph because even Santa's reindeer need some cookies too, but who would want to eat this cute gingerbread?


Christmas Nail Design
Cookies for Rudolph

Here are the polishes and nail art tools used to create this cute nail design:

Base and Top Coat- CND Stickey Base Coat and CND Super Shiney Top Coat.

Polishes- Holo Taco- Birthstone- September- Playing With Sapphire, Holo Taco- Toppers- Rainbow Snow, and Holo Taco- Magnetic Magic Collection- Twice in a Blue Moon. 

Acrylic paint- Black, white, red, brown, and peach. 

Nail art tools- thin striper brush and detail brush, and a small dotting tool.


Christmas Nail Design

Apply a top coat to clean dry nails, then let that dry.

Polish-

Thumb- a sapphire blue 

Index, middle, and pinky- a holographic glitter polish.

Ring finger nail- a shimmery blue.

Let that dry.

Christmas Nail Design

The index, middle and pinky finger nails will stay as is with no nail art on them.

Christmas Nail Design

Gingerbread Man on the Thumb Nail:

First we will start off with the gingerbread man, usually with this kind of design I jump back and forth between the two to let layers dry, when I am actually paint the designs, for explaining purposes I will just explain it all in two parts, not back and fourth like when you paint the design. 

Take a thin detail brush with brown paint on it, make a large circle near the tip of the nail and fill that in. Then make two arms, for his body and legs make a upside down heart shape, then fill in your gingerbread man with brown paint, you will need to go over the a few times to be opaque.

Once your gingerbread man shape has dried, take a dotting tool with black paint on it and make two dots for his eyes.

For his smile take a striper brush with black paint and make a curved line under his eyes. With that same clean brush, just use white paint make a few squiggly line on his arms and legs.

For the last final touches we will add a bow tie and some buttons. To make his small bow tie, take a thin detail brush with red paint on it, make a small oval, then make two symmetrical round loops on each side for the rest of the bow.

Lastly take your dotting tool with white paint on it, make two dots on his tummy for the buttons

He turned out so cute! 🥰

Also if you would like you can add some snow in the background, take the same holo glitter polish that you used on the index, middle and pinky nail on a dotting tool and dot some snow on random spots on the nails. 

Christmas Nail Design

Christmas Nail Design

Rudolph the Red Nose Reindeer on the Ring Finger Nail:

To complete this design we will be crate Rudolph on the ring finger nail. Take a small detail brush with brown paint on it and make a lager circle for his head near the cuticle. Then make a large oval for his body, two little arms and then two ovals for his feet, also make two small circles on top of his head for his ears. Once you have the shape fill that in with the brown paint, you will need to go over this a few times to be opaque.

For this face make a peach colored oval near the bottom of the head and kind of near the tummy, fill this in.

On his tummy make a heart shape with the same peach color, then lastly with the peach color make two small circles in his ears. 

For his facial features take your dotting tool with black paint on it and make two black dots for his eyes. For his noses make an oval in the middle of the peach oval.

On his hands fill in the tip of the hands with black and the feet make two small ovals.

For the final touch Rudolph's antlers, take your thin striper brush with black paint on it, on top of his head make two lines, with two smaller lines at the top coming out from the sides. 

Christmas Nail Design
Just including this to show the glow that holo glitter can have! 

Christmas Nail Design

Once your nails are Christmas ready apply a top coat to add even more shine and to help them last through all of your cookie eating. 

Hope all of you enjoyed this Christmas nail design, I really like how the gingerbread came out, he is so adorable and the Rudolph also looks cute too. 


Here is the practice version


Hope all of you have a Merry Christmas and a Happy Holidays! 

See you next time for more nail fun! 

Tuesday, December 24, 2024

Merry Christmas & Happy Holiday's Nail Design

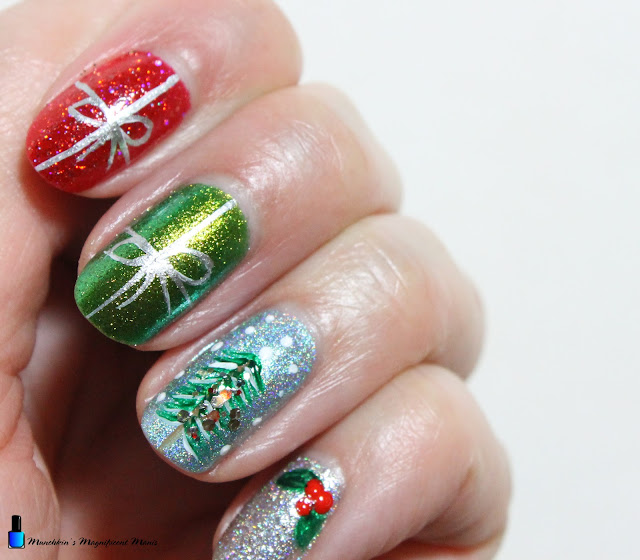
Hello everyone! Merry Christmas and Happy Holidays! Today on the blog we will be creating a Christmas themed nail design; with a gingerbread man, two gifts, a Christmas tree and mistletoe or holly. For this nail design we will be using some polish from the Holo Taco Birthstone collection. 

Christmas Nail Design

Here are the polishes and nail art tools used to create this nail design:

Base and top coat- CND Stickey Base Coat and CND Super Shiney Top Coat.

Polishes- Holo Taco- Birthstone- March- Happily Ever Aqua, Holo Taco- Birthstone- July- Ruby,Madly,Deeply, Holo Taco- Birthstone-August- Peridon't Bother Me, Holo Taco- Birthstone- April- Ride Or Diamond, Holo Taco- Chorme Collection- World's First, and Snowman Rainbow Glitter polish.

Acrylic paint- White, black, red, green, and brown.

Nail art tools- Small dotting tool, thin stripper and detail brushes.

Other- Water and acetone to clean off nail art brushes. 

Christmas Nail Design

Christmas Nail Design

Apply a base coat to clean dry nails, wait for that to dry.

Polish- 

Thumb and ring finger nail- a light blue holographic polish (Holo Taco- Happily Ever Aqua)

Index- a red glitter polish (Holo Taco- Ruby,Madly,Deeply)

Middle- a green glitter/ shimmer polish (Holo Taco- Peridon't Bother Me)

Pinky- a sliver glitter polish (Holo Taco- Ride Or Diamond)

Let that dry.

Christmas Nail Design

 Gingerbread on the Thumb Nail: 

First we will start off with the gingerbread man on the thumb nail. Take your detail brush with brown paint on it. Make a small circle near the tip of the nail, then two arms, a tummy and then two legs, then fill in your gingerbread man with brown paint, you may need to go over your gingerbread man a few times to be opaque. 

Once your gingerbread man has dried take a dotting tool with black paint on it and make two eyes, then wipe that black paint off an take some red paint and make two dots on his tummy for the buttons. 

For his frosting take a thin stripper brush with white paint on it and make some squiggly lines on his arms and legs. On his head take a detail brush with white paint on it and make a curved shape on his head and then make some thicker smaller lines for some dripped of frosting. 

Lastly that same detail brush with black paint on it and make a smile for your gingerbread man. Although my gingerbread don't look to happy he looks a little sad that he might get eaten. 

Christmas Nail Design

Gifts on the Index and Middle Finger Nails: 

On the index and middle finger nails we will be making a red and green gift. On both nails I started with an outline using white paint. First take a thin stripper brush with white paint on it and make a cross on the nail, then make two loops on both sides of the center part of your cross, lastly make two lines come down from the loops you made. If you would like you can stop here or you can take a sliver polish (Holo Taco- World's First) and go over the white bows you just made with silver. 

Christmas Nail Design

Christmas Tree on the Ring Finger Nail: 

On the ring finger nail we will make a Christmas tree with snow. First take a thin stripper brush with brown paint on it and make a thin line starting in the center of the nail and going to the tip of the nail, this is for your tree stump. With that same stripper brush with green paint on it, make thin lines that are kind of curved all the way down the tree stump on both sides as you go down the tree start to make each line just a little longer. Also add a few line of white to the tree for snow. 

For a last touch to your tree add a little bit of glitter to the tree, I used a glitter that a different colors in it with a little bit larger glitters. 

Then you can add snow to the sky by taking a dotting tool with white paint on it make random dots to the sky. 

Mistletoe/ Holly on the Pinky Finger Nails: 

On the pinky finger nail we will make mistletoe or holly. Near the cuticle take your detail brush with green paint on it and make two leaves on both sides of the nail. Then take your dotting tool with red paint on it and make tree red dots. 

Christmas Nail Design

Christmas Nail Design

When you are happy with how your Christmas design turned out, apply a top coat to seal in your design and to help it to last all Christmas long. 

Here is the practice version of this nail design.

Hope all of you enjoyed this Christmas nail design! 

Christmas Nails

Christmas Nails

Christmas Nails

Christmas Nails

Also if you are wondering what is on my other hand, my right hand, polishes from the Holo Taco Birthstone collection. April, July, and August birthstone polishes. This makes a great Christmas color combo. 

Have a Merry Christmas and Happy Holidays! 

See you next time for more nail fun!!

Saturday, December 23, 2023

Santa's Cookie's- Christmas Nail Design

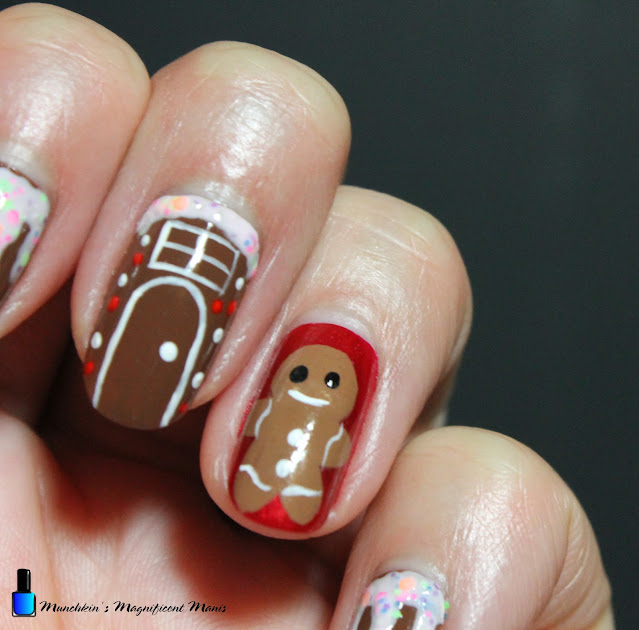
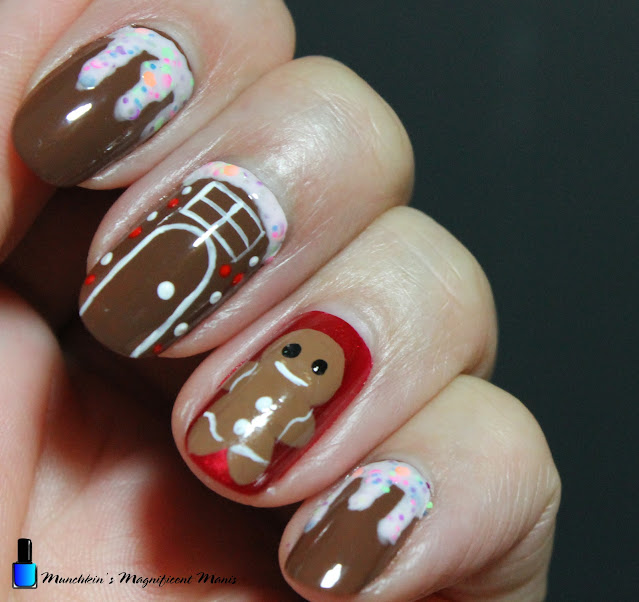
Hello everyone! Merry Christmas and Happy Holiday's! Today on the blog we will be creating a Christmas cookie nail design, specifically a gingerbread man and house, along with Rudolph on the thumb nail, just in time for Christmas.

Christmas Cookie Nail Design

Here are the nail polish and nail art tools used to create this Christmas cookie nail design:

Base and top coat- CND Stickey Base Coat and CND Super Shiney Top Coat.

Polishes- Finger paints- Cubism Crimson, Nicole by OPI- That's Just Plain Nuts! and China Glaze- Dippin Dots- Arctic Confetti. 

Acrylic paint- Black, red, white, and brown.

Nail art tools- Large dotting tool, thin detail and stripper brushes.

Other- Water to clean off your nail art brushes. 

Christmas Cookie Nail Design

Apply a base coat to clean dry nails.

Let that dry.

Polishes- 

Thumb and ring finger nails- red shimmer polish 

Index, middle and pinky finger nails- a cream brown polish. 

Let that dry.  

Christmas Nail Design

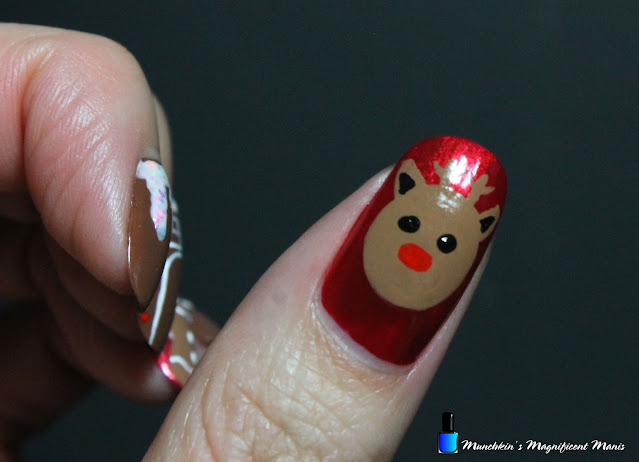
Rudolph the Red Nose Reindeer on the Thumb Nail: 

First we will start off with the thumb nail this time. Take a detail brush with brown paint on it and make a large circle in the middle of the nail, then fill in the circle. Also make two triangle shapes on the sides of the head for the ears, fill that in as well. Then make two small triangles in the ears with black paint. 

On top of the head make two lines and the two more coming out of the larger lines for antlers.

For the eyes take a large dotting tool with black paint on it and make two dots for his eyes.  

Lastly with your detail brush with red paint on it make a large red oval right under the eyes for his red nose.

Christmas Cookie Nail Design

Gingerbread Man on the Ring Finger Nail:

Second we will make the gingerbread man on the ring finger nail. Take your detail brush with brown paint on it make a small circle near the cuticle then on each side of the head make two round arms and then two round shape legs. Fill in your gingerbread man with brown.

Then take a large dotting tool with black paint on it, make two dots for his eyes. Wipe off your dotting tool and then with white paint, make two dots on his chest for buttons. 

Lastly take a thin stripper brush with white paint on it and make a cured line for his smile, then with that same brush and white paint make some squiggle lines on his arms and legs. 

Christmas Cookie Nail Design

Christmas Cookie Nail Design

Gingerbread House on Middle Finger Nail:

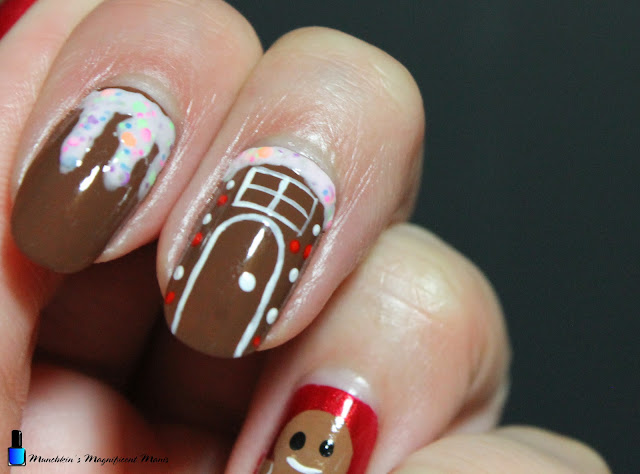
Third we will be making a gingerbread house on the middle finger nail. Take a thin striper brush with white paint on it and make a long curved line for the door near the tip of the nail. 

With that same stripper brush with white paint on it, we will make a small window. Make a small rectangle above the door and then a cross in the middle to make smaller squares in the rectangle. 

For the final small details take a dotting tool with white paint first then red, and dot random dots all over your nail for small pieces of candy. Also make a dot on the door as well for your door handle.

Lastly for the dripping frosting, we will do that along with the other nails that only have the frosting on them.

Christmas Cookie Nail Design

Dripping Frosting on the Index and Pinky Finger Nails:

For our last two nails this will be very simple. Pour a small amount of your frosting looking polish on to a nail matte or a piece of foil (any surface that is easy to clean up), then take a large doting tool with that polish on it and dab it near the cuticle and then make three drips down that part that you just made. 

Also if you don't have a frosting looking polish you can just use a white polish for your frosting. 

Lastly on your gingerbread house repeat the same step, just make sure you don't cover up your window. 

Christmas Cookie Nail Design

Once your nails are ready for Santa, apply a top coat to help seal in your nails and to help it last through all of your Christmas celebrations. 

Hope all of you enjoyed this Christmas cookie nail design and have a Merry Christmas and Happy Holiday's! Also Happy New Year! 

See you in the New Year with more nail fun! 

Wednesday, December 21, 2022

Merry Merry Christmas- Christmas Nail Design

Hello everyone! Merry Christmas and Happy Holidays! Today on the blog we will be create a cute Christmas nail design for the holidays. This design will have a Rudolph the red nose reindeer, Christmas tree branches and a gingerbread man. I don't know about all of you, I can't believe that it all ready Christmas and almost a new year, time just goes way too fast! 

Christmas Nail Design

Here are the polishes and nail art tools used to create this Christmas nail design: 


Base and top coat- CND Stickey Base Coat and CND Super Shiney Top Coat.

Polishes- China Glaze- Chalk Me Up!, Sinful Colors- Cinderella, Colors by llarowe- Arturo, and China glaze mini- Grinch- Resting Grinch Face.

Acrylic paint- Brown, black, red, green and white.

Nail art brushes- thin detail and stripper brush, and a large dotting tool.

Other- a cup of water to clean off your nail art brushes. Also. toothpick to place the glitter on the tree branches. 

Christmas Nail Design

Apply base coat to clean nails, let that dry.

Polishes-

Thumb, index, middle, and pinky- a light blue and a light blue shimmer polish.
(I first applied a cream light blue polish and then a light blue shimmer polish, just to get the light blue to be more opaque.) 

Ring finger nail- a light blue Holographic polish.

Let that dry.

Christmas Nail Design

Christmas Nail Design

Christmas tree branches on the index, middle and ring finger nails-

First we will start off with the more simple part the tree branches, first take a thin stripper brush with brown paint on it on each of the nails (index, middle and ring) make a curved line.

Then with that same brush, take a green paint and make thin lines on the top and bottom of that brown line, that are close together.

Once the green lines are dry, make a few white line for some snow.

For a final touch take some rainbow glitter polish and dab a few of those glitter pieces on to the branches. I used a tooth pick of this. 

Christmas Nail Design

Gingerbread Man on the ring finger nail- 

Now on to the Gingerbread man, take a thin detail brush with brown paint on it, make a circle near the cuticle, make to oval shapes on the side for his arms, then two more oval shapes for his legs/feet. You will need to go over this a few time to be opaque.

Once your gingerbread man shape has dried we can add his details. Take a large dotting tool with white paint on it and make two dots in the center of the circle/ his head. Then with a detail brush, also with white paint on it make a small dot for his nose, then take a thin striper brush and make small curve for his smile.

Now on to the Gingerbread's other features, For the bow take the same striper brush with white paint on it and make a line going around his neck, then make two loops in the center of that line and then make two lines going down from those loops. 

On both of his arms and legs make a small wavy line. Lastly make two dots for buttons. 

Christmas Nail Design

Reindeer on the thumb nail- 

Lastly we will make a Rudolph the red nose reindeer. Take you detail brush with brown paint on it first make a curved line near the center of the nail and then make an oval shape for his head, then make tow triangles on each side of the head for his ears. 

For his antlers make two curved line on the top of the head, make a few smaller lines on those lines for the antlers. 

For his face take a detail brush with black paint on it a make two small ovals for his eyes and then with red paint make a large oval for his bright red nose.  

For a final touch take your dotting tool with red and then green, make few dots near Rudolph's antlers. 

Christmas Nail Design

Once your nails are Christmas ready, apply a topcoat to seal in your design and to help it to last all Christmas. 


Here is my practice version, I actually like how the reindeer turned out better on the practice, on the final design I made his head a weird shape. 


Hope all of you enjoyed this Christmas nail design! Have a safe and Happy Holidays! Merry Christmas and Happy New Year 2023!!

See you next time for more nail fun! 


Tuesday, December 24, 2019

Christmas Eve- Christmas Nail Design

Hello everyone! Merry Christmas Eve! Today on the eve of Christmas, we will be creating a cute glitter filled nail design. Each nail will have a different design on it, that you can also do on each nail or just put on on a accent nail.


Christmas Nail Design
 Christmas Nail Design  

Here are the polishes and tools used to create this cute Christmas nail design:

Yes I used way to many polishes, but most of the glitters are just for the Christmas lights, so very little is used, and of course you don't have to use that many glitters for the lights, I just choose to do so. 

 
Base and top coat- CND Stickey Base Coat and Revlon Extra Life No Chip top coat.

Acrylic paint- black, white, red, and brown, and mixing red and white for pink.

Nail art brushes and dotting tools- thin detail and stripper brush, and a medium size dotting tool.

Optional, for glitter placement- a toothpick.  

Nail polishes- 

Your base polishes are-
China Glaze mini- Sesame Street- 50 Shimmering Years, China glaze mini- Grinch- Deliciously Wicked, Zoya- Twinkling- Alessia, China glaze mini- Grinch- Merry Whatever, Sally Hansen- xtreme wear-Celeb city, and China Glaze mini- Sesame Street- T is for Tinsel (over top of Celeb city).

Polishes for the Christmas lights- 

China glaze mini- Grinch- Resting Grinch Face, China Glaze mini- Sesame Street- #This is my Street, China Glaze mini- Sesame Street- Cele- Bert, China Glaze mini- Sesame Street- On the nice list, China Glaze mini- Sesame Street- A Grouchy New Year, and China Glaze mini- Sesame Street- Gift Fur You.


Christmas Nail Design  
 Christmas Nail Design  

Apply a base coat, let that dry.

Polishes on each finger-

Thumb- Rose gold glitter polish, China Glaze- 50 Shimmering Years.
Index- Light shimmer blue glitter, China glaze- Deliciously Wicked
Middle- shimmery blue, Zoya- Twinkling- Alessia
Ring- Gold glitter polish, China glaze- Merry Whatever
Pinky- Sliver- Sally Hansen- xtreme wear-Celeb city, China Glaze- T is for Tinsel (over top of Celeb city.)

Let that dry.

Christmas Nail Design 
 
 Christmas Nail Design 

Gingerbread Man on the Thumb Nail-  

With a thin detail brush with brown paint on it, make a circle for his head near the tip of the nail, the make two arms, and two legs, then also fill in the body with brown as well. You will need to go over this a few times.

For the eyes take a dotting tool with black paint on it and make two dots in the middle of head. 

For his smile make a straight line and a curved line under that, then fill that in with pink.

For his pink cheeks and white buttons, just make two pink dots with your dotting tool on each side of the mouth. Then for the buttons make two dots down is tummy.

Lastly for a final detail, making the frosting lines. Take a thin stripper brush with white paint on it and make a squiggly line on his head and one on each arm and leg.

Christmas Nail Design 
 Christmas Nail Design 

Christmas Light on the Index Nail- 

Take a thin stripper brush with black paint on it and make a thin zig zag line going down the nail. Then with a lot of different glitters, with a toothpick or just the brush in the bottle, place the glitters on the line you just made for the lights.

Christmas Nail Design  
       Christmas Nail Design 

Ornaments and Snowflakes on the Middle Finger Nail-   

Take a thin stripper brush with white paint on it and make three circles, that are all at different levels, then make a small square at the top of the circles and make a line going from each square to the cuticle area. To finish your Christmas ornaments make a curved line and a small dot under that for the refection on the ornament. 

For the larger snowflakes make a star shape, then for the smaller snowflakes just take a dotting tool with white paint on it and make a few random dots all over the nail.  

Christmas Nail Design  
 Christmas Nail Design 

Reindeer on the Ring Finger Nail-  

With a thin detail brush with brown paint on it make a circle near the tip of the nail, then fill that in. 

For his eyes take a dotting tool with black paint on it, and dot two eyes in the center of his head, then with that same dotting tool with red paint on it make a red dot. For an added touch you can add a red glitter polish on top as well.

Then for his antlers, take your detail brush with black paint on it and make two lines coming from his head and make two small ones from that line.  

  Christmas Nail Design
Christmas Nail Design 

 
Christmas Lights on the Pinky Finger Nail- 

Take your thin stripper brush with black paint on it and make a line down the nail that has loops in it. If the loops are a little to hard to make, you can just repeat the same light design that we did on the index nail. 

Once again for the lights take a few different glitters, with a toothpick or just the brush in the bottle, place the glitters on the line you just made for the lights.
 
Christmas Nail Design 
 Christmas Nail Design

Once you have your Christmas design the way you like apply a top coat to seal in your design and to help your design to last through all of your Christmas celebrations. 

Hope all of you enjoyed this Christmas nail design!

Merry Christmas and Happy Holidays! 

See you next time for more nail fun!