Christmas Nail Design, Rudolph and Christmas Trees
Here are the polishes and nail art tools used for this Holiday/ Christmas nail design:
Base and top coat- CND Stickey Base Coat and Revlon Extra Life No Chip top coat.
Nail polishes- Finger paints- Tiffany imposter, Zoya- Estelle, Snowman rainbow glitter- frosty, Funky Fingers- As If, and China glaze mini- Grinch- Lukewarm Wishes
Acrylic paint- Green, white, red, black, brown, peach.
Nail art brushes- Thin detail brush, stripper brush, liner brush, small flat brush and a very small detail brush. (not sure why I used so many brushes?)
Small cup of water to clean off nail art brushes.
Let's start this reindeer game!
Christmas Nail Design
First start off with a thin layer of base coat over your clean nails, then let that dry.
Then polish your thumb, index, and ring finger with a light blue (I used Finger paints- Tiffany imposter) then once that light blue has dried to add a shimmer to the blue I applied China Glaze- Grinch- Lukewarm Wishes. Then on the middle and pinky finger nail polish those nails with dark shimmery blue (I used Zoya- Estelle).
Let that dry.
Christmas Nail Design
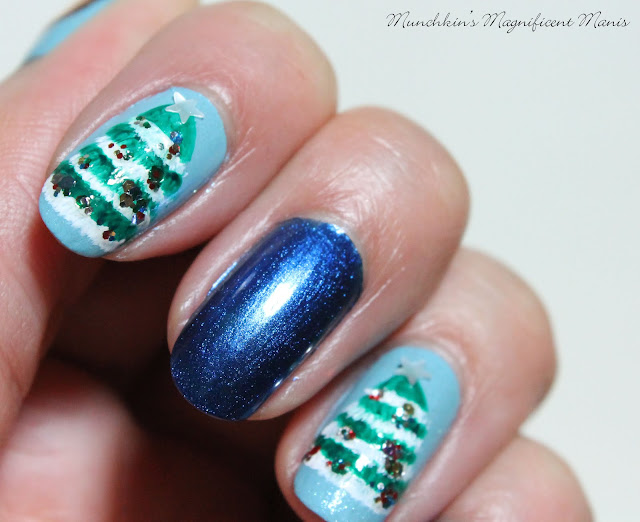
Once your polish has dried we will make our little trees on the index and ring finger nails. For the tree this is suppose to be done by the one stroke method, where you would dip your flat brush into green first and then white, then begin to paint your tree. Well that was not working out for me, so we will do this a little different.
On a small flat brush with green on it near the tip of the nail make a thick green line, by staring on one side and going to the other, by just pushing the brush up and down a little to make a line. Then take that same brush with white paint on it and right under the green do the same thing, just make this line thinner for the snow on the tree.
Repeat this step three more times, each time you go up the tree make the green and white part shorter, until you get to the top then make a small triangle.
Christmas Nail Design
Next we need to add some ornaments to our tree, this is done simply with some glitter. I took a small amount on my nail mat and with a toothpick placed the glitters pieces on a few parts of the trees. For the star I have a polish that has stars in it, I just fished out one star out of the polish and just placed it on top of the tree.
Christmas Nail Design, Rudolph
Once you have your trees the way you like we will finish up this design with Rudolph the red nose reindeer. With thin liner brush with peach paint on it (yes I did get a peach and a brown paint, ever time I would try and make a brown color it would always turn out to dark, so I thought it would be easier to just buy a brown paint.) make a circle and fill that in, it can be kind a sheer at first.
Then for his mouth make a oval near the bottom of the circle, you may need go over this a few time to be opaque. For the rest of the circle fill that in a few time with brown paint, then make two triangles at the top for his ears. Then for his antlers make two long lines with two small lines at the top.
Now on to his face, with your very small brush make to curved lines for his eyes, for his noes make a large red circle and then for his mouth make to upside down curved lines.
This is optional and I felt made Rudolph look better, you can outline him with black paint. This part is kind of hard, that why I suggested it as optional.
Once Rudolph is already to help out Santa, you can apply a top coat to help your nails to last until Christmas, or at lest a week (that's about how long my polish last for me.)
Hope all of you enjoyed this Christmas nail design, I do plan on doing another Christmas nail design using The Grinch China Glaze polishes for next week.
See you next time for more nail fun!
Also hope all of you are have a wonderful start to the holiday season!


No comments:
Post a Comment