Showing posts with label KBShimmer. Show all posts

Monday, January 20, 2025

Blue Holo Gradient

Hello everyone! Hope everyone is having a good start to the new year. Today on the blog we will be staring off the new year with a more simple design a gradient design, yes I have done this kind of design before, I just love to sometimes just do a simple gradient design and I still wanted to share it with all of you even thought I have done quite a few gradients on this blog. 

On each hand I did do two different colored polishes, still a dark blue (the same dark blue) and then two different light blues. 

Here is the first version on my left hand which was my favorite.

Blue Holo Gradient

Here are the polishes and nail art tools used to create this blue gradient- 


Base and top coat- CND Stickey Base Coat and CND Super Shiney Top Coat. 

Polishes- KB Shimmer- Plant One On Me Collection- Lilac It Or Not, Zoya Enchanted Collection- Saint, Zoya- Twinkling Collection- Jen, Holo Taco- Toppers- Flakie, and Holo Taco- Toppers- Scattered. 

Nail art tools- Makeup sponge for gradients, and Holo Taco Protective Peel Liquid Latex. 


Blue Holo Gradient

Blue Holo Gradient

Blue Holo Gradient

First when it comes to gradient we need to polish all of our nails with our lights color. (KB Shimmer- Lilac It Or Not), then let that dry. 

Then for creating a gradient from lightest on the tip of the nails to darkest near the cuticle, first take make up sponge and polish your lightest blue polish (I used KB Shimmer- Lilac It Or Not) then polish your darkest blue color (I used Zoya Jen). Then with your lightest color on the tip of the nails, dab the sponge on the nails to make a gradient. 

You will need to do this step few time so your gradient will be opaque. I went over each nail twice. 

For an added holo touch, take a Flakie Holo topper and polish on the darkest part of your gradient and then a Scattered Holo topper right under that, but not all the way down the nail on the lightest part just a little on the lightest part. (you will be able to see this better on the other colors I did on my right hand.)

Now for the second version on my right hand.

Blue Holo Gradient

Blue Holo Gradient

Blue Holo Gradient

Blue Holo Gradient

For this color scheme we will still use the same dark blue Zoya Jen, this time the gradient will go from darkest on the tip of the nails to lightest near the cuticle. For the lightest color I used a more light periwinkle blue Zoya Saint. For the gradient follow the same steps as before just darkest on the tip and lightest near the cuticle. 

Then once again for the glitter take a Flakie Holo polish on the tip of the nails and polish it on the darkest part then, take scattered holo and polish that on the lightest part but just a little bit not all the way on the lightest part. 

Blue Holo Gradient

Blue Holo Gradient

Once you are all finished apply a top coat to seal in your design to help it to last.

Which on of these gradients is your favorite? My favorite is the first on on my left hand, the one I used KBShimmer Lilac It Or Not this gradient I feel has an ocean look to it, which in the summer time I might do again for a nice tropical design. 

Hope all of you enjoyed this gradient design!

See you next time for more nail fun! 

Wednesday, May 10, 2023

KBShimmer Nail Polish Review

Hello everyone! Today on the blog we will be taking look at the Indie brand of nail polish KBShimmer. I recently purchased five polishes from the KBShimmer website, they where just random polishes that I thought would look pretty, not realizing two where from the Plant One On Me Collection and the other three where from The Lounge Set. Three out of the five polishes are a new to me formula, reflective polish. This brand is not new to me I have purchased from them in the past and I did enjoy the polishes back then, so I figured why not buy from this small brand again. 

KBShimmer Nail Polish Review

KBShimmer Nail Polish Review

Here are the polishes that I purchased from the Lounge Set, Their are 9 polishes in this collection. You can really see the silver reflective glitter in the photo above. 

KBShimmer Nail Polish Review

Here are the polishes from the Plant One On Me Collection, their is also 9 polishes in this collection.

The Lounge Set, the polishes that I have are reflective polishes, this means that there are small reflective glitters in the polish that make the polish very shinny in the light. I have also heard reflective polish described as the same material that is in a reflective stop sign.  

Let's take look at all 5 polishes on the nails. 

KBShimmer- Lounging Around- Reflective

KBShimmer- Lounging Around- Reflective

KBShimmer- Lounging Around- Reflective

KBShimmer- Lounging Around- Reflective

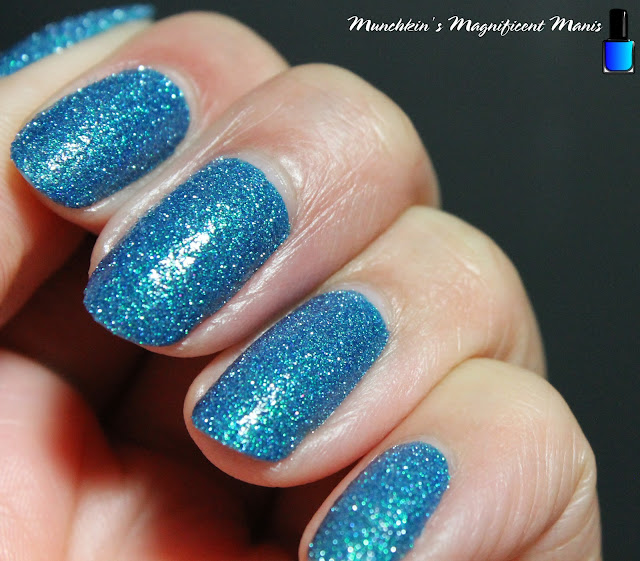
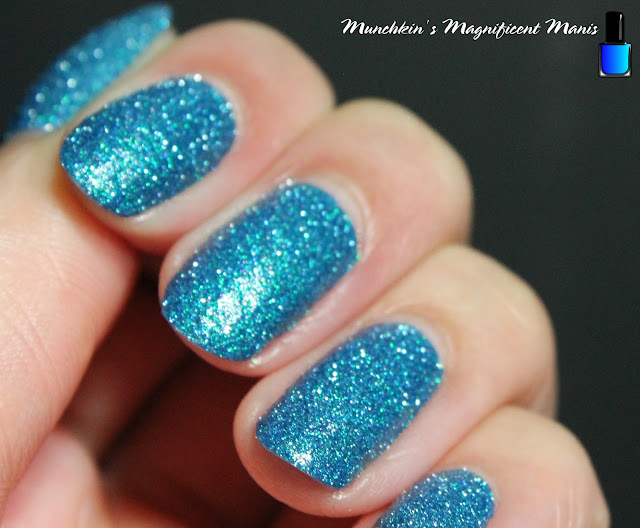
First we have Lounging Around this is described as a electric aqua/ blue reflective polish. It is said that when the light hits this polish it can shift from blue, indigo, purple, in brighter light emerald and turquoise. I would say that I did see the aqua blue and the emeralds. 

This polish is very glitter heavy, I put two coats of top coat to try and get this polish to be smooth, but maybe the top coat I use the CND Super Shiney top coat is more on the thin side, so it might be best to use a thick top coat if you want these to be more smooth.

This polish was opaque for me in two coats, and did apply well. At the end of the week the reflective polish I figured would be hard to remove so I soaked them off, which is just taking a cotton ball with regular acetone/ nail polish remover and rapping the nails is foil and letting the soak for about 5mins. 

KBShimmer- Lounging Around- Reflective

These polish are suppose to look very reflective and super shinny with a flash light hitting them. Here is the polish with my cell phone light hitting the nails. I feel like this photo doesn't even do this polish justice, it looks even more amazing in real life. 😯

KBShimmer- Love You Brunches- Reflective

KBShimmer- Love You Brunches- Reflective

KBShimmer- Love You Brunches- Reflective

KBShimmer- Love You Brunches- Reflective

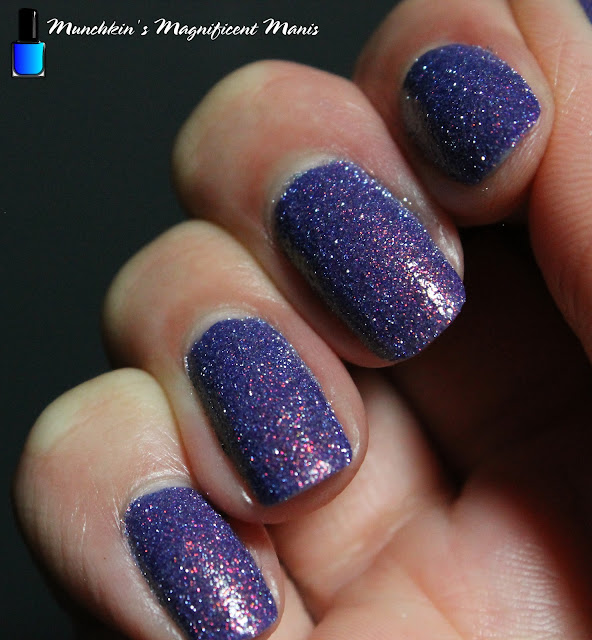
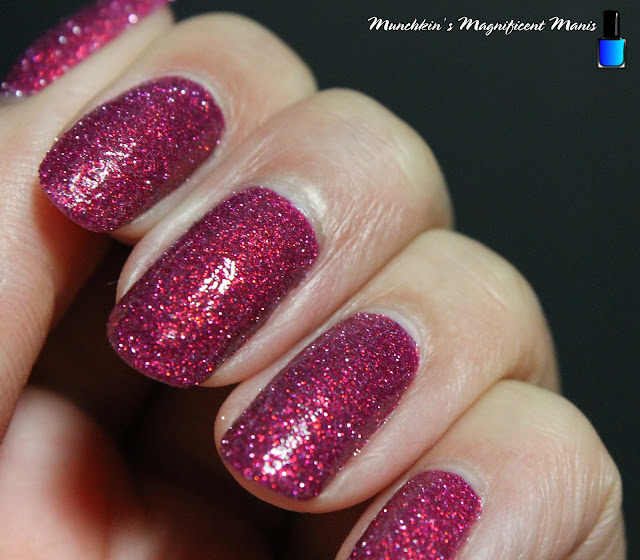
Next we have Love You Brunches, which is decried as a purple/ violet reflective polish, with silver reflective glitters in it. This polish is said to have a shift of copper, magenta, gold, and bronze. For this polish I would say that I do see the magenta shift in it, and even a light blue shift. 

This polish was opaque for me in two coats, and did apply well. Just like the blue polish this is a very thick glitter polish. 

KBShimmer- Love You Brunches- Reflective

Once again here is the polish with a flash light/ cell phone light hitting the nails, to show how reflective the polish is. 

KBShimmer- There's A Nap For That- Reflective

KBShimmer- There's A Nap For That- Reflective

KBShimmer- There's A Nap For That- Reflective

KBShimmer- There's A Nap For That- Reflective

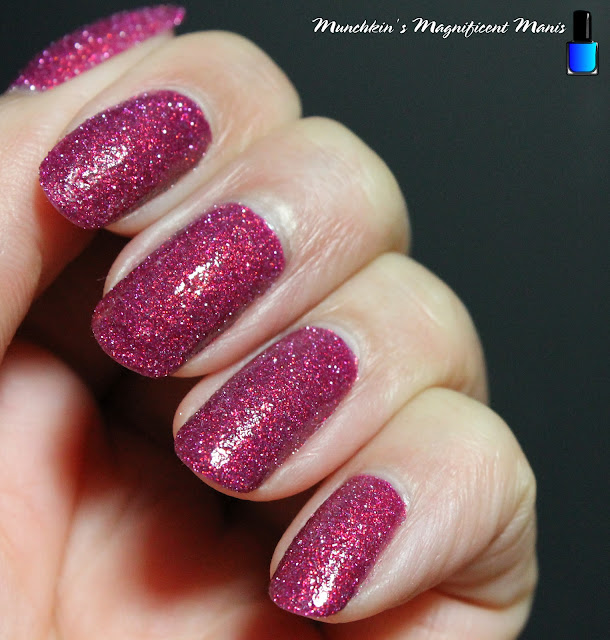
Lastly from the Lounge Set/ Reflective polish is There's A Nap For That this is a pink/ berry colored polish, with silver reflective glitter in it. It is said to shift from red, orange, to a gold. For this polish I would say that I do see the red and gold shift.

This polish was also opaque for me in two coats, and again was thick because of all the glitter.  

KBShimmer- There's A Nap For That- Reflective

Here is the polish 
with a flash light/ cell phone light hitting the nails, to show how reflective the polish is. 

The next polishes we will be taking a look at is from the Plant One On Me Collection. For these polishes for some reason I didn't take enough photos, so there is only three of each.😕 

KBShimmer-  Lilac It Or Not

KBShimmer-  Lilac It Or Not

KBShimmer-  Lilac It Or Not

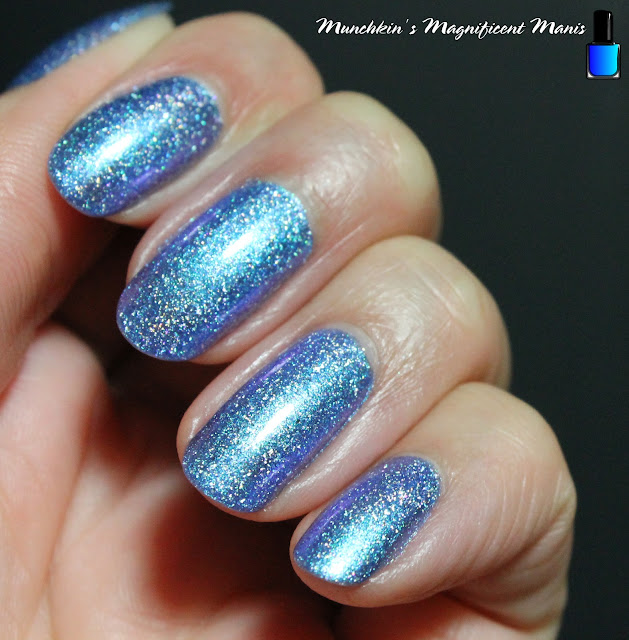
First we have Lilac It Or Not, this is described as a light blue or periwinkle blue, with holographic flakes. This polish shifts from a lavender and purple, and also has an icy blue look to it from the shimmer.

This polish was opaque for me in three coats and applied well, these were more on the thin side.  

KBShimmer-  Before & Aster

KBShimmer-  Before & Aster

KBShimmer-  Before & Aster

Lastly from the Plant One On Me Collection is Before & Aster this is purple polish, that has holographic flakes in it. This shift to pink, a hint of copper, green and gold. 

This polish was opaque for me in three coats, this polish and Lilac It Or Not have the same formula and are not as thick and glitter as the reflective polishes. 


In conclusion I loved all of these polishes! I have been eyeing reflective polishes for a while now and I wish I would have gotten some sooner, I am still glad that I did final get some. The reflective polish look even more amazing and shinny in real life, then in photos or video. 

Also the other non reflective, the ones with holographic flakes I loved just as much. I do highly recommend all of these polishes. I personally have been liking Indie brand more anyways because of how unique they are, and you can't find polish like this in a store. 

Here is the link to the polishes the_lounge_set- The Reflective Polishes $11 Each USD, Collection $99 USD (I just linked the whole collection) 

plant-one-on-me collection $12 Each USD, Collection $99 USD.

Hope all of you enjoyed this KBShimmer review! 

See you next time for more nail fun! 😊💅🏼


Friday, October 6, 2017

Under the Sea- Mermaid Nail Design

Hello everyone! Today we will be creating a fun design that would probably better for summer, but Halloween is coming up so maybe all of you could create this on your nails for Halloween. Anyways we will be create a mermaid inspired nail design, mermaids and unicorns have been a big thing this year, it seems like they are on everything, so I thought it would be cool to make mermaid scales on our nails.   

 Mermaid Nail Design
 Mermaid Nail Design

Here are the nail polishes and tools used for this mermaid nail design-  

 
Base and Top coat- - CND Stickey Base Coat and Revlon Extra Life No Chip top coat.

Nail polishes- Sinful Color- Gorgeous, Sally Hansen- Triple Shine- Make Waves (optional not needed, all you need really is one of these types of polishes), Revlon- blue mosaic,Color Club Halo's- Harp on, and KBShimmer- Blue- d Lines.

Acrylic paint- black and white.

Nail art brushes- small detail brush, very small thin detail brush.

Other- Small cup or glass jar with water in it to clean off nail art brushes.


Let's start this under water adventure to find a mermaid or even two. 
   Mermaid Nail Design
        Mermaid Nail Design

As always start off with a thin layer of base coat.

Once that has dried, on your thumb, index and pinky finger nail polish those nails with a shimmery blue/green polish (I used Sinful Colors- Gorgeous and for some reason to be extra I used Sally Hansen- Triple Shine- Make Waves, but really you only need one polish.)

For the mermaid scales on the middle and ring finger nail, polish the middle finger nail with a silver holographic polish, and then the ring finger nail with a blue holographic polish. I feel like using holo polish for the scales would be the best!

Once your base colors have dried we will make the scales. I did hand paint these on my nails which is much harder, but their is another option, their is mermaid scale nail vinyls that will make this design much easier. But today we will be creating this by hand. 

For the scales with a very thin nail art brush dipped into black paint, starting near the cuticle  make three upside down U's, then under that making sure that the next line of U's don't line up, and make another line of U's. Do this all the way down the nail. You can make the scales small (like I did) or big it is up to you.        

Mermaid Nail Design 
   Mermaid Nail Design, with Seashell

Next we will create the seashell on the thumb nail. With a thin detail brush with white paint on it, first make a small rectangle near the cuticle area, then for the shell details make some long U shapes going in a circle for the shell shape. 

Once that has dried take your silver holo polish and fill in the shell, you can use the the brush that is in the bottle, you don't really need to use a nail art brush for this. Also you may need to go over the shell two times to be opaque. Also the outline you just made you most likely will have to go over that again because you cover it up when you filled in the shell with the silver holo polish. 

Mermaid Nail Design 
 Mermaid Nail Design

For the final touch on the index and pinky nails we will just polish a mermaid looking glitter polish, that has small and large blue glitter, and large silver and green glitter in it.  

Also on the thumb nail with the seashell, add a little of the same glitter around the shell as part of the background.  

Mermaid Nail Design
  Mermaid Nail Design

Once your mermaid nail design has dried apply a top coat to seal/ protect your design.

Hope all of you enjoyed this fun mermaid nail design that you can wear just for fun or for a upcoming Halloween party, coming up toward the end of this month.

See you next time for more nail fun!   

Friday, March 17, 2017

Unicorns Are Real? Unicorn Nail Design

Hello everyone! Sorry for the lack of post last week, in the area that I live in their was a bad wind storm that knocked out power for almost a million people and we had no power for a few days, some people almost a week. Also last week I just felt like taking a break from blogging, so it ended up working out. Anyways did all of you know that unicorns are real? They are the one that make holographic polish, and the wonderful rainbows that are in them, or maybe not I just thought that would be a fun/ weird way to introduce this weeks tutorial. As you may have guessed we are creating a cute holographic inspired, unicorn design. 

Unicorn Nail Design  
Unicorns are real? 

 Here are the nail polishes and tools used for this unicorn nail design:

  
Base and Top coat - CND Stickey Base Coat and Revlon Extra Life No Chip top coat.

Nail polishes- Color Club Halo's- Harp on, KBShimmer- Blue- d Lines, China glaze- white on white, Zoya- Estelle, Zoya- Renee- Redbook trio, Sinful Color-Let's Meet, and Sinful Color- HD Nails. 

Acrylic paints- black, white, blue, red, green, and yellow.

Nail art tools- large dotting tool, thin liner brush, long thin liner brush, and a small detail brush (for small lines). 

Other- glass jar with water and a small jar with acetone to clean nail art brushes.

Let's start this magical nail design!

*Just a side note, for all of the nail designs that I do I jump around from one part of the design to the other (or nails). I do this just to wait for each part to dry before I move on. So I will paint the unicorn body, then go the rainbow, then back to the unicorn to add the details.  

Unicorn Nail Design, Rainbow   
Rainbow design 

As always start off with a thin layer of base coat.

When that has dried polish your thumb nail with a silver holographic polish, and your other nails with a blue holographic polish, then let that dry.

First we will start off with the rainbow that will go across three of your nails; the index, middle, and ring finger nail. For this part try to make sure that your rainbow lines up as much as you can ( this can be hard to do.)

I started first with the index nail, middle, then ring finger nail, using acrylic paint as just an outline, then later went in with nail polish.

First make a curved blue line on the index nail, then a curved line on the middle nail, then on the ring finger nail. I did this one at a time on each nail, then went on to the next color.

Repeat this step for each color of the rainbow. I only used four colors, you can use more or different colors. 

Once your acrylic paint has dried, you can go over that with nail polish in the same colors, or if you are brave enough you can start off with nail polish. I personally like to start off with acrylic paint, just in case I make a mistake. 

Then once your rainbow has dried you can make a cloud under it. With a large dotting tool make two dots at the top and two at the bottom, and one on each side, then you have a cloud. 

Unicorn Nail Design, clouds      Cloud nail design

On your pinky nail you can leave that with just the blue holo, or you can make two or more  clouds on the nail. I made big and a little cloud on this nail.

Unicorn Nail Design 
 Unicorn nail design

I thought I would save the hard part for last, the cute little unicorn. I did have trouble myself with this one, when I first started to paint this on my nail it just was not looking right, so I did have to redo this one. 

First take your detail brush with white paint and make the shape of her body, staring with the head and then the body, also make two triangles for her ears and one in the middle for her horn.  

For the final design, I made the little feet first. If you don't have pink you can make it by mixing red and white. Then make two large circles on the sides of her body, then two small ones in the center.

Now for the tricky part outlining. Take a thin liner brush with black paint on and outline the head and body, along with her ears and horn. Then where the middle feet are make four lines for her legs, and then outline the feet as well.

Next will be do more detail, For her eyes take a large dotting tool with black paint on it and make two eyes near the top of her head. If needed you can make her eyes bigger with a brush. Once that has dried make two white dots in the center of her eyes.

For her nose just make two small curved lines under her eyes.

Then for her smile make a curved line under her nose and one small curved line on the side.  

For her hair with a light blue and pink paint (or whatever color you would like) on a thin brush make small lines for her hair. I also added a few black lines a well, just for a outline. Also for her horn just add a few blue and black lines.

For her tail, using that same light blue and pink on a thin brush make a few curved lines for her hair, then outline that in black as well.

Unicorn Nail Design, with a rainbow and clouds   
      Unicorn nail design

Once your cute nail design has dried apply a top coat, to protect your nails and to help your design to not chip as fast. 

rainbow and clouds nail design
Rainbow and clouds nail design

As usual I have been doing a simple version on my right hand, because I have trouble doing designs on my right hand, and painting the unicorn was hard enough on my left hand. The only thing different I did on my right hand, was I put different size clouds on the thumb nail. 

 Unicorn nail design
 Practice version of the unicorn design

I also wanted to include the practice version of this design as well, because the unicorn turned out super cute and adorable, and I thought it was worth showing. If I was to do this design again I would have made the unicorn smaller and her head bigger like in the practice version. But I still think the final version tuned out just as cute.    

Hope all of you enjoyed this cute and holo filled unicorn nail design, and now you know that unicorns are real (maybe!)

Some people say that holo is made from unicorns them self, but no need to worry no unicorns where harmed in the making of this design.

See you next time for more nail fun!    

Saturday, October 24, 2015

Let's See your Feathers- Peacock Design


Hello everyone! For this weeks post their really was no theme for this design, I just deiced to do a peacock feather design. This design was inspired by a photo that I found on Pinterest, and I just deiced to make it into a nail design.

    Peacock Nail Designs. Design inspired by Pinterest Peacock photo


Here are the polishes and tools used for this peacock design:


Base and Top coat- Nicole OPI-  3in1- base, top, & strengthener and Revlon Extra Life No Chip top coat.

Nail polishes- Sinful Color- Gorgeous, KBShimmer- Up and Cunning, Revlon- blue mosaic, Zoya- Charla, and Kiss nail art stripper- Silver.

Acrylic paint- blue, black, and white.

Nail art tools- thin slanted nail art brush, and a latex free makeup sponge.

Other- a cup of water to clean off your brush.


The skill level for this Peacock nail design is: 

 
Beginners
This design is simple. The only part that has some small details is the ring finger nail, with the peacock feather. Although this does have some small details they are simple curved lines.
Let's start this colorful peacock nail design!
1. Start off with a base coat to protect your nails.


2. Then we will paint our nails with some shimmery teal colors. On the pinky, middle, and index finger paint your nails with a shimmer teal, I used Sinful Color- Gorgeous. Then on the ring and thumb nail we will paint them with a teal holographic polish, I used KBShimmer- Up and Cunning. 

3. Next we will sponge on a bluish teal color with a metallic shimmer(I used Zoya's Charla) on to just the index, middle, and pinky nails. Take a makeup sponge that is cut into a small piece, you don't need all of the sponge a small piece will work just fine. Then paint the color onto the sponge, and then dab the sponge on to the nail tip, then just go slightly up the nail to create a gradient. You may need to repeat this step two more times for the color to be opaque enough.

4. Now we will start the peacock feather on the ring finger nail. Take your thin nail art brush dipped into blue acrylic paint and make a line going up the nail, then a circle at the top, and two curved lines on the sides. The way it looks right now is kind of like a stick figure with his hand in the air.

5. For the next step it is a little hard to show step by step of how to create the peacock feather, due to their being a lot of small little lines, but I will try to explain it. First we need to mix together our different shades of blue. First squirt some blue, black, and white on to a piece of paper or a piece of foil. Then take your blue and a small about of black and mix them together to make a dark blue, then take some more blue and add some white to it to make a light blue. Now you can start to make different curved lines going up your stick figure looking shape. I really had no order of how I put the colors I just started to paint a lot of curved lines.

Also for this step you can always add a little more or less of each color while painting to make the color you want.

 Final peacock nail design.

6. After you finish that side go onto the other side that is closes to your finger and repeat the last step. Also if you would like you can add some sliver to your feather, by taking a silver nail art stripper and just make a few sliver lines on the feather.

7. To finish off this look you can always stop here or if you want a little more glitz, you can add some glitter polish to the gradient. Once again take a small piece of makeup sponge and paint a blue, green, sliver glitter polish onto the sponge (I used Revlon- blue mosaic.) You may need to do this one more time, so that their is enough glitter or you can just take the brush that came in the bottle and paint some glitter on after sponging on the first layer. 

As for the thumb nail I just left it as is with just a holographic polish on it.

Then once everything has dried apply a top coat to protect your beautiful bright nail design.


Hope all of you enjoyed this bright peacock nail design!

See you next time for more bright and fun nail designs!