Showing posts with label Cirque Madder. Show all posts

Friday, March 22, 2019

Leopard Nail Design

Hello everyone! Today I decided that I wanted to create another leopard print nail design. A few years ago I created a blue and silver leopard design on this blog, but this time I wanted to have a more realistic color palette, plus is seems like in fashion leopard print has become popular, so this would be great to have on your nails with your favorite leopard print outfit.

This design is very simple to create and great for beginners, the only nail art tool you need is a dotting tool. 

Leopard Print Nail Design 
Leopard Print Nail Design

Here at the polishes and nail art tools that you will need for this leopard design:


Base an top coat - CND Stickey Base Coat and Revlon Extra Life No Chip top coat.

Polishes- Left hand; OPI Hawaii- Do you take Lei Away and Cirque- Madder.
Right hand; Revlon- Gold Coin, Zoya- Renee- Redbook trio, and Nicole by OPI- That's Just Plain Nuts!  (for the brown spots)

Acrylic paint- Black and brown- hot cocoa.

Nail art tools- large dotting tool (that is all!) 


Leopard Print Nail Design
  Leopard Print Nail Design

As always start off with clean dry nails and apply a thin layer of base coat, then let that dry.

For this design I used two different types of polish on each hand. I always like to have two different polish colors on each hand, to make it more fun! As always you can just go with one or the other for your color choice as well. 

On your left hand polish your thumb, middle and ring finger with a nude/ tan polish (I used  OPI- Do you take Lei Away) and then your index and pinky nail, polish those nails with a red holographic polish ( I used Cirque- Madder.) 

 Leopard Print Nail Design
  Leopard Print Nail Design

On your right hand polish your thumb, middle, and ring finger with a gold polish (I used
Revlon- Gold Coin) and then your index and pinky nail, polish those with a red creme polish (I used Zoya- Renee.) 

Let your base polishes dry.

 Leopard Print Nail Design
 Leopard Print Nail Design
 Leopard Print Nail Design
 
Now on to the leopard print, which will go on the tan/ gold nails. For the leopard print only put a few of the larger prints, try not to make to many and make sure to leave some of the tan/ gold showing, other wise the nails might look to cluttered.

Take your dotting tool and dip it into your brown paint, for your left hand and then for your right hand use a darker brown polish. On each nail make different random shaped dots to start your leopard print.

For both hands take that same clean dotting tool with black paint on it, and on each large dot make a curved shape on some of the sides, on some of the dots I put two and some I put three curved shapes.

Then to finish off your leopard print make some small black dots in the blank areas, also make sure to only make a few.

That is all that is to it for this leopard design. 

Leopard Print Nail Design 
 Leopard Print Nail Design

Leopard Print Nail Design 
 Leopard Print Nail Design
 Leopard Print Nail Design

Leopard Print Nail Design 
Leopard Print Nail Design
 
Once you have your leopard print the way you like, apply a top coat to seal in your design and to help it to last. 

Hope all of you enjoyed this simple leopard print nail design! 

See you next time for more nail fun!

Friday, February 9, 2018

Hugs and Kisses- Valentine's Day Design

Hello everyone! Happy Valentine's Day! Today we will be creating a design with a few different holographic polishes, five polishes (I know that is kind of a lot, but you can always just use a few, or all of the polishes.) This design will have some hearts (or course) and the letters XO. This design is great for your V-day date or just for fun even if you don't have a valentines. 

Valentine's Day Nail Design  
Valentine's Day Nail Design

Here are the polishes and nail art tools used for this V-day nail design:


Base and top coat - CND Stickey Base Coat and Revlon Extra Life No Chip top coat.

Nail polishes- Glitter Daze- Let's have a Waikiki, Cupcake Polish- Lord Licorice- CandyLand, Superchic Lacquer- Cherub, Cirque- Madder, and Color Club Halo's- Harp on. 

Nail art brushes- thin stripper brush, thin detail brush, and small detail brush.

Acrylic paint- white and red.

Other- small cup of water, and small glass jar with acetone for cleaning nail art brushes.


Let's start this love filled nail design! 

Valentine's Day Nail Design

Start off with a thin layer of base coat, then let that dry.

Once your base coat has dried polish your thumb with a pink glittery polish (I used Glitter Daze- Let's have a Waikiki), your index nail with a red holo glitter polish (I used Cupcake Polish- Lord Licorice), your middle and pinky nail with a red holo polish (I used Superchic Lacquer- Cherub), and then a dark red holo on your ring finger nail (I used Cirque- Madder.)

Let all of your base colored polishes dry, then we will start the nail designs.

Valentine's Day Nail Design 
Two hearts on thumb nail, left hand     

Valentine's Day Nail Design
One heart on thumb nail, right hand

We will start on the thumb nail, on the left hand I painted two hearts and the right hand I just painted one heart. You can pick out which one you would like to do on the thumb nail. 

Two hearts side by side:

Take a thin detail brush with red acrylic paint, and near the side of the nail make a big heart outline, then fill that in. Then over lapping that heart, make a smaller heart right next to the big heart. 

One big heart:

If you just want to make one heart, do the same thing, just make the heart bigger. First make the outline for the heart and then fill that in with the red acrylic paint.

Valentine's Day Nail Design

For the next part of the design we will paint XO (hugs & kisses) on our index nail. Take a thin detail brush with white paint on it, near the side of the nail carefully paint an X and then right next to the X make a circle shape for the O.

Valentine's Day Nail Design 
 Valentine's Day Nail Design


For the last part of this design, we will make the love raining down on us, on the ring finger nail. Take a thin stripper brush with a silver holo polish (I used Color Club Halo's- Harp on)  and make different size lines, some long and some short, right next to each other. 

Then near the tip of the nail make three small heart, I actually at first made the shape of the hearts with white acrylic paint and then filled them in with the silver holo polish.

On the middle and pinky finger nail, we will just leave those as is, with just the red holo polish.   

Valentine's Day Nail Design
 Valentine's Day Nail Design
 Valentine's Day Nail Design

Once you have your design the way you like/ love apply a top coat to help protect your nails and to make them nice a shinny for your valentines day date.

Valentine's Day Nail Design  
 Valentine's Day Nail Design
 Valentine's Day Nail Design, right hand nail design

Here is the other design that I created on my right hand, this time it was very similar, the only thing that was different was the thumb nail.

Hope all of you enjoyed this Valentine's day, hugs and kisses nail design!

Happy Valentine's Day!

See you next time for more nail fun!

Saturday, December 23, 2017

Light Of My Life- Christmas Lights Design

Hello everyone! Merry Christmas and Happy Holiday's, today we will be creating another Christmas nail design, last week we made candy canes on our nails, for this week we will make Christmas lights on our nails. I was planning on doing one more Christmas nail design, then I realized that this Monday is Christmas, so I will only be doing these two designs.

Christmas Light Nail Design 
Christmas Light Nail Design

Here are the polishes and nail art tools used for this nail design:


Base and top coat - CND Stickey Base Coat and Revlon Extra Life No Chip top coat.

Nail polishes- Emily De Molly- Everlasting Gaze, Cirque- Madder, Color Club Halo's- Harp on, Zoya- Dream, and Zoya- Urban Grunge-Merida. 

Acrylic paint- white and black 

Nail art brushes- two small thin detail brushes.

Other- small jar with acetone to clean off brushes and a small cup of water to also clean off brushes.

Let's start this bright and festive nail design!

Christmas Light Nail Design 
 Christmas Light Nail Design

Start off with a thin layer of base coat.

Let your base coat dry, then polish a turquoise green holographic polish on your nails, I used  a new polish that I just purchased not to long ago called Emily De Molly- Everlasting Gaze.  

One your base polish has dried we wills start to make the Christmas lights on all of the nails. Take a thin detail brush, with black paint on it (I used two different once, one for just paint and the other for polish.) Start on the thumb and going all the way to the pinky nail make a squiggly line, on one nail I did add a loop. 

After you make the squiggly lines, make some small squares to hold the bulbs in place, on each nail I made two to three small squares. 

 Christmas Light Nail Design
 Christmas Light Nail Design

Then for the bulbs I first made the shape with white paint and then went over that with different colored polishes, once the white paint had dried. Also make sure to make attach the bulbs to the small squares. I used a red, green, blue and silver polish, you can use the same colors or different ones it is up to you, I just thought I would go with some Christmas type colors. 

Just for some small detail, once your bulbs have dried you can make small white line to show a reflection of light on the bulbs, this is optional if you want to skip this step that is okay, I just did this for more detail.   

Christmas Light Nail Design
 Christmas Light Nail Design
 Christmas Light Nail Design

Once your bright and colorful Christmas light nail design has dried apply a top coat to seal in your design and to make it even more shinny, to where it all most looks like it will light up. 

Hope all of you enjoyed this bright and colorful Christmas light nail design!

Have a wonderful Christmas/ Happy Holiday and a safe and Happy New Years!

See you next time for more nail fun!  

Friday, December 15, 2017

Candy Cane Lane

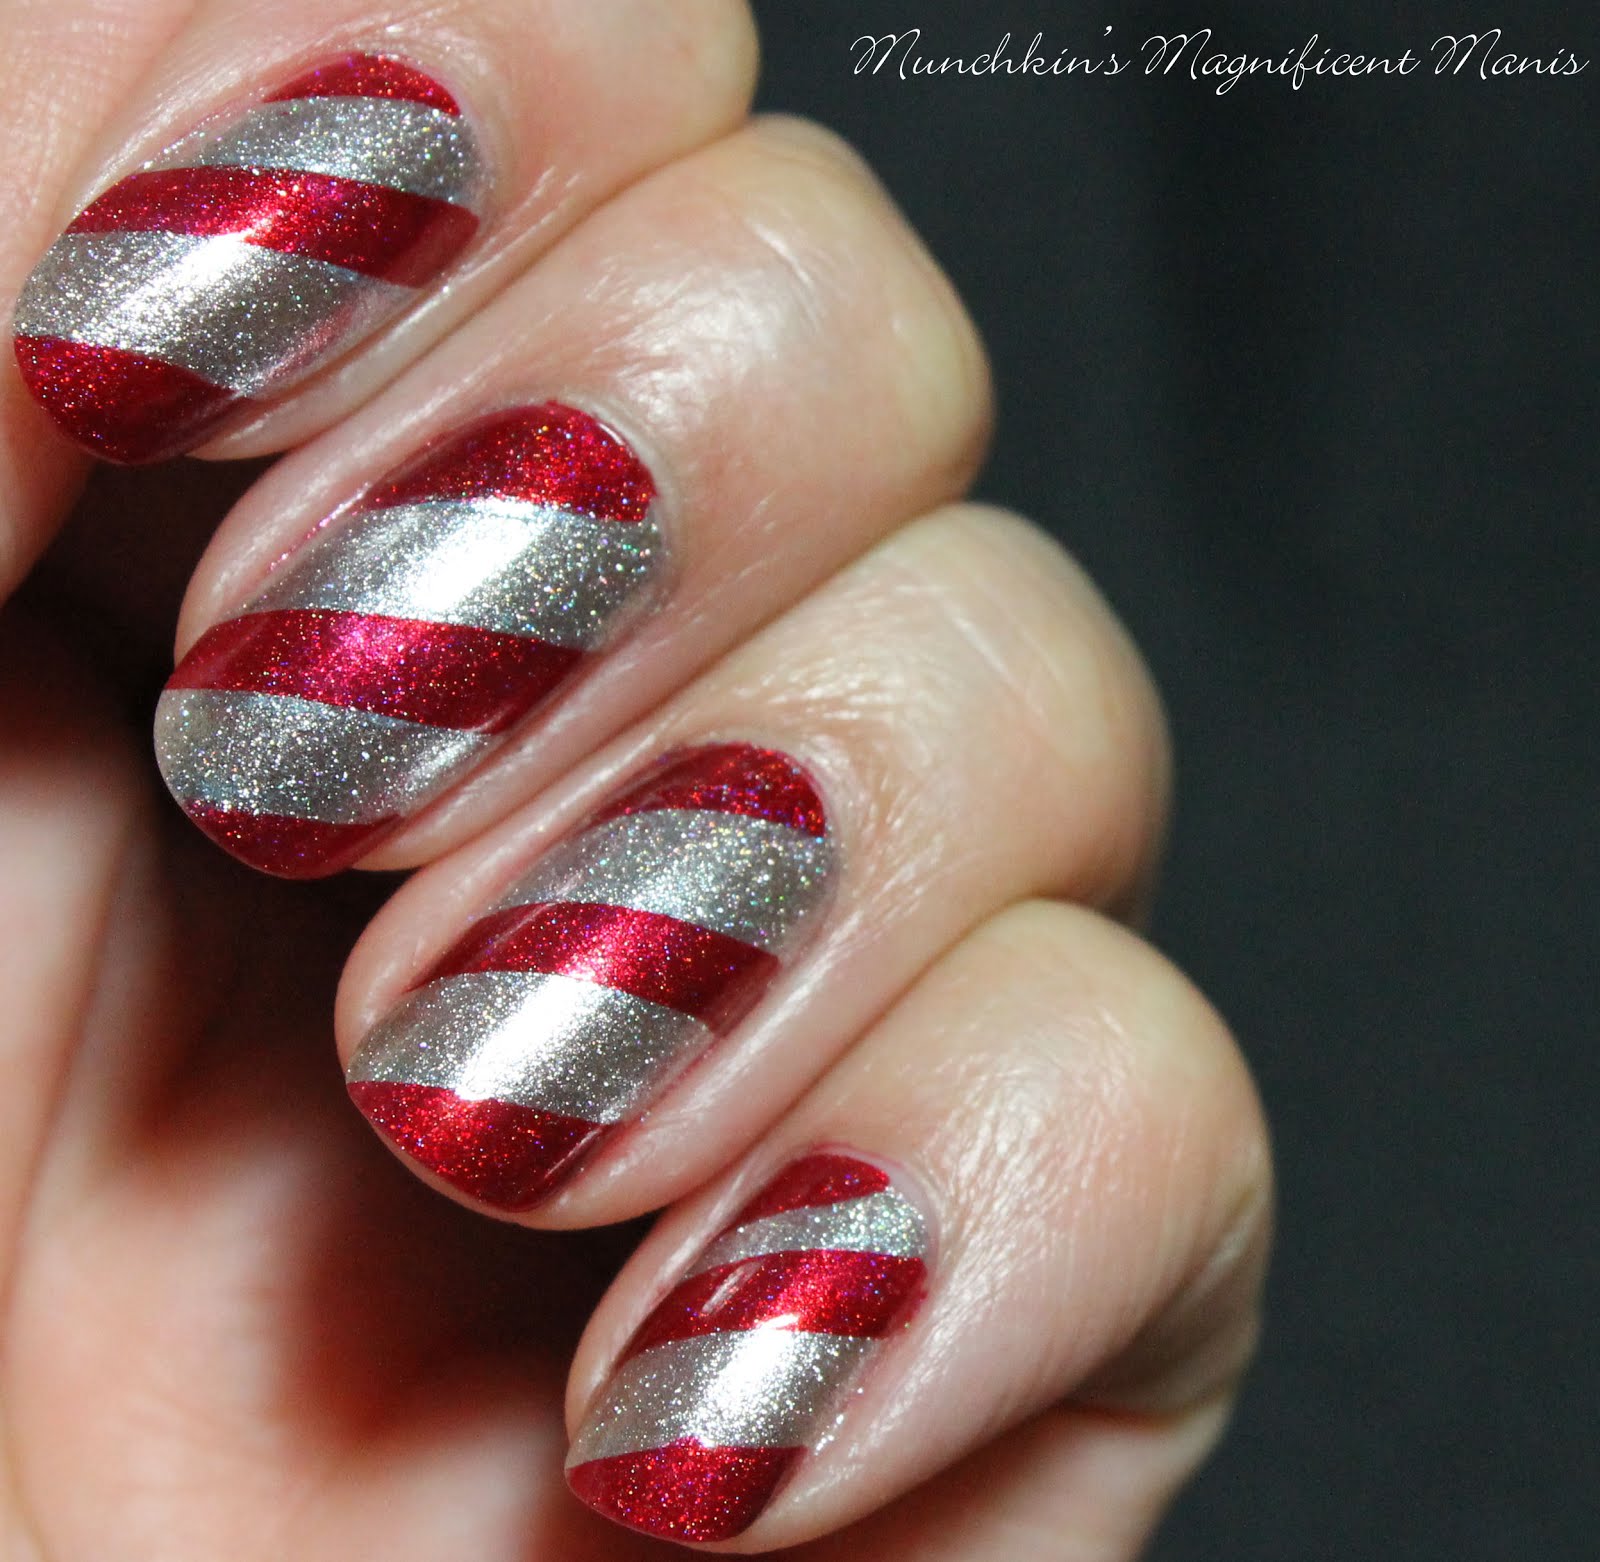
Hello everyone! Hope all of you are enjoying the winter weather, if you live in a cold environment like myself. If you are anything like me then, no you are not enjoying the cold snowy weather. Anyways seeing how Christmas is quickly approaching, this week we will be making candy canes on our nails, and not just any candy cane with plain white polish and plain red, we will be using a silver and red polish with some holo in it, because what better way then to use holo polish, besides it looks more festive.
    
Candy Cane Nail Design
 Candy Cane Nail Design

Here are the polishes and tools used for this festive nail design, and yes this design only needs a few things!

 
Base and Top coat- CND Stickey Base Coat and Revlon Extra Life No Chip top coat.
Nail polishes-  OPI Holiday 2017- Ornament to Be Together and Cirque- Madder.
Nail art tools- just some nail art tape.
Other- scissors and tweezers to take off the tape (Items not show above)
That's all you need!
Let's get this fun and yummy candy cane nail design started!
Candy Cane Nail Design  
Candy Cane Nail Design
Start off with a thin layer of base coat, my fav is CND Stickey base coat.
Let that dry, then polish all of your nails with a silver polish that has some holo in it. The polish I used is Ornament to Be Together from OPI, this polish is part of their new holiday collection for 2017. This silver polish has a subtle amount of holo in compared to most holos that I have. 
Once your base color of silver has dried, take your nail art tape and cut it into small pieces and place them on an angle on the nail, so that it will look like a candy cane.
Candy Cane Nail Design 
 Candy Cane Nail Design
At the tip of the nail, polish that area with a red holo polish, then the next area leave that silver. Repeat this for each part, to where every other part is red (as shown in the photo above.)
Grab your tweezers and right away, make sure your red polish does not dry and peel off the nail art tape that you placed on the nails. Doing this right away will help to keep your lines looking clean and straight.  

Repeat all of the steps above for all of your nails, or on my other hand I did things a little different. 

Candy Cane Nail Design
 Candy Cane Nail Design
 Candy Cane Nail Design

If you only want a few nails with the candy cane design on it you can just do the design on two nail, the thumb and ring finger nail (like the photo above), or even just as a accent nail, the ring finger nail.

Candy Cane Nail Design 
 Candy Cane Nail Design
   Candy Cane Nail Design

Once you have your candy cane nails the way you like, apply a top coat to seal in your design and to make your holo candy canes even more shinny. 

Hope you enjoyed this simple holiday nail design!

See you next time for more nail fun! 

Next week we have another Christmas nail design!   
     

Friday, December 2, 2016

Holoday's, Easiest Design Ever, Chevron

Hello everyone! A lot of times on this blog we create some kind of hard/ detailed designs, well today I have the easiest design ever! That anyone and everyone can create, a chevron design. If you have been checking out this blog for a while now, then you know that I am all about the hand painted designs. But today I cheating a little bit, yes I used nail vinyls. I know shame on me, but I wanted to do a chevron design and I have been having trouble creating this by hand, so what better and easy way then with nail vinyls.

Holographic Chevron Nail Design. 
Holographic Chevron Nail Design.
I love the black background, it make the nails in the photo look so elegant, 
don't know why I haven't done this sooner!   

Here are the polishes and tools that we will be using for this design:


Base and Top Coat- CND Stickey Base Coat and Revlon Extra Life No Chip top coat. 

Nail Polishes- Cirque- Madder, Zoya- Urban Grunge- Alicia, or Color Club Halo's- Harp on.

Nail tools- Twinkled T Chevron nail vinyls, and some twisters to to pick up and pill the nail vinyls (twisters not show in the photo above.)

That's all you need! 

Holographic Chevron Nail Design 

As always start off with a thin layer of base coat.

Then for your base polishes paint your thumb, index, and pinky finger nail with a red holographic polish (Cirque- Madder) and then your middle and ring finger nail with a silver holographic polish (Zoya- Urban Grunge- Alicia). 

Once your base color has dried, on just your ring finger nail apply a top coat, a fast drying one would be best. This is so the nail vinyl will not stick to you polish, that you have already put on your nail.

Then wait until that nail has fully dried.

Take some twisters and peel off your nail vinyl from the sheet, and then place it on your nail. Then press down on the vinyl making sure it is on the nail good and free of bubbles.

* For the photo above I used two vinyls, you can use two or three, or even one depending on the length of your nails. I kind of wished I used three. 

Paint the same color of red that you put on the other nails, over the entire nail covering the nail vinyl.

Very important! You need to peel off the nail vinyl right away with tweezers, do not wait for the polish to dry! This will unsure that your chevron lines look nice and clean. 

Holographic Chevron Nail Design 
 Holographic Chevron Nail Design  

Once all of your nails have fully dried apply a top coat. Your ring finger nail with the chevron will have two layers of top coat on it. 

Their you go a very simple way of do some nail art, with out have to have skills in doing nail art, or if you just want to keep things simple. 

I was not planning on do a holiday design, but the red holographic polish that I really wanted to use and the silver ended up looking kind of Christmas like. These colors ended up looking so beautiful together and would be great for the holidays or holodays!     

Holographic Chevron Nail Design
 Holographic Chevron Nail Design
  Holographic Chevron Nail Design, using Color Club's Harp On

Want a little bit more intense holo and doesn't ? Then you can always use a linear holo instead of a scattered holo.

Zoya's Alicia (left hand) that I used to show all of you this tutorial is a scattered holo, which means the holographic particles are larger and less dense, and will not show as much of an intense rainbow, but still looks very shimmery.

Color Club's Harp On (used my right hand) and Cirque- Madder are linear holos, which means the holographic particles are smaller and create a stronger rainbow effect. When you look at the polish on your nails in the sun, you can see a circle in the nail from the holo.

Hope all of you enjoyed this holographic chevron nail design!

See you next time for more nail fun!  

Friday, June 17, 2016

Holo Fun! Live Love Polish Hologrphic Review

Hello everyone! Sorry I have been missing in action lately! A few weeks ago in school I just went on the floor/ can work on clients, so my schedule has been busy with going to school five days a week and then working the other two, I had zero free time/ very little. But I decided to take a very big risk, and put in my two weeks at the job I had been at for along time, due to being unhappy (I don't really get into it here). So now I have time to work on my blog again, which I have missed doing! 

Anyways to transition back into to the M.M.M blog, I will be doing a review of some polishes that I bought way back in April from the company Live Love Polish, this is my second time buying anything from this company and I was very happy both time!

Live Love Polish Review    

As you can tell/ if you have been following the M.M.M blog we love us some Holo polish! After all it like a rainbow in each bottle!

Pretty & Polished Sea Spray 

Let's start off with this pretty blue holographic polish from Pretty & Polished.

Sea Spray is a scattered holographic royal or sapphire blue. This polish was opaque in two coats and went on very smooth. If you want to you could apply a third coat to make sure that it is not sheer, as you can tell in the photo above it looks a little sheer still, but this may be do to the daytime light bulb that I use to take my photos. This polish is very pretty and the application was really good, which is always a good thing and makes it a polish that I really liked.

Pretty & Polished Sea Spary  $9.50 on Live Love Polishes website 

Color Club Eternal Beauty 
 Color Club Eternal Beauty
 Color Club Eternal Beauty 

Next we have Color Club Eternal Beauty, this is a purple linear holographic polish. I have purchase quite a few Color Club polishes and all of the formulas have been excellent, and this one is no different. This polish went on very smooth in almost one coat, but I always like to put on two coats to make sure it is at full opacity. This was another very beautiful polish that I really liked. 

Unfortunately at this time this polish is sold out on Live Love Polish, but if you are interested keep a look out for it, it will probably go back in stock soon.  

 
Cirque Madder 
Cirque Madder     
 Cirque Madder
The next polish we have is from the brand Cirque. This brand is new for me, before I purchase this polish I had never tried this brand. Cirque is an indie brand polish that hand mixes all of their polishes, and they are based out of New York City. The polish Madder is a beautiful red scattered holographic polish, that is part of the 2015 Cirque Holiday collection. This polish went on very smooth and was opaque in two coats. Once again this was very pretty red holo polish and for my first try of this brand, I would say this polish was great. 

Cirque Madder  $13.00 On Live Love Polish.com


  Fun Lacquer Million Dollar Dream
 Fun Lacquer Million Dollar Dream
Fun Lacquer Million Dollar Dream 

Last but far from lest is the beautiful, amazing, and super shinny Fun Lacquer Million Dollar Dream. This polish was very hard to capture the true beauty of in the photo, but at the end I have a link to Fun Lacquer website, so you can see the true awesomeness that  Million Dollar Dream is! 

Anyways this a gold holographic glitter boom, that on Fun Lacquer website is said to have higher quality glitter that makes it much more brighter/ shinier then other glitter polishes. This polish was a little bit patchy as you can see from the photo above, and it is best to apply one coat with the brush, then take a makeup sponge and dab on the second coat on to have the full glitter pay off. I knew this but forgot to do that for when wore this polish, but I will remember that for next time. 

Just to warn all of you that like this polish, this is a very dense glitter polish,which means it is a pain to get off. So when it is time to take this polish off, it is best to take some cotton balls soaked in pure acetone and then wrapped in foil around your fingers, then let it soak for maybe ten minutes, then pull the foil off. Or you can always take some acetone and scrub the polish off, it will just take a while to come off. 

Fun Lacquer is another new brand to me that I decided to give a try. Fun Lacquer is a artisan indie brand that is made in Singapore. Once again I am very pleased with this brand, at first the only thing that was holding me back from purchasing this polish was the price, Fun Lacquers polishes are $16.00 to $18.00 per bottle! Which is high for one bottle of nail polish, but as always I wait until I can get a discount code, which I got 10% off. 

Million Dollar Dream is not available on Live Love Polishes website anymore, but here is a link to Fun Lacquers website.


Also here is a link to Live Love Polishes Fun Lacquer polishes on their site http://www.livelovepolish.com/collections/fun-lacquer

All of these polishes I really enjoyed, they are all very beautiful and I would highly recommend any of these polishes. I personally think you can't go wrong with holographic polish, and any holo polish that I have purchased has had really great formals, that go on very smooth and are just amazing. 

For all four of these polishes with free shipping and a 10% discount code I spent $43.65. Which I know it kind of high, but as I always say if they are unique enough, I will pay extra for the polish.

If you missed my first Live Love Polish review make sure to check that out as well.
Live Love Polish Review Time 

Here is a link to Live Love Polishes website:
 http://www.livelovepolish.com/


Hope all of you enjoyed this Holo filled review! 

See you next time for more nail fun!

I will be back next week with more nail art!!