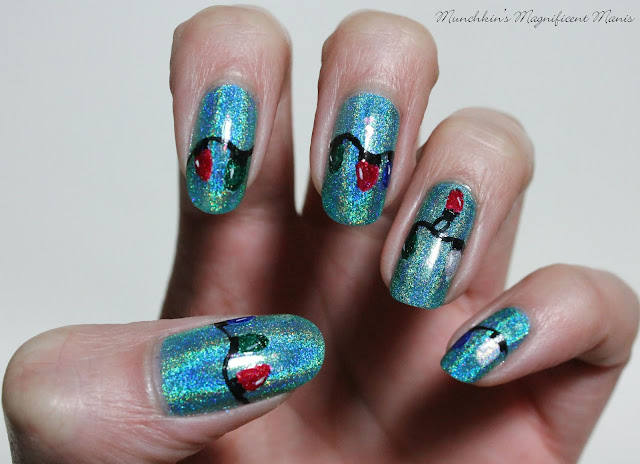
Christmas Light Nail Design
Here are the polishes and nail art tools used for this nail design:
Base and top coat - CND Stickey Base Coat and Revlon Extra Life No Chip top coat.
Nail polishes- Emily De Molly- Everlasting Gaze, Cirque- Madder, Color Club Halo's- Harp on, Zoya- Dream, and Zoya- Urban Grunge-Merida.
Acrylic paint- white and black
Nail art brushes- two small thin detail brushes.
Other- small jar with acetone to clean off brushes and a small cup of water to also clean off brushes.
Let's start this bright and festive nail design!
Christmas Light Nail Design
Start off with a thin layer of base coat.
Let your base coat dry, then polish a turquoise green holographic polish on your nails, I used a new polish that I just purchased not to long ago called Emily De Molly- Everlasting Gaze.
One your base polish has dried we wills start to make the Christmas lights on all of the nails. Take a thin detail brush, with black paint on it (I used two different once, one for just paint and the other for polish.) Start on the thumb and going all the way to the pinky nail make a squiggly line, on one nail I did add a loop.
After you make the squiggly lines, make some small squares to hold the bulbs in place, on each nail I made two to three small squares.
Christmas Light Nail Design
Then for the bulbs I first made the shape with white paint and then went over that with different colored polishes, once the white paint had dried. Also make sure to make attach the bulbs to the small squares. I used a red, green, blue and silver polish, you can use the same colors or different ones it is up to you, I just thought I would go with some Christmas type colors.
Just for some small detail, once your bulbs have dried you can make small white line to show a reflection of light on the bulbs, this is optional if you want to skip this step that is okay, I just did this for more detail.
Christmas Light Nail Design
Once your bright and colorful Christmas light nail design has dried apply a top coat to seal in your design and to make it even more shinny, to where it all most looks like it will light up.
Hope all of you enjoyed this bright and colorful Christmas light nail design!
Have a wonderful Christmas/ Happy Holiday and a safe and Happy New Years!
See you next time for more nail fun!


Best Christmas Led Wire Light
ReplyDelete