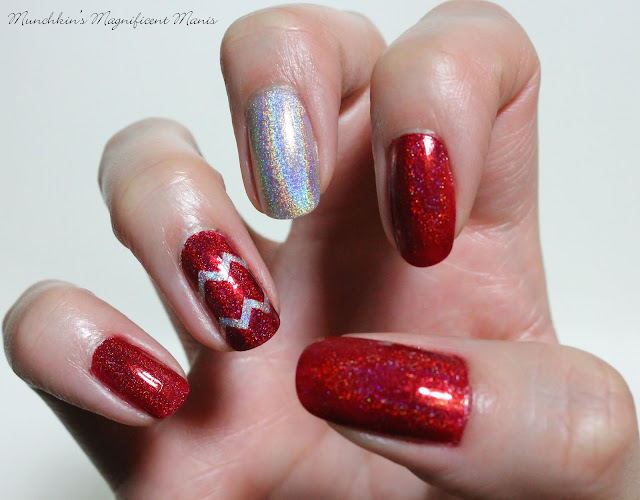
Holographic Chevron Nail Design.
I love the black background, it make the nails in the photo look so elegant,
don't know why I haven't done this sooner!
Here are the polishes and tools that we will be using for this design:
Base and Top Coat- CND Stickey Base Coat and Revlon Extra Life No Chip top coat.
Nail Polishes- Cirque- Madder, Zoya- Urban Grunge- Alicia, or Color Club Halo's- Harp on.
Nail tools- Twinkled T Chevron nail vinyls, and some twisters to to pick up and pill the nail vinyls (twisters not show in the photo above.)
That's all you need!
Holographic Chevron Nail Design
As always start off with a thin layer of base coat.
Then for your base polishes paint your thumb, index, and pinky finger nail with a red holographic polish (Cirque- Madder) and then your middle and ring finger nail with a silver holographic polish (Zoya- Urban Grunge- Alicia).
Once your base color has dried, on just your ring finger nail apply a top coat, a fast drying one would be best. This is so the nail vinyl will not stick to you polish, that you have already put on your nail.
Then wait until that nail has fully dried.
Take some twisters and peel off your nail vinyl from the sheet, and then place it on your nail. Then press down on the vinyl making sure it is on the nail good and free of bubbles.
* For the photo above I used two vinyls, you can use two or three, or even one depending on the length of your nails. I kind of wished I used three.
Paint the same color of red that you put on the other nails, over the entire nail covering the nail vinyl.
Very important! You need to peel off the nail vinyl right away with tweezers, do not wait for the polish to dry! This will unsure that your chevron lines look nice and clean.
Holographic Chevron Nail Design
Once all of your nails have fully dried apply a top coat. Your ring finger nail with the chevron will have two layers of top coat on it.
Their you go a very simple way of do some nail art, with out have to have skills in doing nail art, or if you just want to keep things simple.


Holographic Chevron Nail Design, using Color Club's Harp On
Want a little bit more intense holo and doesn't ? Then you can always use a linear holo instead of a scattered holo.
Zoya's Alicia (left hand) that I used to show all of you this tutorial is a scattered holo, which means the holographic particles are larger and less dense, and will not show as much of an intense rainbow, but still looks very shimmery.
Color Club's Harp On (used my right hand) and Cirque- Madder are linear holos, which means the holographic particles are smaller and create a stronger rainbow effect. When you look at the polish on your nails in the sun, you can see a circle in the nail from the holo.
Hope all of you enjoyed this holographic chevron nail design!
See you next time for more nail fun!


No comments:
Post a Comment