Showing posts with label Color Club holographic. Show all posts

Thursday, January 16, 2020

Starry Night Sky- Star Nail Design

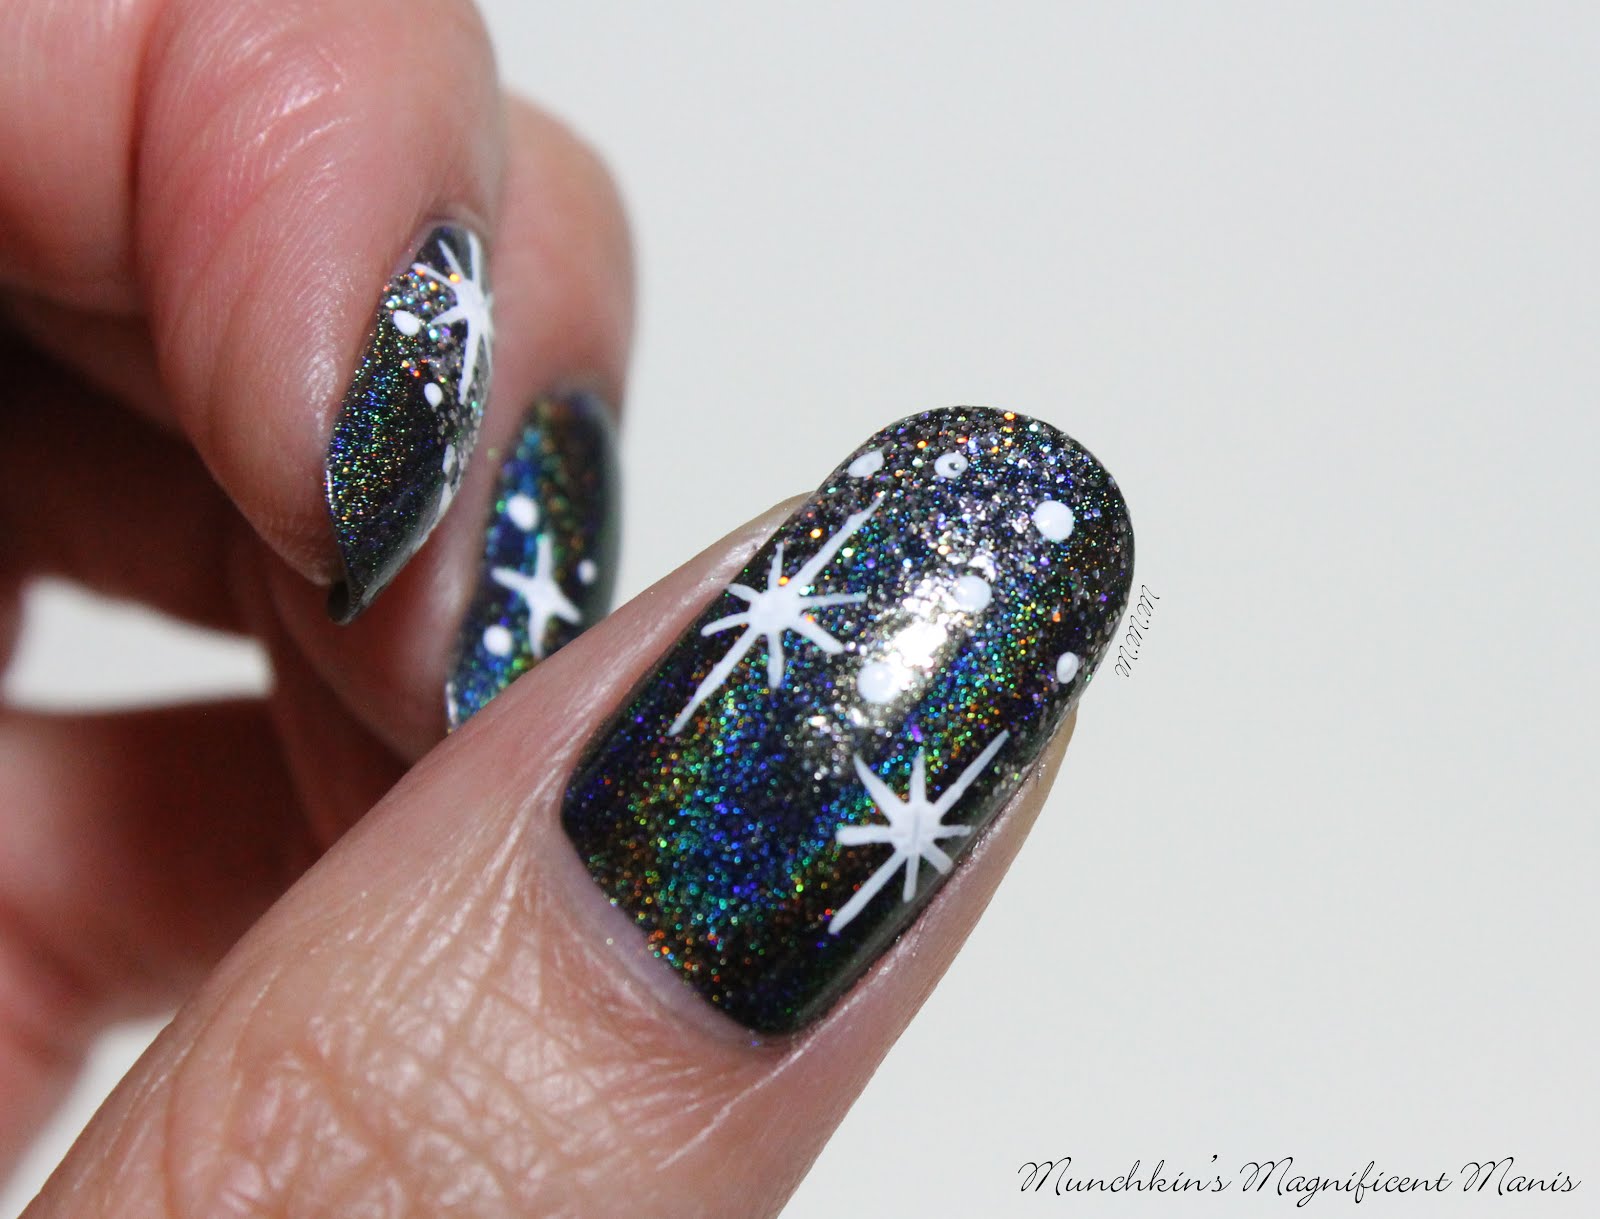
Hello everyone! Hope everyone is having a good new year so far! Today we will be creating a starry night sky inspired nail design, just because. Sometimes I don't really have a reason to do a design, I just decide sometimes that when I look for inspiration that would be cool to do, and today it the day that that happened.

Star Nail Design
Star Nail Design 

Here are the polishes and tool used to crate this starry night nail design:  


Top and base coat- CND Stickey Base Coat and Revlon Extra Life No Chip top coat.

Polishes- Color Club- Black Magic- holo, Color Club- Mini- Silver Glitter, Cover Girl- Boundless color- Disco dazzle (very old polish). 

Other option for base color- Zoya Dream.

Arcylic paint- white.

Nail art tools- thin stripper brush, small and medium dotting tools.

Cup of water to clean off you nail art brushes. 

Star Nail Design  
Star Nail Design
 Star Nail Design 

Apply base coat, let dry.

Polish all of your nail with a black holographic polish, or a creme black polish if for some reason you don't have a holo polish. 

Thumb nail- add a silver glitter near the tip of the nail.
Index nail- make a thick line of glitter going across the nail.
Middle finger nail- no glitter. 
Ring and pink nail- add a larger glitter polish near the tips of the nails.

Another option that I will show later on is to use a blue scattered holo polish as your base color.   

Let that dry. 

Star Nail Design
Star Nail Design  
Star Nail Design 

For this star nail design it is very similar to making snowflakes, just less lines depending on what kind of snowflakes you make.


For making the stars on all the nails-
Just take a dotting tool with white paint on it and place a dot on the nail. Then with a thin stripper brush with white paint on it as well make four or two long lines from the circle. (depending on how you want to make your stars)


On the index nail we will make a large star and a actual star shape, then make different size dots with a dotting tool.

On the middle finger nail, make three stars that only have two lines, and then place random dots around your big stars. Also focus this near the tip of the nail. 

Star Nail Design  
 Star Nail Design
 Star Nail Design 

On the ring finger nail make three large stars going down the nail, kind of near the tip of the nail, once again add random small dots with a dotting tool. Also on these stars make the line in the center longer then the other lines. 

On the pinky finger nail make one large star and a few dots near the large star.
Star Nail Design
Star Nail Design  
Star Nail Design 

Lastly on the thumb nail, make your star just like the one on the ring finger with a longer line down the middle, and only two stars, and then add a few dots near the tip of the nail.

Star Nail Design
Star Nail Design
 Star Nail Design 

Once you have your starry night sky looking just right, apply a top coat to seal in your design and to help it to last.

Star Nail Design
Star Nail Design
  Star Nail Design
 Star Nail Design
 Star Nail Design, Blue Polish

Above is another option, using blue polish as your base color and just doing the design on two nails. Lately on my right hand,(If I do nail art on that hand) I have just been doing a design on two nails. 

 Practice version of My Star Nail Design 

I originally was going to polish all of my nails with Zoya's Dream (as you can see from the practice version), but then when I showed my hubby, he said maybe I should use a black polish for the sky because this look to similar to a design that I have done before. So that is why I went with Color Club's Black Magic.   

Hope all of you enjoyed this starry night sky nail design! 

See you next time for more nail fun! 

Thursday, August 11, 2016

Butterfly Kisses- Butterfly Nail Design

Hello everyone! Today on the M.M.M blog we will be creating a pretty butterfly; a full butterfly on the thumb nail and the butterfly wings on the other nails. This butterfly will be a little bit different from the butterflies that you are use to seeing, these butterflies will be holograph. I thought it would be a different and cool twist on creating butterflies if we use holo polish.   

 Pink Holographic Butterfly Nail Design   


Here are the polishes and tools used for this butterfly nail design:


Base and Top Coat- CND Stickey Base Coat and Revlon Extra Life No Chip top coat.

Nail polishes- Color Club- Halo's- Cloud Nine, Color Club- Eternal Beauty,Color Club- Halo's- Crystal Baller, Sally Hansen- Hard as Nails- Black Heart, and China glaze- white on white.

Nail art polish- Kiss nail art stripper- Black

Acrylic paint- black

Nail art tools- small dotting tool, long thin stripper brush, and a thin liner brush.

Other- small glass jar with water in it to clean off your brushes.


Let's start this holo butterfly design!   

Always start off with a base coat to protect your nails and to help your design last.

Then paint all of your nails with a pink holographic polish (Color Club- Halo's- Cloud Nine.)  

 Butterfly wings on index, middle, ring, and pinky finger nails.

First we will start off with the wing design on the index, middle, ring, and pinky finger nails. With black acrylic paint and a thin stripper or liner brush ( I ended up switching between the two), first make a curved line near the cuticle.

On the curved line make three or more small lines or dots as a guide to where you are going to make the larger lines for the wings.

Then try to make straight lines going up the nail (I had a little bit of trouble for some reason, my hand kept shaking when I was trying to make the line).

Once you get to the top make a small curved line, after you have one area done go to the next and make the top of the curve a little lower, keep making the curves lower for each part of the wing.

Once you have the wing shapes, take a black polish and fill in the tip of the nail, for the smaller parts you may need to use your black stripper/ nail art polish.

Once the black part has dried, take a small dotting tool with white polish on it and make a few dots along the tip of your nail, I only did three.

 
 Butterfly on the thumb nail

Next we will be making the larger butterfly. First we will make the outline of the body, take a thin liner brush with black acrylic paint and draw a thin line down the center, this will be kind of a guide to know where to paint the butterflies wings and be a part of it too.

Then make a curved shape near the bottom right half of the nail tip for it's wing.Then on the other side do the same thing for two wings. 

After that on the top of the wing on the right side, kind of make half of a wing.

On the other side, or above the wing on the left side make another wing, for me I ended up kind of making this wing pointed, you can always try and make it more round like the other wings or the same as I did. 

Now we will add some color into to butterfly, take a purple holographic polish (Color Club- Eternal Beauty) and paint the inside of the wings, once that has dried take a blue holographic polish (Color Club-Crystal Baller) and paint some blue staring in the middle of the wings, only go half way up the wings still leaving some purple showing. 

Once that has dried you may need to re-outline your butterfly with black paint, if the holographic polish covered the outline. 

For the smaller details, first we will make a curved line on the tips of the wings and paint that in with black paint. Then on the wings we will add small lines on the wings, I just made a few thin lines from the center of the wings.

Once the black part on the wings has dried, take a small dotting tool with white polish on it and make a few dots on each part of the wings.

For the final touch just add two lines on top and the center of the butterfly for the antennas. 

  
 Final Butterfly Nail Deisgn

Once your design has dried apply a top coat to protect you nails and make them even more shinny!

Other close up of the butterfly on the thumb nail.

For this design you can use whatever holographic colored polish you would like or any type of polish from cremes, glitters, shimmers, etc. I just thing holo makes any design look more prettier.

Hope all of you enjoyed this holographic butterfly design!

See you next time for more nail fun! 

Friday, December 11, 2015

It Smells Like Snow!- Winter Design

Hello everyone! It's that time of year again when it starts to snow, this can either be a good or bad thing. I personal don't care for the snow, but it does look pretty, sometimes. One place that snowflakes always look pretty is on your nails. As you may have guessed this week we will be creating a pretty snowflake design.

Snowflake nail design Final snowflake nail design 

The nail polish and tools used for this snowflake design will be right next to the images as we go.

The skill level for this snowflake nail design is:

Beginner Basic

This design is great for beginners. It is simple and easy to create, all you really need to do is try to keep a steady hand when drawing the snowflakes.  

Let's start this winter snowflake nail design!
 Base coat used Nicole OPI-  3in1- base, top, & strengthener.

1. Start off with a base coat to protect your nails.

Polish used Zoya's Dream

2. Then paint all of your nails with a shimmer blue polish. I used the very beautiful Dream by Zoya, this color is so amazing and shinny, and I that it went very well with this design. 

White acrylic paint and a small thin nail art brush.

3. Next we will be making the snowflakes, we will make a large one and a small one. Depending on the size of your nails, you can make more or less snowflakes. Start off with a thin nail art brush dipped into white paint and make a star shape, like the photo above. 
4. Now we will start to make the snowflake look like a snowflake. For this snowflake we will make two arrows on each line of the star shape.
5. Once you have finished your first snowflake it should like the photo above. Next we will make half of a snowflake near the tip of the nail. With your thin nail art bush dipped into white make three lines, then two arrow shapes on top of the lines. 
Snowflake nail design

Final nail design. Polish used for dots Color Club Halo's- Harp on,
 and medium and regular size dotting tool 

6. For the final touch on your snowflake nails, we will add dots for the small snowflakes. Take a medium dotting tool dipped into a silver holographic polish and make dots on some of the empty space around your snowflake. Then with the regular or small doting tool repeat this step again.

                                                  
Top coat used, - Revlon Extra Life No Chip top coat 

Once your snowflake nail design has dried apply a top coat, to seal in your pretty design.

Snowflake nail design
   Final snowflake nail design

With all snowflakes they all look different, so for this design on each nail you can change up how you make your snowflakes, some of them I kept the same and just changed the size,and other I changed how they looked. It's all up to you on how you want your snowflakes to look. 

Hope all of you enjoyed this pretty snowflake nail design!

See you next time for more fun and bright nail tutorials!    

Friday, January 23, 2015

It's Freezing Outside- Blue glitter gradient

Hello everyone! For this weeks post I wanted to create a winter themed nail design for all of you. It has been another cold and snowy winter (at least where I live) and I thought I would show all of you a simple blue glitter gradient design, to help all of you get through this cold winter with some cool nail designs.

glitter gradient nail design
 Final winter/ freezing nail design, left hand


 Here are the polishes and nail tools used to create this blue glitter gradient nail design:

Top coat and base coat - Revlon Extra Life No Chip top coat and - Nicole OPI-  3in1- base, top, & strengthener.

Nail polishes- Sinful Color- Cinderella, NYC- Water street blue, JulieG- Blueberry Fizz- texture, Color Club- Halo's- Blue Heaven, 
Cover Girl- Boundless color- Disco dazzle (this polish you can't find in stores, this is an old polish that I have that is still good, but you can find ones that are very similar to this in stores.)
,and Color Club-  Mini- Silver Glitter.

Nail art tools- Makeup sponge for gradient

* I decided to retake the nail polish photos. I have been using a different set up to take photos of the polishes and the final nail design, that hopefully looks a little bit better. 


The Skill level for this blue glitter gradient nail design is:
Beginner Basic

This is a very simple nail design that is great for beginners. This design consist of just painting your nails a solid color of light blue, then sponging on a little bit darker blue, then adding glitter with large and small glitter pieces, then for a final touch add a little more glitter on the tips of the nail.

Now let's begin this winter/ freezing nail design! 

*Just a tip, it is best to work quickly to try and get the two colors to blend together as best as you can.


1. Start off with a thin layer of base coat.

Last week when I did the post about the Zoya dream box, I actually broke my index nail on my left hand at work. Unsure if you can tell from last weeks post and this week, I had to cut my nails a little bit shorter then I usually do. But luckly I was able to save most of my nail, even though at first I thought I broke it in a bad spot.  


2. Paint all of your nails a light blue, except for your ring finger this will be the accent nail. On the left hand I paint the ring finger with a blue textured polish and then the right ring finger nail with a blue holographic polish, just to change things up a little bit.

3. Next take you makeup sponge and cut a small piece of it, then paint a small bit of the sponge with a little bit darker blue polish. 

4. Then take your sponge and dab the polish on the nail, the tip of the nail should have more polish/ be darker, then the color should almost fade into the lighter blue, by dabbing less polish on the nail the farther you go on the nail.

5. For this step you do not need to wait for the blue polish that you just sponged to dry. You take a glitter polish that has small and large glitter pieces in it and right away polish over the blue that you just sponged on. This can help to blend in the color. 

6. For a final touch take another glitter polish that has small glitter pieces and paint the just tips of your nails, for more of a frosty look. 

blue glitter gradient nail design
Left nail design with Julie G- Blueberry Fizz textured polish on the ring finger. 
Right nail design with Color Club- Holographic- Blue Heaven on the ring finger.

Once your nail design has dried dried finish off this look with a top coat. Now you have a beautiful winter theme nail design, that will hopefully take away your winter blues, well at least until the weather gets warmer. 

blue glitter gradient nail design

 Hope all of you enjoyed this winter/ freezing nail design and try to stay warm for the next few months of winter we have left.

See you next time for my next design tutorial!