Showing posts with label Sally Hansen xterme wear. Show all posts

Wednesday, June 19, 2019

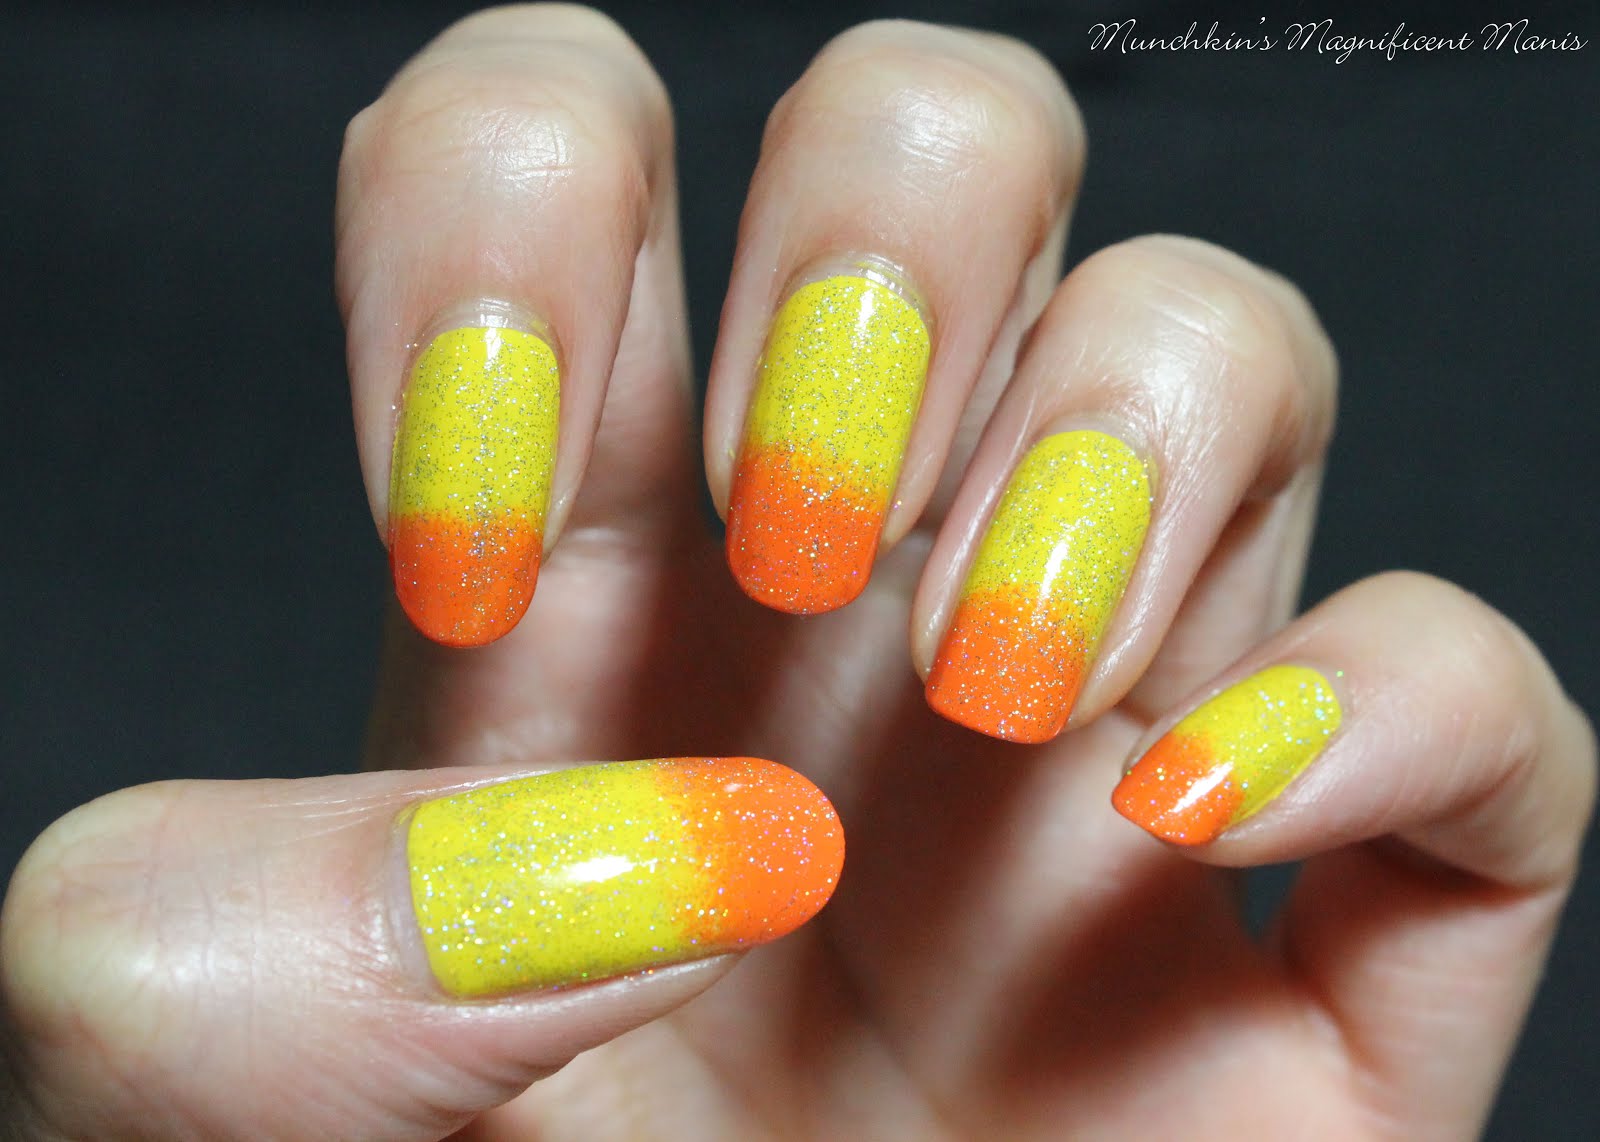
Not So Gradient, Yellow and Orange Gradient Nail Design

Hello everyone! As you can see from the title, I once again tried to create a gradient nail design, but I didn't really have to much luck. Although this design might not have turned out the way I had hoped, I still wanted to show all of you this design anyways, to show that I am not perfect at doing nail art and that sometimes our nails designs don't always turn out the way we like, but they still some what look good. 

Yellow and Orange Gradient Nail Design

Yellow and Orange Gradient? 

Here are the polishes and one item you will need for this nail design:


Base and top coat- CND Stickey Base Coat and Revlon Extra Life No Chip top coat.

Nail polishes- Sally Hansen- Triple Shine- Lemon Shark, Sally Hansen- xterme wear- Sun kissed, and Revlon- Holographic Pearls- Transforming Effects.

Nail art tool/ other- makeup sponge.


Yellow and Orange Gradient Nail Design
 Yellow and Orange Gradient Nail Design
 Yellow and Orange Gradient? 

For this design I have created a few gradients before, some have turned out better then others. This one still looks nice but this is not exactly what I was going for.

With a gradient the colors are suppose to fade into each other like the orange is darker at the tip of the nail, then get lighter going up the nail, to where it would then fade to yellow. As you can see my nails don't really look like what I just explained. 

For a gradient nail design you first polish your nails (for this design) yellow and then you would normally take a makeup sponge, polish the bottom part of the sponge orange and the top yellow making sure to over lap the colors, then you would dab the sponge on the nails and blend the colors together.   

 Yellow and Orange Gradient Nail Design
 Yellow and Orange Gradient Nail Design
 Yellow and Orange Gradient?

For me when I have tried this I have trouble with it and it seems like it doesn't want to blend. So I will do one color at a time, in this case I still had to trouble. Their has been a few times where I have tried doing a gradient and this method has worked out better. 

Like anything I still need to practice with this type of design.

 Yellow and Orange Gradient Nail Design
 Yellow and Orange Gradient Nail Design
 Yellow and Orange Gradient?


Here are the link to the other gradient that I have created: 
(The ones at the top of the list I fell like turned out better.)


Well I hope all of you enjoyed this post, even though their was not much to it, I just thought this design was still worth showing. 

See you next time for more nail fun!  

Wednesday, May 22, 2019

Dragonfly Dreams- Dragonfly Nail Design

Hello everyone! Today we will be creating a dragonfly design. This design is inspired by a design that I would do on this lady, that would come to the nail salon that I use to work at and she would always want a dragonfly on her big toenail. So after doing this design plenty of times on her, I thought I would give it a try on my own finger nails, and show all of you how it is done. 


Dragonfly Nail Design 

Here are the nail art tools and polishes used to create this dragonfly design:


Base coat and top coat - CND Stickey Base Coat and Revlon Extra Life No Chip top coat.

Nail polishes- Sally Hansen- Insta Dri Matte- Smoldering Teal, Loreal- textured polish, too dimensional, Sally Hansen- xtreme wear-Celeb city, and Color Club- Mini- Silver Glitter.

Acrylic paint- (optional used to create an outline) White.

Nail art tools- thin detail brush, medium and large dotting tools.

Other- a small glass jar with acetone in it to clean off your nail art brushes.


Dragonfly Nail Design 
Dragonfly Nail Design

Start off with clean nails, with no polish on them, and apply a thin layer of base coat.

Let that dry.

Then polish all of your nails with a teal colored polish, I used Sally Hansen- Insta Dri Matte- Smoldering Teal.

Let that dry as well.

Dragonfly Nail Design 
 Dragonfly Nail Design

We will first start off with the very simple part, the glitter trail that is left behind by the dragonfly. I know dragonflies don't leave a glitter trail, but I thought it would look pretty as a part of this design and I was really unsure what I could put on the other nails, so we will go with a glitter trail.  

Start off by take a little bit of your glitter polish and pouring some out on a nail mat or a plastic bag, then taking a small detail brush with that glitter on it and make a very big curved line that starts at the index nail and end at the pinky finger nail. I did each part of the line in sections/ one nail at a time. Just make sure the line lines up when you put your finger together.

Dragonfly Nail Design 
Dragonfly Nail Design

To complete this design we will make the dragonfly on the thumb nail. With all of the designs I do I always like to create an outline with acrylic paint, for this design I first created the outline with white, this part is optional you can always go straight in with nail polish. 

For creating the white outline, first take a clean detail brush with white paint on it and we will make the wings first. Also make sure to leave a little bit of space in between the wings for the body.

Starting on the right side make a teardrop shape near the tip of the nail and then right under that make another teardrop shape for the wings. Repeat this step on the other side for the other part of the wings.

For the body take a few different sized dotting tools to make your dots/ body for the dragonfly, with a sliver polish starting with a large dot and then going small, make a kind of curved line with dots for the body going down the nail.

If you did create a outline with white paint, once that has dried with a small detail brush and a glittery purple (our whatever colored polish you would like), go over the wings with that polish. 

Dragonfly Nail Design
 Dragonfly Nail Design

Once you have your design the way you like apply a topcoat to seal in your design and to make it nice and shinny, I did use a matte teal polish for the base color. 

Hope all of you enjoyed this design, that is nice and simple and great for Spring and Summer.

See you next time for more nail fun!   

Friday, November 16, 2018

Happy 90th Birthday Mickey Mouse- Mickey Mouse Nail Design

Hello everyone! Today we will be creating a Mickey Mouse nail design to celebrate the mouse's big birthday, his 90th birthday! I have been hearing pretty much all year that it's Mickey Mouse's 90th Birthday, but I was unsure when it was because I actually planned to do this design a few months ago. I looked it up and his birthday is November 18, so the timing for this design ended up working out.

Mickey Mouse Nail Design


Here are the polishes and nail art tools use for this design:


Base and top coat - CND Stickey Base Coat and Revlon Extra Life No Chip top coat

Polishes- Sally Hansen- xtreme wear-Celeb city, Zoya- Renee, Color Club- Daisy Does it, NYC- Broadway Burgundy Frost, OPI Hawaii- Do you take Lei away, and Sally Hansen- Hard as Nails- Black Heart.

Acrylic paint- black and white.

Nail art brushes- large dotting tool, thin detail and liner brush, and a very small detail brush.

Small cup or jar with water in it to clean off your nail art brushes. 


I don't know about all of you but Mickey looks pretty good for 90 years old! Let's celebrate his big day with this Mickey Mouse nail design!   


Mickey Mouse Nail Design
 Mickey Mouse Nail Design

Start off with a thin layer of base coat, then let that dry.

Once that has dried we will polish our base colors. Polish your thumb nail with a silver polish, your index with a red creme polish, the middle and pinky finger nail with a glittery yellow, and then your ring finger nail with a glittery red polish. 

Then let that dry.

Mickey Mouse Nail Design 
 Mickey Mouse Nail Design

Now we will make Mickey's body on the index nail. First take a black polish and polish near the top part of the nail near the cuticle, going to about the middle of the nail, making sure that the other half is red for his pants.

Then make two thin lines on the red part for his two buttons on his pants.   

Mickey Mouse Nail Design
   Mickey Mouse Nail Design

Next we will be creating the Mickey shape on the middle and the ring finger nail. On the middle finger nail use a black paint and on the ring finger nail use a white paint. First make a large circle for his head and then make to smaller ones on top of the larger circle, for his ears. 

Mickey Mouse Nail Design
 Mickey Mouse Nail Design

Now on to the pinky finger nail with a lot of Mickey Mouse shapes on it. Take your large doting tool with black paint or polish, dot one dot for his head and then two smaller dots on the top of that dot for his ears, you can repeat this step as may times as you would like. 

Mickey Mouse Nail Design 
Mickey Mouse Nail Design

Last but far from least is the star of this design Mickey Mouse himself. For Mickey I first put down a very thin layer of white paint to just get the outline of Mickey. First make kind of a heart shape at the top for his head and then make to half circles on the sides for his checks. Then once the white outline is dry go over that with a peach/tan colored polish a few time to be opaque. 

Then on to his ears and the side of his face. For the side of his face just follow the outline of the top of his head, but just make this part very thick. Then make to circles on top of this head for his ears.  

Lastly is Mickey's face. We will first make his eyes, take a thin detail brush with white paint on it and make two long ovals right next to each other, then fill them in with the white. Once that is dry make two smaller black ovals in the white oval for his pupils.

For his nose, first make a large arch right under his eyes, then under that arch make a oval for his nose and fill that in with black. 

Now to complete Mickey we need to make his smile, take your very small detail brush with black paint on it make a large curved line, then two small curved lines at the end of each of the larger curved line.

Mickey Mouse Nail Design  
 Mickey Mouse Nail Design

Once you have your Mickey Mouse design the way you like apply a top coat to seal in your design and to help it last. 

Mickey Mouse Nail Design 
  Mickey Mouse Nail Design
 Mickey Mouse Nail Design

Here is the other design that I did on my right hand a more simple version, with just the Mickey shapes on the thumb and ring finger nail, this is the same design that I did on my pinky finger nail. 

Mickey Mouse has always been my favorite ever since I was little, so it is always fun to make any Disney themed nail design. 

Hope all of you enjoyed this Mickey Mouse nail design!  

Also Happy Birthday Mickey Mouse!

See you next time for more nail fun!  

Tuesday, October 30, 2018

Things are going to get messy- Halloween Nail Design

Hello everyone! Happy Halloween! Today we will be creating something a little bit different for Halloween, well for me. I usually like to create more cute nail designs, but for this Halloween I decided to go outside of the box for this design and I ended up really liking it and having fun creating this design, the only thing is this design is a little bit messy! 

Halloween Nail Design 
Halloween Nail Design

Here are the polishes and tools for this creepy messy nail design: 


Base and top coat- CND Stickey Base Coat, Revlon Extra Life No Chip top coat, and NYC- Matte Me Crazy topcoat. 

Polishes- Essie- Coconut Cove, Sally Hansen- xterme wear- Sun kissed, and Sally Hansen- Triple Shine- Lemon Shark. 

Acrylic paint- Red and black 

Nail art brushes- flat brush, thin detail brush, thin stripper brush, and a very small detail brush. 

Other- a make up sponge and a small cup of water.


Warning!! Things are going to get Messy!!

Halloween Nail Design 
Halloween Nail Design
 Halloween Nail Design

As always start off with a base coat to protect your nail and to help your nail design to last, even thought this bloody mess you may not want to last.

Once you base coat has dried polish your index, middle, and ring finger nail with a off white polish, then your thumb orange and your ring finger nail yellow.    

*For this part I strongly suggest using paint and not nail polish and to polish your other hand last, this step is very messy and your other hand will be all red at the end! Also make sure to have something down on your surface that you do your nails, I use a nail mat.*  

 Halloween Nail Design
 Halloween Nail Design

Let your base polishes dry, then let's get to making a mess. We will first start off with the blood splatter on the index, middle, and ring finger nail. First we need to make our blood take a red paint and add the smallest amount of black to it, or until your red looks blood like.

Then water down your red paint so it is very watery, this will make it easier to splatter. Take a flat brush and make sure your brush is soaked with the red paint/ blood, then with your other hand and one finger (or like make end up getting it all over your hand) flick your brush at your nail to make the blood splatter, your will need to do this step many times. Then I also took my finger (because as stated above your other hand will be all red and messy) and dabbed a few spots on the nails.       

Then once your splatter is just right, you can go wash your other hand of all the red paint/ blood or the evidence. (just kidding, their is no real blood used in this design)

Halloween Nail Design 
 Halloween Nail Design

Next we will be creating a spooky scene on our ring finger nail. First take makeup sponge with black paint on it and sponge the black paint near the tip of the nail and near the cuticle, make sure to leave some of the yellow showing in the middle of the nail.

Then make a tombstone near the side of your nails. Then on both side with a thin stripping brush make thin lines that will look like tree branches. 

Halloween Nail Design 
 Halloween Nail Design

Last but not least is the pumpkin in a spooky scene. For this nail repeat the step that you did for the last nail, with the black paint and the sponge, and once again leave some of the orange in the middle showing.

Then we will make the pumpkin on the side of the nail. First make a small circle, do not fill it in, with your very small detail brush make two triangles for his eyes and then make a mouth, fill that in with black, make three curved lines on the pumpkin, lastly add a curved line at the top of the pumpkin.  

Once again just like the ring finger nail make two tress on the sides of the nail.  

Halloween Nail Design
 Halloween Nail Design

Then once you have your nail design just right, apply a glossy top coat to all of your nails, then on the blood splattered nails we will apply a matte top coat, once your glossy top coat has dried.  

Hope all of you enjoyed this nail design, even thought blood/gory and scary movies are not my thing. I really enjoyed make this design it was a lot of fun, just kind of a pain to clean up after.
 

Here is the practice design, I used a neural skin tone color and didn't really care for how it turned out, I think it tuned out better on a white base. 

Halloween Nail Design  
Sorry for the big messy I forgot to clean up the white polish and black paint on my nails before taking my photos, see I'm not perfect at polishing my nails, but that's what a clean up brush is for.

 Halloween Nail Design
This is the only way white polish should be worn on the nails, I never got why so many people like a sold white polish on all of their nails. As you can tell I hate white polish along with neutrals, sheer pinks and white toned pinks.     

 
 Just in case you where wonder this is what is on my other hand.

Hope all of you have a fun a safe Halloween!

See you next time for more nail fun! 

Friday, July 13, 2018

Fiery Sunset- Tropical Sunset Nail Design

Hello everyone! It's that time of the year again, summer time when I love to create tropical nail designs. Anytime I create a tropical nail design it make me want to go on a tropical vacation, but unfortunately we can't always go on one, so why not create a mini vacation on our nails.
Also the tropical design is all created with acrylic paint and a white polish as the base (the part you can't see under the tropical design.) 

 Tropical Sunset Nail Design
    Tropical Sunset Nail Design

Here are the nail polishes, paints, and nail art tools used to create this warm tropical nail design:


Base and top coat - CND Stickey Base Coat and Revlon Extra Life No Chip top coat.

Nail polishes-  Sally Hansen- xterme wear- Sun kisses and Essie- Coconut Cove (this is your base color for your tropical design) 

Acrylic paint- White, black, red, blue, and yellow.

Nail art brushes-  Medium flat brush, small fan brush, small detail brush, and a stripper brush.

Other- small cup or jar with water in it to clean off your nail art brushes.

Let's get ready for a nice, warm, and sunny tropical vacation!  

Tropical Sunset Nail Design 
Tropical Sunset Nail Design

As always start off with a thin layer of base coat to protect your nails and to help your tropical design to last through your vacation.  

Let your base coat dry.

Once your base coat has dried polish your thumb and pinky finger nail orange, these will stay as is with no nail art on them. Then polish your index, middle, and ring finger nail with a white/ or off white polish. I only applied one coat of the white polish, this will act as your base (will not show at all on the nails) because the whole tropical design is done with acrylic paint and the paint does still need a polish base to stick to.    

Tropical Sunset Nail Design 
 Tropical Sunset Nail Design

These steps need to be repeated on all three nails.

* Paints colors you will need for the sky: yellow, orange (I mixed red and yellow to make orange), and red.*

Let your base polish colors dry. Then on to the tropical design on our three fingers. On a flat medium size brush near the cuticle paint yellow, then orange right under the yellow, then red under the orange, make sure each color over lapses each other, this is for blending each color.

Then while the paint is still wet take a fan brush and blend the colors together, if the colors seem to blend away take a small amount of that color on the fan brush and paint over that part. I did end up having to to this few times.  

*Paints colors you will need for the ocean: dark blue, light blue (just add white to the darker blue), and white.*

Under the sky take a dark blue paint and paint that near the tip of the nail for the ocean. You will need to go over this another time for it to be opaque.

Then once that has dried some, take your light blue paint and go over the darker blue, so the colors blend and then add some white paint to the water as well so that also blends. I tried to make it look like a wave, but I'm not to sure that is look like one because my canvas is so small and that is hard to do on a small scale.

For the land take a small detail brush with black paint on it and make a thin black line near the tip of the nail, on the index nail make a small hill, also the lines do not have to be straight I made my lines more curved. 

Also I suggest for this part to use a black polish because the black paint seems to wear away faster then polish because it is on the tips of the nail, where you get the most wear/ chipping.

Tropical Sunset Nail Design
 Tropical Sunset Nail Design

For the sun on the middle finger, first make a oval shape with white paint, that way the yellow sun will show up, and then make a half circle on each side of the other two nails. Then fill that in with yellow paint.

Next on to the one big palm tree on the index nail. Take your thin stripper brush with black paint on it, from the left hand corner make a long curved line for the tree trunk.Then make four curved lines and two straight lines for the outline of the palm tree, then you just add small lines to the branches for the palm leaves.

On the ring finger nail you need to make another part of the land near the sun and kind of on the top part of the water. You just need to make a slanted line, a straight line and fill that in for your land.

For the two palm trees repeat the steps for the larger palm tree that we just made on the index nail. Just make one taller then the other.

Tropical Sunset Nail Design 
      Tropical Sunset Nail Design

For this design you most likely will need to go over some parts a few time to make the colors blend together good and for them to fully show up/ be opaque enough.  

Once you have your tropical design ready for your vacation, apply a top coat to help your design to last thought your whole vacation. 

 
Tropical Sunset Nail Design, practice 

Also I always practice whatever nail designs I am going to do, and I really liked how this design turned out, so I thought I would share it with all of you. I really think the sky turned out to look very cool and like fire.    

Hope all of you enjoyed this tropical sunset nail design and hopefully your next tropical vacation will happen sooner then later, that's what I sure hope for.

See you next time for more bright and fun nails!   

Friday, December 30, 2016

New Year, New Beginnings- New Year Nail Design

Hello everyone! Happy New Year, well almost New Year! I can't believe how fast this year has gone! This year has been another big year for me, with a new career choice deciding to become a professional/ licensed nail tech, going back to school again to get licensed, passing the state board test, and then getting a job in a salon. This year has defiantly brought some big changes! In the coming year, I hope for more awesome new adventures!

Anyways today to celebrate this New Year we will be creating a new year nail design, with silver, holo silver, and black nail polish and for a pop of color adding some rainbow glitter to the design. This design can be kind of hard because we will be painting words and numbers on the nail, don't worry I do have a easier alternative that I did on my right hand.  

Happy New year 2017 Nail Design          Happy New year 2017! 

Here are the polishes and nail art tools use for this design:
 
Base and top coat - CND Stickey Base Coat and Revlon Extra Life No Chip top coat. 

Nail polishes- Sally Hansen- Hard as Nails- Black Heart, Sally Hansen- xtreme wear-Celeb city, Color Club Halo's- Harp on, Snowman rainbow glitter- frosty, and Color Club- Mini- Silver Glitter.

Nail art polishes- Kiss nail art polishes in black and silver.

Acrylic paint- black and white.

Nail art tools- a thin detail brush, a small dotting tool and nail art tape.

Other- a jar or cup with water in it to clean your nail art brushes, tweezers and small nail scissors, and a toothpick to place the glitter (not show in the photo above.) 

Let's start this New Year off right, with a cool nail design!    

Happy New year 2017 Nail Design
Happy New Year 2017 Nail Design
Start off with a base coat to protect your nails.
Once your base coat has dried, polish your thumb and pinky nail black, your middle and ring finger a glittery/ shimmery silver, and on your thumb a silver holographic. Also the black polish I used for this design  Sally Hansen- Hard as Nails- Black Heart is an awesome cheap black polish, that covers in one coat, the way it should be with a dark polish!

Happy New year 2017 Nail Design
 Happy New Year design on the thumb nail.

Let's start off with the thumb nail. This part can be kind of hard, I found that if you first paint the words with white acrylic paint it makes it a little bit easier, that if you mess up you can just wipe off the paint. Once you have Happy New Year! on your nails let that dry and then if you would like, take a silver stripping polish and go over the words again. Then once that dries take a rainbow glitter and polish that on the nail to look like confetti. 
Happy New year 2017 Nail Design  
 Silver Holo, black, and rainbow glitter nail design on index nail.
Next we will make the design on the index nail. First make sure the silver holo is dry, then take three strips of nail art tape and staring from the corner of the nail, place them on the nail on a slant. 
With your black thin nail art polish, fill in the top two areas that are taped off (like the photo above) and then with a regular black polish fill in the rest. I used the black stripper polish because it was easier to use a smaller brush near the top, that way you don't mess up that part with a thicker brush. 
* Make sure to peel up the tape with tweezers right away, don't wait for the polish to dry!
Then take your black stripper polish and make two thin lines in the blank areas.
After that has dried take a toothpick and place your rainbow glitter at the top corner of the design for a pop of color.
Happy New year 2017 Nail Design  
  2017 on middle and index nail 
Another hard part is writing 2017 on the middle and index nail. Once again I found that using black paint to write 2017 made it much easier. Start off with 2 and then 0 on the middle finger nail, then 1 and 7 on the ring finger nail, try to make sure that all of the numbers line up.
Once your numbers have dried, polish your rainbow glitter all over the nails so that is also looks like confetti. 
Happy New year 2017 Nail Design   
 Dripping glitter on the pinky nail.

Lastly the easy part dripping sliver glitter. Take your dotting tool with the sliver glitter on it, first drag the dotting tool on the tip of the nail, then drag the glitter down the nail making some long and some short drips. You will need to re- dip your dotting tool in the silver glitter polish when making the drips. 
 Happy New year 2017 Nail Design
 Happy New Year Nail Design! 

Once your New Year design is New Years ready, or just dried apply a top coat to protect your nails and to help them last into the New Year.

Happy New year 2017 Nail Design, simple design
  Other New Years Nail design on the right hand.
Was the first design a little to hard? Here is another option that incorporates some of the first design just made more simple.
On the index nail I did the same design as the pinky nail with a silver background and silver dripping glitter.    
The middle and ring finger nail I used the nail art tape to make a simple design. You just place as many pieces of nail art tape as you would like,and starting from one corner on a slant. The middle finger nail I used four pieces and the ring finger nail I used three pieces. 

Make sure to put extra top coat over the tape to make sure it sicks to the nails. I have ran into the problem of the tape not sicking well. 

Than for an add touch just place some glitter in the corner where all the tape meets. 
The pinky nails just polish some rainbow glitter over the black. 
Happy New year 2017 Nail Design, simple design     Design on the other thumb nail
For the thumb nail this is the same design that is created on the index nail on my left hand. The thicker black part is just in the middle and the two thin lines are on the sides. 
Happy New year 2017 Nail Design, simple design 
New Years Nail Design on the right hand.

Above is the final design that I created on my right hand, this is a great option if writing Happy New Year! 2017 is a little to hard.

Hope all of you enjoyed this party ready or just sitting at home watching the ball drop on TV design.

See you next year for more nail fun! 

The start of next year I have a collection that I am super excited to share with all of you, it is a collection based on one of my favorite movies, and of course a lot more fun nail art that we can try together or you can just look at and enjoy!     

Have a fun and safe New Year 2017!