Showing posts with label Revlon Holographic Top Coat. Show all posts

Wednesday, June 19, 2019

Not So Gradient, Yellow and Orange Gradient Nail Design

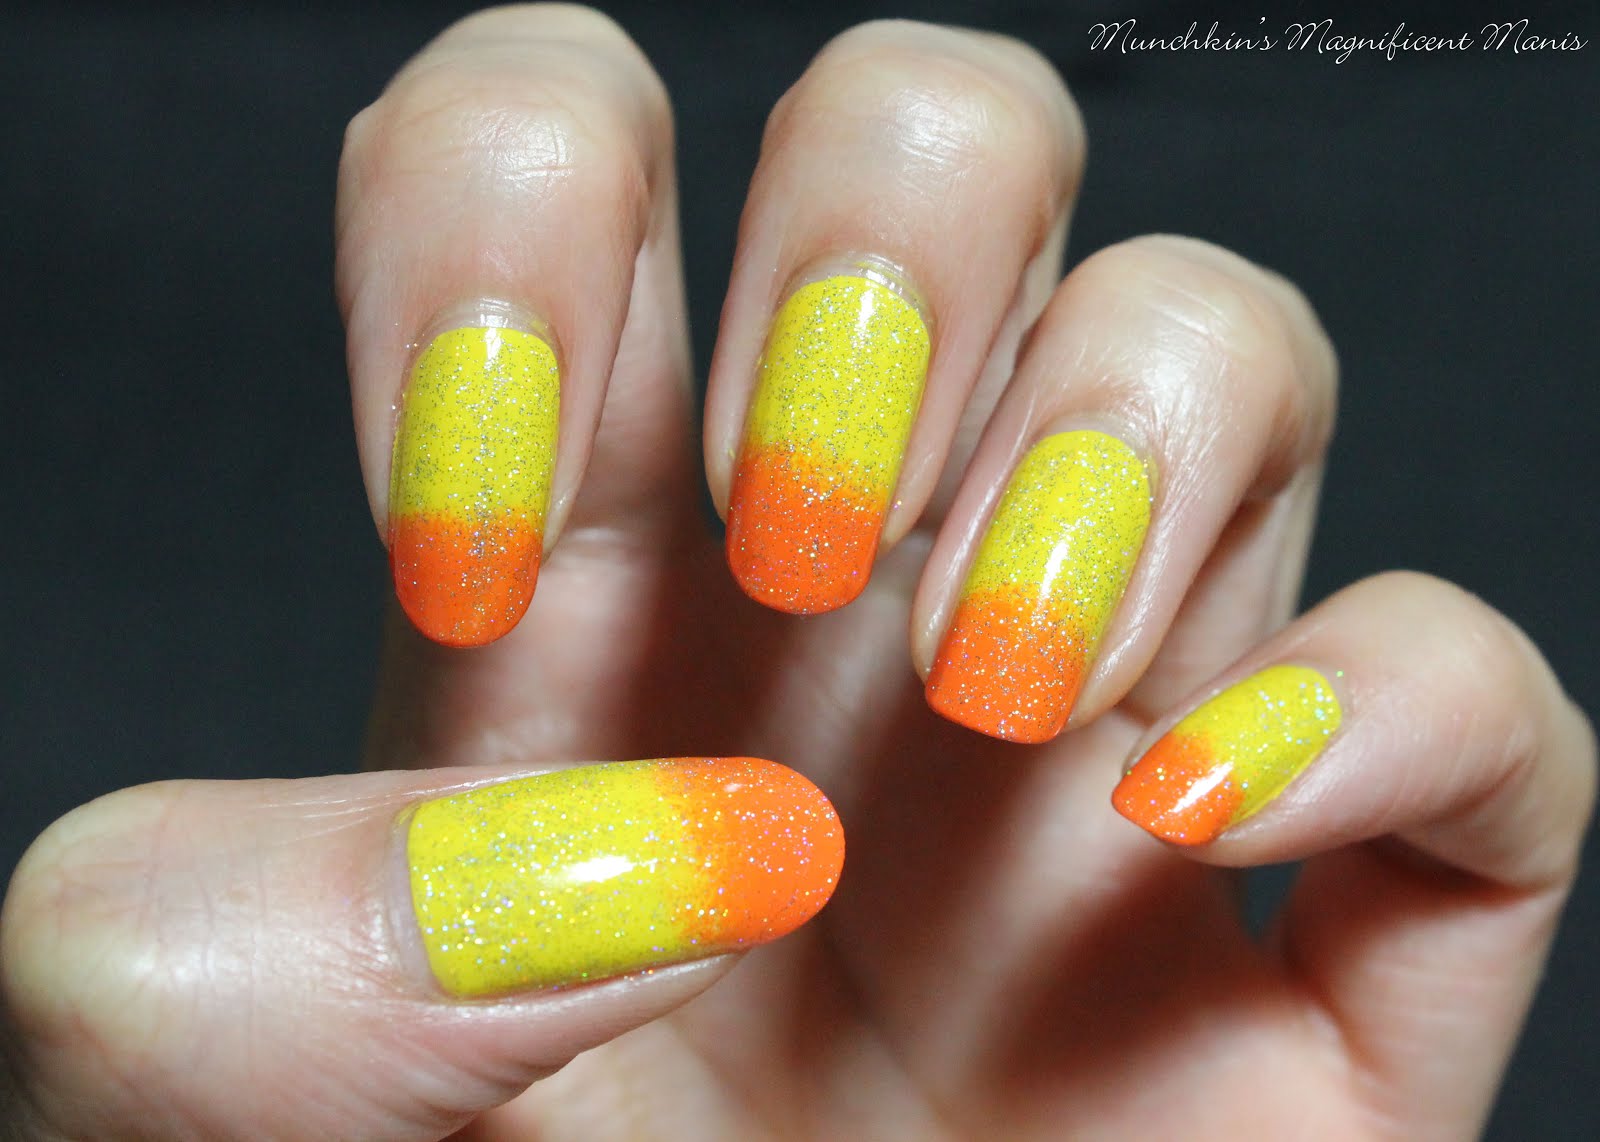
Hello everyone! As you can see from the title, I once again tried to create a gradient nail design, but I didn't really have to much luck. Although this design might not have turned out the way I had hoped, I still wanted to show all of you this design anyways, to show that I am not perfect at doing nail art and that sometimes our nails designs don't always turn out the way we like, but they still some what look good. 

Yellow and Orange Gradient Nail Design

Yellow and Orange Gradient? 

Here are the polishes and one item you will need for this nail design:


Base and top coat- CND Stickey Base Coat and Revlon Extra Life No Chip top coat.

Nail polishes- Sally Hansen- Triple Shine- Lemon Shark, Sally Hansen- xterme wear- Sun kissed, and Revlon- Holographic Pearls- Transforming Effects.

Nail art tool/ other- makeup sponge.


Yellow and Orange Gradient Nail Design
 Yellow and Orange Gradient Nail Design
 Yellow and Orange Gradient? 

For this design I have created a few gradients before, some have turned out better then others. This one still looks nice but this is not exactly what I was going for.

With a gradient the colors are suppose to fade into each other like the orange is darker at the tip of the nail, then get lighter going up the nail, to where it would then fade to yellow. As you can see my nails don't really look like what I just explained. 

For a gradient nail design you first polish your nails (for this design) yellow and then you would normally take a makeup sponge, polish the bottom part of the sponge orange and the top yellow making sure to over lap the colors, then you would dab the sponge on the nails and blend the colors together.   

 Yellow and Orange Gradient Nail Design
 Yellow and Orange Gradient Nail Design
 Yellow and Orange Gradient?

For me when I have tried this I have trouble with it and it seems like it doesn't want to blend. So I will do one color at a time, in this case I still had to trouble. Their has been a few times where I have tried doing a gradient and this method has worked out better. 

Like anything I still need to practice with this type of design.

 Yellow and Orange Gradient Nail Design
 Yellow and Orange Gradient Nail Design
 Yellow and Orange Gradient?


Here are the link to the other gradient that I have created: 
(The ones at the top of the list I fell like turned out better.)


Well I hope all of you enjoyed this post, even though their was not much to it, I just thought this design was still worth showing. 

See you next time for more nail fun!  

Wednesday, February 13, 2019

Day of Love- Valentines Day Nail Design

Hello everyone! Happy Valentines Day! This week I am posting a little bit early because of Valentines day being on a Thursday. Today we will be creating a pink and red gradient, with some swirls and hearts.

Valentines Day Nail Design   
Valentines Day Nail Design 

Here are the polishes and tools used to create this valentines day nail design. 


Base and top coat - CND Stickey Base Coat and Revlon Extra Life No Chip top coat.

Polishes- Zoya Sunshine- Minnie, Zoya Sunshine- Virginia, and Revlon- Holographic Pearls- Transforming Effects. 

Acrylic paint- white.

Nail art tools- thin stripper brush and a makeup sponge.     

Other- liquid latex for easy clean up around your nails or you can use tape, and a small cup of water.


What is your favorite valentines day treat? My favorite treat is of course chocolate and getting red roses from my hubby. 

Valentines Day Nail Design Valentines Day Nail Design
Valentines Day Nail Design

Start off with clean nails and apply a thin layer of base coat, and then let that dry.

Then polish all of your nails with a light pink, I used Zoya Minnie. 

Let that dry.

Once your base color has dried we will start the gradient, this gradient will start off with red near the tip of the nails and fade into pink near the cuticle. First to prevent a big mess you can apply a liquid latex to all of your nails, if you have a latex allergy you can put tape around your nails instead.   

For this step for making your gradient, you will need a makeup sponge. Take the same pink polish that you polished on all of your nails and polish the top half of the sponge with that polish and then overlapping that color just a little bit with a red polish (I used Zoya Virginia) right next to the pink. Then dab the sponge on to the nail until the colors start to blend together, you may need to repeat this step two more times to be opaque.

 Valentines Day Nail Design
 Valentines Day Nail Design

For this gradient I actually was able to do this the right way, with two colors on the sponge, a lot of time when I would do a gradient I would sponge one color at a time, this time I did both at the same time. On some of the nail I did still have to sponge one color at a time to get the colors to look more blended/ fade into each other . 

Valentines Day Nail Design  
Valentines Day Nail Design
 Valentines Day Nail Design 

Once you have your gradient the way you like, we will create the hearts on the nails. On all of the nail except for the thumb the heart design is similar. We will start off with the design that goes on all of the nails except for the thumb nail. 

This design was a actually a little hard to do because I had to paint the design upside down from the way I would view my nails, which I always do except for on my thumb nail, and I do have some trouble making curved lines. I do still think this design turned out really well even if I had a little bit of trouble.

Anyways take a thin stripping brush with white paint on it and make a heart shape, for the two swirls that met in the center, I took a cotton swab and wiped away the center part where the heart met and then painted in the swirls. Then at the bottom of the heart make two swirls, you can make them kind of different by having them go different directions or the same, it is up to you.  

Repeat this step on all four of your nails. 

Valentines Day Nail Design      Valentines Day Nail Design Valentines Day Nail Design 

On the thumb nail the design is a little bit different, I found this to be a little bit easier because when I was doing the design my thumb was facing me, I did not do this one upside down. 

For this design first start off by make a sideways heart near the side of your nail, then make a swirl staring from the bottom part of the heart, add another one from that one, then near the top of the heart make three swirls. Lastly on the other side of the bottom part of the heart make two more swirls. Hopefully that make sense, for the swirls part of this design it is just random swirls that are place randomly. 

Valentines Day Nail Design  
Valentines Day Nail Design 

Once you have your Valentines Day nail design the way you like apply a top coat to seal in your design and to help it last through your date night or if you are just wearing this design for fun. 

As I have stated in other blog post I get inspiration for my nails designs from Pinterest and then I make them my own. For this design I got inspiration from the YouTube My Simple Little Pleasures, she did a design that was similar to this one first and I wanted to give her credit. But as always I did change it up to make it my own.    

Hope all of you enjoined this valentines day nail design, My favorite nail was my thumb nail I really like how that design came out.

Happy Valentines Day! See you next time for more nail fun!   

Friday, February 1, 2019

Northern Lights Nail Design

Hello everyone! Today I thought it would fun to create a Northern Lights or Aurora Borealis nail design. For the longest I thought this was one of the coolest and prettiest natural wonders that happens in the world, and the one and probably only reason why I would want to visit a cold place like Alaska or any other place that you could see the Northern Lights. Also with it being winter I thought this would make a nice winter design as well.

Northern Lights Nail Design  
Northern Lights Nail Design

Here are the polishes and nail art tools to create this natural wonder! 


Base coat and top coat- CND Stickey Base Coat and Revlon Extra Life No Chip top coat.

Polishes- Sinful Colors- Midnight blue and Revlon- Holographic Pearls- Transforming Effects.

Acrylic paint- White, black, blue, green, and purple.

Nail art brushes- thin stripper brush, and thin detail brush.

Northern Lights Nail Design 
 Northern Lights Nail Design
 Northern Lights Nail Design

As always start off with clean nails, that are free of old polish and apply a thin layer of base coat to all of your nails. 

Let that dry.

Once your base coat has dried polish all of your nails with a dark blue polish.

Then let that dry as well.

Now on to the Northern Lights design. This design is very abstract with a lot of random lines  and colors in the sky. For each nail I tried to make them each look different.

 Northern Lights Nail Design
 Northern Lights Nail Design
 
With a thin stripper brush with white paint it, on each nail you first start off with some solid white lines that are curved, then with a flat brush and the smallest amount of watered down white paint, take your flat brush on the line and push up on the line to create a kind of white light, that goes all the way down the line.

Then take a watered down purple, blue and green and place it on different parts/ small sections of the white that you just made. This should not be opaque it looks better kind of sheer, but I still had to go over this part as lest two times.  

After that you may need to go back over the white line that you made because it will get covered up by what you just did. 

Under your Northern Lights design/ the sky you can add some trees and mountains. On most of my nails I just added a few trees at the bottom, that where simple. With your stripping brush first make a long line for the tree trunk and then make small lines from the top, for the branches for your little trees. 

Northern Lights Nail Design 
  Northern Lights Nail Design

On the thumb nail I did add three little mountains, which where just simple little triangles that I first made the outline with black and then added white on the inside. 

After the Northern Lights Design was finished, it seem like it was still missing something, so I tried applying a holographic top coat and it made this design so much better, the holo top coat give it a star like look to it, and just made this design look so much better and complete. 

Northern Lights Nail Design  
 Northern Lights Nail Design
   Northern Lights Nail Design
    
Once you have your Northern Lights design the way you like, apply a top coat to seal in your design and make it look even more shinny like the night sky.

Hope all of you enjoyed this Northern Lights nail design, and are staying warm this winter. All of a sudden the area I live in had a deep freeze, which was disappointing I was enjoying the mild winter we where having.

See you next time for more nail fun!