Showing posts with label Makeup Sponge. Show all posts

Wednesday, February 13, 2019

Day of Love- Valentines Day Nail Design

Hello everyone! Happy Valentines Day! This week I am posting a little bit early because of Valentines day being on a Thursday. Today we will be creating a pink and red gradient, with some swirls and hearts.

Valentines Day Nail Design   
Valentines Day Nail Design 

Here are the polishes and tools used to create this valentines day nail design. 


Base and top coat - CND Stickey Base Coat and Revlon Extra Life No Chip top coat.

Polishes- Zoya Sunshine- Minnie, Zoya Sunshine- Virginia, and Revlon- Holographic Pearls- Transforming Effects. 

Acrylic paint- white.

Nail art tools- thin stripper brush and a makeup sponge.     

Other- liquid latex for easy clean up around your nails or you can use tape, and a small cup of water.


What is your favorite valentines day treat? My favorite treat is of course chocolate and getting red roses from my hubby. 

Valentines Day Nail Design Valentines Day Nail Design
Valentines Day Nail Design

Start off with clean nails and apply a thin layer of base coat, and then let that dry.

Then polish all of your nails with a light pink, I used Zoya Minnie. 

Let that dry.

Once your base color has dried we will start the gradient, this gradient will start off with red near the tip of the nails and fade into pink near the cuticle. First to prevent a big mess you can apply a liquid latex to all of your nails, if you have a latex allergy you can put tape around your nails instead.   

For this step for making your gradient, you will need a makeup sponge. Take the same pink polish that you polished on all of your nails and polish the top half of the sponge with that polish and then overlapping that color just a little bit with a red polish (I used Zoya Virginia) right next to the pink. Then dab the sponge on to the nail until the colors start to blend together, you may need to repeat this step two more times to be opaque.

 Valentines Day Nail Design
 Valentines Day Nail Design

For this gradient I actually was able to do this the right way, with two colors on the sponge, a lot of time when I would do a gradient I would sponge one color at a time, this time I did both at the same time. On some of the nail I did still have to sponge one color at a time to get the colors to look more blended/ fade into each other . 

Valentines Day Nail Design  
Valentines Day Nail Design
 Valentines Day Nail Design 

Once you have your gradient the way you like, we will create the hearts on the nails. On all of the nail except for the thumb the heart design is similar. We will start off with the design that goes on all of the nails except for the thumb nail. 

This design was a actually a little hard to do because I had to paint the design upside down from the way I would view my nails, which I always do except for on my thumb nail, and I do have some trouble making curved lines. I do still think this design turned out really well even if I had a little bit of trouble.

Anyways take a thin stripping brush with white paint on it and make a heart shape, for the two swirls that met in the center, I took a cotton swab and wiped away the center part where the heart met and then painted in the swirls. Then at the bottom of the heart make two swirls, you can make them kind of different by having them go different directions or the same, it is up to you.  

Repeat this step on all four of your nails. 

Valentines Day Nail Design      Valentines Day Nail Design Valentines Day Nail Design 

On the thumb nail the design is a little bit different, I found this to be a little bit easier because when I was doing the design my thumb was facing me, I did not do this one upside down. 

For this design first start off by make a sideways heart near the side of your nail, then make a swirl staring from the bottom part of the heart, add another one from that one, then near the top of the heart make three swirls. Lastly on the other side of the bottom part of the heart make two more swirls. Hopefully that make sense, for the swirls part of this design it is just random swirls that are place randomly. 

Valentines Day Nail Design  
Valentines Day Nail Design 

Once you have your Valentines Day nail design the way you like apply a top coat to seal in your design and to help it last through your date night or if you are just wearing this design for fun. 

As I have stated in other blog post I get inspiration for my nails designs from Pinterest and then I make them my own. For this design I got inspiration from the YouTube My Simple Little Pleasures, she did a design that was similar to this one first and I wanted to give her credit. But as always I did change it up to make it my own.    

Hope all of you enjoined this valentines day nail design, My favorite nail was my thumb nail I really like how that design came out.

Happy Valentines Day! See you next time for more nail fun!   

Friday, January 18, 2019

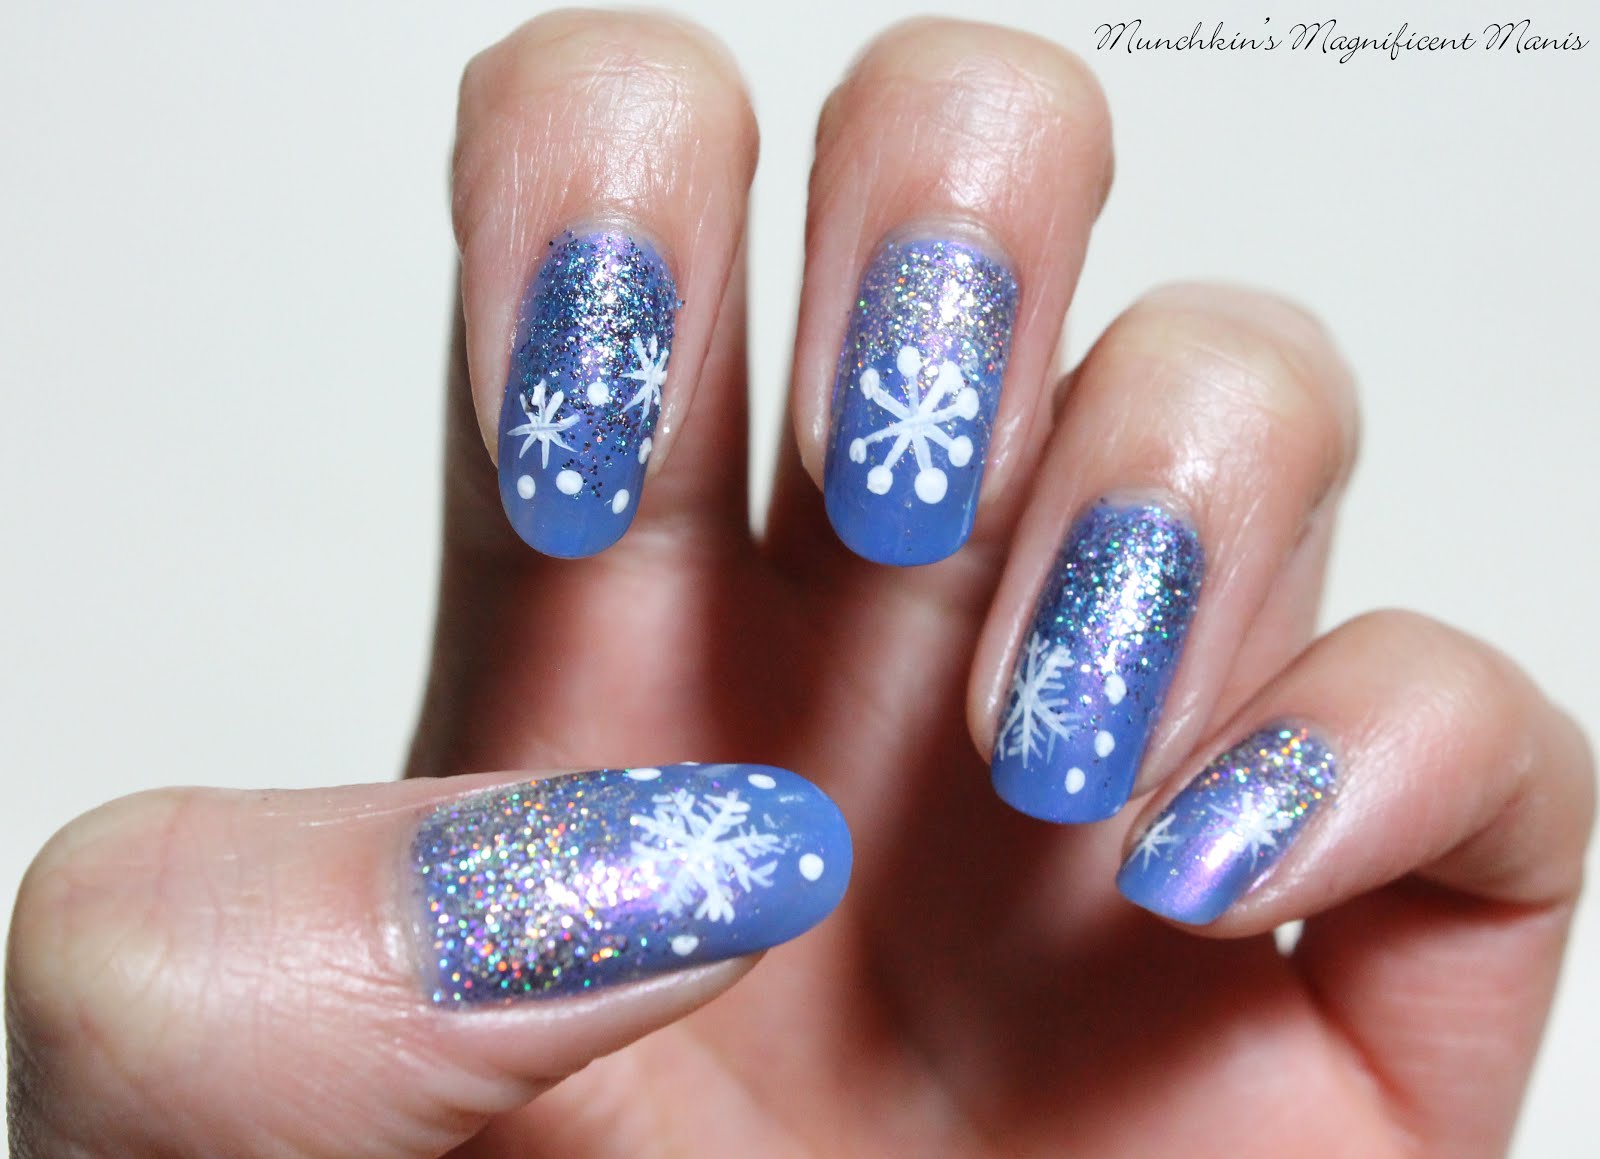
Snow day- Glitter Gradient and Snowflake Nail Design

Hello everyone! Happy New Year well a little late in the month, but still not to late. Sorry I have not post anything in a while, I have been a little bit busy/ tired. Anyways today we will be creating a winter nail design, a glitter gradient with some snowflakes. So far in the area I live winter has been kind of mild not much snow, which I am perfectly fine with, but I thought because it is still winter it would be cool to make a winter/ snowy nail design. 

Glitter Gradient and Snowflake Nail Design  
Snow day! Winter nail design

Here are the polishes and nail art tools used to create this winter nail design: 


Base and top coat- CND Stickey Base Coat and Revlon Extra Life No Chip top coat.

Nail polishes- Your base color Zoya Enchanted- Saint, for the glitter gradient Color Club- Mini- Silver Glitter and blue and purple glitter. 

Acrylic paint- white

Nail art tools- Thin stripper brush and small dotting tool.

Other- Makeup sponge for glitter gradient, and a small cup of water to clean off nail art brushes. 

 Glitter Gradient and Snowflake Nail Design
 Glitter Gradient and Snowflake Nail Design
 Winter nail design

Start off with clean nails and then apply a thin coat of base coat to make your polish last. 

Let that dry.

Then on all of your nails, polish them with a periwinkle blue (I used Zoya - Saint.) 

Let that dry as well.

Then on to the glitter gradient, for this you will need a makeup sponge. For me I found it easier to first take the polish and the brush it came in, and polish the gradient on first and then sponge on more of the glitter. 

For this gradient we will start from the cuticle and then go down the nail. For the glitter gradient most of the glitter will be focused/ mainly be near the cuticle and then faded in to less glitter as we go down the nail. 

As stated above I first took the brush and polished the glitter on and then I took a makeup sponge putting some of the glitter polish on to the sponge and dabbed it on to the nail. 

Glitter Gradient and Snowflake Nail Design  
Winter nail design

Once you have your glitter gradient the way you like on to the snowflakes, to make this more of a winter design. On my left hand I did put snowflakes on all of the nails and on my right hand I only put snowflakes on three nails. 

For each nail you can make each snowflake different. Some nails I put one snowflake the other nails two with some small dots. 

For each snowflake they all start off with a X and then look kind of star shaped, some of the flakes you can leave as is or add more lines to make them different. Then once you have the larger flakes you can take a dotting tool and make small dots for very small snowflakes. 

Glitter Gradient and Snowflake Nail Design 
 Winter nail design, on thumb nail 

Glitter Gradient and Snowflake Nail Design
 Glitter Gradient and Snowflake Nail Design 
Winter nail design

Once you have your winter nail design the way you like apply a top coat to seal in your design and to help it last thought your next snow day, or just a regular day. I don't know about you but I am fine with a mild winter with little snow, it was much better when we where kids and had actually snow days, now we don't get snow days we still have to go to work no matter what.

Glitter Gradient and Snowflake Nail Design  
Glitter Gradient and Snowflake Nail Design
Winter nail design, on my right hand 

Glitter Gradient and Snowflake Nail Design
Glitter Gradient and Snowflake Nail Design 
Winter nail design, on my right hand 

Here is the practice version that I did a well. 
 
 
Hope all of you enjoined this winter glitter gradient nail design, and I hope all of you are having a great start to the new year and stay warm if it is cold where you are at. 
 
See you next time for more nail fun !

Friday, January 19, 2018

Happy Belated New Years- Purple & Gold Glitter Gradient

Hello everyone! Sorry that it has been a few weeks since I did a post, a lot of unexpected things have come up and I have not had a chance to sit down a do a nail toutial. Now I have a chance to do one. Anyways I hope everyone had a nice and safe New Year, and for today we will kind of be creating a belated New years nail design, a purple and gold glitter gradient, yes we will be creating this design in the middle of January, I thought this design was very pretty and really could be worn at anytime. 

Purple and Gold Glitter Gradient 

 Here are the nail polishes and nail art tools used for this simple design:


Base and top coat- CND Stickey Base Coat and Revlon Extra Life No Chip top coat

Nail polishes- Fun Lacquer- Million Dollar Dream and Zoya- Urban Grunge- Finley

Nail art tools- a makeup sponge

That's all you will need!  

 Let's start this pretty glitter gradient design that is great for any party or just for fun! 

Purple and Gold Glitter Gradient, Fun Lacquer- Million Dollar Dream and Zoya Finley 
 Purple and Gold Glitter Gradient, Fun Lacquer- Million Dollar Dream and Zoya Finley
 Purple and Gold Glitter Gradient

Start off by applying a thin layer of base coat to all of your nails, then let that dry.

Just like last year, this year will be filled with lot of holographic glitter polishes (gotta love the holo!) Once your base coat has dried polish all of your nails with a dark purple holo polish, or just a glitter purple polish.

Purple and Gold Glitter Gradient 
 Purple and Gold Glitter Gradient
 Purple and Gold Glitter Gradient

Let that dry, then take a makeup sponge and polish a little bit of a gold glitter polish on to a makeup sponge, then dab that on the nails, focusing most of the glitter near the tip of the nails. You will need to repeat this step for each nail and you may also need to cut some of the sponge if the polish dries out.

I actually thought that I sponge a little to much glitter near the tips of the nails and if I was to do this again I would have not done a much, but I still feel like this turned out well.  

Then with the brush that is in the polish, with very little on the brush polish some glitter more up the nail, so it looks like the gold glitter is almost fading into the purple.      

Purple and Gold Glitter Gradient 
 Purple and Gold Glitter Gradient 

Once you have your glitter gradient with the right amount of glitter, you can now apply a top coat to seal in your design and keep your nails nice and shinny, and to help them last through any party.  

Their you go now you have a fun glitter nail design that is great for any party that you go to throughout the year, or even just for fun!

Sorry that I did not get a chance to post this in time for New Year, even though this is great design for New Years, I still though it would be nice to show all of you.

Hope you enjoyed this glitter gradient nail design!

See you next time for more nail fun!