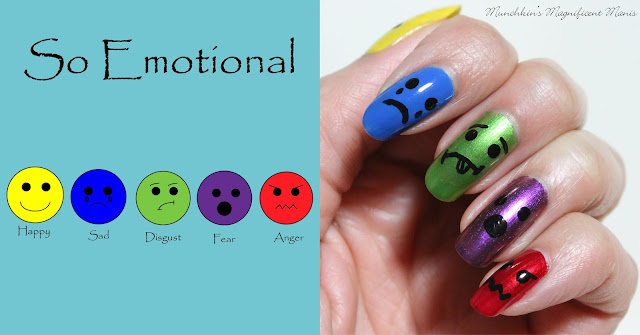
The nail polish and tools used for this design will be right next to the images as we go.
The skill level for this emotions design is:
Beginners
This design is great for beginners. It is very simple to create with a dotting tool and a thin nail art brush with simple lines to create the happy face designs.
Before we start I just wanted to let you know that the happy face was one of the very first designs that I use to do on my nails. I use to us a pencil that you are suppose to write on paper with, dip that in polish and draw a happy face on my nails. They really didn't turn out to well, plus I use to bite my nails really badly so they did not stay on my nails for very long.
Let's not be to emotional when creating this design!
Base cost used- CND Sticky
1. Start off with a thin layer of base coat to protect your nails.
OPI- Hello Kitty- My Pal Joey, OPI Hawaii- My Gecko Does Tricks,
Julep- Hazel- Boho glam, and Finger paints- Cubism Crimson.
2. After your base coat has dried paint you thumb nail yellow, index finger nail blue, middle finger nail green, ring finger nail purple, and pinky finger nail red.
Sally Hansen- Hard as Nails- Black Heart and Large dotting tool.
3. Once your colorful base colors has dried, take your large dotting tool with black polish on it and dot two dots for the eyes on each nail.
Black acrylic paint and a thin nail art brush
4. Next we will start to make the faces for each emotion; happy, sad, disgust, fear, and anger. Refer to the photo above for the faces, the only thing with disgust is make the mouth more curved (I had to redo that part disgust looked a little to happy.)
5. For some final touches on the sad face add two tears, disgust a tongue and some slated eye brows, and the anger face some slanted eye brows as well.
Then once your emotional design has dried apply a top coat to protect your nails, because the last thing you want it to be mad or sad that your nails just chipped.
Just a side note as stated above life is a emotional roller coaster, and all of us want to be happy but sometime our other emotions like to get in the way. But all emotions are their to balance out everything (well that what they said in the movie Inside Out.)
That was kind of the reason why Happiness is on the thumb nail because being happy should be important part of life and the other emotions are their to balance everything. Also anger is on the smallest finger because no one likes to be anger and we want to make anger a smaller part of out lives.
Hope all of you enjoyed this emotional nail design!
See you next time for more nail fun!


No comments:
Post a Comment