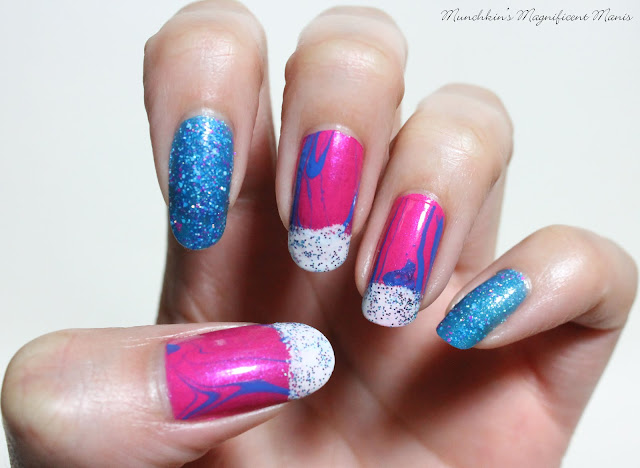
Unicorn Frap, Water Marble Nail Design
This nail design has been done a few different ways, but the best way that it seem to work out for me is by water marbling.
Here are the nail polishes and nail art tool used to create this mythical nail design.
Base and Top coat - CND Stickey Base Coat and Revlon Extra Life No Chip top coat.
Nail polishes- Glam Polish Experiment 626- Stitch to the Rescue, OPI- La Paz-itively Hot, OPI- Hello Kitty- My Pal Joey, Julep- Hazel- Boho glam, Essie- Coconut Cove, and Color Club- Mini- Blue Purple glitter.
Nail art tools- a stylus or tool for marbling and a makeup sponge.
Other (Not show in the photo above)- two plastic cups with room temp water in it ( I recommend two cups just in case your water starts to get to messy), toothpicks (if you don't have the stylus, even if you do I recommend toothpicks!), tape to tape around your fingers, or Liquid Latex, and some paper tower this design is Messy!
Let's start this mythical unicorn water marble nail design!
Unicorn Frap, Water Marble Nail Design
First off start off with a thin layer of base coat to protect your nails and too help your polish last a little longer.
Then once your base coat has dried, polish your thumb, middle, and ring finger with a bright hot pink polish. We will only be doing the water marbling on those fingers, you can always do this design on all the nails, I just wanted to do the water marble on three finger nails.
If you want to only do the water marble on the three nails, you can polish your index and pinky with a bright blue with white, bright pink and holo glitter in it, I found that the polish from the Glam Polish Experiment 626 collection Stitch to the Rescue, went perfect with this design.
Once the bright pink polish has dried on your thumb, middle and ring finger nails we will start the water marbling. This process is messy so it is best to put tape around your finger, near the cuticles and the sides of the nail, or even better you can use liquid latex to put around your finger for an easier cleanup. I still don't have any liquid latex, so I used tape.
Then take your bright pink polish (the same one you used for your base color), a purple and a blue polish and open all of the bottles, so you have them ready to go, you do need to work kind of fast for this design.
Take the bright pink and make sure the polish brush is loaded with polish, so you can drip the polish into the water. Do the same with the purple and blue, in the end you should have a bulls-eye design in your cup.
Then with your stylus or toothpick start to drag the toothpick in the water to create a marble design. Then quickly dip your finger into the part of the water that you like design.
Then take another toothpick and remove the rest of the polish around your finger. Then take your finger out of the water. Then remove the tape or liquid latex around your fingers, as you go on each finger that you are going to marble.
Once your marble design has dried we will add some whip cream on top or on the tip of the nails. Take a small piece of makeup sponge and polish some white polish on it, then dab the sponge onto the tip of the nail, kind of like a french manicure but it does not need to be perfect.
Then once that has dried we will add the sprinkles or sugar (not sure what is on top of the drink?) Just take a blue and purple glitter polish and polish that over the white polish.

Unicorn Frap, Water Marble Nail Design
Once your unicorn frap water marble nail design has dried apply a top coat to seal in your nail design.
Water marbling can be both easy and hard, the concept seem easy but some times your water marble still does not come out the way you want, it just takes practice, the right temperature for your water and the right nail polishes. Also here is a link to the first water marble that I did back in 2015 Lets try water marbling, where I show step by step photos. I definitely feel like this time around that the water marble turned out much better. Also their are a lot of YouTube videos out their on how to do water marbling as well.
Hope all of you enjoyed this unicorn frap, water marble nail design, even if you did or didn't care for the drink, I still think this design turned out pretty cool!
See you next time for more nail fun!


No comments:
Post a Comment