Wednesday, July 17, 2019

Secret Garden- Flower Nail Design

Hello everyone! Today on the blog we will be creating a flower design. This design was meant more for spring time, but summer time came so quick that I didn't get a chance to do this design until just now, really though this design can also be great for summer as well or really any time of the year.

 Flower Nail Design 
Flower Nail Design

Here are the polishes and tools used for this flower nail design:

 
Base and top coat - CND Stickey Base Coat and Revlon Extra Life No Chip top coat.

Polishes-  Femme Fatale- Pride Must Suffer Pain- Little Mermaid, Nails Inc- Rainbow Wishes- Sparkle like a Unicorn duo, and Nails Inc-Dream Dust- Sparkle like a Unicorn duo. 

Acrylic paint-  red, white, yellow, green, and purple.

Nail art brushes- thin detail brush, and a thin stripper brush.

Other- a cup of water to clean off your nail art brushes.


Flower Nail Design 
Flower Nail Design

Start off with clean nails that are free of all polish. Then apply a thin layer of base coat. 

Let that dry.

Once your base coat has dried, polish your pinky and index nail with a shimmer pink polish (I used Nails Inc-Dream Dust), your middle and thumb nail with a purple shimmer polish (I used Femme Fatale- Pride Must Suffer Pain, this is a color changing polish it turns purple when you are cold and light blue when you are warm.) Lastly polish your ring finger nail with a purple iridescent polish (I used Nails Inc- Rainbow Wishes.)

Then let that dry.

After your base polishes have dried on to the nail art, the flower design will be done on the ring, middle and thumb nail. 

Flower Nail Design  
 Flower Nail Design

For all of the nails we will star off with the larger pink flower that is on the side of the nail, for each nail I just switched the which side I put the flower on. For the large pink flower take a thin detail brush with pink paint on it and starting from the side of the nail make petal shape, then make three or four more to make a flower. Then add a small brown circle in the center of the flower, some small yellow dots and small thin light pink lines coming from the brown circle. 

Once you have finished your pink flower on to the green steams and leaves. Staring from the middle part of the pink flower, with your thin stripper brush with a medium colored green and darker green, make a thin line that goes across the nail. Then for the other leaves I kind of made them in random spots around the flower.

Then for the purple flowers, take a thin detail brush with purple paint on it and wherever you want to make a purple flower (manly on the green steams), make a line at the top, two on the sides and two more under that, to make a flower shape (hopefully that makes sense.) Then make a small yellow dot in the center.

Flower Nail Design 
     Flower Nail Design on the thumb nail

If needed you can also add more lines for the steams and leaves.

Flower Nail Design
  Flower Nail Design
  
Once your flower nail design are ready to be picked, apply a top coat to seal in your design and to help it last.  

For this design I also did a more simple/ less design on my right hand. I just put the design on my ring and thumb nail.

Flower Nail Design
 Flower Nail Design
Flower Nail Design
  Flower Nail Design on the right hand 

Hope all of you enjoyed this flower nail design!

See you next time for more nail fun! 

Tuesday, July 2, 2019

Happy 4th of July- Nail Design

Hello everyone! Happy 4th of July! Well almost. I can't believe I am say that all ready it feels like it was just Memorial day! Anyways it has been some years since I last did a 4th of July nail design, since I first staring do this blog about five years ago, so I thought I would do one this year. I kind of feel like with 4th of July designs their is not much you can do with them other then a flag, fireworks, and some way incorporating red, white and blue, so I tried my best. 

4th of July Nail Design  
4th of July Nail Design  

Here are the polishes and nail art tools for this simple 4th of July nail design:

 
Base and top coat- - CND Stickey Base Coat and Revlon Extra Life No Chip top coat.

Nail polishes- Zoya- Renee- Redbook trio, Zoya- Estelle, and Color Club Halo's- Harp on.

Acrylic paint- white.

Nail art tools- nail art tape, and a thin stripping brush.

Other- a small glass jar with acetone in it to clean off your nail art brush, and a cup of water to clean off your nail art brush as well. Twisters to pull nail art tape off the nails.

This is a very simple 4th of July design that is great for beginners!

4th of July Nail Design
 4th of July Nail Design 

As always start off with clean dry nails that are free of any old polish. Then apply a thin layer of base coat to help your design to last. 

Let that dry.

Next we will be applying nail art tape to all of the nails except for the ring finger nail, that nail we will polish with a silver holographic polish. Take any color of nail art tape and cut a small amount off, then place the tape on the nails at an angle.

4th of July Nail Design  
4th of July Nail Design  

Then near the cuticle take a red polish and polish one half of the nail that we taped off. Then right away take some twisters and peel of that tape. Do this same step for all four nails. 

Then once your done with that step, polish the other half of the nail with a blue polish, being careful not to over lap the red and blue polish.

4th of July Nail Design  
 4th of July Nail Design 

Then for the design part, take a thin stripping brush with white paint on it, and then make a straight line going in between the nail (the same area that you placed the nail art tape), then once you get near the tip of the nail make a few smaller lines that come off of the larger line you just made. 

For our final touch I wanted to add some of the silver holo to the nail as well that we polished on the ring finger nail. Once again take that same thin stripper brush with some silver holo polish on it and make a shorter line right next to the white line and then make a few shorter lines from that line on each side of that line. 

In the end this design ended up looking kind of like a feather, which I was not really going for but it worked out anyways. 

4th of July Nail Design  
   4th of July Nail Design 

Once your design is 4th of July ready, apply a top coat to seal in your design and to help it last through all of your 4th of July celebrations.

I did end up doing this design on my right hand as well, I did not change anything keep it the same as the left hand. 

4th of July Nail Design  
4th of July Nail Design 

Hope all of you enjoyed this simple 4th of July nail design and have a safe and Happy 4th of July!

See you next time for more nail fun!   

Wednesday, June 19, 2019

Not So Gradient, Yellow and Orange Gradient Nail Design

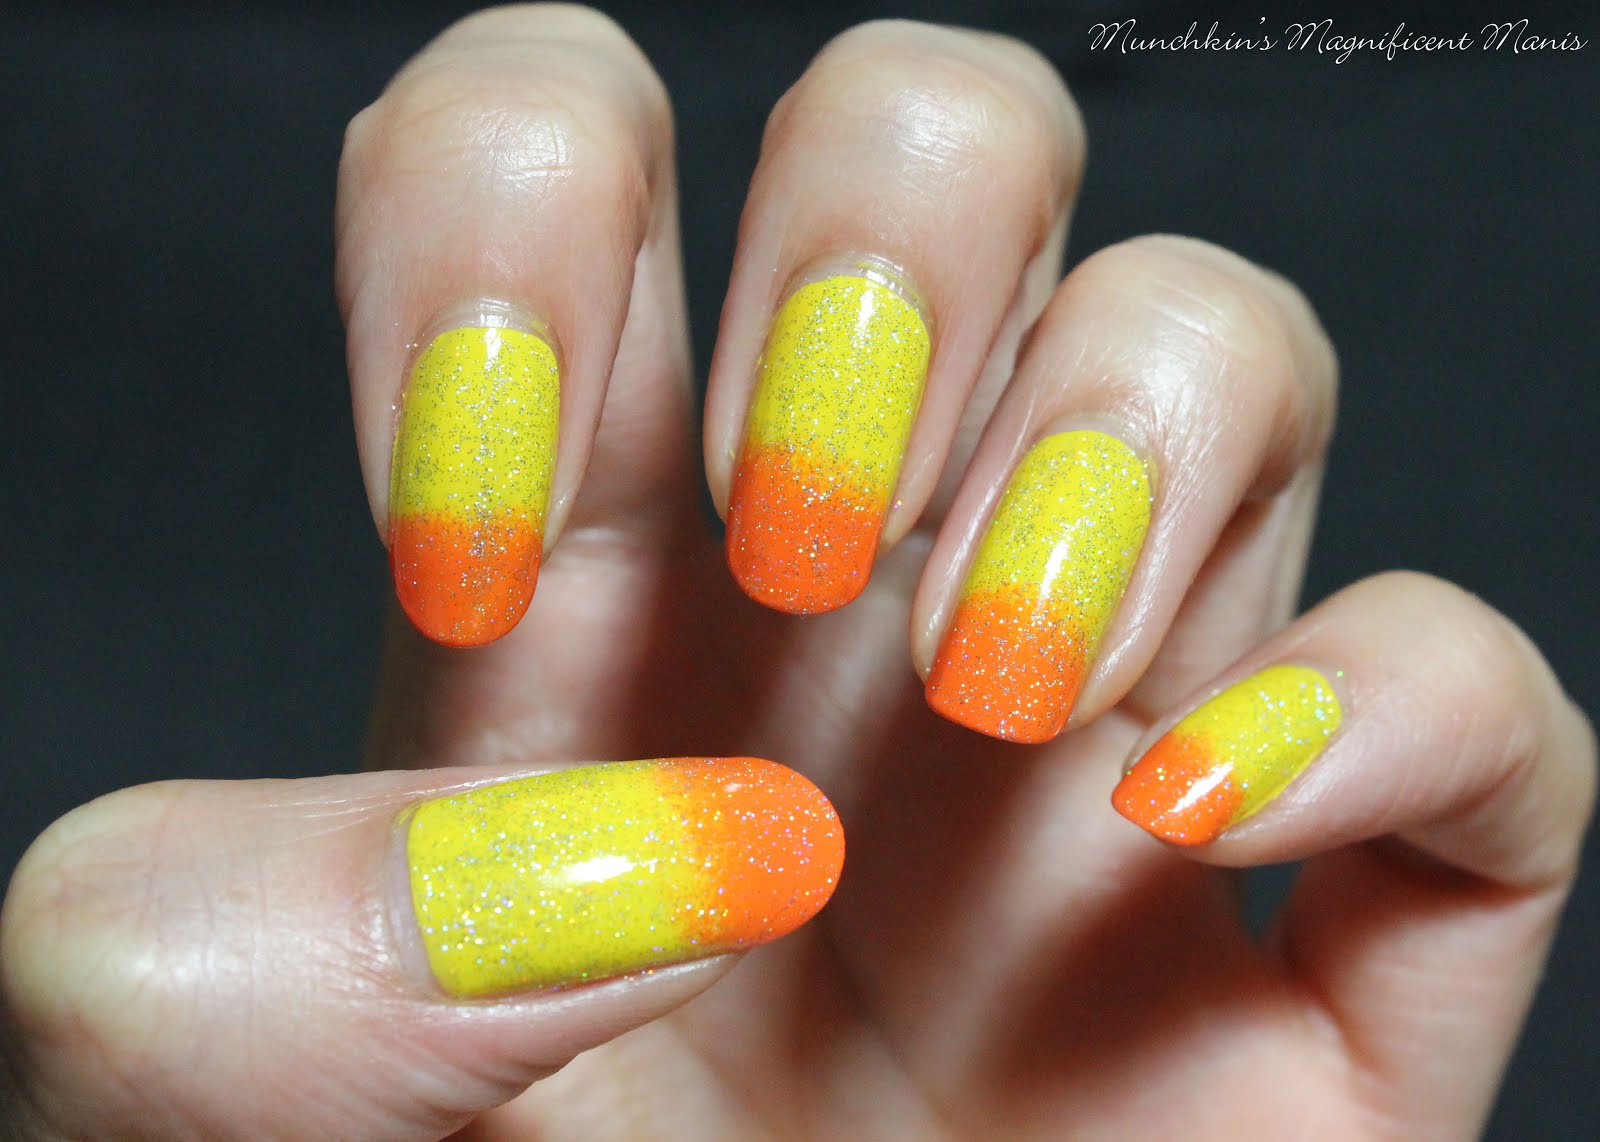
Hello everyone! As you can see from the title, I once again tried to create a gradient nail design, but I didn't really have to much luck. Although this design might not have turned out the way I had hoped, I still wanted to show all of you this design anyways, to show that I am not perfect at doing nail art and that sometimes our nails designs don't always turn out the way we like, but they still some what look good. 

Yellow and Orange Gradient Nail Design

Yellow and Orange Gradient? 

Here are the polishes and one item you will need for this nail design:


Base and top coat- CND Stickey Base Coat and Revlon Extra Life No Chip top coat.

Nail polishes- Sally Hansen- Triple Shine- Lemon Shark, Sally Hansen- xterme wear- Sun kissed, and Revlon- Holographic Pearls- Transforming Effects.

Nail art tool/ other- makeup sponge.


Yellow and Orange Gradient Nail Design
 Yellow and Orange Gradient Nail Design
 Yellow and Orange Gradient? 

For this design I have created a few gradients before, some have turned out better then others. This one still looks nice but this is not exactly what I was going for.

With a gradient the colors are suppose to fade into each other like the orange is darker at the tip of the nail, then get lighter going up the nail, to where it would then fade to yellow. As you can see my nails don't really look like what I just explained. 

For a gradient nail design you first polish your nails (for this design) yellow and then you would normally take a makeup sponge, polish the bottom part of the sponge orange and the top yellow making sure to over lap the colors, then you would dab the sponge on the nails and blend the colors together.   

 Yellow and Orange Gradient Nail Design
 Yellow and Orange Gradient Nail Design
 Yellow and Orange Gradient?

For me when I have tried this I have trouble with it and it seems like it doesn't want to blend. So I will do one color at a time, in this case I still had to trouble. Their has been a few times where I have tried doing a gradient and this method has worked out better. 

Like anything I still need to practice with this type of design.

 Yellow and Orange Gradient Nail Design
 Yellow and Orange Gradient Nail Design
 Yellow and Orange Gradient?


Here are the link to the other gradient that I have created: 
(The ones at the top of the list I fell like turned out better.)


Well I hope all of you enjoyed this post, even though their was not much to it, I just thought this design was still worth showing. 

See you next time for more nail fun!  

Thursday, June 13, 2019

Spring in bloom- flower nail design

Hello everyone! Hope everyone is having a nice spring time, I know where I live it has been a very rainy one. Anyways today we will be creating a blue spring time flower design. 

Blue flower nail design 
Blue flower nail design

The nail polishes and tools we will be using for this flower nail design:  


Base and top coat- CND Stickey Base Coat and Revlon Extra Life No Chip top coat.

Nail polishes- Finger paints- Tiffany imposter and OPI- Hello Kitty- My Pal Joey.

Acrylic paint- white, blue, green and yellow.

Nail art brushes- a thin detail and linear brush, and a striping brush.

A cup of water to clean off your nail art brushes.

Blue flower nail design 
 Blue flower nail design

As always start off with clean nails that are free of old polish, then apply a thin layer of base coat.

Let that dry.

Once your base coat has dried polish your thumb, middle and ring finger nail with a medium colored blue (I used OPI- My Pal Joey), then polish your index and pinky with a light blue polish (I used Finger paints- Tiffany imposter.)

Let that dry.

 Blue flower nail design
 Blue flower nail design

Then once your base colored polishes have dried on to the flower nail art, which will be done on the thumb, middle and ring finger nail.  

*First we will need to mix some paint colors to make the different shades of blue. We will need to make two shades of blue (medium and light blue) and a lighter green. For the blues first take a darker blue and some white paint and mix those together to make a medium blue. For a lighter blue add more white then blue. Then for the light green ad some yellow to a dark green.

Staring with the middle and ring finger nails and then the thumb nail, we will first make a bigger flower that is more off to the side of the nail. Take a thin liner brush with white paint on it and make your first petal starting near the tip of the nail, and then two petals from the sides, two more under that, and then one last petal under that.

Blue flower nail design
 Blue flower nail design

For the other two flowers repeat the same steps, just change the colors of the flowers and of course make them smaller. These flowers should go under the lager flower. Also some of your flowers can have a few less petal or the same as the large flower. 

Once you have your flowers, we need to add the leaves and green branches. Take a thin stripper brush with light green paint on it and make some random long lines from the flowers and then add some leaves as well, you can also change the green to a darker green as well for the leaves and branches.   

Blue flower nail design 
Blue flower nail design

For our final step, which I feel like you can see the best on the thumb nail is to add some small lines in the center of the flower and some yellow dots in the center of the flower. Take a thin stripper brush with the opposite color that you used, like in the photo above the large flower is a light blue, so for the lines use a medium blue. Starting from the center make lines that go half way up the petals. 

Then for the yellow dots just take your detail brush with yellow paint on it and make very small dots in the center of your flowers.

Blue flower nail design
 Blue flower nail design

Once your flowers are spring time ready, apply a top coat to seal in your design and to help it last. 

Hope all of you enjoyed this blue flower nail design, and have a great spring time. 

See you next time for more nail fun!