Monday, December 30, 2019

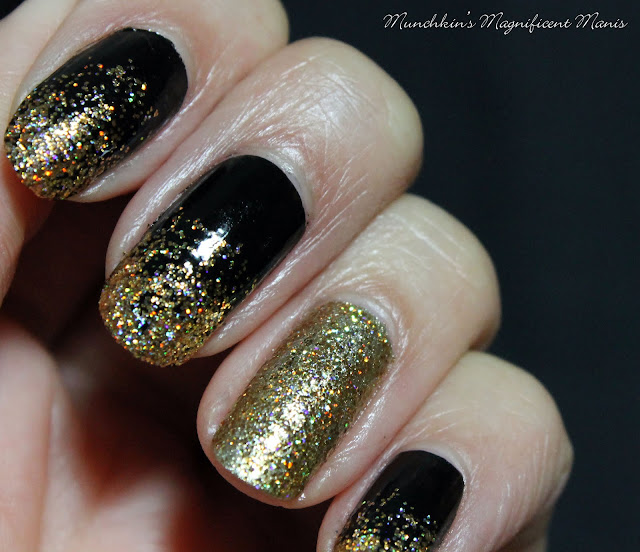
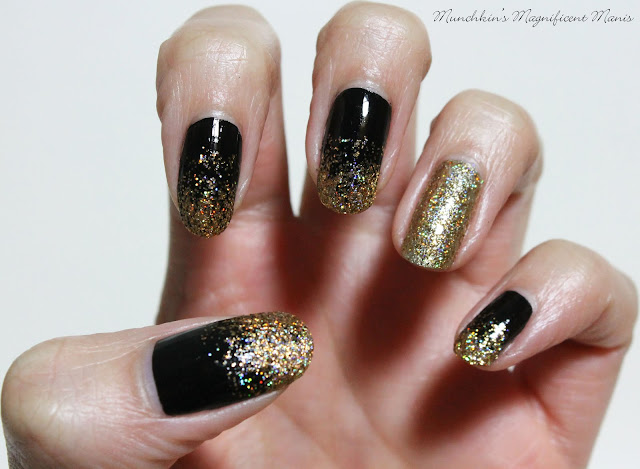
Bye 2019, Hello 2020- New Years Glitter Gradient Nail Design

Hello everyone! Happy almost New Year 2020! I can't believe that I am saying that! Time has just been going so fast, it just seem like it was just the beginning of 2019 not to long ago. I do say that 2019 was not to bad, in the middle of the year I got a new full time job that I have been at now for three months and I do still like, and along with get that new job it helped me to be able to get a new car that I unfortunately needed (yes I got the same car a VW Beetle, just a newer version, I had a 2005 Beetle for 14 years and I loved that car.) Anyways today we will be creating a basic glitter gradient nail design that is great for new years.   

New Years Glitter Gradient Nail Design 
Happy New Year's Nail Design 

All you need for this simple glitter gradient nail design:

  
Base and top coat- CND Stickey Base Coat and Revlon Extra Life No Chip top coat.

Polishes- Sally Hansen- Hard as Nails- Black Heart, Fun Lacquer- Million Dollar Dream and Revlon- Gold Coin (your base color under the glitter.)

Other- a makeup sponge for your glitter gradient. 

New Years Glitter Gradient Nail Design 
 Happy New Year's Nail Design 

Apply Base coat, let that dry.

Polish nails-

Thumb, index, middle, and pinky nail- a black creme polish.

Ring finger nail- a gold polish (Revlon- Gold Coin) and a gold holographic glitter polish, the same one that you will use for the gradient on all the other nails (Fun Lacquer- Million Dollar Dream.)

Let dry.

New Years Glitter Gradient Nail Design
 New Years Glitter Gradient Nail Design
 Happy New Year's Nail Design 

For the gradient on the tip of the nails, first just polish a light coat of your gold holo glitter polish, starting from the tip of the nails and just slightly going up the nail. 

Then take your makeup sponge and polish that same glitter on the sponge, this soaks up most of the clear base making more of the glitter stick to the nail. 

Then dab the sponge mainly at the tip of the nail, making sure that their is not that much glitter going up the nail, that is starts to almost fade.  

Also I did go over a few spots with the brush that may have needed just a little more glitter.

New Years Glitter Gradient Nail Design
 Happy New Year's Nail Design 

That's all you need to create this beautiful glitter gradient nail design, that with the gold holo glitter and black are perfect for New Years, or any time of the year all you have to do is just change up the colors that you use.

Once your nails are new years ready, apply a top coat to seal in your design and to help it last through all of your parties and midnight or just saying at home to watch the ball drop, (that is what my hubby and I will be doing and eating pizza.)

Hope all of you enjoyed this black and gold holo glitter gradient nail design.

Have a safe and Happy New Year 2020!  

See you next year for more nail fun!  

Tuesday, December 24, 2019

Christmas Eve- Christmas Nail Design

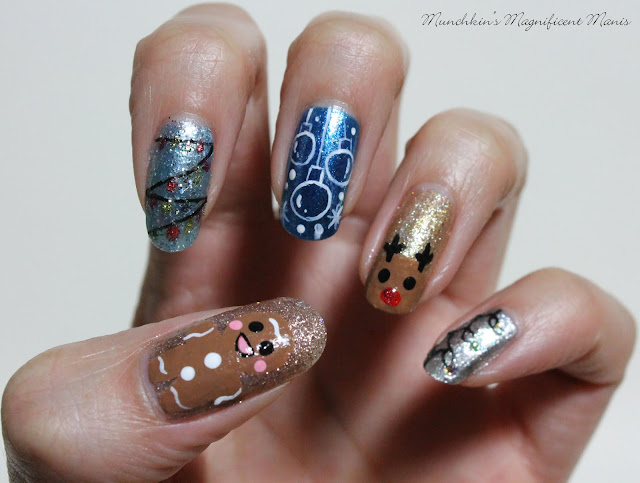
Hello everyone! Merry Christmas Eve! Today on the eve of Christmas, we will be creating a cute glitter filled nail design. Each nail will have a different design on it, that you can also do on each nail or just put on on a accent nail.


Christmas Nail Design
 Christmas Nail Design  

Here are the polishes and tools used to create this cute Christmas nail design:

Yes I used way to many polishes, but most of the glitters are just for the Christmas lights, so very little is used, and of course you don't have to use that many glitters for the lights, I just choose to do so. 

 
Base and top coat- CND Stickey Base Coat and Revlon Extra Life No Chip top coat.

Acrylic paint- black, white, red, and brown, and mixing red and white for pink.

Nail art brushes and dotting tools- thin detail and stripper brush, and a medium size dotting tool.

Optional, for glitter placement- a toothpick.  

Nail polishes- 

Your base polishes are-
China Glaze mini- Sesame Street- 50 Shimmering Years, China glaze mini- Grinch- Deliciously Wicked, Zoya- Twinkling- Alessia, China glaze mini- Grinch- Merry Whatever, Sally Hansen- xtreme wear-Celeb city, and China Glaze mini- Sesame Street- T is for Tinsel (over top of Celeb city).

Polishes for the Christmas lights- 

China glaze mini- Grinch- Resting Grinch Face, China Glaze mini- Sesame Street- #This is my Street, China Glaze mini- Sesame Street- Cele- Bert, China Glaze mini- Sesame Street- On the nice list, China Glaze mini- Sesame Street- A Grouchy New Year, and China Glaze mini- Sesame Street- Gift Fur You.


Christmas Nail Design  
 Christmas Nail Design  

Apply a base coat, let that dry.

Polishes on each finger-

Thumb- Rose gold glitter polish, China Glaze- 50 Shimmering Years.
Index- Light shimmer blue glitter, China glaze- Deliciously Wicked
Middle- shimmery blue, Zoya- Twinkling- Alessia
Ring- Gold glitter polish, China glaze- Merry Whatever
Pinky- Sliver- Sally Hansen- xtreme wear-Celeb city, China Glaze- T is for Tinsel (over top of Celeb city.)

Let that dry.

Christmas Nail Design 
 
 Christmas Nail Design 

Gingerbread Man on the Thumb Nail-  

With a thin detail brush with brown paint on it, make a circle for his head near the tip of the nail, the make two arms, and two legs, then also fill in the body with brown as well. You will need to go over this a few times.

For the eyes take a dotting tool with black paint on it and make two dots in the middle of head. 

For his smile make a straight line and a curved line under that, then fill that in with pink.

For his pink cheeks and white buttons, just make two pink dots with your dotting tool on each side of the mouth. Then for the buttons make two dots down is tummy.

Lastly for a final detail, making the frosting lines. Take a thin stripper brush with white paint on it and make a squiggly line on his head and one on each arm and leg.

Christmas Nail Design 
 Christmas Nail Design 

Christmas Light on the Index Nail- 

Take a thin stripper brush with black paint on it and make a thin zig zag line going down the nail. Then with a lot of different glitters, with a toothpick or just the brush in the bottle, place the glitters on the line you just made for the lights.

Christmas Nail Design  
       Christmas Nail Design 

Ornaments and Snowflakes on the Middle Finger Nail-   

Take a thin stripper brush with white paint on it and make three circles, that are all at different levels, then make a small square at the top of the circles and make a line going from each square to the cuticle area. To finish your Christmas ornaments make a curved line and a small dot under that for the refection on the ornament. 

For the larger snowflakes make a star shape, then for the smaller snowflakes just take a dotting tool with white paint on it and make a few random dots all over the nail.  

Christmas Nail Design  
 Christmas Nail Design 

Reindeer on the Ring Finger Nail-  

With a thin detail brush with brown paint on it make a circle near the tip of the nail, then fill that in. 

For his eyes take a dotting tool with black paint on it, and dot two eyes in the center of his head, then with that same dotting tool with red paint on it make a red dot. For an added touch you can add a red glitter polish on top as well.

Then for his antlers, take your detail brush with black paint on it and make two lines coming from his head and make two small ones from that line.  

  Christmas Nail Design
Christmas Nail Design 

 
Christmas Lights on the Pinky Finger Nail- 

Take your thin stripper brush with black paint on it and make a line down the nail that has loops in it. If the loops are a little to hard to make, you can just repeat the same light design that we did on the index nail. 

Once again for the lights take a few different glitters, with a toothpick or just the brush in the bottle, place the glitters on the line you just made for the lights.
 
Christmas Nail Design 
 Christmas Nail Design

Once you have your Christmas design the way you like apply a top coat to seal in your design and to help your design to last through all of your Christmas celebrations. 

Hope all of you enjoyed this Christmas nail design!

Merry Christmas and Happy Holidays! 

See you next time for more nail fun! 

Friday, December 20, 2019

WinterWonderland- Snowflake Nail Design

Hello everyone! Hope everyone is having a good winter, if that is possible? I personally don't care for winter or snow, but it is sometimes nice to look at, mainly when it first falls. Anyways today we will be creating a pretty snowflake nail design that is great for winter or even a Christmas design.

Snowflake Nail Design
 Snowflake Nail Design

Here are the polishes and tools used to create this snowflake nail design: 


Base and top coat - CND Stickey Base Coat and Revlon Extra Life No Chip top coat.

Polishes- China Glaze mini- Sesame Street- Me Ate Santa's Cookies! and China Glaze mini- Sesame Street- T is for Tinsel.

Arcylic paint- White

Nail art tools- thin stripper brush and a small dotting tool. 


Snowflake Nail Design

I Just wanted to let you all know that because I have done multiple snowflake designs over the years, I will not be going step by step on how to create the snowflake in this design, I will just go over the basics of this design like glitter placement and the polishes used. 

Snowflake Nail Design
 Snowflake Nail Design

First apply a base coat, then let that dry.

Polish all of your nails-
Base polish, a shimmery/metallic blue, China Glaze- Me Ate Santa's Cookies.
Glitter over top- a sliver and blue glitter, China Glaze- T is for Tinsel

For the snowflake nail art white acrylic paint was used.  

Snowflake Nail Design
 Snowflake Nail Design

For the glitter placement- 

Thumb- have glitter go around the edge of the nail, no glitter in the center of the nail.
Index and middle- glitter covers the whole nail.
Ring finger- just on the tip of the nail.
Pinky finger- curing up the nail on the left side, and going to the tip of the nail.


Here are some link to my other snowflake nail designs:


Snowflake Nail Design
 Snowflake Nail Design

Once you have you snowflake design the way you like, apply a top coat to seal in you design. 

Hope all of you don't mind this kind of post, with less words and more pictures. I just felt like because I have done multiple snowflake design, their was no need to do the step by step process on the design.

 See you next time for more nail fun!  

Tuesday, November 26, 2019

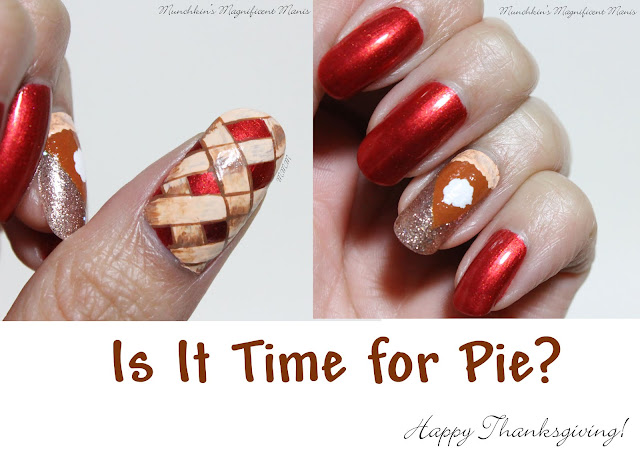
Pie Time- Thanksgiving Nail Design

Hello everyone! Happy almost Thanksgiving! What is your favorite food to eat during Thanksgiving? My favorite food is ham and mac and cheese, as for desert I love pumpkin pie that is loaded with lots and lots of whip cream! So today on the blog we will be celebrating Thanksgiving with a fun pie design, cherry and pumpkin pie. 

  Thanksgiving Pie Nail Design Thanksgiving Pie Nail Design 


Here are the polishes and tools used for this yummy pie design: 


Top an base coat- CND Stickey Base Coat and Revlon Extra Life No Chip top coat.

Polishes- OPI Lisbon- Now Museum Now You Don't and China Glaze mini- Sesame Street- 50 Shimmering Years.

Acrylic paint- Brown, peach, red, yellow (to make orange) and white.

Nail art brushes- thin detail brush and a thin stripper brush. 

A small cup of water to clean off your nail art brushes.

Thanksgiving Pie Nail Design  
Thanksgiving Pie Nail Design 

Apply base coat.

Polishes-  

Thumb, index, middle, and pinky finger nails. A reddish orange polish (I used OPI - Now Museum Now You Don't.) 
Ring finger nail, a rose gold glitter polish (I used China Glaze- 50 Shimmering Years.)

Thanksgiving Pie Nail Design  
 Thanksgiving Pie Nail Design 

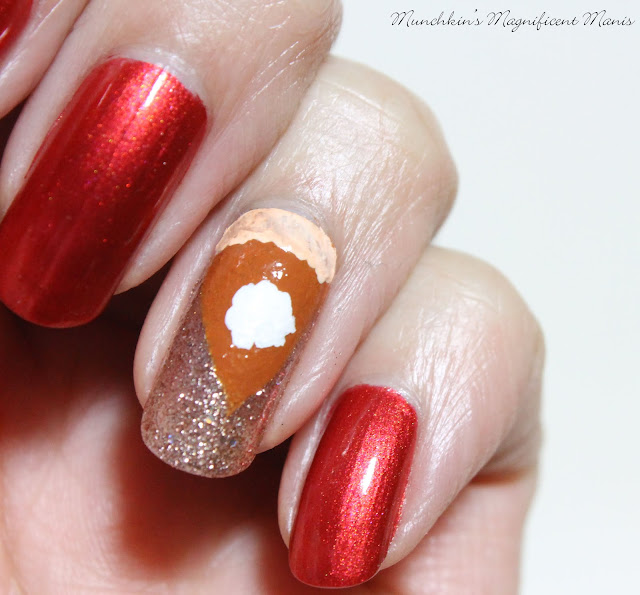
Pumpkin Pie Design on the Ring Finger Nail- 

Mix a red,orange and brown paint together to make your pumpkin pie color. Then make a triangle shape near the cuticle, fill that in with the paint you just mixed. You will need to go over this a few times to be opaque. 

Then to make the crust take a peach colored paint on a thin detail brush and dab the paint near the cuticle making a crust looking shape.

Now to add the whip cream, which I would add way more then what I did in this design on my actual pie, but for the purpose of this design I just put a little whip cream, so you can tell that this is pumpkin pie. Anyways take a thin detail brush with white paint on it and dab the white in the center of the triangle in a circle shape. 

Thanksgiving Pie Nail Design  
 Thanksgiving Pie Nail Design 

Cherry Pie on the Thumb Nail- 

For the cherry pie design, we will be making a checkered patterned for the crust on the nail. Starting from the tip of the nail make a thick peach strips with your stripping brush, I made four going down the nail. Then staring on the side of the nail, make three more thick strips. 

For added detail you can outline your crust pieces with brown, some pieces can over lap and some can not. Then for even more detail take some brown paint and place that paint on different parts of the crust, then with water smudge that paint to make it kind of blend in.      

Thanksgiving Pie Nail Design  
Thanksgiving Pie Nail Design 
Once you have your pies looking yummy and ready to eat, apply a top coat to seal in your design and to help it last all though out your Thanksgiving day meal, unlike all the food you will be eating that will not last.

Hope all of you have a wonderful Thanksgiving and enjoy all the yummy food!

See you next time for more nail fun!  

Friday, November 22, 2019

China Glaze Holiday Sesame Street Collection

Hello everyone! Today I have a cool and very glittery collection from China Glaze to share with all of you, the Sesame Street 50th Anniversary Holiday collection. This collection is loaded with a lot of glittery and shimmery polishes, which I love! If you also love glittery and shimmery polishes this collection will be great for you as well. When I saw some reviews of this collection on YouTube I knew this collection was right up my ally. Summer and winter/ holidays are my favorite times of the year for polishes, winter/ holidays because of all the glitter, summer because of the bright colors. 

China Glaze Holiday Sesame Street Collection    
China Glaze Holiday Sesame Street Collection

If you love glittery and shimmery polishes keep reading, you will love this collection! 

China Glaze Holiday Sesame Street Collection
 China Glaze Holiday Sesame Street Collection

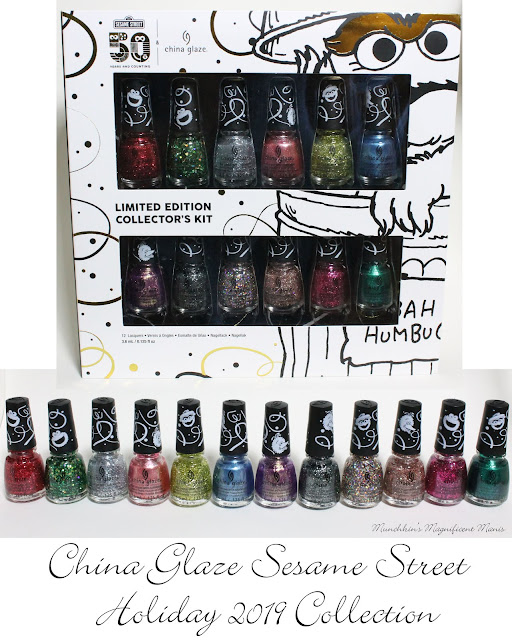
The China Glaze Holiday Sesame Street Collection has 12 polishes in the collection with mainly glitters and four shimmers. 

As you can see I purchased the mini set, they also come in full size as well. The minis I feel are not hard to use, unlike some polishes companies that have minis they are not very functional.    

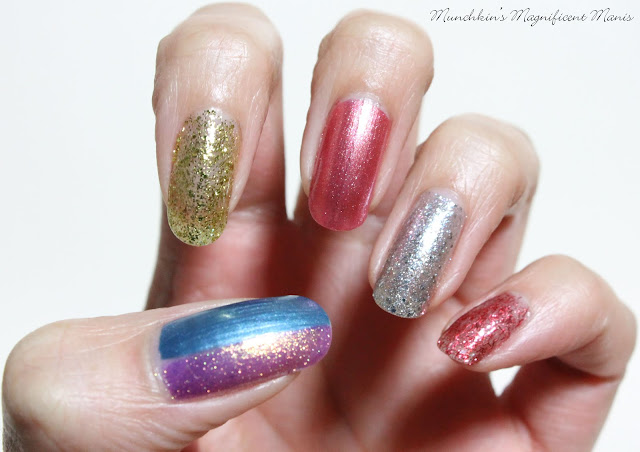
For my reviews, I swatch them a little bit different, I wore all 12 polishes at once because I like to wear my polish all week, so I find it better to wear them all at once.

China Glaze Holiday Sesame Street Collection, On the nice list 
 China Glaze Holiday Sesame Street Collection, On the nice list

The polish we will be taking a look at first is On the nice list, this for the most part is a glitter topper with red small and bar glitters. 

This polish took three coats to be almost full coverage, this would be much better as a topper over maybe a red.  

China Glaze Holiday Sesame Street Collection, Brought to you by & A Grouchy New Year.
  China Glaze Holiday Sesame Street Collection, Brought to you by & A Grouchy New Year.

Next we have A Grouchy New Year this is a green shimmer polish. Then over that polish we have Brought to You By a green glitter topper with small green glitters and small hex holographic gold glitters in the polish. 

A Grouchy New Year took two coats to be opaque and A Grouchy New Year I applied two coat over half of the nail. 

China Glaze Holiday Sesame Street Collection, T is for Tinsel 
 China Glaze Holiday Sesame Street Collection, T is for Tinsel

T is for Tinsel a silvery glitter polish with different size sliver glitters and a few blue glitters as well. 

This took three coats to be opaque, this can be worn on it own and possible as a topper. 

China Glaze Holiday Sesame Street Collection, Giggling All The Way 
   China Glaze Holiday Sesame Street Collection, Giggling All The Way
  
 Giggling All The Way is a pink shimmer polish with silver in it. 

This took two coat to be opqaue. 
 
 China Glaze Holiday Sesame Street Collection, Cele- Bert 
 China Glaze Holiday Sesame Street Collection, Cele- Bert

Cele- Bert is a yellow and gold glitter topper. 

I applied three coats, but this polish was still kind of sheer. This polish would be better as a topper. 

China Glaze Holiday Sesame Street Collection, Me Ate Santa's Cookies &  Fa- La- Ah- Ah- Ahhh!  
China Glaze Holiday Sesame Street Collection, Me Ate Santa's Cookies &  Fa- La- Ah- Ah- Ahhh!

Me Ate Santa's Cookies is blue shimmer polish with sliver shimmer in it, this one is very similar to the pink polish.

On the other half of my thumb nail, we have Fa- La- Ah- Ah- Ahhh! This is a purple with a gold shimmer in it. 
  
Me Ate Santa's Cookies took two coats to be opqaue.

Fa- La- Ah- Ah- Ahhh took three coats, but still looked a little sheer in some lighting. 


China Glaze Holiday Sesame Street Collection, Since 1969

Since 1969 is a dark grey or black with silver shimmer in it. 

This took two coats to be opqaue. 

 
China Glaze Holiday Sesame Street Collection, #This is my Street 

#This is my Street is a glitter topper with gold holographic glitter and some blue glitter in it as well. 

This polish I wore two coats over a gold polish.  

  China Glaze Holiday Sesame Street Collection, 50 Shimmering Years
 China Glaze Holiday Sesame Street Collection, 50 Shimmering Years 

50 Shimmering Years is a rose gold/ champagne glitter polish. This took three coats to be opaque. 

China Glaze Holiday Sesame Street Collection, Gift Fur You  
  China Glaze Holiday Sesame Street Collection, Gift Fur You

Gift Fur You is a magenta glitter polish. This one also would be best as a topper, but I did wear this in three coats on my pink finger nail. 

China Glaze Holiday Sesame Street Collection 
 China Glaze Holiday Sesame Street Collection
China Glaze Holiday Sesame Street Collection, on all the nails. 

This collection I really enjoyed, I really liked all of the polishes, but if I had to pick a favorite I would pick Me Ate Santa's Cookies the blue and T is for Tinsel the silver polish. 

This collection is available at Sally's:

Full size bottles are $6.79 sesame-street-50th-anniversary-nail-polish 


Mini Booklet set is $25.99sesame-street-micro-mini-12ct-booklet 


Hope all of you enjoyed the review of the China Glaze Holiday Sesame Street Collection!

See you next time for more nail polish fun!