Friday, February 27, 2015

Another Half Moon- Half Moon Design

Hello everyone! For this week I have a recreation or re-due of a nail design. One of the first nail tutorials I did was how to create a half moon nail design using hole punch stickers. Now that I have done a lot more nail designs, I can look back at that design and realize that it did not look very half moon like. So I decided to do a re- due, to try my hand again at this design to see if I could get the half moons to look more curved, after all practice makes perfect. 


half moon nail design
 Second try at Half Moon design

For this time around I did not want to create the same half moon design. So I used spring colors because if you live in a cold climate like me, we are all tired of the cold, snowy weather, and ready for spring. Then for a slightly different look, I went for a glossy/ matte look with a glossy glitter light purple (even though it looks pink in the photo), and a violet matte purple.

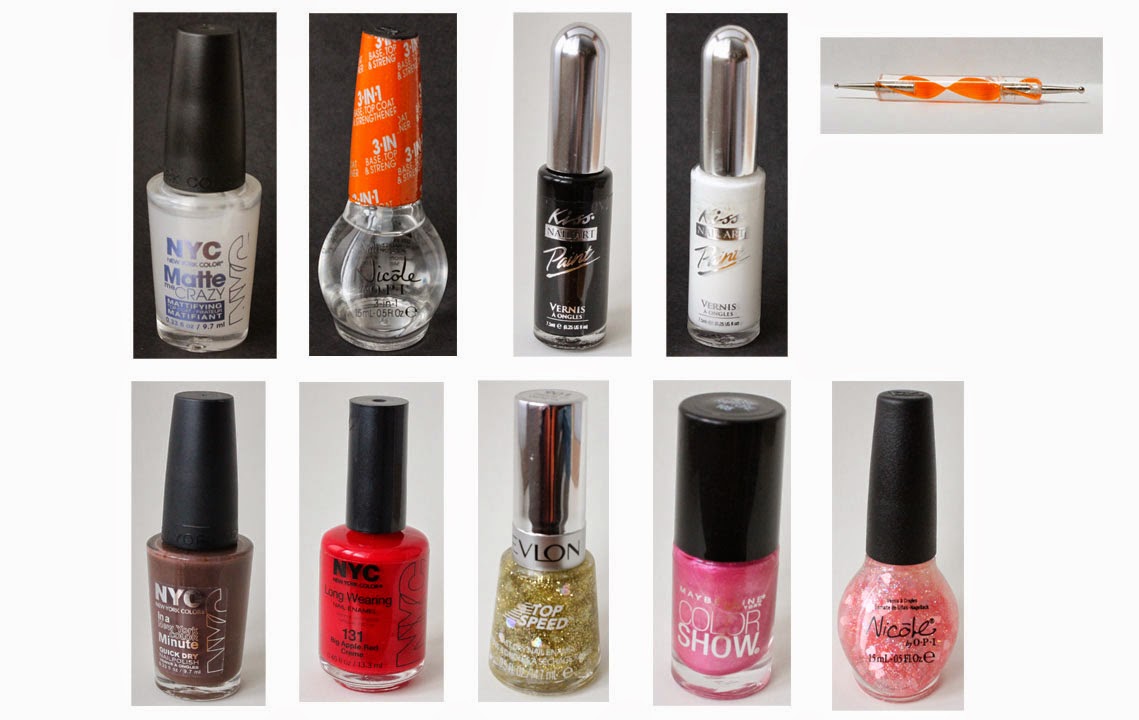
Here are the nail polishes used for this half moon nail design (no nail tools needed):
Base and top coat- Nicole OPI-  3in1- base, top, & strengthener, Revlon Extra Life No Chip top coat, and NYC- Matte Me Crazy topcoat.

Nail polish- Sinful Color- Purple Diamond and Sally Hansen- Hard as Nails - No hard feelings. 

Nail art stripper polish- Kiss nail art in silver.


The skill level for this half moon nail design is:

 Beginner/ Basic 

Even though this design is done free hand with no guides, this is a very simple design. It can be done with hole punch guides or free hand either one is simple to create. 


Let's start this freehand half moon design!

1. Start off with a thin layer of base coat.


2. Paint all of your nails with two coats of a glitter light purple , I know this polish looks pink in the photo but it is a light purple. Also right now it still looks a little sheer, but we will add another coat later on. 

3. Next we will be doing a freehand half moon nail design. I actually found doing a freehand half moon design to be much easier and turned out better than using a guide. 
Anyways you create the half moon by taking the brush in the bottle, starting on one side of the nail create a curved line that goes to the other side of the nail. When you get to the center of the nail you can left up on the brush, start another curved line on the other side and meet the lines in the center of the nail to make a curve.    


4. After you have made the curved line fill in that part with a violet polish. Then to make the  glitter light purple less sheer add one more layer of the light purple polish, making sure not to get any on the violet polish. You can stop at this step or go on to the optional next step. 

5. This step as stated above is optional. For a different look you can apply a matte top coat to the violet half moon and leave the light glitter purple glossy. 

half moon nail design Another optional step is taking your silver nail art stripper polish and draw a curved line over the half moon, to outline it. Then once your half moon design has dried apply a shiny top coat over the glitter light purple, leave the half moon with just the matte topcoat.

Hope all of you enjoyed this recreation/ re-due of the half moon design that is great for the spring time. 

See you next time for my next design tutorial! 

Friday, February 20, 2015

Chocoholic- Chocolate Design


Hello everyone! For all you fellow chocolate lovers, that also love nails, then this is the tutorial you will love! This weeks tutorial is kind of Valentine's themed and I should have done this a week before, but really chocolate can be for any time. If you are like me then you love chocolate just as much as doing your nails, so why not combine the two. 

Chocolate nail design
 Yummy Chocolate nails and some of the chocolates that I based my designs off of.

Here are the nail polishes and the few nail tools used to make these chocolate nails:

Base and top coat- Nicole OPI-  3in1- base, top, & strengthener, NYC- Matte Me Crazy topcoat (use a matte top coat, not a glossy one.)

Nail art polishes/ strippers- Kiss nail art- Black and White

Nail polish- NYC- Brownstone, NYC- big apple red creme, Revlon- top speed- Hearts of gold fx (just use the small gold glitter pieces or just a plain gold glitter polish), Maybelline- Color show- Rose rapture, and Nicole by OPI- Love your life. 

Nail tools- Just a dotting tool


The skill level for this chocolate nail design is:

Beginner/ Basic

This design is simple and has kind of a basic look to it, but still looks cool. Their are basic swirls and lines that are found on chocolates. The only thing that might be a little bit tricky is some of the swirls can be a little bit hard to draw, but really, what chocolates look perfect. 

Let's start this yummy chocolate nail design! 


1. Start off with a thin layer of base coat.


2. Apply a brown nail polish to all of your nails.

3. Next we will be doing things a little bit different. After your glossy brown polish has dried, apply a matte top coat to all of your nails to give your nails a chocolatey look. 

4. Now to give your chocolates more of a chocolate candy look, by adding some designs that you see on your favorite chocolates. Take your black nail art stripper polish and draw two horizontal lines side by side, in the middle of the nail.   

5. To finish this chocolate piece we will add a flower in the middle. Take your dotting tool dipped in red polish, make a dot in the middle then four dots around that dot to make a small flower. 

6. For the index nail we will make a swirl design. Take your white nail art stripper start in the corner of the nail make a curved line and then make a loop. 

7. Then make a curved line under that loop, just like the photo above. 

8. Now for the next chocolate. This one is simple with just a few lines for a chocolate drizzle look. Take your black nail art stripper and draw four curved lines down your nail, or a few more or less depending on the length of your nail.   


9. For the pinky nail we will make a gold dusted chocolate, that you might see with some fancier chocolates. Just simply take a gold glitter polish and paint over the brown (I used one with heart glitter in it, and just left the heart out because that is the only gold glitter polish I have, surprisingly.) Now this nail looks a little too shiney and not chocolate like, so we need to apply another coat of matte topcoat.   

10. On the ring finger nail we will make a different swirl design. Take your white nail art stripper polish near the cuticle and create a loop, like in the photo above, then make two more loops to fill up the nail or a few more if your nails are longer. 

11. For the most part on the right hand I did the same design, other than the middle finger nail and the ring finger nail. For the middle finger nail we will make a checkerboard design. To create this design, take your white nail art stripper and draw two vertical lines. 

12. Then draw three horizontal lines. When doing this make sure not to draw too many lines, it seems to look better with fewer lines. 


Chocolate nail design
                                               Right hand chocolate nail design

For the right hand, the index nail for the most part is the same as the left hand, the lines are not curved (refer to step 8), the pinky nail is the same, and the only thing different about the thumb nail is the heart glitter piece. For the polish I used (as stated in my Valentine's day nail design) the heart pieces sunk to the bottom and you need to fish them out. First dab a small amount of the clear glitter base on the nail so the heart glitter can stick, fish out a heart glitter piece, take a toothpick and place the heart on the nail,then apply a small amount of matte topcoat to keep the heart in place. For the ring finger nail just take some pink nail polish and the brush it came with and swipe the pink on the tip and in the middle of the nail.  

Chocolate nail design
  Left hand chocolate nail design

Unlike the other design that we have done you are now finished. No need to add the usual topcoat because that will make your nails look shinny, and we are going for a realistic chocolate look. For the design that we made just leave them shinny, their is no need to add more matte top coat. 

Now your nails look good enough to eat, but don't do that, they may look like chocolate but they won't taste like it. 

Hope all of your enjoyed this chocolate nail design, and if you are anything like me don't eat all of your Valentines day chocolate at once!

See you next time for my next nail design tutorial!

Wednesday, February 11, 2015

Valentine's Day

Hello everyone! It's Valentine's Day, the day of love! Either if you have someone or not this day can be special for everyone.You don't necessarily have to have a special someone, you can celebrate friendship or family.

For today let's celebrate the love for one another with this Valentine's day nail design. 

Valentine's day nail design
 Valentine's Final Nail Design


Here are the Nail polishes and Nail tools used for this Valentine's Design:

Top Coat and Base Coat- Revlon Extra Life No Chip top coat and - Nicole OPI-  3in1- base, top, & strengthener. 

Nail Polish- Maybelline- Color show- Rose rapture, OPI mini- Liquid sand- The Impossible,NYC- Broadway Burgundy Frost, NYC- big apple red creme.
Two Glitter heart nail polishes- Nicole by OPI- Love your life and Revlon- top speed- Hearts of gold FX. 

Nail art tools- Small glass jar with nail polish remover to clean off nail art brushes, a small thin nail art brush, and optional heart stencils from the Sally Hansen I heart nail art kit. 


The skill level for this design is:  
Beginner 

This design is simple, with basic heart shapes, done with stencils and by freehand. Then just adding heart shape glitter pieces to the nail.


Let's begin this Love themed nail design!

1. As always start off with a thin layer of base coat.

2. Paint all of your nails except your index nail, with a rosy or simmer pink polish. Then paint your index nail with a pink texture polish. 

3.Once your textured polish has dried take a pink glitter heart polish and place the hearts on the nail. 

This part can be a little tricky, the polish Love your life from Nicole by OPI was kind of hard to get the heart pieces out, they all sunk to the bottom of the bottle. So you need to fish out the hearts by taking the brush and grab some of the heart glitter piece. First make sure you put a small dot of the polish that the heats came in to help the hearts stay on the nail. Then once you have a heart piece take a toothpick, pick up the heart and place it on your nail, do this until you have a good amount of hearts on the nail.  

4. Repeat the last step for the pinky nail. I used Revlon- top speed- Hearts of gold FX to give a slightly different look with small gold glitter and silver heart glitters. If you only have one heart glitter polish you can always use the same polish for both nails. 

5. Next we will be freehand drawing a bigger heart. Take your small thin nail art brush and dip it in a red glitter polish or just a plain red polish. Then starting at the bottom, near the tip of the nail make a V shape then draw to curved lines on the sides, then draw the top of the heart. I actually did this for the thumb nail and I thought it turned out better to start at the bottom of the heart, which on the ring finger nail (in the photo above) I did not do. 

6. Do this step again for a large heart on the thumb nail. 

7. Another and more simple way to create hearts is with a stencil. I used the heart stencil that came with the Sally Hansen I heart nail art kit. Just simply place the sticker stencil on the nail, paint over the heart shape, and then peel the sticker up. 
Of course this sticker stencil becomes a bit worn due to its stickiness after using it a few times, so I am unsure how many time you can really use this. 

Valentine's day nail design
After your lovely Valentine's day nail design has dried apply a top coat. Make sure if you put a topcoat on the texture polish that it is a thin layer. Also the nails that have the heart pieces on them make sure to have a good amount of topcoat over them, to help them from coming off.

Hope all of you enjoyed this Valentine's day nail design, that would be great for a date or just a fun time with the girls. 

Happy Valentine's Day and see you next time for my next design tutorial!

Friday, February 6, 2015

Let It Snow! Winter Design


Hello Everyone! Yes, as you can tell from the title, we have another winter nail design. Ironically, as I type up this week's blog post, where I live it is snowing a lot! If you also live in an area where it snows, you are probably like me and just wish it was Spring/ Summer time. But in the meantime, I thought I would once again make a pretty winter themed nail design, to help get through all this cold weather and snow.   

winter nail design

  Snowy Winter design

If you have been following my blog this design might look somewhat familiar, this design is kind of a re-creation of design that I did around Christmas time, without the penguin and snowman (here is the link for that design Winter Wonderland .) No this is not a Christmas design (it could be, I guess? But Christmas is over with.) I just thought I would give this design another try with the Zoya Nori polish, for a winter loo. (Here is the link for the Zoya post Zoya Dream Box .) 


The Nail Polish I used: (There are No tools used for this design!)

Top coat and base coat- Revlon Extra Life No Chip top coat and - Nicole OPI-  3in1- base, top, & strengthener.

Nail Polish- Zoya- Pixie Dust- Nori and Kiss nail art- Silver.


The Skill level for the Winter nail design is:

Beginner/ Basic

This design is very simple! Their are only two polishes used for this design, a base color and a nail art polish/ stripper. The design itself is a lot of lines, simple snowflakes, and a french manicure to start off the icicles.   


For this design even though this is a recreation with some changes, I will still put the steps again for all of you right here in this post. 


 1. Start off with a thin layer of base coat. 


2. Paint all of your nails with a blue glitter texture polish. I used the beautiful Zoya Nori polish from the pixie dust collection. It did take three thin coats to get opaque enough, this was kind of a sheer color. 

3. We will start with the thumb nail design, a large snowflake. Take your silver nail art polish and draw a vertical line on the side of the nail, then a line in the middle, and two slanted lines one at the top and one on the bottom.  

4. To finish off your snowflake, draw arrow like lines on the three larger lines all the way down the larger lines. 

5. Do step 3 and 4 again for the ring finger nail.

6. Next we will be creating the icicles and snowflakes on the index, middle, and pinky nail. Start off by create a silver french manicure with the silver nail art polish/ stripper. Do this by slowing dragging your nail art polish across the nail and then fill in that part. 


7. Let's make the icicles.We already have part of it started with the french manicure part, now we just need to add the dripping ice, take your silver nail art polish and draw two lines on the side under the french manicure. Make these two lines kind of long. You can start anywhere on the nail, it does not have to start on the corners, this is just how I did this.

8. Then draw different size lines all the way across the nail, while leaving a little bit of space in between each line/ icicle. Each line should be different sizes, some long some short. 

9. The last step is to make the small snowflakes under the icicles. Take your silver nail art stripper and draw as many star like shapes as you would like, most of the nails I put one to two snowflake/ stars. 

winter nail design
For textured polish you really are not suppose to add a topcoat because this could mess up the texture effect. I found if you put a thin layer of top coat this does not take away the texture effect. So if you want to have extra protection for your manicure, just add a thin layer of top coat. 

winter nail design
Here's a side of side view of Winter Wonderland and Let is Snow. As you can see the designs of the snowflakes is a little bit different. Due to the Zoya Nori having glitter in it I did not add the small dots for snowflakes like the original.   

Hope all of you enjoyed this recreation! 

See you next time for my next design tutorial!