Wednesday, April 17, 2019

Chill-in with My Peeps- Easter Nail Desig

Hello everyone! Happy Easter! Well soon to be Easter, I am posting this a few days earlier just before Easter Day. Today we will be creating a design based on the Easter candy, Peeps. When it comes to Peeps they are not really my favorite Easter candy, but I thought it would be cute to make into a nail design, my favorite Easter candy is the Cadbury eggs, the original and the caramel ones. What is your favorite Easter candy? Peeps, Cadbury eggs, jelly beans, chocolate bunnies?   
 
Peeps Easter Nail Design

Here are the polishes and nail art tools used for this Easter treat nail design: 


Base and top coat- CND Stickey Base Coat and Revlon Extra Life No Chip top coat.

Nail polishes- Picture Polish- Salt Water- Nailstorming, OPI- Hello Kitty- My Pal Joey, Sinful Colors-Let's Meet, Zoya Mini- Leslie, Zoya Mini- Eden, and Zoya Mini- Daisy.

Acrylic paint- black and white.

Nail at tools- small and medium dotting tools and a thin detail brush.

Other- small glass jar with a little bit of acetone to clean of your nail art brushes, and a cup of water. 

Peeps Easter Nail Design 
 Peeps Easter Nail Design

Start off by applying a thin layer of base coat to your clean nails.

Let that dry.

Once your base coat has dried polish your thumb, middle and ring finger nail with a light blue polish (I used Picture Polish- Salt Water), then polish your index and pinky finger nail with a light yellow polish (I used Zoya- Daisy.)

Let that dry as well.

Peeps Easter Nail Design 
 Peeps Easter Nail Design

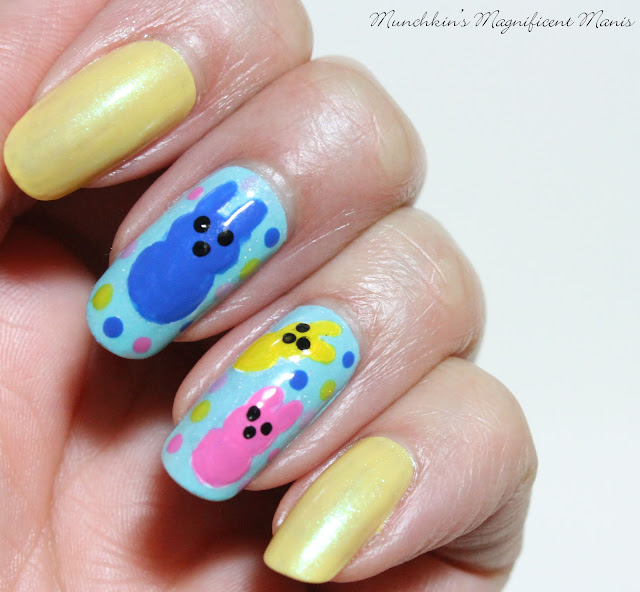
Now we will be creating the cute marshmallow bunny Peeps on our thumb, middle, and ring finger nails. For this design I did first make a outline with white paint for the bunnies then went over that with polish. 

First we will create the one blue bunny on the middle finger nail. Take a detail brush with white paint on it, this step is optional if you first want to make an outline, or you can always go straight in with polish. 

First make a small circle for it's head and then a little bit bigger one for it's body, then make two thick lines on the top of the small circle (it's head) that are rounded at the top for the two ears. Then let that dry and then you can go over that with polish, I used a blue polish ( OPI- My Pal Joey) for the bunny, you will need to go over this at least two times. Once again let that dry. 

Then we will make their little eyes and nose. With a small dotting tool with black paint on it make two dots on it's head for it's eyes and then another dot under that for it's nose. Peeps don't have a mouth, so that is all for their faces.

Next we will make the to smaller Peeps bunnies on the ring finger, for this nail just follow the same steps as we just did for the blue bunny, just make them smaller and two different colors, yellow and pink, and don't forget to make their eyes and nose too. 

Peeps Easter Nail Design    Peeps Easter Nail Design, on the thumb nail

Lastly to finish off our Peeps design we will create half of the bunny on our thumb nail. Once again we will create an outline with white paint. With a detail brush with white paint on it make a circle near the cuticle and then make to long bunny ears from that circle, let that dry. Then go over that with a light purple polish three times (I used Zoya Mini- Leslie.)

Once that is dry we need to make his eyes and nose. With a medium size dotting tool with black paint on it make two eyes and a nose right under those two circles.   

For a final touch I made a few colored dots around the Peeps Bunnies that where the same color as the Peeps; light purple, yellow, pink, and blue.

Peeps Easter Nail Design 
Peeps Easter Nail Design

Once you have your Peeps Bunnies design the way you like (almost ready to eat), apply a top coat to help your yummy design to last thought Easter.

Peeps Easter Nail Design
 Peeps Easter Nail Design
  Peeps Easter Nail Design

Hope all of you enjoyed this Peeps Easter nail design!

Happy Easter!  

See you next time for more nail fun!

Friday, April 12, 2019

Sally Hansen Insta- Dri Jelly Belly Polishes

Hello everyone! Today we will be take a look at a few polishes from the Sally Hansen Insta- Dri Jelly Belly collection. I only bought three of the polishes from the collection, two where in a set, their are a total of eleven polishes in this collection. I usually don't buy the whole collection of any polishes, just a few that might grab my attention and these where a few that somewhat garbed my attention.

Sally Hansen Insta- Dri- Jelly Belly Polishes  
Sally Hansen Insta- Dri Jelly Belly Polishes  

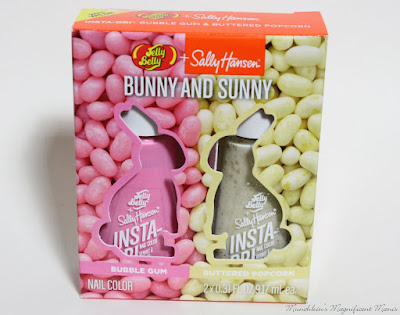
Out of all eleven polishes I got Peach (individual polish), Butter Popcorn and Bubble Gum (these two where in a set.) 

 Sally Hansen Insta- Dri- Jelly Belly Polishes
Sally Hansen Insta- Dri- Jelly Belly Polishes 
Bubble Gum and Butter Popcorn set 

All eleven polishes can be purchased on their own and their is also a few set that you can purcahse as well. Their are three duo sets, the one show above; Hopply Ever After with Berry Blue and Tutti- Fruitti and Some Bunny to Love with Coconut and Peach. 

Anyways let's take a look at these three polishes. 

Sally Hansen Insta- Dri- Jelly Belly Polishes 
Sally Hansen Insta- Dri- Jelly Belly Polishes in Peach and Bubble Gum
 

Jelly Belly Polish- Bubble Gum     Jelly Belly Polish- Bubble Gum
                             Jelly Belly Polish- Bubble Gum 
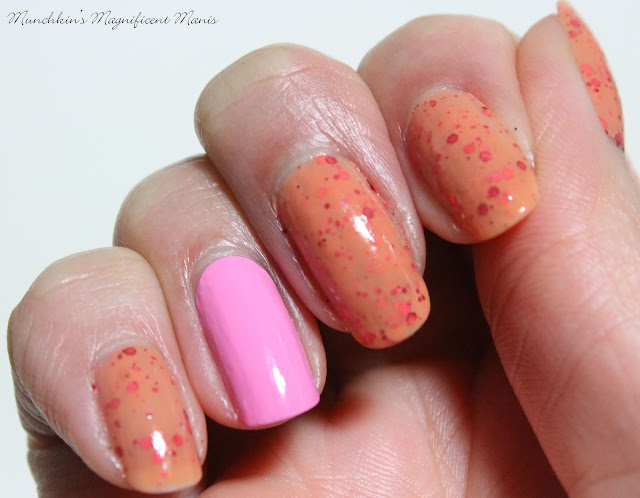
We will first start off with Bubble Gum, this is your basic bubble gum creme pink polish, their is really not that much to this polish. This polish applied for me in three coats, this color of polish I often have trouble polishing, the light color always seem to apply streaky for me, but as you can see on my nail (ring finger nail) it applied okay. 


Jelly Belly Polish- Peach  Jelly Belly Polish- Peach     
                    Jelly Belly Polish- Peach 

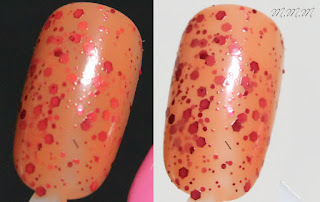
Next we have Peach, this is a crelly, orange polish with red glitter pieces in it. This polish is meant to be more on the thinner side (that's why it is a crelly) to show the glitter pieces. This polish applied for me in three coats, after a while this polish did seem to get thick and was a little hard for me to apply. 


Jelly Belly Polish- Butter Popcorn   Jelly Belly Polish- Butter Popcorn
                                    Jelly Belly Polish- Butter Popcorn 

Lastly we have Butter Popcorn this is also another crelly, this has a white base with gold glitter pieces in it. As you can see I don't have a photo of this polish on my nails, this unfortunately applied so terrible on my nails I had to take this polish off. This polish also applied thick for me and is a type of polish that I have trouble polishing (white polishes.)


Sally Hansen Insta- Dri Jelly Belly Polishes 
Sally Hansen Insta- Dri Jelly Belly Polishes  

In conclusion I was disappointed with these polishes, for me at least they did not apply well. This made me so sad that I didn't like these polishes, I really wanted to like them because I felt like Peach and Butter Popcorn where very unique polishes. I do like the concept of these polishes the Jelly Belly theme is cute. As stated above I did only purcahse three of the eleven polishes, so maybe the other polishes would be better.

As many of you know Sally Hansen has like a million different bottle's and formulas. This polish has a wide brush that I feel like held way to much polish on the steam and the brush it's self. On the box and website this polish clams to be one stroke, one coat, and dries in 60 seconds. As for the first two clams their are not true for when I applies them, as for the drying in 60 seconds, I am not sure I always wait along time regardless just to make sure my nails are dry.  

I did purchase these at Meijer and their was not really that many polishes on the display, this collection is limited edition I'm guessing for Easter, so hopefully if any of you are interested in these polishes hopefully you can still find them in stores.

The individual polish cost $3.99 at Meijer 

The set was $7.98 at Meijer        


Individual polishes at Target  $4.09
Sets Target  $6.59


Here is a link to Sally Hansen website as well, for the Jelly Belly Collection.   


Hope all of you enjoined this review of the Jelly Belly Collection from Sally Hansen even thought sadly it was not that great. 

See you next time for more nail fun!