Saturday, May 27, 2023

Home Run- Detroit Tigers Baseball Nail Design

Hello everyone! Today we will be create a design that is a little different, at lest for me, we are creating a sports nail design, the Detroit Tigers nail design. Recently my hubby took me to my very first baseball game. I am not into sports, but my hubby thought we should still go just to experience a game. I didn't really know what was going on during the game, but it was nice to experience a baseball game. So thought that I would create a Tiger baseball themed nail design, to celebrate my first baseball game, I guess. 

Detroit Tigers Baseball Nail Design

 Here are the polish and nail art tools used for this Tiger baseball nail design:

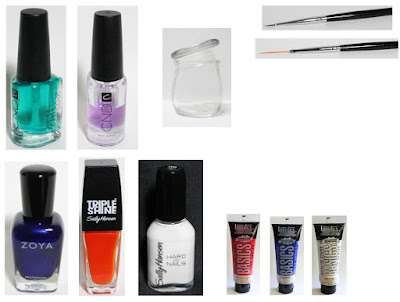
Base coat and Top coat- CND Stickey Base Coat and CND Super Shiney Top Coat.

Polishes- Zoya- Twinkling- Jen, Sally Hansen- Triple Shine- Play Koi, and Sally Hansen- Hard as Nails- Hard to get.

Acrylic paint- Red, blues and white.

Nail art brushes- thin detail and stripper brushes.

Other- small cup of water to clean off your nail art brushes. 

Detroit Tigers Baseball Nail Design

Apply a base coat to clean dry nails.

Let that dry.

Polish- 

*The Tigers teams colors are navy blue, orange and white.*

Thumb nail- dark/ navy blue shimmer polish (Zoya- Jen)

Index, middle and pinky nails- Orange polish (Sally Hansen- Triple Shine- Play Koi)

Ring finger nail- White polish (Sally Hansen- Hard as Nails- Hard to get.)

Let that dry.

Detroit Tigers Baseball Nail Design

Detroit Tigers Baseball Nail Design

Tigers Print on the Index, Middle and Pinky Nails:

We will first start off with the tiger print on the index, middle and pinky finger nails. This part is very simple on each side of the nails, with a blue or even black paint on a stripper brush make random lines, a few of the lines I did make them connect. 

Detroit Tigers Baseball Nail Design

Baseball on the Ring finger nail: 

Take a thin stripper brush with red paint on it kind of near the cuticle make a arch, then near the tip of the nail make another arch, then make small line on that arch for the stitches on a baseball. 

Detroit Tigers Baseball Nail Design

D for the Detroit Tiger on the Thumb Nail:

Lastly we have the hard part the Old English D for the Detroit Tigers. I always like to hand paint all of my nail art, if this is a little to hard you can maybe just leave this blue, or find a decal or a stencil. I also suggest if you want to also hand paint the Old English D have a picture to look at as a reference. 

If you do want to also hand paint the Old English D, take a thin stripper brush with white paint on it, staring with the curved part at the top of the D near the left side of the nail, then make a small curve on the side, a long line down the nail, another small curve, then another long arch. 

For the inner part, on the long line that we just made, make a U shaped curve, then another curve under that one. Then to divide the letter D make a thick curved line.

With a little space in between make another thick line similar to the line you just made, then on that line on the side make two small tall like shapes. Then in between make to curved lines to connect the thick liens that we made.

Lastly take thin detail brush with white paint on it and make all of your lines thicker, if they seem to thin. Hopefully this makes sense, making this D was very hard and hard to explain too.

Detroit Tigers Baseball Nail Design

Once your nails are game time ready, apply a top coat to seal in nail design and to help them to last though all of the innings.


Here is the practice version of the nail design that I did. 

Hope all of you enjoyed this nail design, and as always you can change things up to fit your states/ cites home team.

See you next time for more nail fun!  

Wednesday, May 10, 2023

KBShimmer Nail Polish Review

Hello everyone! Today on the blog we will be taking look at the Indie brand of nail polish KBShimmer. I recently purchased five polishes from the KBShimmer website, they where just random polishes that I thought would look pretty, not realizing two where from the Plant One On Me Collection and the other three where from The Lounge Set. Three out of the five polishes are a new to me formula, reflective polish. This brand is not new to me I have purchased from them in the past and I did enjoy the polishes back then, so I figured why not buy from this small brand again. 

KBShimmer Nail Polish Review

KBShimmer Nail Polish Review

Here are the polishes that I purchased from the Lounge Set, Their are 9 polishes in this collection. You can really see the silver reflective glitter in the photo above. 

KBShimmer Nail Polish Review

Here are the polishes from the Plant One On Me Collection, their is also 9 polishes in this collection.

The Lounge Set, the polishes that I have are reflective polishes, this means that there are small reflective glitters in the polish that make the polish very shinny in the light. I have also heard reflective polish described as the same material that is in a reflective stop sign.  

Let's take look at all 5 polishes on the nails. 

KBShimmer- Lounging Around- Reflective

KBShimmer- Lounging Around- Reflective

KBShimmer- Lounging Around- Reflective

KBShimmer- Lounging Around- Reflective

First we have Lounging Around this is described as a electric aqua/ blue reflective polish. It is said that when the light hits this polish it can shift from blue, indigo, purple, in brighter light emerald and turquoise. I would say that I did see the aqua blue and the emeralds. 

This polish is very glitter heavy, I put two coats of top coat to try and get this polish to be smooth, but maybe the top coat I use the CND Super Shiney top coat is more on the thin side, so it might be best to use a thick top coat if you want these to be more smooth.

This polish was opaque for me in two coats, and did apply well. At the end of the week the reflective polish I figured would be hard to remove so I soaked them off, which is just taking a cotton ball with regular acetone/ nail polish remover and rapping the nails is foil and letting the soak for about 5mins. 

KBShimmer- Lounging Around- Reflective

These polish are suppose to look very reflective and super shinny with a flash light hitting them. Here is the polish with my cell phone light hitting the nails. I feel like this photo doesn't even do this polish justice, it looks even more amazing in real life. 😯

KBShimmer- Love You Brunches- Reflective

KBShimmer- Love You Brunches- Reflective

KBShimmer- Love You Brunches- Reflective

KBShimmer- Love You Brunches- Reflective

Next we have Love You Brunches, which is decried as a purple/ violet reflective polish, with silver reflective glitters in it. This polish is said to have a shift of copper, magenta, gold, and bronze. For this polish I would say that I do see the magenta shift in it, and even a light blue shift. 

This polish was opaque for me in two coats, and did apply well. Just like the blue polish this is a very thick glitter polish. 

KBShimmer- Love You Brunches- Reflective

Once again here is the polish with a flash light/ cell phone light hitting the nails, to show how reflective the polish is. 

KBShimmer- There's A Nap For That- Reflective

KBShimmer- There's A Nap For That- Reflective

KBShimmer- There's A Nap For That- Reflective

KBShimmer- There's A Nap For That- Reflective

Lastly from the Lounge Set/ Reflective polish is There's A Nap For That this is a pink/ berry colored polish, with silver reflective glitter in it. It is said to shift from red, orange, to a gold. For this polish I would say that I do see the red and gold shift.

This polish was also opaque for me in two coats, and again was thick because of all the glitter.  

KBShimmer- There's A Nap For That- Reflective

Here is the polish 
with a flash light/ cell phone light hitting the nails, to show how reflective the polish is. 

The next polishes we will be taking a look at is from the Plant One On Me Collection. For these polishes for some reason I didn't take enough photos, so there is only three of each.😕 

KBShimmer-  Lilac It Or Not

KBShimmer-  Lilac It Or Not

KBShimmer-  Lilac It Or Not

First we have Lilac It Or Not, this is described as a light blue or periwinkle blue, with holographic flakes. This polish shifts from a lavender and purple, and also has an icy blue look to it from the shimmer.

This polish was opaque for me in three coats and applied well, these were more on the thin side.  

KBShimmer-  Before & Aster

KBShimmer-  Before & Aster

KBShimmer-  Before & Aster

Lastly from the Plant One On Me Collection is Before & Aster this is purple polish, that has holographic flakes in it. This shift to pink, a hint of copper, green and gold. 

This polish was opaque for me in three coats, this polish and Lilac It Or Not have the same formula and are not as thick and glitter as the reflective polishes. 


In conclusion I loved all of these polishes! I have been eyeing reflective polishes for a while now and I wish I would have gotten some sooner, I am still glad that I did final get some. The reflective polish look even more amazing and shinny in real life, then in photos or video. 

Also the other non reflective, the ones with holographic flakes I loved just as much. I do highly recommend all of these polishes. I personally have been liking Indie brand more anyways because of how unique they are, and you can't find polish like this in a store. 

Here is the link to the polishes the_lounge_set- The Reflective Polishes $11 Each USD, Collection $99 USD (I just linked the whole collection) 

plant-one-on-me collection $12 Each USD, Collection $99 USD.

Hope all of you enjoyed this KBShimmer review! 

See you next time for more nail fun! 😊💅🏼