Friday, April 24, 2015

Rain drops keep falling on my nails!

Hello everyone! April is known for being a rainy month (even though it is actually almost over with), for this weeks nail design I thought that I would show all of you a rainy day themed nail design, that actually looks like rain drops on your nails along with some clouds in the sky. Also their is no water involved in this tutorial. 
 
Rain drop and clouds nail design
 Rain drops keep falling on my nails! Rain drop and clouds nail design


Here are the nail polishes and nail tools used for this rainy day nail design-


Base coat and top coat- Nicole OPI-  3in1- base, top, & strengthener, Revlon Extra Life No Chip top coat, and NYC- Matte Me Crazy topcoat.

Nail polishes- NYC- Water street blue, Pop-arazzi- The Hue is Blue, and Sally Hansen- xtreme wear- White on.

Nail tools- three different size dotting tools; an extra large, large, and medium size dotting tools.


The skill level for this rainy day nail design is:

  Beginner basic

This design is very simple, it just consists of random dots for the rain drops. For the clouds this also consist of more dots to form the clouds. 
 
Let's start this lovely looking rain drop tutorial!

1. Apply a thin layer of base coat to protect your nails.

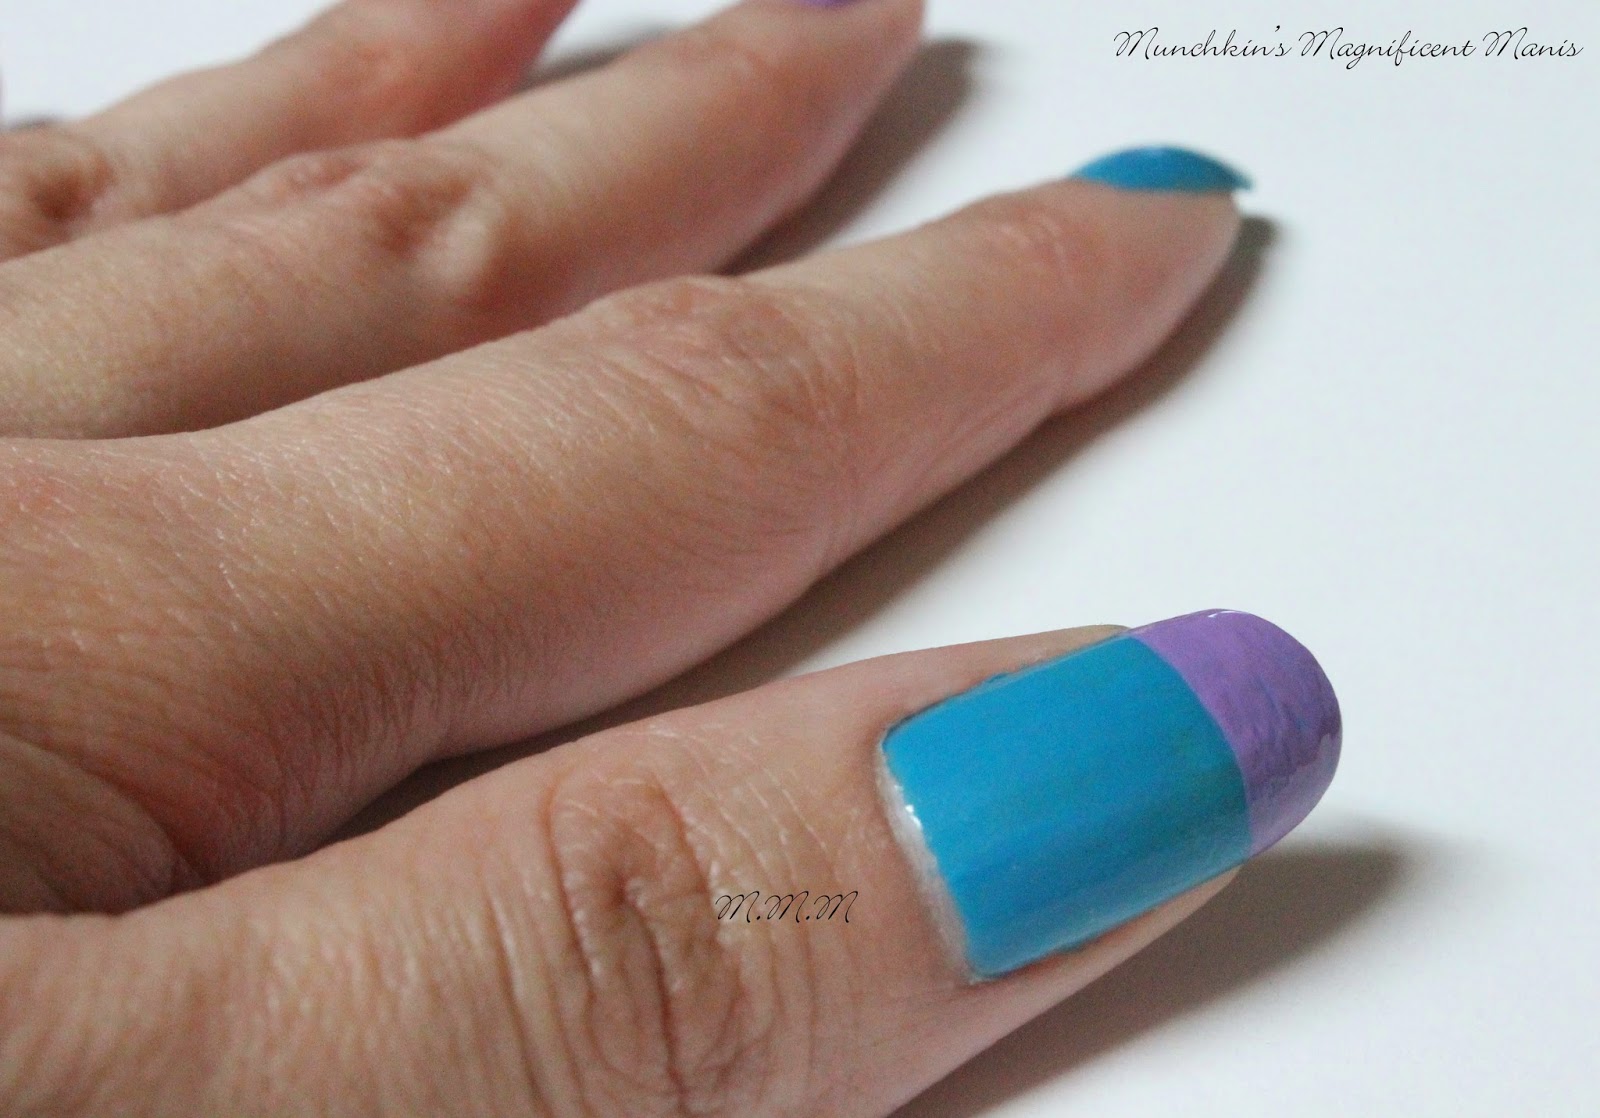
2. Once your base coat has dried, apply a light sky blue to your thumb and ring finger for the blue sky. Then apply a little bit darker blue to your index, middle, and pinky nail. Then let these two colors dry. 

3. Once your nails have dried, its time to do step one of giving your nails that rain drop effect. For just your index, middle, and pinky nail apply a matte top coat, this will help to make your rain drops pop and show up on your nails. Then leave your ring and thumb nail that are painted a sky blue with no top coat until the end. 

 4. As we wait for the matte top coat to dry, we will start on the clouds. Take your extra large dotting tool dipped a generous amount of white polish, then lightly dot two dots right next to each other on the top of where you want to start your cloud. You may have to keep dipping your dotting tool in polish each time you make a dot, to make sure your dots will come out.

5.Wipe your dotting tool off on a paper towel or napkin, then dip the dotting tool in white polish again, then make two more dots under the first dots you made to start to make a cloud shape. 

6. To finish your cloud you may once again need to wipe your dotting tool off, then dip the dotting tool in white polish. Then on the other side of the cloud shape, dot one more dot to finish your cloud. 
For the clouds repeat step 4- 6 as many time as you like to fill up the nail, just remember to leave a little bit of light blue showing. Also do the same thing on your thumb nail.


7. Once you have the desired amount of clouds on your ring and thumb nail, we will go on to the next step of make the rain drops. Take your extra large dotting tool dipped into a generous amount of clear polish or top coat, then dot random dots on your nail. Repeat this step with different size dotting tools, a large and medium sized dotting tool along with your extra large doting tool. You may have to go over the dots a few time to get them to show. The first coat when it dried did become a little flat, but once I added another layer to the dot it was better.

Rain drops and clouds nail design
Once your nails have dried apply a top coat to only your thumb and ring finger nails. For your rain drop nails just let them dry, do not apply a top coat. Now you have realistic looking  rain drop with clouds. 

As always, you can do all the rain drops on your nails or even do every other nail with rain drops and clouds. Also this design, like most designs, is inspired by a design that I found on Pinterest, that I make my own. But to be fair I will still give them credit Inspired rain drop nail design    

Hope all of you enjoyed this cool rain drop and cloud nail design!

See you next time for my next design tutorial!

Friday, April 17, 2015

Spring Delight- Zoya Spring 2015

Hello everyone! Now that it is officially Spring and the weather is starting to feel much more livelier, I felt like discussing a new, bright Spring nail polish collection from Zoya with all of you. Recently, Zoya came out with a new Spring collection for 2015, called the Delight collection. This collection is made up of bright pastels with three shimmers or metallic, (as described on the Zoya website) and three regular pastels.

Zoya Delight minis
    Zoya Delight minis 

On the Zoya website around Easter they had a deal for the minis in the Delight collection, buy five mini's for $20 with free shipping, or you can get faster shipping you would just have to pay a little more. As stated above their are six colors in the collection, but for this deal for some reason you could only get five for $20, which would have been nice if you could get the whole collection for the same amount.

So I decided to order these to give them a try for all of you.

Zoya spring 2015 color chart
 Spring 2015 color chart

The mini's came with a color chart brochure with all of Zoya's colors that you can buy. I think the recent brochure comes with every order that you make. 

Zoya Delight color swatches
  Delight book that the tray was in, Delight color swatch tray, 
and the tray flipped over to show the actual finish. 

This time when I ordered from Zoya, they gave me these acrylic trays with the swatches of all the colors from the collection. This is kind of a nice way to see all the colors from the collection and if you did not buy all them, you can see how they would actually look. Also, you do have to flip the tray over to see the actual finish.

Zoya Naturel Satins color swatches
 Naturel Satins book that the tray was in,Satins color swatch tray, 
and the tray flipped over to show the actual finish. 

Zoya also put this in the order as well, to show the new Naturel Satins collection.I did not purchases these colors.

Now to show the mini's that I got in the Delight collection.

Zoya Delight minis
 For the minis Zoya put the polishes in a cute colorful box. 


Zoya Delight minis

Staring from left to right:

Rayne is a shimmery light blue with green shimmer. Or as Zoya describes as a metallic blue with a turquoise flash. The formal on all of these colors was good. This polish was a little bit sheer though. 

Daisy is another shimmery color. This is a yellow with some green shimmer in it as well. Also described by Zoya as a yellow metallic with a turquoise flash. This polish was also a little bit sheer.

Leslie is another shimmer, a purple shimmer with yet again some green shimmer in it. This once again was a little sheer. 

Lillian is a cream blue or aquamarine. When I looked at this in the bottle it looked a little more greenish blue, then once I put it on the nail it looked more blue to me. This color was just a little bit streaky but easy to fix. 

Eden is another cream, a bright pink. This color was pretty good on coverage and opacity. 

Tiana is a light minty green cream. As for this polish I am unsure how it applies because I did not purchase this one.

Rayne miss print
Just a side note. I notice on my mini that on the box the name was correct Rayne, then on the bottle the name was miss spelled Payne. This was the only one that had this miss print on it. If any of you reading this blog that have purchased the minis, did any of you have a miss print on your polishes? 

Zoya Delight collection 2015
Left hand; thumb, index and pinky nail Rayne, middle finger nail Daisy,
 and ring finger nail Leslie.
 
Zoya Delight collection 2015

 Right hand; thumb, index and pinky nail Rayne, middle finger nail Eden, 
and ring finger nail Lillian 

As for the Delight collection, this collection is very nice it had a nice range of shimmers and creams. As stated above the shimmers where a bit sheer but easy to fix. For the shimmers Rayne, Leslie, and Daisy due to them being a bit sheer I did have to apply three coats to be opaque. For the creams Lillian and Eden, Lillian was a bit streaky but easy to fix, due to it being streaky I did have to apply three coats. Eden applied pretty good with two coats to be opaque. I do always apply very thin layers of polish every time I paint my nails, so application could be a little bit different for everyone depending how you apply the polish.  

I would recommend the Delight mini collection. With the minis this is a great way to try a polish. The Zoya minis do give you a good amount of polish and the brush is easy to us.

Zoya full size, Zoya mini, OPI mini
  Zoya mini next to a regular size Zoya polish. Zoya mini next to an OPI mini.

The Zoya minis have 7.5ml/ 0.25fl.oz, the regular size 15ml/ 0.5fl.oz. which is a good amount for a mini. Just a comparison, OPI in their minis they give you 3.75ml- 1/8 fl oz, so I would say for the Zoya minis compared OPI you get more for your money. 

The Zoya minis you can buy on Zoya Delights- mins
Unfortunately the five for $20 deal is no longer available, but you can still get the minis for $5 each. You can also purchase the full sizes for $9 each or $54 for all of the full size polishes. Zoya Delights- full size
Also Zoya.com does have a lot of deals on their website, so if you enjoy these polishes be on the look out for great deals on their website.On their social media, such as Facebook they announce their deals as well.  

Hope all of you enjoyed this review of the Zoya Delight collection!

See you next time for my next design tutorial! 

Friday, April 3, 2015

Happy Easter!

Hello everyone! Sorry for the lack of a post last Friday, we had some power issues last weekend when I usually work on the M.M.M blog, so I could not work on a blog post. Now everything is good! For this Friday, Easter is coming Sunday April 5, and what better way to dress up for Easter than to dress up your nails with a cute Easter design.

Happy Easter!
Happy Easter! Final left hand nail design.


 Here are the polishes and tools used in this Easter nail design:
nail polihses and nail tools

Base coat and top coat - Revlon Extra Life No Chip top coat and - Nicole OPI-  3in1- base, top, & strengthener.

Nail polishes- OPI mini- Hawaii- Suzi shops & island hops, NYC- Water street blue, Sally Hansen- Hard as Nails - No hard feelings, Sinful Color- Cinderella, Sinful Color- Mint Apple, Sinful Color- HD Nails, NYC- Brownstone, Milani- Quick Teal, Sally Hansen- xtreme wear- White on. Optional polish- Revlon- Rebel graffiti.

Nail art stripper polishes- Kiss nail art- White and Black.

Nail tools- Glass jar with nail polish remover to clean nail art brushes, extra large dotting tool, large dotting tool, thin nail art brush, and a small nail art brush.


The skill level for this Easter nail design is:

 
Beginner

This nail design is in between beginner and intermediate. Most of the design is simple with dots, simple lines for the eggs, and the flowers and glass for the most part is simple to create. The only part that might be considered intermediate is the chocolate bunny in the basket and the bunny on the other hand.

Let's begin this cute Easter theme nail design!

1. Start off by applying a thin layer of base coat to all of your nails.  

2.Once your base coat has dried, paint your thumb and index nail a light blue, your middle finger nail a light purple, your ring finger a lighter blue, and your pinky nail a light pink.

* If you are wondering why the position of my hand/ nails has changed in the photos. I have been trying to improve my photos since I started this blog. The way I would position my hand when I take the step by step photos was unconformable and would hurt my wrist after a while, so I thought this way would be more better. 

3. On the thumb nail we will be making a chocolate bunny in a basket. Start off by taking your purple polish and paint a wide french tip, by just swiping the polish from one end to the other.  

4. Next we will make the handle for the basket. Take your white nail art stripper polish, and kind of outline the nail to make a handle, by drawing a line on both sides and near the cuticle, you can always go over the lines a few times to make the lines thicker.

5. Now we will start the chocolate bunny. Take your small nail art brush dipped in brown polish and make a circle right in the middle of the basket. Then take your large dotting tool dipped in brown and make two dots under the bunny's head for paws. 


6. Now for the bunny's ears. Take your large dotting tool dipped in brown polish, start at the top of the bunny's head and drag the dotting tool down until the ears connect to the head. 

7. To finish the small detail for the basket, we will add some lines to the basket. Take your white nail art stripper polish, staring on the sides make three horizontal lines across the basket, then five vertical lines going down the basket. 

8. As we let the bunny dry, we will go on to the index nail. We will be making dots on this nail for an Easter egg. Take your large dotting tool dipped in purple, pink, teal or green, then dot the colors on the nail. Make sure to clean off your dotting tool in between colors. 

9. For the middle finger nail we will be making a Easter egg. Take your thin nail art brush dipped in a teal polish, draw a thin line near the tip of the nail and the cuticle.

10. Then under the thin line, make a thicker line, then a squiggly line under that line.

11. Then under the squiggly line, make a zig- zag line under that line by makeing small triangles. For the pinky nail repeat step 10 and 11, just use a purple polish to make the lines. 

12. Next we will make flowers and grass. Take your thin nail art brush dipped in light green polish and make different size lines on the tip of the nail, for grass.

13. Then clean your brush off and dip it into a darker green polish, and add more lines next to the light green lines. Make sure three of the lines are taller for the stems of the flowers. Then add two lines on the sides for the leaves. To make the flowers, dip your thin nail art brush in purple then make a curved shape, and three points to make a flower. Do this two more times with pink and teal polish to make two more flowers.  

14. Now your bunny should be dry, so it's time to finish it. Take your extra large dotting tool dipped in black polish and dot two eyes.


15. Then take your large dotting tool dipped in a light pink polish and make a nose. Then to add a small detail to the ears, take your large dotting tool dipped in light pink and go over the ears, with out covering the brown part of the ears. Also the bunny's whiskers (shown in the photo below) take your black nail art stripper and draw two slanted lines next to the nose.

easter nail design
 Right hand Easter design

Once your Easter design has dried fully, (yes make sure it has dried fully) before applying a top coat. I actually top coated too soon on the other hand and smudged the bunny a little bit. 


easter nail design

Left hand Easter design
For the right hand I changed the design just a little for a different look. On the thumb nail I just painted a large white bunny. This is done the same way as the chocolate bunny just larger. To create the bunny refer to steps 5-7 and steps 14 and 15. Then on the middle and pinky nail for a different kind of egg, I went for the speckled egg look by taking a black and white glitter like polish ( I used Revlon's Rebel graffiti.)
For this design you can always do the same design for both hands or change it up just a little, like I did. 
Hope all of you have a wonderful Easter and as always hope all of you enjoyed this cute Easter nail design.  
See you next time for my next design tutorial!