Saturday, March 16, 2024

Spring Time Swirls- Swirl Nail Design

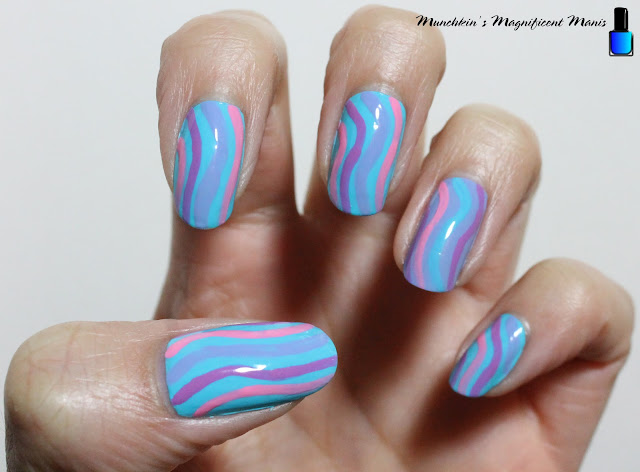
Hello everyone! Today on the blog we will be creating a simple swirl design. When I was looking for inspiration I thought it would be fun for spring a summer time to create a swirl bright color design. This design is supposedly is trending this year.

Swirl Nail Design

Here are the polishes and nail art tools used to create this nail design: 


Base and top coat- CND Stickey Base Coat and CND Super Shiney Top Coat.

Polishes- Sally Hansen- Insta Dri- Peeps Blue, Finger Paints- Heavenly Hues, Zoya Sunshine- Delia, and Sally Hansen- Insta Dri Jelly Belly- Bubble Gum.

Nail art brushes- Thin detail brush.

Other- Acetone and water to clean off your nail art brush.

Swirl Nail Design

Apply a base coat to clean nails.

Polish- This is your base colors.

Thumb, index, middle, pinky finger nails- Light blue (Sally Hansen- Insta Dri- Peeps Blue.)

Ring finger- Periwinkle blue (Finger Paints- Heavenly Hues)

Let that dry.

Swirl Nail Design

For this design I just switched the colors on each nail, from purple, pink, and periwinkle, with the light blue base. Then with the periwinkle base you would use purple and pink again and just add the light blue for the swirls. 

Swirl Nail Design

Swirl Nail Design

Swirl Nail Design

For this design it is very abstract with random lines. For this design I jump around from each nail for each color. First take a thin detail brush with a periwinkle polish on it and staring on the middle of the nail make a swirl line (this is for the nails with a light blue base). 

For the ring finger nail with a periwinkle base use the light blue polish to make your first swirl. 

Then for the other swirls switch between pink and purple, just make sure the other swirls are  right next to each other, leaving space in between each swirl so that you can still see the base color.   

Swirl Nail Design

Once you are happy with how your swirl nail design look, apply a top coat to seal in your design and to help it to last. 

Swirl Nail Design

Swirl Nail Design

If you want to go even more simple you can just put the swirl design on the ring finger and the thumb nails, and leave the other nails with no design.

Also as with any design you can use any colors that you want, you can use more spring colors, very bright colors for summer or later in the year you can use fall or winter colors. 


Here is the practice version.

Hope all of you enjoy this swirl nail design!

See you next time for more nail fun!


Tuesday, February 13, 2024

Happy Valentine's Day 2024 Nail Design

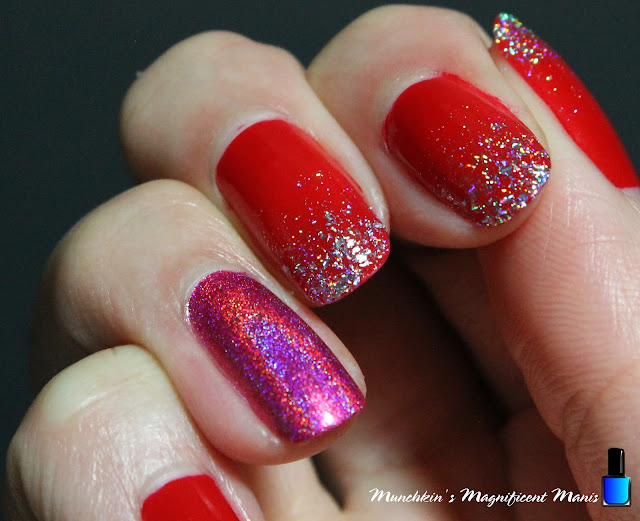
Hello everyone! Happy Valentine's Day! Today on the blog we will be creating a simple and pretty glitter gradient with a heart accent nail. This year I decided to keep the Valentines Day design simple and I was actually inspired to do a glitter gradient from the new years glitter gradients that I always do, I just thought it would look pretty to do a glitter gradient with a red polish. 

Valentine's Day Nail Design

Here are the polishes and nail art tool used to create this V-day nail design: 


Base and top coat- CND Stickey Base Coat and CND Super Shiney Top Coat.

Polishes- Zoya- Renee- Redbook trio, Finger paints- Cubism Crimson, Holo Taco- Hot - Wire Pink- Electric Holo Collection, Cirque- Madder, Holo Taco- Flakie Taco, and Holo Taco- Scattered. 

Nail art tools- Thin detail brush and a makeup sponge for glitter gradients.

Other- Water to clean off nail art brush. 

Valentine's Day Nail Design

Apply a top coat, let that dry.

Polishes- 

Thumb, index, middle, pinky- A shimmer red (Finger paints- Cubism Crimson, I used on the left hand.) or a cream red ( Zoya- Renee, I used on the right hand.)

Ring finger- Holographic hot pink (Holo Taco- Hot - Wire Pink.)

Let that dry.

Valentine's Day Nail Design

Valentine's Day Nail Design

Glitter Gradient on the Thumb, Index, Middle and Pinky Nails- 

First take your silver flakie holo polish and polish that a little bit on the tip of the nail. Then take a makeup sponge, polish that same flakie polish on that sponge and dab that on the tips of the nail, focusing most of the glitter on the tip of the nail.

Repeat this for all four nails.

Then take your silver scattered polish and polish over the flakie and going a little past the glitter that you dabbed on to give a gradient effect. Basically larger glitter more at the tip and small glitter near the middle of the nail, for that gradient look. 

Valentine's Day Nail Design


Heart Design on the Ring Finger Nail- 

For the accent nail or the ring finger nail, take a detail brush with red paint on it and make a heart shape, I always do this first even if I am going to go in with polish later. Then go over that heart shape that you just made with a red holo polish (Cirque- Madder). I make my heart upside down for photo purpose, if this is a little heart to do you can alway make the heart facing you.

Valentine's Day Nail Design

Once your nails are Valentine's Day ready, apply a top coat to seal in your design and to help it to last. 

If you would like an even simpler option, below is just a glitter gradient and the accent nail/ ring finger nail just has a the pink holo polish with no heart. 

Valentine's Day Nail Design

Valentine's Day Nail Design

Valentine's Day Nail Design

Valentine's Day Nail Design

Valentine's Day Nail Design


Lastly here the practice version, where I tried different reds, and even some heart glitters. 

Hope everyone has a good Valentine's Day and I hope all of you enjoy this Valentine's Day nail design!

See you next time for more nail fun! 

Saturday, February 10, 2024

I'm A Cookie Monster- Cookie Nail Design

Hello everyone! Today on the blog we will be creating a fun cookie nail design to be specific a chocolate chip cookie nail design. I love all things chocolate and dessert and I just thought it would be fun and cute to make a cookie nail design. If you are a cookie monster just like me then this nail design is just for you. 

Cookie Nail Design

Here are the polish and nail art tools used to create this cookie nail design:


Base and top coat- CND Stickey Base Coat and CND Super Shiney Top Coat. OPI- Matte Topcoat (for the chocolate look on one nail.)

Polishes- Zoya- Splash- Maren, Finger paints- Tiffany Imposter, Nicole by OPI- That's Just Plain Nuts!, and Holo Taco- Fairy Tail- Magnetic Magic Collection. 

Acrylic paint- Brown.

Nail art brushes- Thin detail and stripper brushes. 

Other- Water to clean off nail art brushes.

Cookie Nail Design

Apply a top coat, let that dry.

Polish- 

Thumb- a dark blue (Zoya- Maren)

Index, middle, and pinky- a light blue (Finger paints- Tiffany Imposter)

Ring finger nail- a brown cream polish (Nicole by OPI- That's Just Plain Nuts!) 

Let that dry.

* Also apply a Matte top coat over your brown polish on the ring finger nail. *


Cookie Nail Design

Large Cookie on the Thumb Nail: 

First we will start off with the large cookie on the thumb nail. Take a detail brush with brown paint on it and make a large circle on the middle of the nail and fill that in, you will need to go over that a few times to be opaque. 

When that is dry take the brown polish that you used on your ring finger nail and we will make the chocolate chips. With that same clean detail brush with a small amount of brown polish on it make some random shapes for your chocolate chips.

The nice part of this design is the cookie doesn't need to be a perfect circle along with the chocolate chips. 😊 

Cookie Nail Design

Small cookies on the index and pinky nails:

Next we will make some very small cookies on the index and pinky nail. Once again take your small detail brush with brown paint on it and make a few small circles, on both nails I made four circles. Some of the circles I did make half circles. 

Then repeat the same steps that you did for the large cookie just for the smaller cookies. 

Cookie Nail Design

Half Cookies on the Middle Finger Nail: 

For the middle finger nail we will make one cookie that someone bit and one half cookie.
For our half eaten cookie make a large half circle near the cuticle, the way I made this was I made the half circle fill it in and then wiped away the area that I made the bitten part and made a triangle shape for the bit mark. 

Once again repeat the same steps you did before for the other cookies. 

Cookie Nail Design

Chocolate Ring Finger Nail: 

On your ring finger nail that has the matte top coat, this gives a nice chocolate look to it. We will now add a chocolate drizzle on it. Take a more shimmery brown polish (I used Holo Taco- Fairy Tail) and with a stripper brush make some random lines all over the nail. 

Cookie Nail Design

Once your cookie nails are good enough to eat, apply a top coat to seal in your nails and to help them last. 

Hope all of you enjoyed this cookie nail design!

See you next time for more nail fun! 

Saturday, February 3, 2024

Holo Taco Review- The best and worst

Hello everyone! Today on the blog we will be taking a closer look at the nail polish brand Holo Taco. This brand is created by YouTuber Cristine of Simply Nailogical/ Not Logical in 2019. She now has hundreds of polishes from creme, glitter, iridescent, and of course holographic polishes in her line. I have purchase quite a few polish from her line and today I will be ranking them from best to worst. 

I do not have every polish form the Holo Taco line, also the polishes that I do have I will only rank the ones that I like the most to lest, so not all of the Holo Taco polishes I own will be included in the post.   

We will start on a positive note. 😊

holo taco rainbow collection-

The Rainbow collection, this was a seven piece collection that came it 2020. This collection is my favorite because I feel like Cristine does linear holo polishes the best. The polishes have really good formulas apply very smooth. I feel like I always reach for this collection, that this is the collection that I use the most. My most favorite polish is Blue Freezie. 

Holo Taco Electric Holo

Second we have the Electric Holo collection from 2021. Another collection that I reach for quite often. Once again this is a linear holo formula that I just love. My most favorite is Electric Holo the blue polish. 


Third we have two of the topper from Holo Taco's first collection in 2019, Scattered Taco and Flakie Taco. I use both of these polishes a lot, they are great for glitter gradients and to make any polish have some holo to it. There is also a linear holo polish with this collection along with a blue and black creme polish (which I don't have), the linear polish I don't use that much.


Holo Taco Vacation Collection-

Fourth we have The Vacation collection from 2023, if you been taking a look a the M.M.M blog for a while now you know I love tropical nail art, theme and colors. For this collection it is one of my favorites because of the theme. My favorite polish is Never Tide Down the blue. (I love the color blue.) 

Holo Taco- Lite Mode

Fifth we have Holo Taco- Lite Mode from 2022, this collection just has some pretty polishes that I like with. a good formula. my favorites are Wireless Mode the blue, Lite Link the green, and Flash Drive the purple. 

Now that we are get further down the list we will get to the lest liked polishes. 😕


Holo Taco Magnetic Magic

Sixth we have Holo Taco Magnetic Magic collection from 2022. I polishes are very pretty, it was just I could not get the magnetic polish to work that well, the only polishes that I feel like work the best where Love Spell the pink, Wicked Potion the green and Fairy Tale the brown. Twice in a Blue Moon the blue, and Queen's Curse the purple I could not get the magnetic features to show very well. 

 
Holo Taco one coat chrome collection

Seventh is the one coat chrome collection from 2023, unfortunately this is one of my lest favorite collections the polishes are very pretty, it is just the formula is very hard to work with and I felt like the polish didn't wear as well unlike the other Holo Taco polishes.


Holo Taco Frosted Metals Collection

Tied for seventh is the Frosted Metals Collection. In the beginning I really did like this collection, unfortunately with time these polishes have changed in color. I recently wore these polishes again and realize the colors didn't look as vibrant. 

* I took these photo with my iPhone, all other photos on my blog are take with a Cannon SLR camera. 

As you can see the blue Cold Shoulder, now looks like a denim blue. Fake Date on my thumb is a faded pink. Cheap Champagne is not a bright orange. On the second photo Fake Date and Cheap Champange look like the same polish. The green polish Mint Money still looks ok. 


As you can see in the bottle Cold Shoulder don't look the same. I did see online that some peoples polish really turned and doesn't even look blue at all, so I guess my bottle doesn't look to back. This polish was retired on the Holo Taco website, I think it was due to formula issues.  

In conclusion I do love and highly recommend Holo Taco polishes. I just think that Holo Taco does holographic polish the best and they do need to work on the other formulas just a little more. The issue with the frosted metals collection it can happen where after time the polish does turn, it has happen to me before with another nail polish brand, it is just sad to see that after time these polishes are not the same color, after all these polishes are not cheap.

Hope all of you enjoyed this Holo Taco review.

See you next time for more nail polish fun!