Friday, September 26, 2014

Purple Frenzy- Glitter Gradient Design


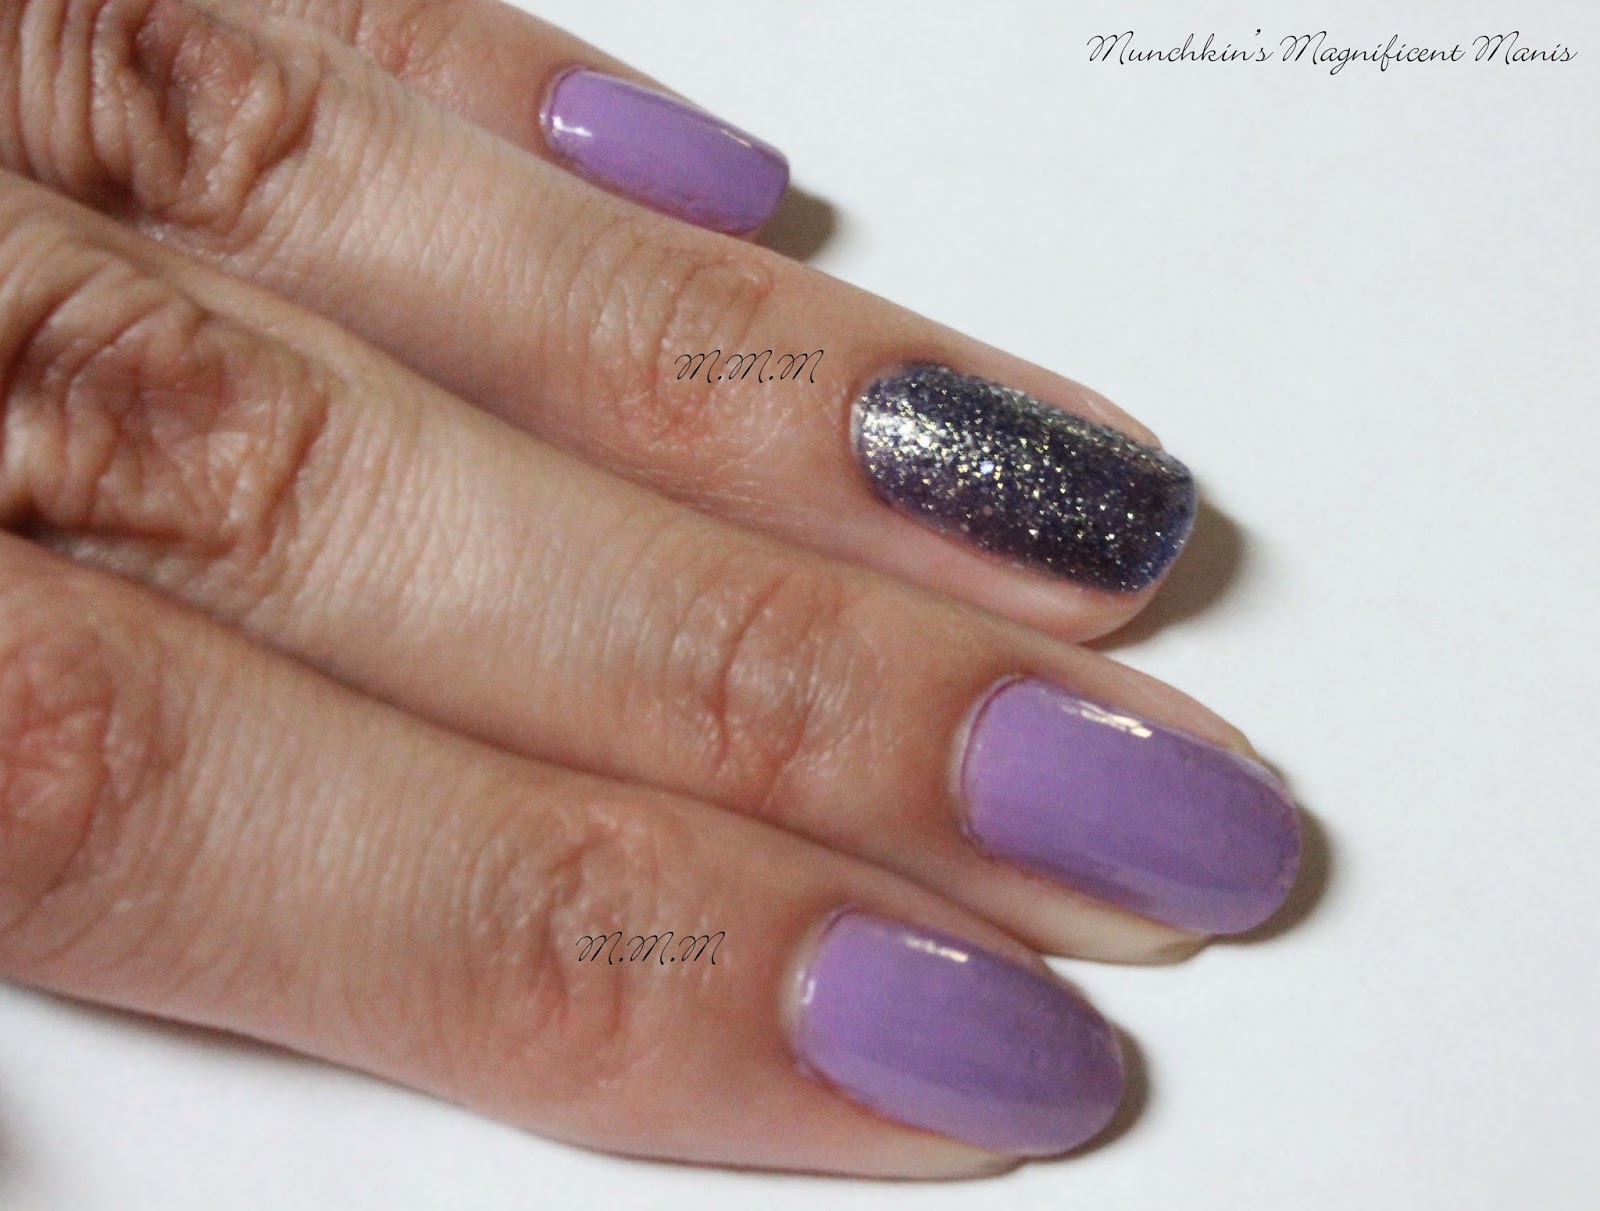
Hello Everyone! For today's design I wanted to keep it very simple. I know that some people like to keep it simple and not always do a really wild design (like I often do). So for those people, today I just did a solid color, with a textured polish on one finger nail, and then sponge on a glitter polish over the solid color to create a gradient glitter design.  


Polishes and tools used for this design:

Polishes: Revlon Extra Life No Chip top coat, - OPI nail envy- nail strengthener/ base coat, 
Sally Hansen- No hard feelings, L'Oreal- textured polish, Too dimensional, and Sinful Color- Frenzy.
Nail tools- Make-up sponge (or cosmetic wedge.)


The Skill Level for this Glitter gradient design is: 

Beginner/ Basic

This glitter gradient design is very simple, all that is required for this design are just two very simple steps of painting all of your nails a solid color an adding glitter to the tips with a sponge. 

Just a side note:

As you may have notice on the polishes I use, I added a nail strengthener/ base coat to the list. If you have been following the M.M.M blog I have stated that I don't use a base coat. So after a few months of doing research I decided to give Opi Nail envy for sensitive and peeling nails a try. My nails have the problem of peeling way to much at the tips of my nails (they have different formulas for different nail issues.), I heard a lot of good reviews about this, so I thought I would give this a try. The only thing that was holding me back is the price: It costs $17.95 with tax $19.03! (you know how I feel about spending a lot of money on polishes) Hopefully this works well, I will keep all of you posted on how this product works out for me. 

Here is the Opi nail envy, nail strengthener in the box. 
I bought this at Ulta for $17.95


Anyways, now to the fun part the nail tutorial.

 1. Apply your base coat.


2. Paint all of your nails a light purple except your ring finger. 


3. For an optional different look paint your ring finger with a darker purple textured polish. Another method is that you can paint your all your nails light purple for a gradient glitter look. 

4. For the last and final step. Take a make-up sponge and cut it in half, then take your glitter polish and paint the sponge with a liberal amount of glitter polish (if needed to you can repaint your sponge and dab the nails as much as needed.) Then dab the tips of your nails with the sponge (make sure their is more glitter near the tips of the nails), then keep dabbing the glitter until you get half way down the nail (when you get the this point dab only a little bit of glitter polish.) When you are finished the bottom of your nail should have no glitter on it, and their should be a lot of glitter at the top of the nail that almost fades into less amount of glitter. 


Once your nails have dried, finish this glitter gradient look with a top coat. When it comes to textured polish you are not suppose to add a top coat, but I normally do anyways. I just make sure not to put to much top coat on because if you do decided to put top coat on a textured polish and you put too much it can smooth-in out your texture polish. 


 Purple Frenzy, Gradient glitter design.

As with any design you can always change the look. Like with this look you can use what ever color you want with any glitter or textured polish. So have fun mixing and matching colors to create any cool color gradient glitter design. 

See you next time for my next design tutorial!


Friday, September 19, 2014

Apple Picking

Hello everyone! It's that time of year again when you go to the apple orchard to get fresh cider, donuts, pies, and of course, apples! Maybe even go and pick some fresh apples for yourself from the apple orchards. To celebrate this time of year that many people enjoy (and not necessarily the cool weather that is coming) I will be creating a apple themed nail design that goes well for this time of year.

As always here are the polishes I used (their will be no nail art tools this time.) 


Polishes: Revlon Extra Life No Chip top coat, Color Club nail art- Black, Sinful Color- Cinderella, NYC- big apple red creme, Sinful Color- Mint Apple, and Sinful Color- HD Nails. 


The Skill level for this apple design is: 

 Beginner

Due to their only being 4 simple steps, painting a solid color and a simple design for the apples themselves. I am giving this apple design a beginner rating.


1. Start off by painting all of your nails a solid color. I choose a light blue to look like the sky or you can paint all of your nails white or whatever color you would like. Due to this color being very light and on the sheer side, I used three coats of polish to get this light blue to be opaque.

2. Next, we will begin to paint the apple on the tips of our nails. First, draw a curved line on the sides of your nails and fill that in (or a half circle.) I will be paint every other nail to be a red apple and the other nails will be a green apple.

3. On the other side of your nails we will be doing the last step again. Once again draw another curved line on the side of the nail and fill that in (or a half circle.) When you are done the apples should look kind of heart shaped. I went over the apple shape with two coats of red and green polish.  

4. Now we will be adding in the stems for the apples, which is a very simple step. All you do is take your nail art polish, and draw a line in the top middle part of the apples. If needed you can make the line ticker by going over it again.

5. Next we will add a small bit if detail to the apples. Once again take your nail art polish and  slowly draw a small curved line under the stem. 


 Left hand design. Started with red then green apples.

6. Before we finish off this look with a top coat, their is one last step that we need to do, add the leaf to the apple. This is done by simply taking your green polish with the original polish brush and drawing a small green leaf on the steam. I went over the leaf two times. 


 Right hand design. Stared green then red apples.

Once your apple design has dried, finish off this look with a top coat to protect your design.

For this look on my left hand I started off with a basic red apple and every other nail I painted a green granny smith apple. Then on the right hand I switched the colors for a slightly different look.  
I you want a different look you can paint all your nails red apple or granny smith green apples, or even add other kinds of apple colors to your nails.

Hope everyone enjoyed this apple themed nail design. Also enjoy all the apple picking and fresh goods from the apple orchard.

See you next time for my next design tutorial! 


Friday, September 12, 2014

Strawberry Blitz

Hello Everyone! For today's post I have another fruit themed nail design. Lately, I have decided that I wanted to have a theme for a few weeks for my nail designs, so for now, I will be doing fruit inspired nail designs. For this week, I will be doing another one of my favorite fruits: The strawberry! This has always been one of my favorite fruits, and I can remember from when I was little I would eat strawberry's right out of my mom's garden (she wouldn't even get a chance to pick any of them, I would always eat all the strawberry's I could get a hold of) Now a-days, I just wish they would last longer, as usually when you buy strawberry's from the store you have to eat them fast because they go bad really quickly.  

Here are the polishes and tools I used for this design: 

Polishes: Revlon Extra Life No Chip top coat, NYC- big apple red creme, Sinful Color- Mint Apple, Sinful Color- HD Nails,and Sinful Color-Let's Meet.

Tools: Glass jar for nail polish remover, dotting tool, and a small nail art brush (The DL professional 10pc nail art brush from Sally Beauty, I numbered them from 1 largest - 10 smallest, this one I number brush 7.)


The Skill level for this Strawberry blitz nail design is: 

 Beginner 

Due to this design only having four basic steps, of just painting simple lines for the leaves on the nail tips and dots for the seeds on the strawberry's, I gave this design a beginners rating.


1. Start off my painting all of your nails red. I used two coats to get the red to be opaque.


2. Next at the tips of your nails take your nail art brush dipped in light green polish and drag the brush down a little bit to create a leaf (do this until you have leaves all the way around the tip of your nails.) I just dragged the brush down to create a simple leaf, when you get to the end part of the leaf you can also draw a point to make the leaf look more like a leaf, I just decided to keep the leaves looking simple. 

3. For these leaves I decided to change them up from the Pineapple design I did last week. For these leaves after you paint all of the leaves around the nail with light green, you go over every other leaf with dark green, or you can leave them as is with light green leaves, or make all of them dark green. (Between the light and dark green make sure to clean off your bush with nail polish remover.)
  
4. The last step is to create the seeds on the strawberry's. Take your dotting tool and dip it in yellow polish and create random dots all over your nails.

After your strawberry blitz nail design has dried, finish this look off with a top coat to protect your design.

If you would like your strawberry's to look more realistic, as stated above you can make a point at the end of your leaves to make the leaves look more like leaves.The seeds you can make them thinner by using a tooth pick to create thinner seeds.  


Hope everyone enjoyed this simple strawberry themed nail design! See you next time for my next design tutorial!


Friday, September 5, 2014

Pineapple Punch- Tropical Pineapple Design


Hello everyone! For this weeks post I have another tropical themed design, but this theme is just a little bit different. This design will be based on one of my favorite tropical fruits: pineapples!


As usual here the the polishes and nail tools I used for this design:


 Polishes: - Revlon Extra Life No Chip top coat, optional, Kiss nail art- White, Sinful Color-Let's Meet, Orange polish, Sinful Color- Mint Apple, and Sinful Color- HD Nails. 
Tools- Glass jar with nail polish remover in it (for cleaning nail art brush), the nail art stripper from the Kiss nail art brush (clean this off for the orange polish, or use a nail art polish in orange.), and a small nail art brush. 


  The skill level for this Pineapple design is:

Beginner 
Due to their only being a few steps and the design itself being very simple, other then maybe the lines that you have to draw for the pineapple maybe being a little hard, (you just need to slowly draw your lines) I give this design a beginner rating. 


For this tutorial I first took the nail stripper from the Kiss nail art in white and cleaned off the brush with nail polish remover (I thought white would be the best to clean from color to color). I tried using a nail art brush but I felt that I could not get the lines thin enough, so the next best thing would be to use the brush that came with the nail art polish. The only Issue with this is it can be very messy. Going from white to orange was not a big issue, it was just going back to the white polish that was the messiest, you really have to make sure you clean off the stripper very good before you put it back in the white polish, other wise your polish will have orange in it. The best thing to do if you want to avoid the mess is to get an orange nail art polish or maybe use an old brush from a nail art polish that you will not be putting back in a polish. Anyways, now we will start the Pineapple tutorial!      


1.  Start off with painting all of your nails yellow. I used three coats to get the color to be opaque enough.


 2. Next take your nail art stripper brush from the nail art polish (or a nail art polish in orange). Dip the stripper in orange polish and draw four lines across your nails (depending on how long or short your nails are you can draw more lines of less lines.) The best way to do this is to slowly drag your nail stripper across your nails. 


3. With the same nail art stripper, dip it in more orange polish. On the opposite side of the nail do the same thing, draw four lines across your nail to create a cris- cross pattern. 

4. Now that we have the pattern for the Pineapple itself done, we will begin creating the leaves that are on top of the Pineapple. First, take your small nail art brush and dip it in light green polish (this is a different brush from what we have been using.) Start off at the tip of your nail and drag down a little bit to create a leaf, do this until the top of your nail is filled with leaves. (for each nail I did a different amount of leaves I had no set number.)  


 5. After the light green polish has dried, take your dark green polish and go over the light green polish (try to leave a small bit of light green polish showing on the sides of the leaves.) You may wondering why I did this.  I did this because I thought adding a light and dark green would help to make the colors pop more. 


Left hand

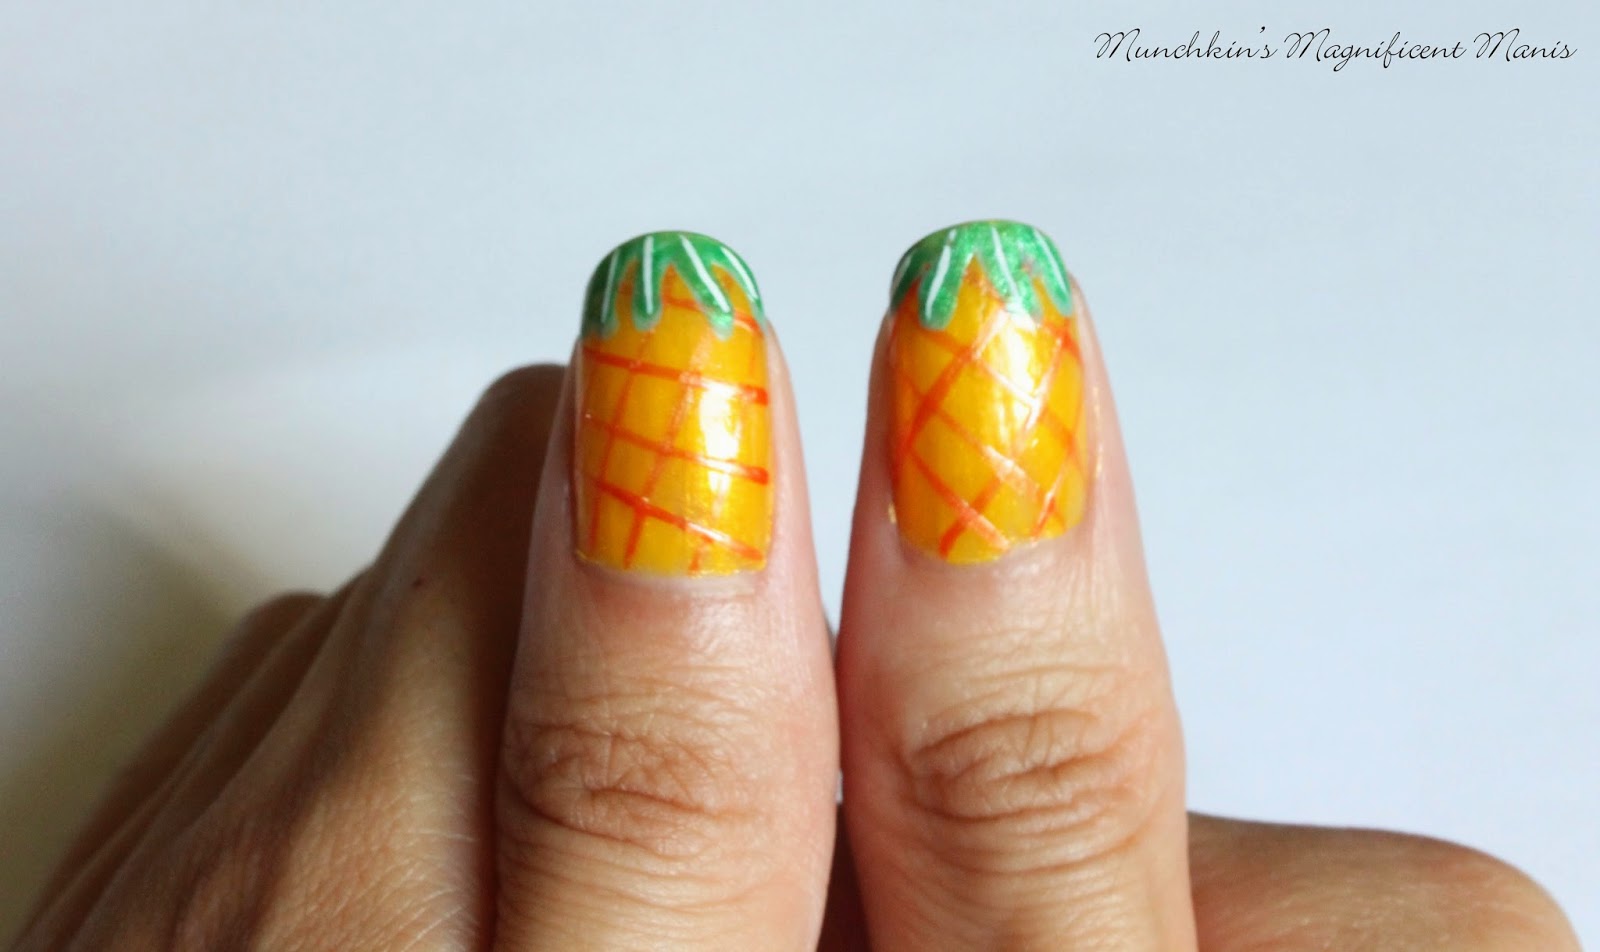
Now you are pretty much finished. You can always leave the leaves as is or to add an extra detail to them.  You can add small white lines to the leaves by taking your white stripper polish and slowly drawing small white lines on each individual leaf. After your yummy Pineapple design has dried add a top coat to protect your nails.


Right hand

For this design I ended up liking the way I drew the lines on right hand better, as I just felt that the pattern looked more like a Pineapple. This doesn't often happen because I am right handed and most of the time I feel that my left hand turns out better because I am using my dominant hand.


  Here is just a side my side comparison of my left and right hand design. 

Hope everyone enjoyed this yummy Pineapple nail design! See you next time for my next design tutorial!