Friday, February 19, 2016

Starry Starry Night- Essie Polish Review


Hello everyone! If you have been following the world of nail polish, then you know that recently their has been a lot of hype about a nail polish, Essie's Starry Starry Night. If you have not heard Essie recently released some of their old polishes in a new collection called the Retro Revival collection, and Starry Starry Night has been one of the popular ones. The original formal of this polish which was said to have "diamond dust" in it has gone for as much as $200 for one bottle on Ebay. So many Starry Starry Night fans were excited that this polish was being released. 

     
Essie Starry Starry Night The Retro Revival Collection
(with the bottle)

After hearing all the hype about this polish I stumbled across this polish at Target, it was the last bottle and due to my curiosity I decided to pick it up to review it for all of you. I don't have the original formal of this polish, actually this is the first Essie polish that I have ever owned.

Unfortunately in a lot of review that I have read they have not been good, a lot of people have said that this polish is not like the original formal, it is thick, not as sparkly. But I still wanted to pick this polish up for my self to give it a try. 

 
 Essie Starry Starry Night The Retro Revival Collection

Sadly the reviews where true, this polish was not that good. This polish is a dark blue with a jelly like formula with small silver, light blue and dark blue glitters in the polishes. For me this polish was a little thick, it was okay on the first coat then seem thicker on the second. I used two coats for the photo above and it just went on streaky and patchy, as you can see in the photo above some parts look darker then other, and some lighter. 

I do have a polish that I want to compare this to and as you may have guess that polish would be Zoya's Dream.
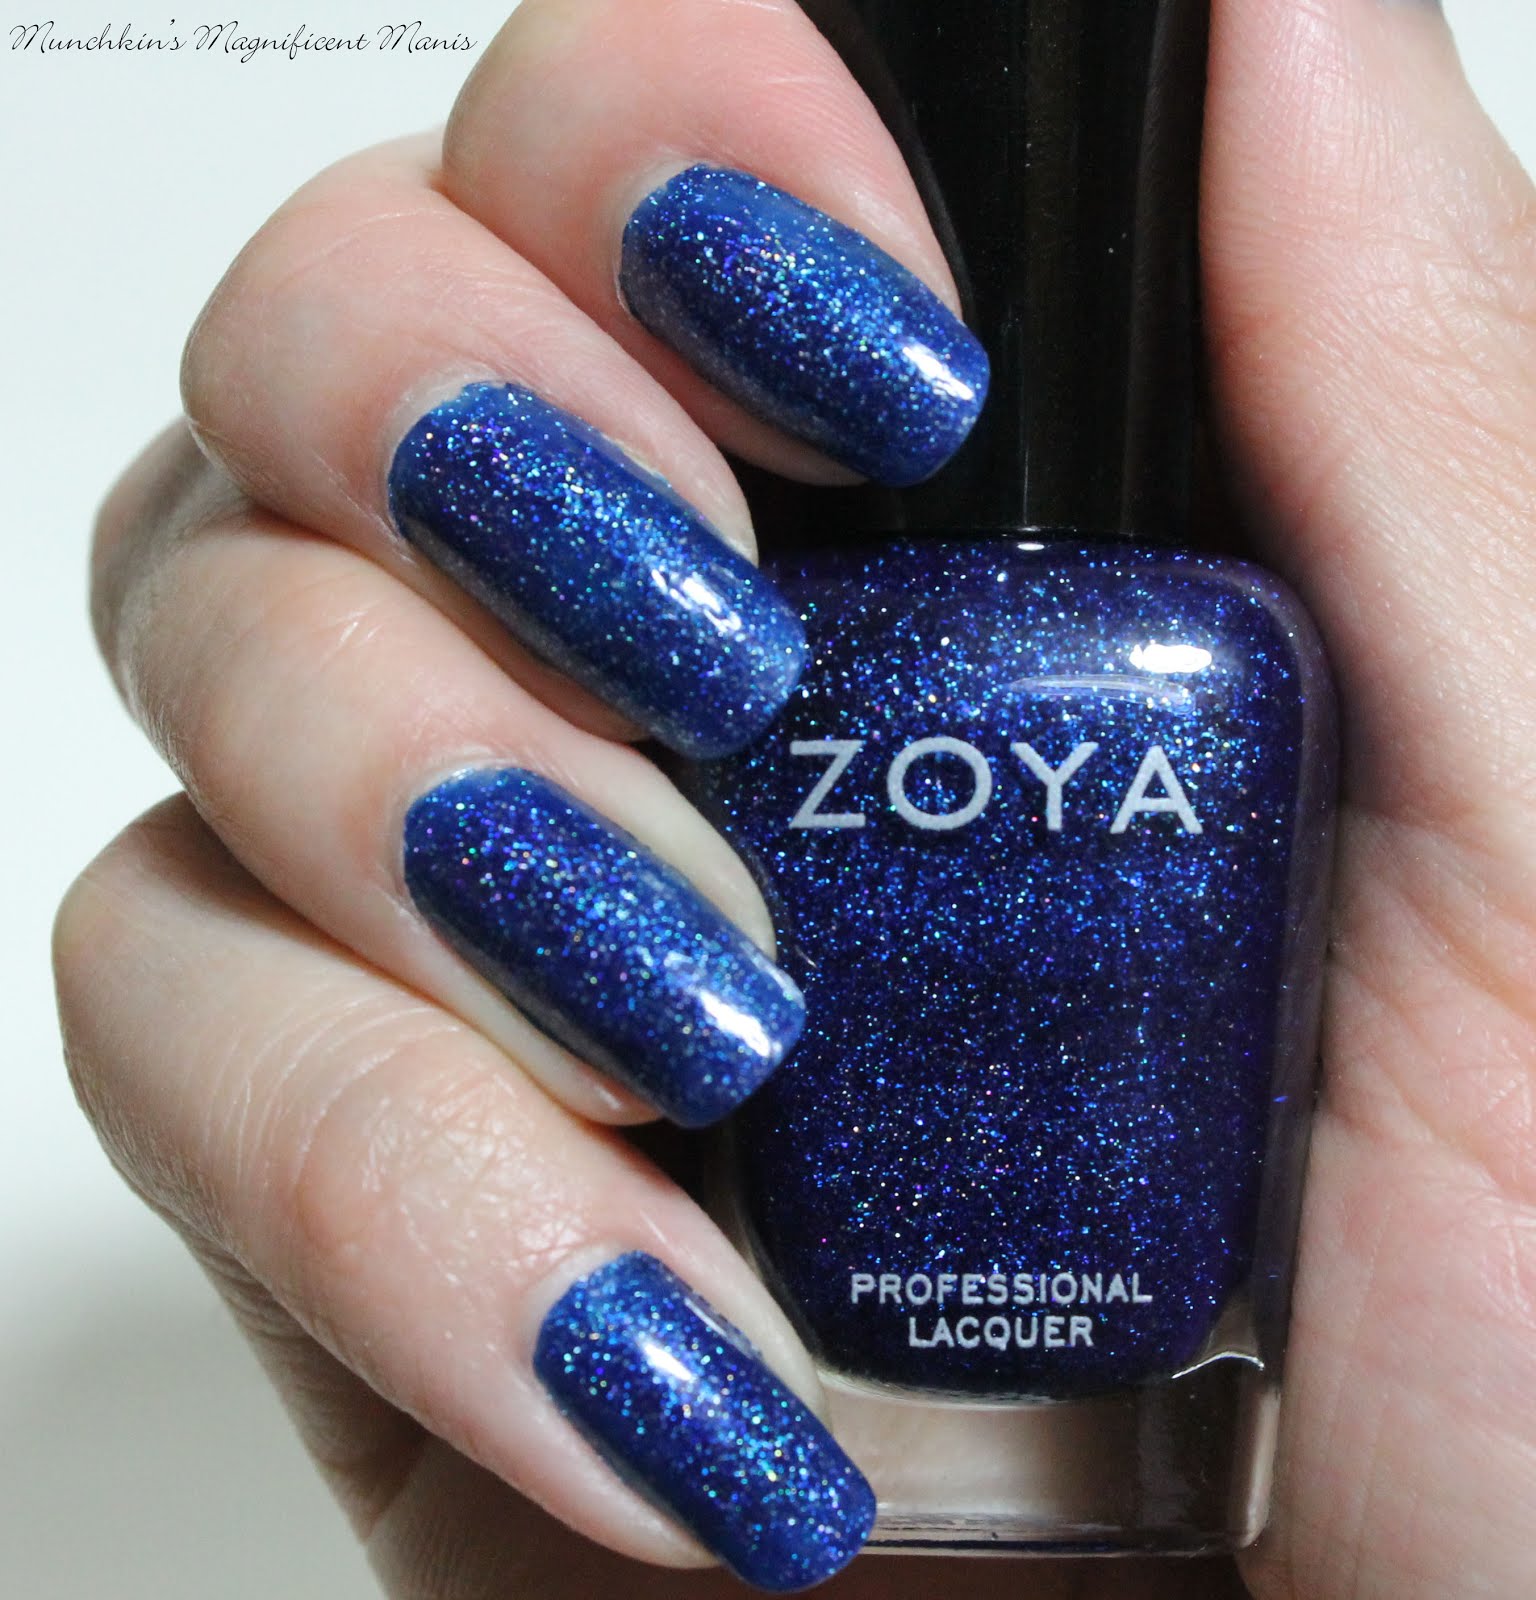
 
   Zoya Dream

Zoya's Dream, I am wearing on my right hand and Essie Starry Starry Night on the left, and sorry their really is no comparison. Zoya Dream I personally think is more pretty and is more comparable to a night sky, it has more sparkly to it with the Holographic glitter in it, it does take three coats to be opaque, but it is not streaky and goes on much smoother too.

 
   Zoya Dream

In conclusion Essie Starry Starry Night is pretty, I just can't get over how streaky and patchy it applied for me. So if you want a polish that reminds you have a night sky, I say go with Zoya Dream. Also I never really got why companies change the formula of products when the costumer enjoy them as is.     

I purchased Essie Starry Starry Night at Target for $8.49.

I just recently look up Zoya Dream and I don't know if Zoya went up on the prices of their polishes or what, because I remember buying Dream for around $9 (well I did get it in a Dream box set) and now all their polishes are $10.00. As I have said in other post, Zoya always has deals going on through their emails, so it's a good idea to sign up for their emails for some good deals.

Here is a link to Essie website ( I could not find the polish on Target's website, also I couldn't find this on Ulta site as well) 

Here is the link to Zoya Dream 

Update on Starry Starry Night: Sadly this polish disappointed me even more. The wear time on this polish was horrible! The first day it stared to chip on the tips of my nails, then day two big chunks of the polish chipped off, so then I just took this polish off of my nails. I most likely will be returning this polish. This is a polish that I regret buying, and I do not recommend buying Essie Starry Starry Night. Sorry for such a bad end result.   

Hope all of you enjoyed this review of Essie Starry Starry Night, even if it was not that great of a review!

See you next time for more nail fun!   
 

Friday, February 12, 2016

Teddy Love- Valentines

Hello everyone! Happy Valentine's Day or day of love! Today we will be creating a cute teddy bear and hearts Valentine's nail design, the bear we will be creating is not just any bear, if you grew up in the 90's you may remember a certain stuffed toy that was very popular, the TY Beanie Babies. Their is a Valentines bear named Valentino that is and all way will my favorite of the Beanie Babies, due to it being sentimental. So I thought what better way to celebrate V-day then with Valentino teddy bear nails.

Valentines nail design    Beanie Baby Valentino Teddy bear (He is welly loved!) and final Valentines nail design.

The nail polish and tools used for design will be right next to the images as we go.  

The skill level for this Valentines nail design is:

Intermediate

This design has both some what simple and hard parts to it. Creating the bow, and writing love on the nails can be a little tricky, you just have to be careful. The heart for the most part is simple, even creating Valentino can be easy, depending on your skill level.


Let's start this cute teddy bear, Valentines nail design!

Base coat - Nicole OPI-  3in1- base, top, & strengthener

1. Apply a base coat to protect your nails. 


2. Once your base coat has dried paint your index, middle, and pinky a light pink (
OPI- Hello Kitty- Look at My Bow!), your ring finger a glitter pink (OPI- Hello Kitty- Starry- Eyed for Dear Daniel) and then for your thumb paint the bottom half a white (China glaze- white on white) and make sure it is curved this is your bears head, then the top half paint this the same light pink as the other nails.


Winstonia 5 pcs Professional Nail Art Set
Just to let all of you know, I just recently bought the 5 pcs Winstonia nail art brush set on Amazon, so far I really like them, I got this set because I need some more really small brushes for nail art. If you are interested here is the link:
Amazon for $7.95


Finger paints- Cubism Crimson, W2 liner brush
3. Once your base colors have dried, we will first be creating a heart on the index finger nail.
Take your thin nail art brush with red polish on it and make the outline of the heart, then fill that in.

 
 Red acrylic paint and W3 striping brush 

4. Next we will make Valentino's bow that is around his neck on the middle finger nail. I first stared off making the outline with red acrylic paint, then later went over that with red polish. To make your bow take your striping brush with red paint on it and make a small dot, then two loops on each side.

 
 5. Then make two lines going down from the loops you made, and now your outline is done. 

 
 White acrylic paint and W3 stripping brush 

6. This is the little bit tricky part of writing love on your pinky nail. You can write in cursive or print it is up to you. I chose cursive on my left hand and print on my right hand. To write love take your stripping brush with white paint on it, staring with L near the cuticle then finishing with E at the tips of the nails.  

 
 Sally Hansen- Hard as Nails- Black Heart and a large dotting tool

7. Next we will be making the bears himself Valentino on our thumb nail . With your white polish swipe a curve on each side for his ears and fill that in. Then for his eyes with a large doting tool with black polish on it, make two dots for his eyes.

 
 Blue, red, and yellow acrylic paint to make brown. 

8. Now that we have his eyes we will create that chocolate looking nose. For this we need a brown, unless you already have brown paint. If not take a little blue, red, yellow and mix that together to make a brown. Then take your liner brush with brown on it, make an oval shape then fill that in. Now you have a cute Valentino on your thumb nail.

Valentines nail design
Final Valentines day nail design on the left hand

 
 Revlon- top speed- Hearts of gold fx

For an added touch on the glitter accent nail, you can add a glitter heart polish to it. You do have to fish the heart out to get them, that why I just have three hearts on the nail. Plus these glitter do not like to stay on the nails, they don't seem to like to lay flat on the nail, but I put them on anyways for an added touch.

Once your design has dried apply a top coat to protect and seal in your nails. As always I used Revlon Extra Life No Chip top coat. 

 Valentines nail design
   Final Valentines day nail design on the right hand.

Here is the design that I did on my right hand, this is the hand that I wrote love in print. 

Hope all of you enjoyed this Valentino teddy bear/ Valentine's day nail design and have a Happy Valentine's day!

See you next time for nail fun! 

Sunday, February 7, 2016

More Big News!

Hello everyone! I just wanted to share with all of you that I have more big new to share with all of you, and no it's not what you are thinking of, If has to do with nails. After a long time of  really thinking long and hard, I have decided to pursue a career as a professional nail tech. I have already signed up and went to orientation and I start classes on Tuesday. 

After starting this nail blog, I have really enjoyed and love sharing and creating nail art with all of you, and have discover a new passion for nails. Also since I have started this blog I have been getting a lot of complements on my nails whenever I go out, which is cool. I have even had some guys say my nails look cool, even thought nails are not really their thing. 

This has been hard choice to make going back to school, due to the fact that I have been there done that with an Associate and Bachelors degree in Digital Media, and the thought of spending more money on school is scary! Due to the fact that it is hard to find a job in Digital Media, I thought why not give Nails a try! After all at lest I tried.

I am not going to get into to much here, but I will just say I am unhappy with my current situation and instead of complaining and doing nothing about it, I am going to do something about it by becoming a nail tech. I am trying to stay positive this time around by not hoping things will happen, but they will happen!

My little advice for anyone that wont's to go back to school or pursue their dreams, go for it! It is worth trying and at lest you tried. With school yes it is pricey! But if at all possible try to make payments and not take out Student Loans. 

As for the M.M.M blog, you may be wondering will I still do the blog? Yes I do 100% still want to blog, this has become a passion of mine, and I love sharing my love of nails with all of you! I may have to change how I do the blog, just to save time, but all of you may not even notice it. I will just have to plain as I go.


Thank you for all your love and support and helping me find another way to keep my love of design, though nail art! Hopefully I have even helped you to discover your dream as well!   

I look forward to many years of fun nail designs to share with all of you!          


Friday, February 5, 2016

What's Your Birthstone? KBShimmer Birthstone Review


Hello everyone! Hope all of you enjoyed the Nail Butter review, if you have not checked out that post you can check it out after this post. For our second post we will be reviewing/ going over two of the polishes from the indie brand KBShimmer. At the beginning of 2016 KBShimmer released their Birthstone collection, with 12 beautiful shimmery polishes.

  KBShimmer Birthstone Collection Peridot and Aquamarine  KBShimmer Birthstone Collection Peridot and Aquamarine   

I only purchase two of the polishes from the collection; Peridot the August birthstone, which is my birthstone and Aquamarine which is my hubby's birthstone. I only purchase these two from the collection due to the price, it would have been kind of pricey to buy the whole collection. 

All the polishes in this collection have metallic holographic flakes, with micro glitters in the polishes and have a color base to match your birthstone.   

Let's take a closer look at Peridot and Aquamarine!

KBShimmer Birthstone Collection Peridot 
  KBShimmer Birthstone Collection Peridot

Peridot is the August birthstone. This polish is a pale lime green with silver metallic holographic flakes, and micro glitters. For me this was opaque in three thin coats, but can be opaque in two. This color is amazing and looks even better in bright sunlight.

 KBShimmer Birthstone Collection Aquamarine
 KBShimmer Birthstone Collection Aquamarine
 KBShimmer Birthstone Collection Aquamarine

Aquamarine is the March birthstone. This polish is a pale blue with silver metallic holographic flakes, and micro glitters as well. Once again this polish was opaque for me in three thin coats, but can be opaque in two. This polish also was very beautiful and looks amazing in the sun.
  
As for the polishes them self I really like, they are both very beautiful and unique, which is the great thing about indie brands, they have more unique polishes then mainstream brands. 

Both of these polishes I purchased from Harlow & Co. for $7.55 each and $5.21 for shipping, with a total of $15.10 all together.

I have made a purchase from Harlow & Co before and had a good experience, the four polishes I ordered came quick. This time around it did take a little longer it took about three weeks to get my polishes. Around week two I got an email saying my order was shipped, and by the end of the week I sill had not got my order. But by week three I did final get my order. Also I didn't get a tacking number to track my order, this is a Canadian company but I still would have like to have had a tracking number to know where my order was. Other wise I do like Harlow & Co.    

Here is a link to the KBShimmer collection on Harlow & Co: (Currently some of the polishes are sold out on this site)

Here is the link directly to KBShimmer website:
     

Just a side note, about the lighting that I have been using:  

I recently purchase a daylight light bulb to try to capture the true beauty of the polishes. I have not only been trying to improve my nail designs and polishing, but I also keep trying to improve my photos as well. This has been a on going process that can always be improved on. Before I would take my final photo by a window for natural light, but due to where I live I can't always depend on natural sunlight. So I thought I would give the daylight light bulb a try.

Hope all of you enjoyed this KBShimmer Birthstone review!

See you next time for more nail fun!   

Butter Up With Nail Butter!

Hello everyone! It has been a while since we have had a Magnificent find (even though it is not in the title this is one). Today I have a great find for all of you, the product that we will be reviewing today is  called Nail Butter. You may wonder what is Nail Butter? is it actually butter? Well if you want to know, continue reading to see the wonder that is Nail Butter! 

  Nail Butter
 Nail Butter the nail treatment, comes in a nice glass jar.

Nail butter is an all natural, handmade, cruelty free, cuticle cream, that is not just a cover up for dry skin and cuticles, it is a treatment. Unlike a lot of cuticle creams out their they just cover up the problem this is meant to treat the problem.    

 Nail Butter Lemongrass
 This is what Nail Butter looks like when you first open it.

Here are the thing that Nail Butter is said to do:

- Strengthen and rejuvenate weak dry nails and cuticles, by keeping them moisturized.
- Enhance and stimulate nail growth.
- Corrects discolored or ridged nail beds.
- Fixes thin, brittle nails.
- Prevents hand nails.
- Helps to heal cracked and peeling nails.
- Helps to smooth calluses.
- Can help dry skin anywhere.

Want to know even more about Nail Butter check out the link below to the Nail Butter website:

Nail Butter bottom of the jar
 The Bottom of the Nail Butter Jar, with simple directions. The date on the bottom is what I put to know when I started to use the product.

Nail butter has very simple directions that are on the bottom of the jar. Here is how I us Nail Butter. 


Take a small amount of Nail Butter and put it on each nail around the cuticles and fingers. Due to my nails being long I usually scoop the Nail Butter out with my nail and I tend to get a little to much, when really all you need is just a little because it goes a long way.  

   
Then rub the Nail Butter upward into the cuticle area. This is what the Nail Butter looks like before you rub it in.

For best result it says to apply it twice a day for 30 days and then once a day after that.

After I rub in the Nail Butter I apply a lotion after, both time that I use Nail Butter. 


My final thoughts on Nail Butter after using it for 30 plus day (I started to use this product Nov 12, 2015) I love this product! For the longest time I been using Burt's Bee's Lemon Butter, and for a little while a cuticle oil from Sally's Beauty. I liked Burt's Bee Lemon Butter but after using Nail Butter, my once favorite will be replaced by Nail Butter (Sorry Burt's Bee Lemon Butter). Both are nail butters, but Burt's Bees is more of a cover up for dry cuticles and Nail butter is a treatment.   

Above I had put all the things that Nail Butter is suppose to do. You may wonder that is a lot of clams can they all be true? Well so far it has helped my cuticles and the sides of my fingers look so much better. I had an issue with the sides of thumb and middle finger on my right hand, having very dry patches and then peeling. After using this it has been so much better, the only thing is I personally still have to use it twice a day, because I stopped and used it once a day like it says and the problem came back, this is most likely due to where I work and the cold weather. 

As for any of the other clams like healing peeling nails, that I am wonder if it will be fixed after more lone term use because I do sill have this problem, not as bad but it is still their. As for strengthening, that I could not really tell because for the most part my nails are strong. Nail growth is another thing I can't really tell because my nail grow really fast, I have to cut and file them once a month or they just get to be to long for me. 

In conclusion I highly recommend Nail Butter for anyone that has dry cuticles and fingers.

This product is kind of pricey, and if you have been following this blog you know how I fell about that, but trust me it is worth it. 

Nail Butter is only available on the Nail Butter website for $24.00. If you go to the bottom the the home page their is a Sign up for Savings where you put your email address in and you can get 10% off. I actually got 20%, so I only payed $18.00 with free shipping.

Also I am unsure how many ounces or grams is in the jar, it is a small jar but as stated above a little goes a long way. Nail Butter comes in two scents Lemongrass and Gardenia, I purchase Lemongrass. The scent can be a little strong and smells a little weird at first, but it does not seem to bother me personally.  

Here is a link to the Nail Butter website if you would like to give it a try for yourself.

Hope all of you enjoyed this review of Nail Butter!

Also there will be a second post this week as well, so make sure to check that out as well.   

See you next time for more nail fun!