Showing posts with label Summer nail design. Show all posts

Monday, August 18, 2025

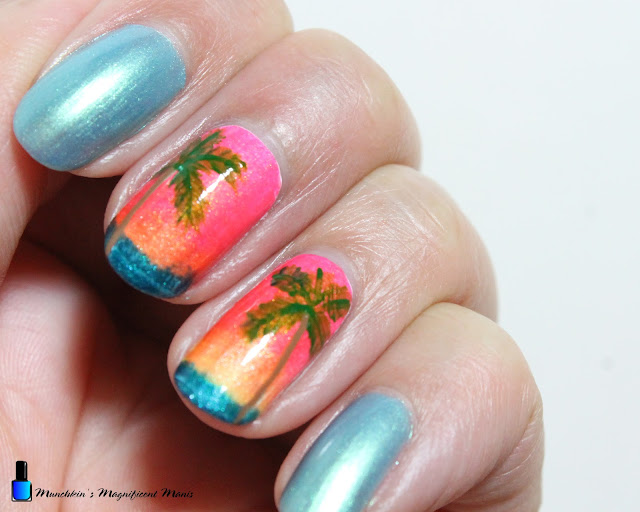
Golden Hour- Tropical- Sunset Nail Design

Hello everyone! Today on the blog we will be creating another tropical nail design, it is still summer time, even though for some reason this year stores have started fall stuff way too early in July. Anyways this summer even more so I have really been wanting to create beautiful tropical nail design, because of the trip to Hawaii that I went on. Hawaii is know for there beautiful sunset and sunrises, we did get to see one really nice sunset on the beach. To remember this sunset we will be creating a golden hour nail design.

Tropical/ Sunset Nail Design

  
 Here are the polishes and nail art tolls used to create this tropical sunset nail design:

Base and Top coat- CND Stickey Base Coat and CND Super Shiney Top Coat. 

Polishes- Finger paints- Legendary Lore, Orly- Melting Point- Erupt To No Good, Orly-Melting Point-Cesium The Day, Holo Taco- Chrome Collection- Trophy Life, Zoya- Ziv.

Nail art brushes- thin striper brush.

Other- make up sponge for gradients, liquid latex for around your fingers, water and acetone to clean off your nail art brush, and tweezers. 

Tropical- Sunset Nail Design

Apply a top coat to clean dry nails, let that dry.

Polish all of the nails a pink with a gold shift. (Finger paints- Legendary Lore)

Let that dry.

Tropical- Sunset Nail Design

Sunset Gradient- 

For all of the nails we will be creating a sunset or sunrise nail gradient, First if you have liquid latex you can apply it before we start to make clean up easy.

For the gradient part take a makeup sponge and first polish your pink with a golden shift (Finger paints- Legendary Lore) the same polish as your base color, then a shimmer orange (Orly- Melting Point- Erupt To No Good), lastly a yellow polish.(Orly-Melting Point-Cesium The Day) Also make sure the polishes slightly over lapping. 

Then dab the sponge on to each nail, you will need to repeat the last step for each nail, also you will need to go over the nails at least three times to be opaque. 

Once you have finished your gradient peel off your liquid latex with some tweezers. 

Then apply a topcoat to smooth and blend your gradient together. 

Tropical- Sunset Nail Design

Tropical- Sunset Nail Design

Palm Tree on the Middle and Ring Finger Nails-

On the middle finger nail make a palm tree on the left side of the nail. On the ring finger nail make a palm tree on the right side of the nail.

For the sand take a sponge and polish a little bit of the sponge with a glittery gold (Zoya- Ziv) and dab that on the tip of the nails for a golden sand look.

Tropical- Sunset Nail Design

Palm Trees on the Thumb Nail- 

On the thumb nail make two palm trees on the right and one on the left side of the nail, make one palm tree taller than the other as well.

Once again with a sponge and gold glitter polish, dab a little of that polish near the cuticle for the sand.

Tropical- Sunset Nail Design

Tropical- Sunset Nail Design

Palm Leaves On the Index and Pinky Nails- 

On the index and pinky nails we will make one palm leaf. On the index nail make on palm leaf starting from the left hand corner near the cuticle. On the pinky nail make a palm leaf starting from the right hand corner of the cuticle. 

Tropical- Sunset Nail Design

Once your nails are ready to see a sunset or sunrise on the beach apply a top coat to seal in your design and to help it last.


Here is the practice version, this one turned out to have more pink in the background which I kind of like better.

Hope all of you enjoyed this tropical sunset nail design!

See you next time for more nail fun! 

Tuesday, August 12, 2025

On Island Time- Tropical Nail Design

Hello/ Aloha everyone! Now over a month (July) ago my husband and I went to Hawaii to celebrate our 10 year wedding anniversary, and the thing that like to always say in Hawaii is Hawaiian time and or island time, which means you will get there when you get there and just take your time and enjoy life. Going to Hawaii really does teach you to just relax and enjoy taking your time. So for today's design we will be creating a palm tree, by the ocean, with a plumeria flower. For this design I really took my time and I feel like it really turned out good. 

Tropical Nail Design

   Here are the polishes and nail art tools used to create this tropical nail design:


Base and topcoat- CND Stickey Base Coat and CND Super Shiney Top Coat.

Polishes- ILNP- Under the Sea Collection- Sandbar Magnetic Polish, Orly- Melting Point- Having a Smeltdown, and China glaze- Shades of Paradise- Mer-Made For Bluer Waters. 

Acrylic paint- green, yellow, blue, red, and white. Mix red, yellow and blue to make a brown paint, and yellow and green to make a light green. 

Nail art tools- thin linear and striper brush. 

Other- makeup sponge for gradients, liquid latex for your nails, and water to clean off your nail art brushes. 

Tropical Nail Design

Apply a topcoat to clean dry nails, let that dry.

Nail polish on all of the nails your base color will be a golden glitter polish (ILMP- Sandbar) 

Let that dry.

Tropical Nail Design


Tropical Nail Design

Ocean Gradient:

For all of the nails we will be creating an ocean/ beach nail gradient, First if you have liquid latex you can apply it before we start to make clean up easy.

For the gradient part take a makeup sponge and first polish your light golden sand color, the same polish as your base color (ILMP-Sandbar), then your lighter blue (Orly- Having a Smeltdown), lastly your slightly lighter blue, this polish is just a little darker then your last polish (China Glaze- Shades of Paradise), also make sure the polishes slightly over lapping. 

Then dab the sponge on to each nail, you will need to repeat the last step for each nail, also you will need to go over the nails at least three times to be opaque. 

Once you have finished your gradient peel off your liquid latex with some tweezers. 

Then apply a topcoat to smooth and blend your gradient together. 

Tropical Nail Design

The thumb nail will just have the ocean/ beach gradient. 

Tropical Nail Design

Tropical Nail Design

PalmTree and Plumeria Nail Design: 

For this design once again I will not go into greater detail about how to create a palm tree because I have done so in many of my other tropical nail designs post. 

Anyways for this design we will be creating the tropical design on our ring and middle finger nails. On the middle finger make a palm tree on the left side of the nail, staring with lighter colored green and then adding the darker green later for more depth. Also you can add a few small coconuts, by just making a few small dots in the tree. 

Near the tip of the nail we make a small plumeria flower, take your small linear brush with with paint on it and make a petal, two on the sides and two on the bottom and fill in the flower with white, when that is dry take some yellow paint make some lines in the flower, then repeat with some brown paint in the yellow lines. 

For your last detail on the middle finger nail we will make some grass, by make lines with our striper brush with light and dark green. 

Tropical Nail Design

Tropical Nail Design

Next we will make another palm tree on the ring finger nail, just on the right hand side, then make some grass at the bottom of the palm tree, once again using light and dark greens. 

Tropical Nail Design

Once took your time on your tropical design apply a topcoat to seal in your design and to help it last through your vacation. 

Hope all of you enjoyed this nail design! As stated above when you really take your time on things I think they turn out really well. 


 Here is the practice version that also turned out very well!

See you next for more nail fun! 

Wednesday, September 11, 2024

Keep Summer Alive- Tropical Nail Design

Hello everyone! This summer has gone way too fast, it seems like it just was Memorial Day and now Labor Day has come and gone. Technically according to the calendar, it is summer until September 22. So to try can keep summer alive for a little longer we will be creating another tropical nail design. Back in April I purchased the Orly Melting Point collection and I wanted to create a tropical design using some of the polishes from that collection, and I finally got to create one. This collection did give me some troubles creating a gradient, I think due the polishes having a more of a sheer finish to them. 

Tropical Nail Design

Here are the polishes and nail art tools used to create this tropical nail design:


Base and top coat- CND Stickey Base Coat and CND Super Shiney Top Coat.

Polishes- Orly- Glass Act, Orly- Having a Smeltdown, Orly- The Floor is Lava, Orly- Erupt To No Good, Orly- Cesium The Day, Sally Hansen- Hard as Nails- Hard to get, and Zoya- Oceane.

Nail art brushes- Thin stripper and detail brushes, and a fan brush.

Acrylic paint- Green, yellow, and brown.

Other- Makeup sponge and liquid latex. 

Tropical Nail Design

Apply a top coat to clean dry nails.

Let that dry.

Polishes-

Thumb- a blueish purple (Orly- Glass Act)

Index and pinky- a blueish green (Orly- Having a Smeltdown) 

Middle and ring finger- white (this is your base color for the gradient, the white helps the colors to show up better.)

Tropical Nail Design

Tropical Nail Design

Sunset gradient on the middle and ring finger nails: 

First we will start off with the sunset gradient. Just to start off, this gradient did take a little bit of trial and error, at first when I practice this design I started with a sponge and it seems to not work that well. So then I looked up a YouTube video to see if anyone had tried to make a gradient using the Orly Melting Point collection and someone had done one using a fan brush, I tried that and it seem to work, then when I did this final design on my nails, I tried the fan brush method and it seem like it was drying to fast. 

Anyways I will go over the weird way that I got this gradient to work. 

First if you have liquid latex you can apply that over your fingers that you are going to do the gradient over. 

First take your fan brush and polish three colors that you would like to use, I used a Pink The Floor Is Lava, Orange Erupt to No Good, and Yellow Cesium The Day, then polish your fan brush with each color overlapping the colors a little. 

Then take your fan brush and wipe the brush from side to side on the nail. I did this a few time and it seem like it was drying to fast and not distribute the polish on the nail enough. 

Then I tried the sponge method and that see to help the gradient to be opaque enough.

If you applied liquid latex, you can peel it off first. 

Once your gradient is done apply a top coat to help to blend the gradient together. 

Tropical Nail Design

Ocean Water: 

For the ocean water we will keep things very simple, just take a makeup sponge with a shimmer blue on it (Zoya Oceane) and dab that on the tip of the nails for your ocean water, it is ok if it looks a little messy.

Tropical Nail Design

Palm Trees: 

For the Palm trees first I mixed green and yellow to make a lighter green (that way I have 2 greens). Make one palm tree on each side of the nail on the right side on the ring finger nail and the left side for the middle finger nail. I went for a true to color palm tree verses a shadow. 

Tropical Nail Design

Once you are happy with how your nails look, apply a top coat again to all of your nails to help your nails last through the rest of the summer days and to help them shine in the sun.

Tropical Nail Design

Here is the practice version, I did like this design but I was not my favorite I just think the Orly Melting Point collection was hard to gradient, due to the polishes being on the sheer side. I did still feel like this was worth doing a post on anyways.

Hope you enjoyed this summer tropical nail design!

See you next time for more nail fun! 

Saturday, March 16, 2024

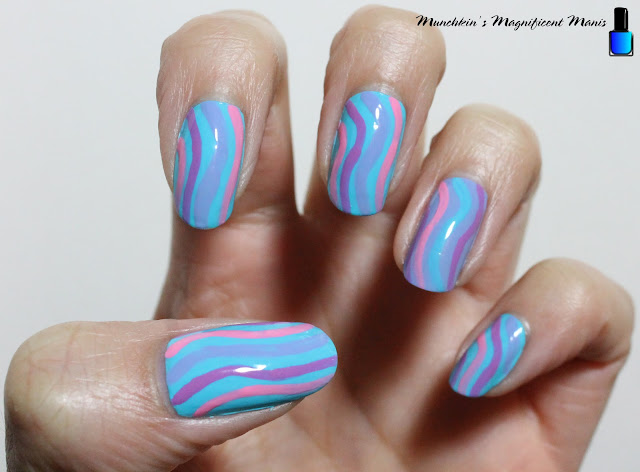
Spring Time Swirls- Swirl Nail Design

Hello everyone! Today on the blog we will be creating a simple swirl design. When I was looking for inspiration I thought it would be fun for spring a summer time to create a swirl bright color design. This design is supposedly is trending this year.

Swirl Nail Design

Here are the polishes and nail art tools used to create this nail design: 


Base and top coat- CND Stickey Base Coat and CND Super Shiney Top Coat.

Polishes- Sally Hansen- Insta Dri- Peeps Blue, Finger Paints- Heavenly Hues, Zoya Sunshine- Delia, and Sally Hansen- Insta Dri Jelly Belly- Bubble Gum.

Nail art brushes- Thin detail brush.

Other- Acetone and water to clean off your nail art brush.

Swirl Nail Design

Apply a base coat to clean nails.

Polish- This is your base colors.

Thumb, index, middle, pinky finger nails- Light blue (Sally Hansen- Insta Dri- Peeps Blue.)

Ring finger- Periwinkle blue (Finger Paints- Heavenly Hues)

Let that dry.

Swirl Nail Design

For this design I just switched the colors on each nail, from purple, pink, and periwinkle, with the light blue base. Then with the periwinkle base you would use purple and pink again and just add the light blue for the swirls. 

Swirl Nail Design

Swirl Nail Design

Swirl Nail Design

For this design it is very abstract with random lines. For this design I jump around from each nail for each color. First take a thin detail brush with a periwinkle polish on it and staring on the middle of the nail make a swirl line (this is for the nails with a light blue base). 

For the ring finger nail with a periwinkle base use the light blue polish to make your first swirl. 

Then for the other swirls switch between pink and purple, just make sure the other swirls are  right next to each other, leaving space in between each swirl so that you can still see the base color.   

Swirl Nail Design

Once you are happy with how your swirl nail design look, apply a top coat to seal in your design and to help it to last. 

Swirl Nail Design

Swirl Nail Design

If you want to go even more simple you can just put the swirl design on the ring finger and the thumb nails, and leave the other nails with no design.

Also as with any design you can use any colors that you want, you can use more spring colors, very bright colors for summer or later in the year you can use fall or winter colors. 


Here is the practice version.

Hope all of you enjoy this swirl nail design!

See you next time for more nail fun!


Saturday, September 16, 2023

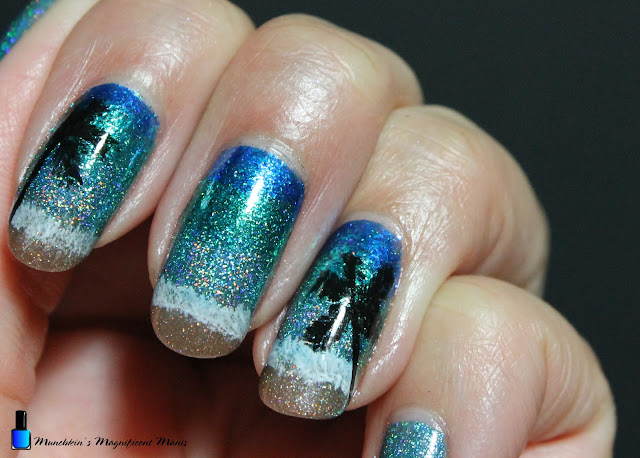
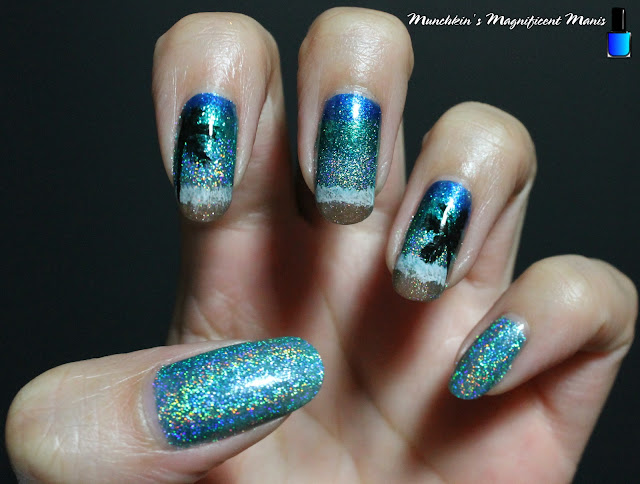
Hawaiian Time- Tropical Nail Design

Hello everyone! Today on the blog we have one more tropical design for the summer, even though to most people summer has come to a close, in most places at lest in the US the weather still fills summer like, so why not make at lest on more summer/ tropical themed nail design. In the last M.M.M post we took a look at the ILNP Under the Sea collection, today we will be creating a design using most of the polishes from that collection. 

Tropical Nail Design

Here are the polishes and nail art tools used to create this tropical nail design:

Base and top coat- CND Stickey Base Coat and CND Super Shiney Top Coat.

Polishes- ILNP- Sea Glass- Under the Sea Collection, ILNP- Paradise, ILNP- Blowing Bubbles, and ILNP- Sandbar Magnetic polish.

Acrylic paint- Black and white. 

Nail art brushes- Thin stripper brush and flat brush.

Other- Water to clean off your nail art brushes and a makeup sponge. 

Tropical Nail Design

Tropical Nail Design

Apply a top coat, let that dry. 

Polishes- 

Thumb and pinky nail- A light blue holo polish (ILNP- Blowing Bubbles)

Index, middle and ring finger nails- Base color a beige sand colored polish (ILNP- Sandbar)

Let that dry.

Tropical Nail Design

Tropical Nail Design

For this design I will not go into too much detail on how to create this design seeing how, most of my tropical designs are created the same way, just different polishes.

Anyways for this design we will need to create a gradient on the index, middle and ring finger nails. On your sponge you will need to start off with, Sandbar, Blowing Bubbles, Paradise, and then Sea Glass. Sponge this on the nails three time to be opaque.

Tropical Nail Design

For the ocean waves take a flat brush with a very small amount of water down white paint and dab this where the sand and ocean meet, Sandbar and Blowing Bubbles bend together.    

Tropical Nail Design

Tropical Nail Design

For the final touch we will add two black/ shadows of a palm trees to the nails, on the index nail make a palm tree on the left side of the nail, then on the ring finger nail make a palm tree on the right side of the nail. On the middle finger nail leave that with just the ocean. 

Tropical Nail Design

Once your nails are vacation ready apply a top coat to seal in your nails and help your beautiful tropical design to last. 
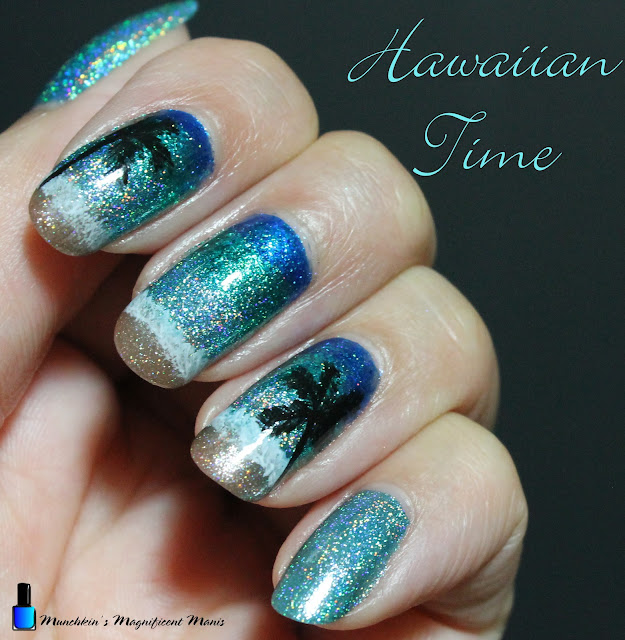

As with all of the nail design that I create, I always do a practice version, if I feel like I did a good job on the practice version I will share it with all of you.

Hope all of you enjoyed this topical nail design! Also hope everyone had a great summer. I know my summer was pretty good, this summer was the first summer in a while that my hubby and I went on a vacation that required us to get on a plain, we went to Miami Beach, Florida. 

See you next time for more nail polish fun!