Valentine's Day Nail Design
Here are the polishes and nail art tools used for this V-day nail design:
Base and top coat - CND Stickey Base Coat and Revlon Extra Life No Chip top coat.
Nail polishes- Glitter Daze- Let's have a Waikiki, Cupcake Polish- Lord Licorice- CandyLand, Superchic Lacquer- Cherub, Cirque- Madder, and Color Club Halo's- Harp on.
Nail art brushes- thin stripper brush, thin detail brush, and small detail brush.
Acrylic paint- white and red.
Other- small cup of water, and small glass jar with acetone for cleaning nail art brushes.
Let's start this love filled nail design!
Valentine's Day Nail Design
Start off with a thin layer of base coat, then let that dry.
Once your base coat has dried polish your thumb with a pink glittery polish (I used Glitter Daze- Let's have a Waikiki), your index nail with a red holo glitter polish (I used Cupcake Polish- Lord Licorice), your middle and pinky nail with a red holo polish (I used Superchic Lacquer- Cherub), and then a dark red holo on your ring finger nail (I used Cirque- Madder.)
Let all of your base colored polishes dry, then we will start the nail designs.
Two hearts on thumb nail, left hand
One heart on thumb nail, right hand
We will start on the thumb nail, on the left hand I painted two hearts and the right hand I just painted one heart. You can pick out which one you would like to do on the thumb nail.
Two hearts side by side:
Take a thin detail brush with red acrylic paint, and near the side of the nail make a big heart outline, then fill that in. Then over lapping that heart, make a smaller heart right next to the big heart.
One big heart:
If you just want to make one heart, do the same thing, just make the heart bigger. First make the outline for the heart and then fill that in with the red acrylic paint.
Valentine's Day Nail Design
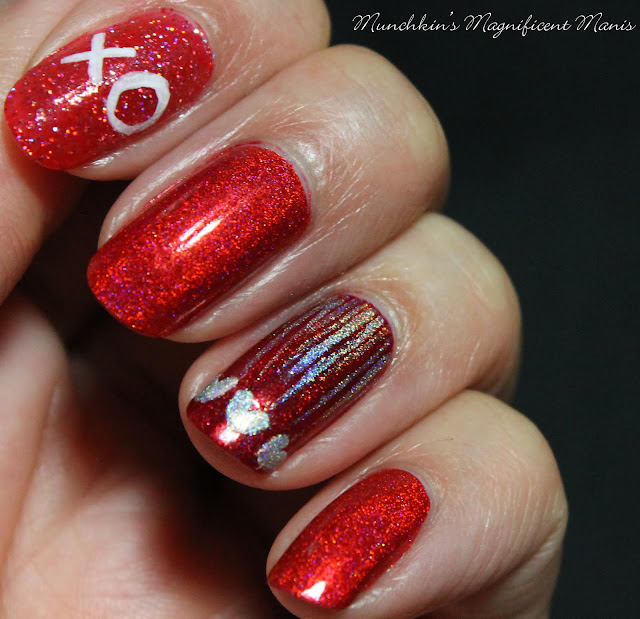
For the next part of the design we will paint XO (hugs & kisses) on our index nail. Take a thin detail brush with white paint on it, near the side of the nail carefully paint an X and then right next to the X make a circle shape for the O.
Valentine's Day Nail Design
For the last part of this design, we will make the love raining down on us, on the ring finger nail. Take a thin stripper brush with a silver holo polish (I used Color Club Halo's- Harp on) and make different size lines, some long and some short, right next to each other.
Then near the tip of the nail make three small heart, I actually at first made the shape of the hearts with white acrylic paint and then filled them in with the silver holo polish.
On the middle and pinky finger nail, we will just leave those as is, with just the red holo polish.
Valentine's Day Nail Design
Once you have your design the way you like/ love apply a top coat to help protect your nails and to make them nice a shinny for your valentines day date.
Valentine's Day Nail Design, right hand nail design
Here is the other design that I created on my right hand, this time it was very similar, the only thing that was different was the thumb nail.
Hope all of you enjoyed this Valentine's day, hugs and kisses nail design!
Happy Valentine's Day!
See you next time for more nail fun!


No comments:
Post a Comment