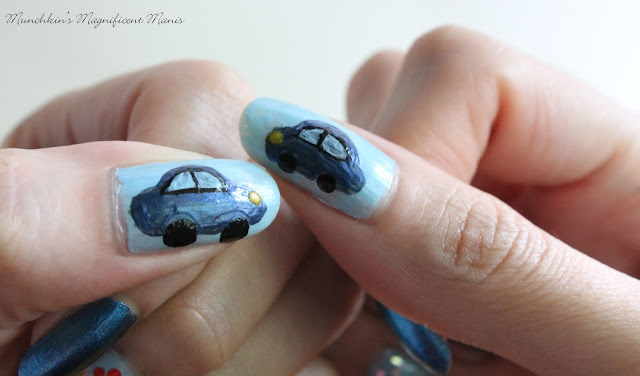
Volkswagen Beetle Nail Design.
My 2005 VW Beetle/ Herbie.
The nail polishes and tools used to create this Herbie nail design is:
Base Coat and Top Coat- Nicole OPI- 3in1- base, top, & strengthener and Revlon Extra Life No Chip top coat.
Nail art polishes- Kiss nail art stripper- black and silver.
Nail polishes- Nicole by OPI- A Lit- Teal Bit of Love, Pop-arazzi- The Hue is Blue, Snowman rainbow glitter- frosty, Sinful Color-Let's Meet, Sally Hansen- Hard as Nails- Black Heart, Jane- Bolt from the blue, OPI Hawaii Collection- Suzi shops & island hops, That's Hula-rious, Lost my bikini in Molokini, and Aloha from OPI.
Nail art tools- small thin brush, extra large and a large dotting tool.
The Skill level for this Herbie nail design is-
Beginner
This, for the most part, is a simple design. The VW logo is easy to create along with the flowers. The only part of the design that is little bit tricky is the Herbie on the thumb, just like any part of the design it really just requires a steady hand.
Let 's celebrate Herbie's Birthday, with this fun nail design!
1. Apply a thin layer of base coat.
2. Paint your pinky, middle,and thumb nail with a light blue polish. Then paint your ring and index finger with a shimmery blue.
3. We will start off with the Volkswagen logo, VW. We will start off by making a W, with your silver nail art stripper. To help yourself out with making the W, make a small dot in the middle of the nail and then draw two lines going down, this will look like an upside down V.
4. Then finish off your W by drawing one line on each side of the nail.
5. To finish the VW logo make a V right on top of the W. If needed you can go over your letters to make them thicker.
6. Now for the flowers. To give this design a hippie feel to it, take your extra large dotting tool dipped in yellow polish, and place it anywhere on your nail. The more flowers you would like the more dots you can add.
7. The last step in creating the colorful flowers is to make the petals. Take your large or a medium size dotting tool, dipped into a light pink polish and make five dots around the yellow circle to make a flower. Repeat this step for each color.
8. Now for the part that brings the whole design together, Herbie. We will start off with Herbie's iconic shape. First, we will draw it horizontally instead of vertically. Take your thin nail art brush dipped in a navy blue, and draw a curved line in the middle of the nail, then to smaller curved lines on the sides.
9. Next we will make the part where the wheels go. Once again take your thin nail art brush dipped in navy blue, and draw two arches side by side.
10. Then fill in your Herbie. If needed you can always thicken your outline, as you fill in your Herbie to make the shape look better.
11. Now it's time for the wheels. Take your extra large dotting tool dipped into black and place the dotting tool in the two arch ways. If needed you can always dip your doting tool a few times to make the wheels bigger.
12. To give the final touches to your Herbie, we will be adding windows. Take your black nail art stripper polish and follow the dome shape of the car, to make a outline for the windows, then draw a line down the center.
To finish off your Herbie take your dotting tool dipped in yellow and make a small head light. Then to fill in your windows, take your thin nail art brush, dipped in the same light blue as the background and fill the windows in. If need you may have to re-outline the windows.
If you would like you can add more details to Herbie, but I just wanted to keep the look of Herbie simple.
As for the index finger nail, I just kept it with no design and just the shimmery blue. The pinky nail, I put a small amount of rainbow glitter.
As always, once your design has dried apply a top coat.
 The Herbie I did on my right hand turned out to be smaller, and actually looks kind of cuter!
If you have a Herbie of your own you can always change the color to match your Herbie.
Hope all of you enjoyed this VW Beetle/ Herbie nail design!
For the next few weeks I will not be doing a post/ nail design, I will be going on vacation. After my vacation I will be back with more fun and bright nail design for all of you!
Aloha and see you all soon!


No comments:
Post a Comment