Friday, January 25, 2019

Zoya Qtica Smart Pods Review

Hello everyone! Today we will be reviewing a new product called Smart Pods, from Qtica the Smart Spa (lotions, scrubs, mask,etc.) part of the brand Zoya. The brand Zoya has their main part of their website/ company where they sell nail polishes,and then their is an other extensions of that brand as well such as Qtica; where they sell lip care, nail care, foot care and hand care products. Then theirs Smart Spa as I just stated, then the Naked Manicure; this has special polish system that is suppose to help your nails, and then they recently released a hand serum and lotion.

 
Qtica Smart Pods   
Qtica Smart Pods  

Let's take a look at the Smart Pod system. The scent we will be using today is
Mandarin Honey.

Before we start I want to say that I do have a pro account with Zoya, where I did get sent this product and as far as I know this product is still only available for pro accounts. Then you may ask why am I reviewing this? When I was sent this I did email the spa coordinator asking if this would be available for customers and she did say yes, I am just not sure when.
Also all of these items are available to everyone in full size on Zoya's website. So I thought it was still worth reviewing.

 Qtica Smart Pods
 Qtica Smart Pods
 Qtica Smart Pods  

What are Smart Pods? They are per-measured individual/ sealed cups (that are disposable/ recyclable) with the same products that are found in the Smart Spa line; the soak, scrub, mask, and lotion. This system can be used for both manicures and pedicures.

Qtica Smart Pods  
Qtica Smart Pods
 Qtica Smart Pods  

Here is what you get in the kit a fresh soak 0.67oz, sugar scrub 1.17oz, moisture mask 0.93oz and luxury lotion 0.5oz. 

This set is designed more for salons to use on individual clients, to use just the right amount on each person and not waste a lot of product/ money, to be sanitary (this is extremely important,) and you can make sure each person in the salon is uses the same amount of product.  

Now we can get to using the Smart Spa system. This is a very simple four step system that can be done at home as well as the salon. 

Make sure you also have a towel or two to wipe your feet off as well. 

Also I will be going over how I use this system at home on my own feet, because not everyone is a nail tech and this can still be used a home along with the salon, and I fell like it would be more helpful to explain the home use, which is still very similar to salon use.

Qtica Smart Pods  
 Qtica Smart Pods - Step 1 Fresh Soak

For this step I do not soak my feet, I always give myself a pedicure after I take a shower. So I used this more as just a soap to clean my feet, but you can always put this soak in the tub and soak your feet.

Step 1- Fresh Soak, If you do soak your feet? Put the soak in the pedicure tub or bath tub (if you are using this at home) and soak your feet for 5mins and then pat dry your feet. 

The next step is not in the system, it is using a foot file. I use a Ped Egg and a cheap foot file that I got for a salon store. I gently rub the Ped Egg on the bottom of my feet, mainly on my heals and my big toe where I have a callus, then I take the other foot file and gently go over that same area. Also I get some dead skin on the inside/ side of my foot that I just kind of rub off with my fingers. 

For my feet I don't require much work at all, just gently using a foot filing on my feet and this system, I don't have much dead skin or callus. I am going to be honest I feel like a lot of people if they just washed their feet and used lotion their feet would be so much better.     

Also I want to let all of you know that Callus are NOT meant to be removed!! They are their for a reason to protect your feet and if you keep removing them or a salon keeps removing them it will only get worse! You are only suppose to soften/ smooth the callus, that is what the foot files I use does. I learned this in nail tech school, and when I was a nail tech I don't know how many people I told this to and they didn't seem to believe me. 

Anyways on to the next steps.

Qtica Smart Pods  
Qtica Smart Pods - Step 2 Sugar Scrub

Step 2- Sugar Scrub, gently rub/ massage the sugar scrub on both of your feet and you can even put this on your legs as well. Then rinse it off and pat dry. This scrub is used to exfoliate and soften the skin.  

Qtica Smart Pods
Qtica Smart Pods - Step 3 Moisture Mask 

Step 3- Moisture Mask, Apply this mask all over your feet and even on your legs some. Let it set for 3- 5 mins, rinse off and then pat dry. This mask is for rejuvenate, brightening, and leaves your skin feeling nice and soft. 

Qtica Smart Pods   
Qica Smart Pods - Step 4 Luxury Lotion

Step 4- Luxury Lotion, the final step in your pedicure system the lotion. Just rub/ message this into your feet and legs. Then you are done and have nice soft feet that will last a month.

I only give myself a pedicure once a month, which is all you really need. I did only use this system on myself, so I was able to use this for three months, I really could have gotten away with using this for four, but around the third use it was staring to get to low. 

Also unlike at a salon, after I use this system I do not polish my nails I always wait, I just don't want my nails to be to moisturizes, this can potentially make your polish chip faster.    

My final thoughts on this system is I love this system like most Zoya/ Qtica products. This is a great way to give all the Smart Spa products a try with out buying the full size products. 

The only product I would not repurchase is the fresh soak because as stated above I don't soak my feet. I have used the lotion and scrub before I got this system, so I knew that I would like them. The scrub weirdly enough I only like to use on my feet, I feel like for some reason on my hands it makes them peel around my fingers. As for the mask I had never tried it, and I love it so much I purchased a full size (which is so big! It will last me forever!) It really does make your feet feel very soft and helped my small callus, which was not bad from the start, but now fell even better. The mask is also great for the hand as well.

When you use this system you feel like you are using quality products, like having a spa at home.  

The Smart Spa line comes in a verity of scents:
Colada Sparkle
Lemon Grass Ginger 
Eucamint 
White Tea
Lime Zest
Lemon Dream
Mandarin Honey (this was the scent I used)
Almond Oatmeal 
Guava Passion 
Exotic Mango
Grapefruit Surprise
Vanilla Wild Plum (This one smells great too!)
Strawberry Cranberry 
Pomegranate Lime  

Here is a link to Zoya/ the Qtica part of the website so you can purchase any of these items, I only have links to the full size items so far. These items are pricey, but you can also use the Zoya discount codes on all products even the Smart Spa items. 

Smart Spa- Soaks 32oz, $36

Smart Spa- Sugar Scrubs 7oz is $18, 44oz is $68


Smart Spa- Masks 8.5oz is $16, 34oz is $36

Hope all of you enjoyed this review of the Qtica Smart Pod System in Mandarin Honey and hopefully leaned something as well.

See you next time for more nail fun!       

Friday, January 18, 2019

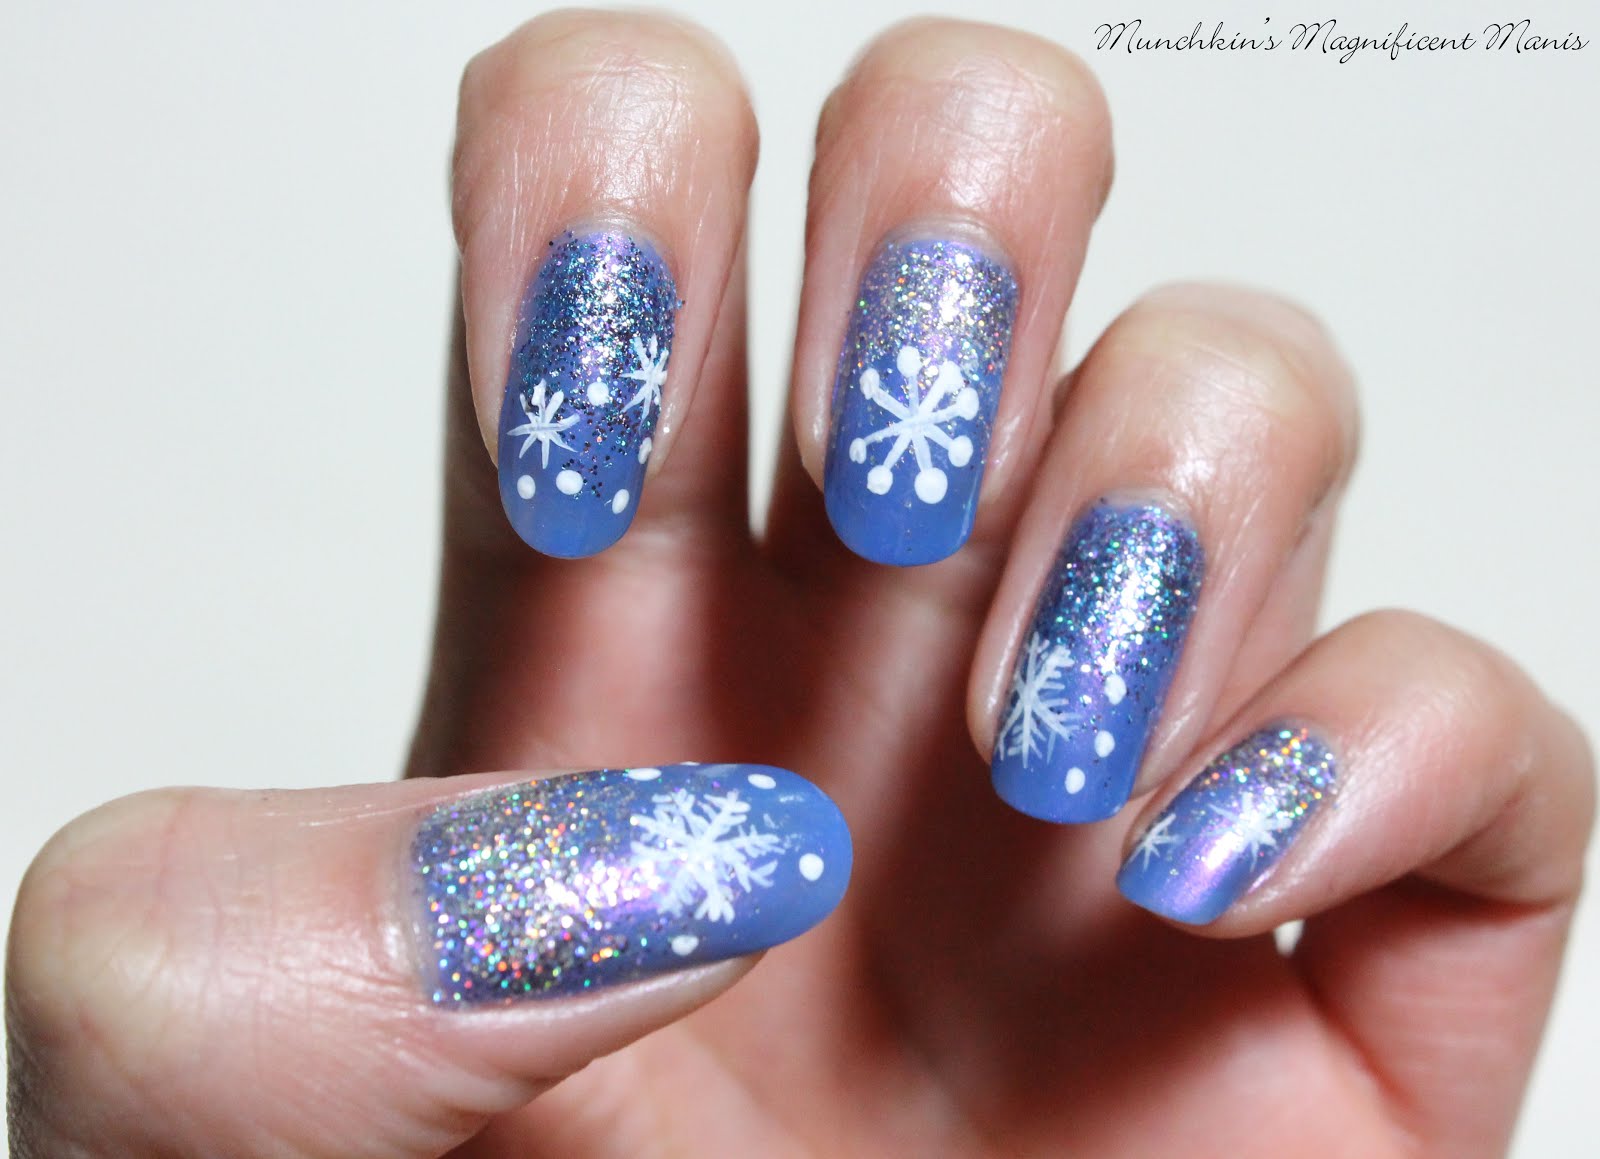
Snow day- Glitter Gradient and Snowflake Nail Design

Hello everyone! Happy New Year well a little late in the month, but still not to late. Sorry I have not post anything in a while, I have been a little bit busy/ tired. Anyways today we will be creating a winter nail design, a glitter gradient with some snowflakes. So far in the area I live winter has been kind of mild not much snow, which I am perfectly fine with, but I thought because it is still winter it would be cool to make a winter/ snowy nail design. 

Glitter Gradient and Snowflake Nail Design  
Snow day! Winter nail design

Here are the polishes and nail art tools used to create this winter nail design: 


Base and top coat- CND Stickey Base Coat and Revlon Extra Life No Chip top coat.

Nail polishes- Your base color Zoya Enchanted- Saint, for the glitter gradient Color Club- Mini- Silver Glitter and blue and purple glitter. 

Acrylic paint- white

Nail art tools- Thin stripper brush and small dotting tool.

Other- Makeup sponge for glitter gradient, and a small cup of water to clean off nail art brushes. 

 Glitter Gradient and Snowflake Nail Design
 Glitter Gradient and Snowflake Nail Design
 Winter nail design

Start off with clean nails and then apply a thin coat of base coat to make your polish last. 

Let that dry.

Then on all of your nails, polish them with a periwinkle blue (I used Zoya - Saint.) 

Let that dry as well.

Then on to the glitter gradient, for this you will need a makeup sponge. For me I found it easier to first take the polish and the brush it came in, and polish the gradient on first and then sponge on more of the glitter. 

For this gradient we will start from the cuticle and then go down the nail. For the glitter gradient most of the glitter will be focused/ mainly be near the cuticle and then faded in to less glitter as we go down the nail. 

As stated above I first took the brush and polished the glitter on and then I took a makeup sponge putting some of the glitter polish on to the sponge and dabbed it on to the nail. 

Glitter Gradient and Snowflake Nail Design  
Winter nail design

Once you have your glitter gradient the way you like on to the snowflakes, to make this more of a winter design. On my left hand I did put snowflakes on all of the nails and on my right hand I only put snowflakes on three nails. 

For each nail you can make each snowflake different. Some nails I put one snowflake the other nails two with some small dots. 

For each snowflake they all start off with a X and then look kind of star shaped, some of the flakes you can leave as is or add more lines to make them different. Then once you have the larger flakes you can take a dotting tool and make small dots for very small snowflakes. 

Glitter Gradient and Snowflake Nail Design 
 Winter nail design, on thumb nail 

Glitter Gradient and Snowflake Nail Design
 Glitter Gradient and Snowflake Nail Design 
Winter nail design

Once you have your winter nail design the way you like apply a top coat to seal in your design and to help it last thought your next snow day, or just a regular day. I don't know about you but I am fine with a mild winter with little snow, it was much better when we where kids and had actually snow days, now we don't get snow days we still have to go to work no matter what.

Glitter Gradient and Snowflake Nail Design  
Glitter Gradient and Snowflake Nail Design
Winter nail design, on my right hand 

Glitter Gradient and Snowflake Nail Design
Glitter Gradient and Snowflake Nail Design 
Winter nail design, on my right hand 

Here is the practice version that I did a well. 
 
 
Hope all of you enjoined this winter glitter gradient nail design, and I hope all of you are having a great start to the new year and stay warm if it is cold where you are at. 
 
See you next time for more nail fun !

Friday, December 21, 2018

Wonderful Christmas- Christmas Nail Design

Hello everyone! Merry Christmas and Happy Holidays! I don't know about all of you but I can't believe that it is almost Christmas, time has been going by so fast! I remember when I was growing up I would count down the days until Christmas and it seem like it always to forever, now days it goes by so fast. Anyways today we have another Christmas nail design; with a Christmas tree, some holly, a gingerbread man, and some ornaments.

  Christmas Nail Design Christmas Nail Design

As always here are the polishes and nail art tools used to create this cute Christmas design:


Base and top coat - CND Stickey Base Coat and Revlon Extra Life No Chip top coat.

Nail polishes- China Glaze The Grinch collection, Kiss nail art stripper- Silver, and Funky Fingers- As If (for just the star glitter.) 

Acrylic paint- white, green, yellow, red, black, and brown.

Nail art tools-  large dotting tool, thin detail brush, and thin stripper brush.

Small cup or jar of water to clean off nail art brushes.

Christmas Nail Design  
Christmas Nail Design  

Start off with a thin layer of base coat to protect your nails and to help your design to last. 

Let that dry. 

For our base color we will be using the polishes from the China Glaze Grinch collection. On your thumb nail polish that nail a glittery green, and a rainbow glitter over that when it is dry, the index nail a light glittery blue, your middle and pinky finger nail a glittery red, and your ring finger nail a glittery gold.

Let that dry.

 Christmas Nail Design
 Christmas Nail Design 

Christmas tree Ornaments- 

Then on to the nail art, we will first start off with the ornaments on the two tree branches on the index nail. Take a thin stripper brush with a light green paint and make two long thin lines, starting from the cuticle. Then make some small lines from the larger lines (kind of like a palm tree branch), after that take a darker green and make some small lines next to the light green lines.  

For the ornaments I first made the circle with white paint and then went over the circles with two different polish colors, a pink with a iridescent shimmer over that, and then a purple polish. 

Then you just add two small sliver line from the branches to the ornaments.

Christmas Nail Design  
      Christmas Nail Design

Christmas Holly-

Next we will creating holly on the middle and pinky finger nail, this design is very simple. Just take a dotting tool with red paint on it and make two or three dots near the cuticle, then make a two long lines with green paint, coming from each side of the red berries, and then make four small lines for the leaves.    


Gingerbread Man-

Now on to the gingerbread man on the ring finger nail. First make outline of the gingerbread man with brown paint, make a circle for his head, two arms and two legs, you will need to go over this a few time to be opaque.

Then with your large dotting tool make to eyes and then two dots on his chest for the buttons, and then make a small curved line under his eyes for his smile. 

Also if you would like you can outline your gingerbread man with black, this is hard to do, but seems to always make the design look better.

My gingerbread was a little deformed, but he sill turned out cute and really when you make cookies that don't turn out perfect. 

Christmas Nail Design  
 Christmas Nail Design

 Christmas Tree-

On the thumb nail when I had used the glittery green and rainbow glitter together for the review of the Grinch polishes, I thought this would look cool just making an outline of a Christmas tree because the colors together remind me of a Christmas tree. So that is what we will be doing on the thumb nail. 

Take a thin stripper brush with black paint on it and make a Christmas tree shape, and then take a polish that has star shapes and place it on top of the tree or you can paint a star on top of your tree. 

Christmas Nail Design  
 Christmas Nail Design 

Once you have your Christmas nail design the way you like, apply a top coat to seal in your design and to help it last until Christmas. 

Hope all of you enjoyed this Christmas nail design, also if you have not all ready don't forget to check out last weeks nail design Reindeer Games 

Hope all of of you have a wonderful Christmas and a Happy Holiday, along with a Happy New Year!

See you next time for more nail fun! 

Friday, December 14, 2018

Reindeer Games- Christmas Nail Design

Hello everyone! I don't know about all of you, but I can't believe it's all ready almost Christmas! I literally was just doing fall design (I was a little behind on fall designs, so maybe that's way.) For today we will be creating a Christmas nail design, with everyone's favorite reindeer, Rudolph, along with some Christmas trees. 

Christmas Nail Design, Rudolph and Christmas Trees  
Christmas Nail Design, Rudolph and Christmas Trees

Here are the polishes and nail art tools used for this Holiday/ Christmas nail design:


Base and top coat- CND Stickey Base Coat and Revlon Extra Life No Chip top coat.

Nail polishes- Finger paints- Tiffany imposter, Zoya- Estelle, Snowman rainbow glitter- frosty, Funky Fingers- As If, and China glaze mini- Grinch- Lukewarm Wishes

Acrylic paint- Green, white, red, black, brown, peach.

Nail art brushes-  Thin detail brush, stripper brush, liner brush, small flat brush and a very small detail brush. (not sure why I used so many brushes?) 

Small cup of water to clean off nail art brushes.


Let's start this reindeer game! 

Christmas Nail Design   
Christmas Nail Design

First start off with a thin layer of base coat over your clean nails, then let that dry.

Then polish your thumb, index, and ring finger with a light blue (I used Finger paints- Tiffany imposter) then once that light blue has dried to add a shimmer to the blue I applied China Glaze- Grinch- Lukewarm Wishes. Then on the middle and pinky finger nail polish those nails with dark shimmery blue (I used Zoya- Estelle).

Let that dry.

Christmas Nail Design   
Christmas Nail Design  
 Christmas Nail Design   

Once your polish has dried we will make our little trees on the index and ring finger nails. For the tree this is suppose to be done by the one stroke method, where you would dip your flat brush into green first and then white, then begin to paint your tree. Well that was not working out for me, so we will do this a little different.

On a small flat brush with green on it near the tip of the nail make a thick green line, by staring on one side and going to the other, by just pushing the brush up and down a little to make a line. Then take that same brush with white paint on it and right under the green do the same thing, just make this line thinner for the snow on the tree. 

Repeat this step three more times, each time you go up the tree make the green and white part shorter, until you get to the top then make a small triangle. 

   Christmas Nail Design
  Christmas Nail Design  

Next we need to add some ornaments to our tree, this is done simply with some glitter. I took a small amount on my nail mat and with a toothpick placed the glitters pieces on a few parts of the trees. For the star I have a polish that has stars in it, I just fished out one star out of the polish and just placed it on top of the tree.

Christmas Nail Design, Rudolph 
  Christmas Nail Design, Rudolph

Once you have your trees the way you like we will finish up this design with Rudolph the red nose reindeer. With thin liner brush with peach paint on it (yes I did get a peach and a brown paint, ever time I would try and make a brown color it would always turn out to dark, so I thought it would be easier to just buy a brown paint.) make a circle and fill that in, it can be kind a sheer at first.

Then for his mouth make a oval near the bottom of the circle, you may need go over this a few time to be opaque. For the rest of the circle fill that in a few time with brown paint, then  make two triangles at the top for his ears. Then for his antlers make two long lines with two small lines at the top.

Now on to his face, with your very small brush make to curved lines for his eyes, for his noes make a large red circle and then for his mouth make to upside down curved lines.

This is optional and I felt made Rudolph look better, you can outline him with black paint. This part is kind of hard, that why I suggested it as optional. 

Christmas Nail Design, Rudolph and Christmas Trees    Christmas Nail Design, Rudolph and Christmas Trees

Once Rudolph is already to help out Santa, you can apply a top coat to help your nails to last until Christmas, or at lest a week (that's about how long my polish last for me.)  

Hope all of you enjoyed this Christmas nail design, I do plan on doing another Christmas nail design using The Grinch China Glaze polishes for next week.  

See you next time for more nail fun!

Also hope all of you are have a wonderful start to the holiday season!