Showing posts with label New York Color Matte Me Crazy topcoat. Show all posts

Friday, April 24, 2015

Rain drops keep falling on my nails!

Hello everyone! April is known for being a rainy month (even though it is actually almost over with), for this weeks nail design I thought that I would show all of you a rainy day themed nail design, that actually looks like rain drops on your nails along with some clouds in the sky. Also their is no water involved in this tutorial. 
 
Rain drop and clouds nail design
 Rain drops keep falling on my nails! Rain drop and clouds nail design


Here are the nail polishes and nail tools used for this rainy day nail design-


Base coat and top coat- Nicole OPI-  3in1- base, top, & strengthener, Revlon Extra Life No Chip top coat, and NYC- Matte Me Crazy topcoat.

Nail polishes- NYC- Water street blue, Pop-arazzi- The Hue is Blue, and Sally Hansen- xtreme wear- White on.

Nail tools- three different size dotting tools; an extra large, large, and medium size dotting tools.


The skill level for this rainy day nail design is:
  Beginner basic

This design is very simple, it just consists of random dots for the rain drops. For the clouds this also consist of more dots to form the clouds. 
 
Let's start this lovely looking rain drop tutorial!

1. Apply a thin layer of base coat to protect your nails.

2. Once your base coat has dried, apply a light sky blue to your thumb and ring finger for the blue sky. Then apply a little bit darker blue to your index, middle, and pinky nail. Then let these two colors dry. 

3. Once your nails have dried, its time to do step one of giving your nails that rain drop effect. For just your index, middle, and pinky nail apply a matte top coat, this will help to make your rain drops pop and show up on your nails. Then leave your ring and thumb nail that are painted a sky blue with no top coat until the end. 

 4. As we wait for the matte top coat to dry, we will start on the clouds. Take your extra large dotting tool dipped a generous amount of white polish, then lightly dot two dots right next to each other on the top of where you want to start your cloud. You may have to keep dipping your dotting tool in polish each time you make a dot, to make sure your dots will come out.

5.Wipe your dotting tool off on a paper towel or napkin, then dip the dotting tool in white polish again, then make two more dots under the first dots you made to start to make a cloud shape. 

6. To finish your cloud you may once again need to wipe your dotting tool off, then dip the dotting tool in white polish. Then on the other side of the cloud shape, dot one more dot to finish your cloud. 
For the clouds repeat step 4- 6 as many time as you like to fill up the nail, just remember to leave a little bit of light blue showing. Also do the same thing on your thumb nail.


7. Once you have the desired amount of clouds on your ring and thumb nail, we will go on to the next step of make the rain drops. Take your extra large dotting tool dipped into a generous amount of clear polish or top coat, then dot random dots on your nail. Repeat this step with different size dotting tools, a large and medium sized dotting tool along with your extra large doting tool. You may have to go over the dots a few time to get them to show. The first coat when it dried did become a little flat, but once I added another layer to the dot it was better.

Rain drops and clouds nail design
Once your nails have dried apply a top coat to only your thumb and ring finger nails. For your rain drop nails just let them dry, do not apply a top coat. Now you have realistic looking  rain drop with clouds. 

As always, you can do all the rain drops on your nails or even do every other nail with rain drops and clouds. Also this design, like most designs, is inspired by a design that I found on Pinterest, that I make my own. But to be fair I will still give them credit Inspired rain drop nail design    

Hope all of you enjoyed this cool rain drop and cloud nail design!

See you next time for my next design tutorial!

Friday, February 27, 2015

Another Half Moon- Half Moon Design

Hello everyone! For this week I have a recreation or re-due of a nail design. One of the first nail tutorials I did was how to create a half moon nail design using hole punch stickers. Now that I have done a lot more nail designs, I can look back at that design and realize that it did not look very half moon like. So I decided to do a re- due, to try my hand again at this design to see if I could get the half moons to look more curved, after all practice makes perfect. 


half moon nail design
 Second try at Half Moon design

For this time around I did not want to create the same half moon design. So I used spring colors because if you live in a cold climate like me, we are all tired of the cold, snowy weather, and ready for spring. Then for a slightly different look, I went for a glossy/ matte look with a glossy glitter light purple (even though it looks pink in the photo), and a violet matte purple.

Here are the nail polishes used for this half moon nail design (no nail tools needed):
Base and top coat- Nicole OPI-  3in1- base, top, & strengthener, Revlon Extra Life No Chip top coat, and NYC- Matte Me Crazy topcoat.

Nail polish- Sinful Color- Purple Diamond and Sally Hansen- Hard as Nails - No hard feelings. 

Nail art stripper polish- Kiss nail art in silver.


The skill level for this half moon nail design is:

 Beginner/ Basic 

Even though this design is done free hand with no guides, this is a very simple design. It can be done with hole punch guides or free hand either one is simple to create. 


Let's start this freehand half moon design!

1. Start off with a thin layer of base coat.


2. Paint all of your nails with two coats of a glitter light purple , I know this polish looks pink in the photo but it is a light purple. Also right now it still looks a little sheer, but we will add another coat later on. 

3. Next we will be doing a freehand half moon nail design. I actually found doing a freehand half moon design to be much easier and turned out better than using a guide. 
Anyways you create the half moon by taking the brush in the bottle, starting on one side of the nail create a curved line that goes to the other side of the nail. When you get to the center of the nail you can left up on the brush, start another curved line on the other side and meet the lines in the center of the nail to make a curve.    


4. After you have made the curved line fill in that part with a violet polish. Then to make the  glitter light purple less sheer add one more layer of the light purple polish, making sure not to get any on the violet polish. You can stop at this step or go on to the optional next step. 

5. This step as stated above is optional. For a different look you can apply a matte top coat to the violet half moon and leave the light glitter purple glossy. 

half moon nail design Another optional step is taking your silver nail art stripper polish and draw a curved line over the half moon, to outline it. Then once your half moon design has dried apply a shiny top coat over the glitter light purple, leave the half moon with just the matte topcoat.

Hope all of you enjoyed this recreation/ re-due of the half moon design that is great for the spring time. 

See you next time for my next design tutorial! 

Friday, February 20, 2015

Chocoholic- Chocolate Design


Hello everyone! For all you fellow chocolate lovers, that also love nails, then this is the tutorial you will love! This weeks tutorial is kind of Valentine's themed and I should have done this a week before, but really chocolate can be for any time. If you are like me then you love chocolate just as much as doing your nails, so why not combine the two. 

Chocolate nail design
 Yummy Chocolate nails and some of the chocolates that I based my designs off of.

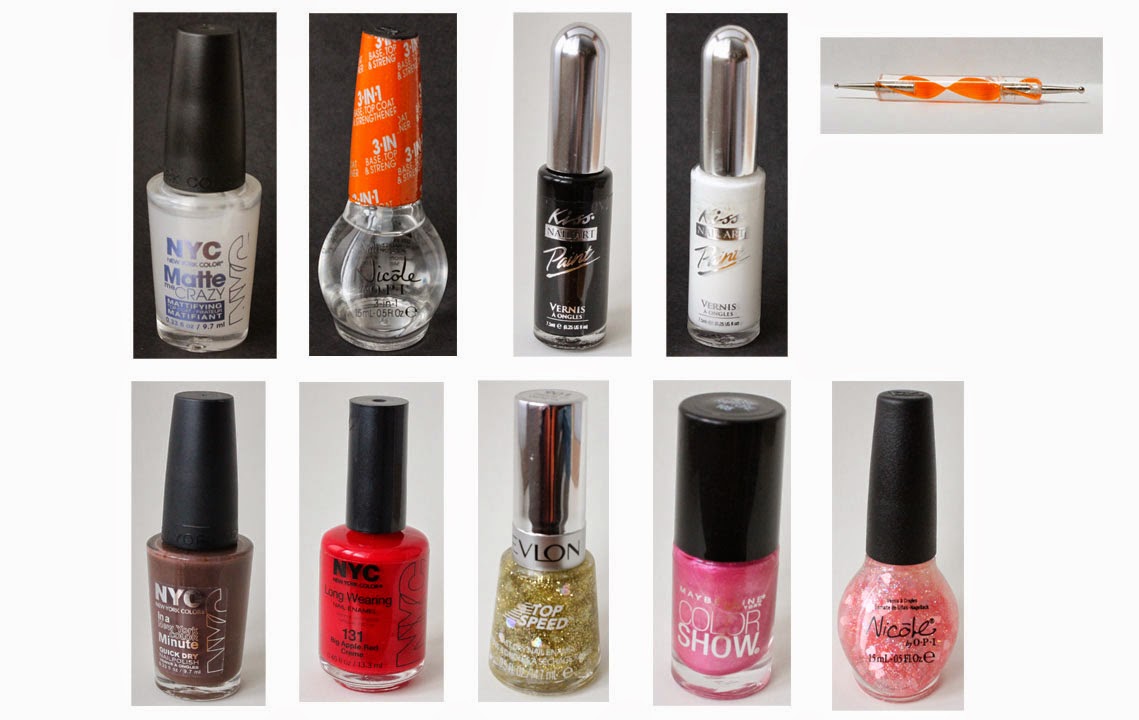
Here are the nail polishes and the few nail tools used to make these chocolate nails:

Base and top coat- Nicole OPI-  3in1- base, top, & strengthener, NYC- Matte Me Crazy topcoat (use a matte top coat, not a glossy one.)

Nail art polishes/ strippers- Kiss nail art- Black and White

Nail polish- NYC- Brownstone, NYC- big apple red creme, Revlon- top speed- Hearts of gold fx (just use the small gold glitter pieces or just a plain gold glitter polish), Maybelline- Color show- Rose rapture, and Nicole by OPI- Love your life. 

Nail tools- Just a dotting tool


The skill level for this chocolate nail design is:

Beginner/ Basic

This design is simple and has kind of a basic look to it, but still looks cool. Their are basic swirls and lines that are found on chocolates. The only thing that might be a little bit tricky is some of the swirls can be a little bit hard to draw, but really, what chocolates look perfect. 

Let's start this yummy chocolate nail design! 


1. Start off with a thin layer of base coat.


2. Apply a brown nail polish to all of your nails.

3. Next we will be doing things a little bit different. After your glossy brown polish has dried, apply a matte top coat to all of your nails to give your nails a chocolatey look. 

4. Now to give your chocolates more of a chocolate candy look, by adding some designs that you see on your favorite chocolates. Take your black nail art stripper polish and draw two horizontal lines side by side, in the middle of the nail.   

5. To finish this chocolate piece we will add a flower in the middle. Take your dotting tool dipped in red polish, make a dot in the middle then four dots around that dot to make a small flower. 

6. For the index nail we will make a swirl design. Take your white nail art stripper start in the corner of the nail make a curved line and then make a loop. 

7. Then make a curved line under that loop, just like the photo above. 

8. Now for the next chocolate. This one is simple with just a few lines for a chocolate drizzle look. Take your black nail art stripper and draw four curved lines down your nail, or a few more or less depending on the length of your nail.   


9. For the pinky nail we will make a gold dusted chocolate, that you might see with some fancier chocolates. Just simply take a gold glitter polish and paint over the brown (I used one with heart glitter in it, and just left the heart out because that is the only gold glitter polish I have, surprisingly.) Now this nail looks a little too shiney and not chocolate like, so we need to apply another coat of matte topcoat.   

10. On the ring finger nail we will make a different swirl design. Take your white nail art stripper polish near the cuticle and create a loop, like in the photo above, then make two more loops to fill up the nail or a few more if your nails are longer. 

11. For the most part on the right hand I did the same design, other than the middle finger nail and the ring finger nail. For the middle finger nail we will make a checkerboard design. To create this design, take your white nail art stripper and draw two vertical lines. 

12. Then draw three horizontal lines. When doing this make sure not to draw too many lines, it seems to look better with fewer lines. 


Chocolate nail design
                                               Right hand chocolate nail design

For the right hand, the index nail for the most part is the same as the left hand, the lines are not curved (refer to step 8), the pinky nail is the same, and the only thing different about the thumb nail is the heart glitter piece. For the polish I used (as stated in my Valentine's day nail design) the heart pieces sunk to the bottom and you need to fish them out. First dab a small amount of the clear glitter base on the nail so the heart glitter can stick, fish out a heart glitter piece, take a toothpick and place the heart on the nail,then apply a small amount of matte topcoat to keep the heart in place. For the ring finger nail just take some pink nail polish and the brush it came with and swipe the pink on the tip and in the middle of the nail.  

Chocolate nail design
  Left hand chocolate nail design

Unlike the other design that we have done you are now finished. No need to add the usual topcoat because that will make your nails look shinny, and we are going for a realistic chocolate look. For the design that we made just leave them shinny, their is no need to add more matte top coat. 

Now your nails look good enough to eat, but don't do that, they may look like chocolate but they won't taste like it. 

Hope all of your enjoyed this chocolate nail design, and if you are anything like me don't eat all of your Valentines day chocolate at once!

See you next time for my next nail design tutorial!

Friday, August 1, 2014

Color Combination- Matte Me Crazy

Hello Everyone and Happy August 1st (wow summer is going fast!) For today's post I will be sharing a finish that has become very popular for the spring and summer season, the matte finish. Usually when it comes to spring time you think of bright, shinny pastels and for summer, bright, shinny, vibrant yellows, pinks, blues, etc. Though with the matte finishes it flattens and makes the colors some what duller, which would seem like the opposite of what people would like for summer color trends. 

For the past few months I have seen the matte polish finishes showing up quite a bit in stores, (a lot of brands make a matte topcoat.) The matte topcoat that I have seen the most  is the Sally Hansen Big Matte topcoat. Also, I have recently seen that Sally Hansen Insta- Dri polish now comes in matte. So after a few months of deciding if I wanted to give this matte finish polish a try, (I was unsure if I would like this finish, I really like shinny glitter polishes) I looked around at the store and seen that New York Color also has a matte topcoat, so I picked that brand to try.


Here are the polishes I used: 
     New York Color-  Matte Me Crazy topcoat, L'Oreal- Tangerine Crush, and Milani- Quick Teal.


For this color combination I decided to use two bright summer color polishes to see if it would still give that bright summer look with out the shine.

 In the photo above I left my right hand with no matte top coat and shiny (the hand at the bottom), and my left hand with the matte topcoat (the hand at the top) to see the difference between the two.


As you can see the matte topcoat can turn even the shiniest nail polish matte.


Before I tried this matte topcoat I was really unsure if I would like it (like I stated above, I like shinny finishes.) Also I was unsure if  the bright nail polishes would still look as vibrant even if they where matted. 
After I tried out the New york color- Matte Me Crazy top coat on these bright colors I do really like this topcoat, the topcoat went on really well in 1 coat, their was just a few spots that I had to go over again because their was still some shine to the polish. 
I feel that even though the polishes are made to be flattened and dull, your nail polish can still have a bright summer feel with out the shine.


I give this a happy Polish, I really like this topcoat.


If you would like to turn any of your nail polishes matte, you can find New York Color- Matte Me Crazy topcoat or other brands of matte topcoat at Meijer, Target, CVS, and any store that sells nail polish. 

 I got the New York Color- Matte Me Crazy topcoat at Meijer for just a $1.79.