

Yummy Chocolate nails and some of the chocolates that I based my designs off of.
Here are the nail polishes and the few nail tools used to make these chocolate nails:
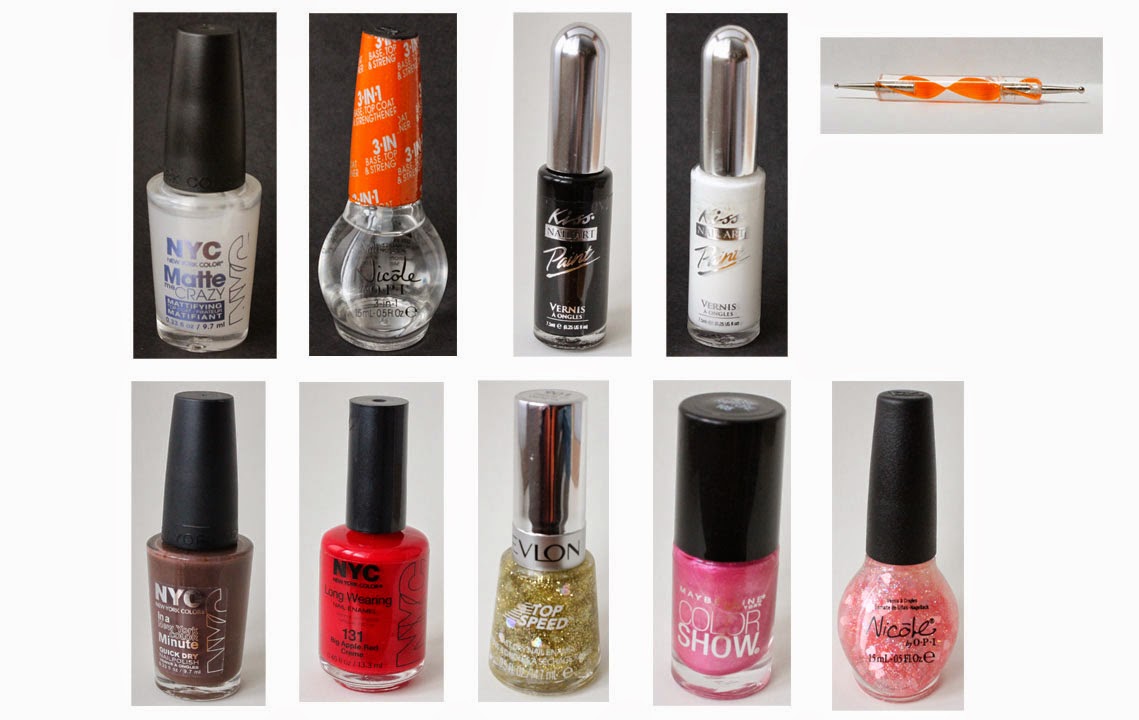
Base and top coat- Nicole OPI- 3in1- base, top, & strengthener, NYC- Matte Me Crazy topcoat (use a matte top coat, not a glossy one.)
Nail art polishes/ strippers- Kiss nail art- Black and White
Nail polish- NYC- Brownstone, NYC- big apple red creme, Revlon- top speed- Hearts of gold fx (just use the small gold glitter pieces or just a plain gold glitter polish), Maybelline- Color show- Rose rapture, and Nicole by OPI- Love your life.
Nail tools- Just a dotting tool
The skill level for this chocolate nail design is:

Beginner/ Basic
This design is simple and has kind of a basic look to it, but still looks cool. Their are basic swirls and lines that are found on chocolates. The only thing that might be a little bit tricky is some of the swirls can be a little bit hard to draw, but really, what chocolates look perfect.
Let's start this yummy chocolate nail design!
 1. Start off with a thin layer of base coat.
 2. Apply a brown nail polish to all of your nails.
 3. Next we will be doing things a little bit different. After your glossy brown polish has dried, apply a matte top coat to all of your nails to give your nails a chocolatey look.
 4. Now to give your chocolates more of a chocolate candy look, by adding some designs that you see on your favorite chocolates. Take your black nail art stripper polish and draw two horizontal lines side by side, in the middle of the nail.
 5. To finish this chocolate piece we will add a flower in the middle. Take your dotting tool dipped in red polish, make a dot in the middle then four dots around that dot to make a small flower.
 6. For the index nail we will make a swirl design. Take your white nail art stripper start in the corner of the nail make a curved line and then make a loop.
 7. Then make a curved line under that loop, just like the photo above.
 8. Now for the next chocolate. This one is simple with just a few lines for a chocolate drizzle look. Take your black nail art stripper and draw four curved lines down your nail, or a few more or less depending on the length of your nail.
 9. For the pinky nail we will make a gold dusted chocolate, that you might see with some fancier chocolates. Just simply take a gold glitter polish and paint over the brown (I used one with heart glitter in it, and just left the heart out because that is the only gold glitter polish I have, surprisingly.) Now this nail looks a little too shiney and not chocolate like, so we need to apply another coat of matte topcoat.
 10. On the ring finger nail we will make a different swirl design. Take your white nail art stripper polish near the cuticle and create a loop, like in the photo above, then make two more loops to fill up the nail or a few more if your nails are longer.
 11. For the most part on the right hand I did the same design, other than the middle finger nail and the ring finger nail. For the middle finger nail we will make a checkerboard design. To create this design, take your white nail art stripper and draw two vertical lines.
 12. Then draw three horizontal lines. When doing this make sure not to draw too many lines, it seems to look better with fewer lines.
 Right hand chocolate nail design
For the right hand, the index nail for the most part is the same as the left hand, the lines are not curved (refer to step 8), the pinky nail is the same, and the only thing different about the thumb nail is the heart glitter piece. For the polish I used (as stated in my Valentine's day nail design) the heart pieces sunk to the bottom and you need to fish them out. First dab a small amount of the clear glitter base on the nail so the heart glitter can stick, fish out a heart glitter piece, take a toothpick and place the heart on the nail,then apply a small amount of matte topcoat to keep the heart in place. For the ring finger nail just take some pink nail polish and the brush it came with and swipe the pink on the tip and in the middle of the nail.

For the right hand, the index nail for the most part is the same as the left hand, the lines are not curved (refer to step 8), the pinky nail is the same, and the only thing different about the thumb nail is the heart glitter piece. For the polish I used (as stated in my Valentine's day nail design) the heart pieces sunk to the bottom and you need to fish them out. First dab a small amount of the clear glitter base on the nail so the heart glitter can stick, fish out a heart glitter piece, take a toothpick and place the heart on the nail,then apply a small amount of matte topcoat to keep the heart in place. For the ring finger nail just take some pink nail polish and the brush it came with and swipe the pink on the tip and in the middle of the nail.
Left hand chocolate nail design
Unlike the other design that we have done you are now finished. No need to add the usual topcoat because that will make your nails look shinny, and we are going for a realistic chocolate look. For the design that we made just leave them shinny, their is no need to add more matte top coat.
Now your nails look good enough to eat, but don't do that, they may look like chocolate but they won't taste like it.
Hope all of your enjoyed this chocolate nail design, and if you are anything like me don't eat all of your Valentines day chocolate at once!
See you next time for my next nail design tutorial!
No comments:
Post a Comment